摘要
- 问题:具有真实地面数据的3D人脸模型是很罕见的
- 提出的方法:1)对一个弱监督学习使用一个混合鲁棒的损失函数来训练,综合考虑了low-level & perception-level 。2)使用多张图片进行重建
- 结果:对遮蔽和大姿态具有鲁棒性 / 在三个数据集上进行测试,并且比较了十五个深度学习的方法,都具有优越性。
preliminaries:Models and Outputs
3DMM模型
* 使用 CNN来回归3DMM模型的参数,使用Res-Net来回归pose,lighting的参数。
* 3DMM模型的face shape 和 texture如下:
s = s(α\alphaα,β\betaβ ) = sˉ\bar{s}sˉ + Bidα+BexpβB_{id} \alpha + B_{exp}\betaBid?α+Bexp?β
T = T( δ\deltaδ ) = Tˉ+Btδ\bar T + B_t \deltaTˉ+Bt?δ
* 使用Basel Face Model来预测Sˉ,Bid,Tˉ,Bt\bar S , B_{id}, \bar T , B_tSˉ,Bid?,Tˉ,Bt?,使用FaceWarehouse来预测BexpB_{exp}Bexp?
* 包括耳朵和脖子的位置,我们最终的模型包含36K个顶点
光照模型
* 假设一个朗伯曲面,用球面调和(SH)来近似场景照明。(35/36文献)
* 具有表面法线nin_ini?,皮肤纹理tit_iti?的顶点sis_isi?的辐射可以这样计算: 
照相机模型
- 使用透视相机模型,并且使用一个前人选择好的焦距
- 三维人脸姿态p由旋转R∈SO(3)和平移t∈R3表示。
总结
- 我们要预测的是一个239维度的向量:x = ( α\alphaα , β\betaβ, γ\gammaγ , σ\sigmaσ, p )
- 使用ResNet-50网络,并且通过最后一层的全连接层来回归这些参数。
单张图片重建的弱监督学习
- 本文中的Res-Net网络训练时没有任何地面真实标签,而是通过评估I′I'I′上的混合损失并反向传播它。
Image-Level Losses
- 这是低阶信息的损失函数,包括:每个像素的颜色和稀疏二维地标
Robust Photometric Loss
- 测量原始图像和重建图像之间的密度光度差是很简单的,但是这里我们使用了一个更鲁棒的,皮肤可感知的光照强度损失。
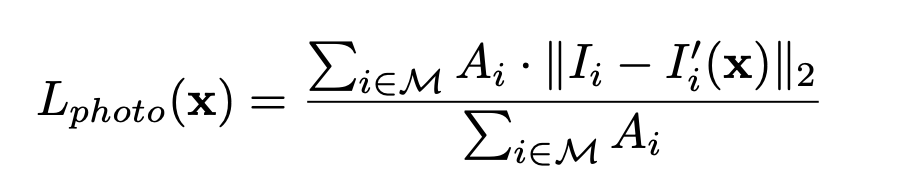
- i 是像素的索引。M 是重建的脸部区域 A 是一种基于attention mask 的肤色(在训练图像上)
Skin Attention - 为了获得对遮挡和其他具有挑战性的外观变化(如胡须和浓妆)的鲁棒性,我们为每个像素计算肤色概率PiP_iPi?。
- 在皮肤图像数据集(数据集来自文献26)上训练了一个高斯混合模型朴素贝叶斯分类器
- 对每个像素i
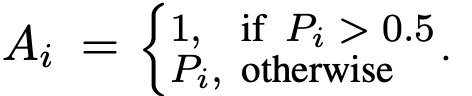
- 这种简单的皮肤感知损失函数在实践中工作得非常好,并不需要传统的那种人脸分割方法
- 与[49,48]中的3D形状顶点相比,我们的损失是在2D图像像素上集成的。它使我们能够很容易地通过z缓冲识别自遮挡,因此我们训练的模型可以处理大型姿态。
相应代码
# input_imgs and render_imgs are [batchsize,h,w,3] BGR images
# img_mask are [batchsize,h,w,1] attention masksdef Photo_loss(input_imgs,render_imgs,img_mask):input_imgs = tf.cast(input_imgs,tf.float32)img_mask = tf.stop_gradient(img_mask[:,:,:,0])# photo loss with skin attentionphoto_loss = tf.sqrt(tf.reduce_sum(tf.square(input_imgs - render_imgs),axis = 3))*img_mask/255photo_loss = tf.reduce_sum(photo_loss) / tf.maximum(tf.reduce_sum(img_mask),1.0)return photo_loss
Landmark Loss
- 我们利用二维图像域上的地标位置作为弱监督来训练网络。
- 使用最先进的三维人脸对齐方法[8]在训练图像上检测68个地标{ qnq_nqn?}
- 将重建图像的3D地标顶点投影到得到图像qn′q'_nqn′?上,损失计算如下:
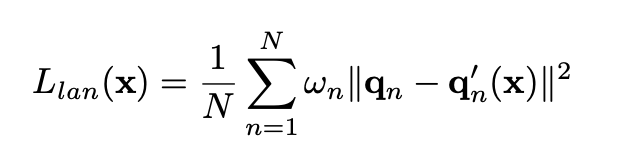
- W是landmark的权重,在实验中嘴唇的内部和鼻子部分设置为20,其他设置为1
代码
def Landmark_loss(landmark_p,landmark_label):# we set higher weights for landmarks around the mouth and nose regionslandmark_weight = tf.concat([tf.ones([1,28]),20*tf.ones([1,3]),tf.ones([1,29]),20*tf.ones([1,8])],axis = 1)landmark_weight = tf.tile(landmark_weight,[tf.shape(landmark_p)[0],1])landmark_loss = tf.reduce_sum(tf.reduce_sum(tf.square(landmark_p-landmark_label),2)*landmark_weight)/(68.0*tf.cast(tf.shape(landmark_p)[0],tf.float32))return landmark_loss
Perception-Level Loss
- 单独使用上面的这些低阶信息会导致三维人脸重建的局部最小问题。
- 图3显示,仅经过图像级损失训练的Res-net生成的纹理比别的更平滑,光度误差更低,但合成的3D形状的准确性较低。
- 一个更低的光照误差并不能保证一个更好的shape。为了解决这个问题,引入了perception-level loss
- 受[16]的启发,我们从预先训练的深度人脸识别网络中寻找弱监督信号。具体来说,我们提取图像的深度特征并计算余弦距离:
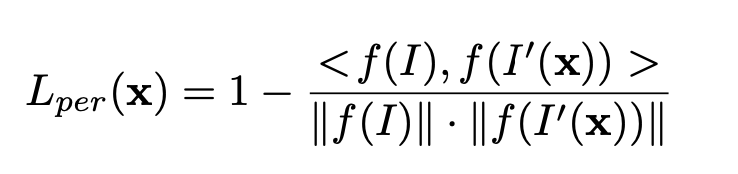
- f(・)为深度特征编码 <・,・>为向量内积
- 我们使用内部人脸识别数据集训练FaceNet,并使用它作为我们的深度特征提取器。该数据集包含从互联网上抓取的50K个身份的3M人脸图像
代码
def Perceptual_loss(id_feature,id_label):id_feature = tf.nn.l2_normalize(id_feature, dim = 1)id_label = tf.nn.l2_normalize(id_label, dim = 1)# cosine similaritysim = tf.reduce_sum(id_feature*id_label,1)loss = tf.reduce_sum(tf.maximum(0.0,1.0 - sim))/tf.cast(tf.shape(id_feature)[0],tf.float32)return loss
Regularization 正则化
- 为了防止面部形状和纹理退化,我们在回归的3DMM系数上添加了一个常用的损失函数从而强制向平均面进行先验分布:

- 根据经验设值为:ωαω_αωα? = 1.0, ωβω_βωβ? = 0.8 , ωγω_γωγ?= 1.7e?3.
- 虽然巴塞尔2009 3DMM中的脸部纹理是通过特殊设备获得的,但它们仍然包含一些 baked-in 的阴影(例如,环境遮挡)。为了获得类似于[48]的恒定皮肤反照率,我们添加了一个平坦约束来惩罚纹理贴图的方差:

- R是一个预定义的皮肤区域,覆盖脸颊、鼻子和前额。
# coefficient regularization to ensure plausible 3d faces
def Regulation_loss(id_coeff,ex_coeff,tex_coeff,opt):w_ex = opt.w_exw_tex = opt.w_texregulation_loss = tf.nn.l2_loss(id_coeff) + w_ex * tf.nn.l2_loss(ex_coeff) + w_tex * tf.nn.l2_loss(tex_coeff)regulation_loss = 2*regulation_loss/ tf.cast(tf.shape(id_coeff)[0],tf.float32)return regulation_loss # albedo regularization to ensure an uniform skin albedo
def Reflectance_loss(face_texture,facemodel):skin_mask = facemodel.skin_maskskin_mask = tf.reshape(skin_mask,[1,tf.shape(skin_mask)[0],1])texture_mean = tf.reduce_sum(face_texture*skin_mask,1)/tf.reduce_sum(skin_mask)texture_mean = tf.expand_dims(texture_mean,1)# minimize texture variance for pre-defined skin region  reflectance_loss = tf.reduce_sum(tf.square((face_texture - texture_mean)*skin_mask/255.0))/(tf.cast(tf.shape(face_texture)[0],tf.float32)*tf.reduce_sum(skin_mask))return reflectance_loss
总结
- R-Net损失函数L(x)由两个图像级损失、一个感知损失和两个正则化损失组成。
- 在所有实验中,它们的权重分别设置为wphotow_{photo}wphoto? = 1.9, wlanw_{lan}wlan? = 1.6e?3,wperw_{per}wper? = 0.2, wcoefw_{coef}wcoef? = 3e?4,wtexw_{tex}wtex? = 5。
多张图片重建的弱监督学习
实验
实现细节
训练R-Net
- 我们从多个数据库如:CelebA , 300W-LP, I-JBA , LFW and LS3D中收集in-the-wild images。在平衡了pose和race分布后,得到了约260K人脸图像作为训练数据集。
- 使用文献12来检测和对齐这些图片。输入图片的大小是224*224。将ImageNet中预先训练的权值作为初始化,R-Net使用Adam优化器。batch size为5,初始学习率为1e?4,总迭代次数为500K。
训练C-Net(多张图片网络)
- 我们使用300W-LP[57]、Multi-PIE[17]和部分内部人脸识别数据集构建了一个图像语料库。对于300W-LP和Multi-PIE,我们为每个人选择5张旋转角度均匀分布的图像。对于人脸识别数据集,我们为每个人随机选择5张图像。整个训练集包含了大约10K个人的50K张图像
- 我们冻结了训练好的R-Net,并随机初始化C-Net,除了它的最后一个完全连接的层被初始化为零(这样我们就从平均池化开始)。我们使用Adam优化器进行训练,batch size为5,初始学习率为2e?5,总迭代量为10K。
Results on Single-Image Reconstruction
Ablation Study
- Ablation Study是为了验证我们提出的混合级别的损耗函数的有效性
- 我们对两个数据集进行Ablation Study:MICC Florence 3D Face数据集[1]和FaceWarehouse数据集[11]。
- MICC包含53个参与者,每个参与者在中性表情下进行地面真实扫描,并在合作、室内和室外场景下拍摄三个视频序列。对于FaceWarehouse,我们使用9个主题,每个主题有20个表情进行评估。
- 结果表明,联合考虑图像级和感知级信息比单独考虑两者具有更高的准确率。
Comparison with Prior Art
Results on Multi-Image Reconstruction
face_decoder.py(使用训练好的参数来得到重建的脸部模型)
Reconstruction_Block(self,coeff,opt) 函数:将参数划分成id_coeff,ex_coeff,tex_coeff,angles,translation,gamma,camera_scale,f_scale,这几个部分,然后对每个部分分别进行重建
- 脸部形状的重建
def Shape_formation_block(self,id_coeff,ex_coeff,facemodel):# 对人脸进行变形,identity和expression两方面,在平均脸的基础上来变形face_shape = tf.einsum('ij,aj->ai',facemodel.idBase,id_coeff) + \tf.einsum('ij,aj->ai',facemodel.exBase,ex_coeff) + facemodel.meanshape# reshape face shape to [batchsize,N,3]face_shape = tf.reshape(face_shape,[tf.shape(face_shape)[0],-1,3])# re-centering the face shape with mean shapeface_shape = face_shape - tf.reshape(tf.reduce_mean(tf.reshape(facemodel.meanshape,[-1,3]),0),[1,1,3])return face_shape
- 脸部纹理的重建
def Texture_formation_block(self,tex_coeff,facemodel):#怎么也是在平均纹理上面变形呢face_texture = tf.einsum('ij,aj->ai',facemodel.texBase,tex_coeff) + facemodel.meantex# reshape face texture to [batchsize,N,3], note that texture is in RGB orderface_texture = tf.reshape(face_texture,[tf.shape(face_texture)[0],-1,3])return face_texture
- 计算旋转矩阵(不知道怎么计算的呢)
def Compute_rotation_matrix(self,angles):n_data = tf.shape(angles)[0]# compute rotation matrix for X-axis, Y-axis, Z-axis respectivelyrotation_X = tf.concat([tf.ones([n_data,1]),tf.zeros([n_data,3]),tf.reshape(tf.cos(angles[:,0]),[n_data,1]),-tf.reshape(tf.sin(angles[:,0]),[n_data,1]),tf.zeros([n_data,1]),tf.reshape(tf.sin(angles[:,0]),[n_data,1]),tf.reshape(tf.cos(angles[:,0]),[n_data,1])],axis = 1)rotation_Y = tf.concat([tf.reshape(tf.cos(angles[:,1]),[n_data,1]),tf.zeros([n_data,1]),tf.reshape(tf.sin(angles[:,1]),[n_data,1]),tf.zeros([n_data,1]),tf.ones([n_data,1]),tf.zeros([n_data,1]),-tf.reshape(tf.sin(angles[:,1]),[n_data,1]),tf.zeros([n_data,1]),tf.reshape(tf.cos(angles[:,1]),[n_data,1])],axis = 1)rotation_Z = tf.concat([tf.reshape(tf.cos(angles[:,2]),[n_data,1]),-tf.reshape(tf.sin(angles[:,2]),[n_data,1]),tf.zeros([n_data,1]),tf.reshape(tf.sin(angles[:,2]),[n_data,1]),tf.reshape(tf.cos(angles[:,2]),[n_data,1]),tf.zeros([n_data,3]),tf.ones([n_data,1])],axis = 1)rotation_X = tf.reshape(rotation_X,[n_data,3,3])rotation_Y = tf.reshape(rotation_Y,[n_data,3,3])rotation_Z = tf.reshape(rotation_Z,[n_data,3,3])# R = RzRyRxrotation = tf.matmul(tf.matmul(rotation_Z,rotation_Y),rotation_X)rotation = tf.transpose(rotation, perm = [0,2,1])return rotation
- 计算顶点法线
def Compute_norm(self,face_shape,facemodel):shape = face_shapeface_id = facemodel.face_bufpoint_id = facemodel.point_buf# face_id and point_id index starts from 1face_id = tf.cast(face_id - 1,tf.int32)point_id = tf.cast(point_id - 1,tf.int32)#compute normal for each facev1 = tf.gather(shape,face_id[:,0], axis = 1)v2 = tf.gather(shape,face_id[:,1], axis = 1)v3 = tf.gather(shape,face_id[:,2], axis = 1)e1 = v1 - v2e2 = v2 - v3face_norm = tf.cross(e1,e2)face_norm = tf.nn.l2_normalize(face_norm, dim = 2) # normalized face_norm firstface_norm = tf.concat([face_norm,tf.zeros([tf.shape(face_shape)[0],1,3])], axis = 1)#compute normal for each vertex using one-ring neighborhoodv_norm = tf.reduce_sum(tf.gather(face_norm, point_id, axis = 1), axis = 2)v_norm = tf.nn.l2_normalize(v_norm, dim = 2)return v_norm
使用预测的旋转和平移对人脸形状进行刚性变换
def Rigid_transform_block(self,face_shape,rotation,translation):# do rigid transformation for 3D face shapeface_shape_r = tf.matmul(face_shape,rotation)face_shape_t = face_shape_r + tf.reshape(translation,[tf.shape(face_shape)[0],1,3])return face_shape_t
- 刚性变化后脸部的68landmarks由神经网络训练的参数coeff中得到
def Compute_landmark(self,face_shape,facemodel):# compute 3D landmark postitions with pre-computed 3D face shapekeypoints_idx = facemodel.keypointskeypoints_idx = tf.cast(keypoints_idx - 1,tf.int32)face_landmark = tf.gather(face_shape,keypoints_idx,axis = 1)return face_landmark
- 投影模块(用变量landmark_p接收返回值 )Projection_block
def Projection_block(self,face_shape,camera_scale,f_scale):# pre-defined camera focal for pespective projectionfocal = tf.constant(1015.0)focal = focal*f_scalefocal = tf.reshape(focal,[-1,1])batchsize = tf.shape(focal)[0]# define camera positioncamera_pos = tf.reshape(tf.constant([0.0,0.0,10.0]),[1,1,3])*tf.reshape(camera_scale,[-1,1,1])reverse_z = tf.tile(tf.reshape(tf.constant([1.0,0,0,0,1,0,0,0,-1.0]),[1,3,3]),[tf.shape(face_shape)[0],1,1])# compute projection matrixp_matrix = tf.concat([focal,tf.zeros([batchsize,1]),112.*tf.ones([batchsize,1]),tf.zeros([batchsize,1]),focal,112.*tf.ones([batchsize,1]),tf.zeros([batchsize,2]),tf.ones([batchsize,1])],axis = 1)p_matrix = tf.reshape(p_matrix,[-1,3,3])# convert z in world space to the distance to cameraface_shape = tf.matmul(face_shape,reverse_z) + camera_posaug_projection = tf.matmul(face_shape,tf.transpose(p_matrix,[0,2,1]))# [batchsize, N,2] 2d face projectionface_projection = aug_projection[:,:,0:2]/tf.reshape(aug_projection[:,:,2],[tf.shape(face_shape)[0],tf.shape(aug_projection)[1],1])return face_projection
- 光照模块 Illumination_block
def Illumination_block(self,face_texture,norm_r,gamma):n_data = tf.shape(gamma)[0]n_point = tf.shape(norm_r)[1]gamma = tf.reshape(gamma,[n_data,3,9])# set initial lighting with an ambient lightinginit_lit = tf.constant([0.8,0,0,0,0,0,0,0,0])gamma = gamma + tf.reshape(init_lit,[1,1,9])# compute vertex color using SH function approximationa0 = m.pi a1 = 2*m.pi/tf.sqrt(3.0)a2 = 2*m.pi/tf.sqrt(8.0)c0 = 1/tf.sqrt(4*m.pi)c1 = tf.sqrt(3.0)/tf.sqrt(4*m.pi)c2 = 3*tf.sqrt(5.0)/tf.sqrt(12*m.pi)Y = tf.concat([tf.tile(tf.reshape(a0*c0,[1,1,1]),[n_data,n_point,1]),tf.expand_dims(-a1*c1*norm_r[:,:,1],2),tf.expand_dims(a1*c1*norm_r[:,:,2],2),tf.expand_dims(-a1*c1*norm_r[:,:,0],2),tf.expand_dims(a2*c2*norm_r[:,:,0]*norm_r[:,:,1],2),tf.expand_dims(-a2*c2*norm_r[:,:,1]*norm_r[:,:,2],2),tf.expand_dims(a2*c2*0.5/tf.sqrt(3.0)*(3*tf.square(norm_r[:,:,2])-1),2),tf.expand_dims(-a2*c2*norm_r[:,:,0]*norm_r[:,:,2],2),tf.expand_dims(a2*c2*0.5*(tf.square(norm_r[:,:,0])-tf.square(norm_r[:,:,1])),2)],axis = 2)color_r = tf.squeeze(tf.matmul(Y,tf.expand_dims(gamma[:,0,:],2)),axis = 2)color_g = tf.squeeze(tf.matmul(Y,tf.expand_dims(gamma[:,1,:],2)),axis = 2)color_b = tf.squeeze(tf.matmul(Y,tf.expand_dims(gamma[:,2,:],2)),axis = 2)#[batchsize,N,3] vertex color in RGB orderface_color = tf.stack([color_r*face_texture[:,:,0],color_g*face_texture[:,:,1],color_b*face_texture[:,:,2]],axis = 2)return face_color
- 渲染模块 Render_block (这里是用的是google的 tf_mesh_render 如果是pytorch可以使用 PyMesh等)
def Render_block(self,face_shape,face_norm,face_color,camera_scale,f_scale,facemodel,batchsize,is_train=True):if is_train and is_windows:raise ValueError('Not support training with Windows environment.')if is_windows:return [],[],[]# render reconstruction images n_vex = int(facemodel.idBase.shape[0].value/3)fov_y = 2*tf.atan(112./(1015.*f_scale))*180./m.pifov_y = tf.reshape(fov_y,[batchsize])# full face regionface_shape = tf.reshape(face_shape,[batchsize,n_vex,3])face_norm = tf.reshape(face_norm,[batchsize,n_vex,3])face_color = tf.reshape(face_color,[batchsize,n_vex,3])# pre-defined cropped face regionmask_face_shape = tf.gather(face_shape,tf.cast(facemodel.front_mask_render-1,tf.int32),axis = 1)mask_face_norm = tf.gather(face_norm,tf.cast(facemodel.front_mask_render-1,tf.int32),axis = 1)mask_face_color = tf.gather(face_color,tf.cast(facemodel.front_mask_render-1,tf.int32),axis = 1)# setting cammera settingscamera_position = tf.constant([[0,0,10.0]])*tf.reshape(camera_scale,[-1,1])camera_lookat = tf.constant([0,0,0.0])camera_up = tf.constant([0,1.0,0])# setting light source position(intensities are set to 0 because we have computed the vertex color)light_positions = tf.tile(tf.reshape(tf.constant([0,0,1e5]),[1,1,3]),[batchsize,1,1])light_intensities = tf.tile(tf.reshape(tf.constant([0.0,0.0,0.0]),[1,1,3]),[batchsize,1,1])ambient_color = tf.tile(tf.reshape(tf.constant([1.0,1,1]),[1,3]),[batchsize,1])#using tf_mesh_renderer for rasterization (https://github.com/google/tf_mesh_renderer)# img: [batchsize,224,224,3] images in RGB order (0-255)# mask:[batchsize,224,224,1] transparency for img ({0,1} value)with tf.device('/cpu:0'):img_rgba = mesh_renderer.mesh_renderer(face_shape,tf.cast(facemodel.face_buf-1,tf.int32),face_norm,face_color,camera_position = camera_position,camera_lookat = camera_lookat,camera_up = camera_up,light_positions = light_positions,light_intensities = light_intensities,image_width = 224,image_height = 224,fov_y = fov_y,near_clip = 0.01,far_clip = 50.0,ambient_color = ambient_color)img = img_rgba[:,:,:,:3]mask = img_rgba[:,:,:,3:]img = tf.cast(img[:,:,:,::-1],tf.float32) #transfer RGB to BGRmask = tf.cast(mask,tf.float32) # full face regionif is_train:# compute mask for small face regionwith tf.device('/cpu:0'):img_crop_rgba = mesh_renderer.mesh_renderer(mask_face_shape,tf.cast(facemodel.mask_face_buf-1,tf.int32),mask_face_norm,mask_face_color,camera_position = camera_position,camera_lookat = camera_lookat,camera_up = camera_up,light_positions = light_positions,light_intensities = light_intensities,image_width = 224,image_height = 224,fov_y = fov_y,near_clip = 0.01,far_clip = 50.0,ambient_color = ambient_color)mask_f = img_crop_rgba[:,:,:,3:]mask_f = tf.cast(mask_f,tf.float32) # small face regionreturn img,mask,mask_fimg_rgba = tf.cast(tf.clip_by_value(img_rgba,0,255),tf.float32)return img_rgba,mask,mask
preprocess_img.py 处理输入图片
整个处理图片的函数
def align_img(img,lm,lm3D):w0,h0 = img.size# change from image plane coordinates to 3D sapce coordinates(X-Y plane)lm = np.stack([lm[:,0],h0 - 1 - lm[:,1]], axis = 1)# calculate translation and scale factors using 5 facial landmarks and standard landmarks of a 3D facet,s = POS(lm.transpose(),lm3D.transpose())# processing the imageimg_new,lm_new = resize_n_crop_img(img,lm,t,s)lm_new = np.stack([lm_new[:,0],223 - lm_new[:,1]], axis = 1)trans_params = np.array([w0,h0,102.0/s,t[0],t[1]])return img_new,lm_new,trans_params
- resize and crop images 需要的是224?224?3224*224*3224?224?3像素的图片
- 使用5个面部地标和标准的3D脸部地标,计算平移 t 和缩放 s 因子 ―― POS函数,最小二乘法(不知道怎么计算的。。。)
def POS(xp,x):npts = xp.shape[1]A = np.zeros([2*npts,8])A[0:2*npts-1:2,0:3] = x.transpose()A[0:2*npts-1:2,3] = 1A[1:2*npts:2,4:7] = x.transpose()A[1:2*npts:2,7] = 1b = np.reshape(xp.transpose(),[2*npts,1])k,_,_,_ = np.linalg.lstsq(A,b) #lstsq 是 LeaST SQuare (最小二乘)的意思R1 = k[0:3]R2 = k[4:7]sTx = k[3]sTy = k[7]s = (np.linalg.norm(R1) + np.linalg.norm(R2))/2t = np.stack([sTx,sTy],axis = 0)return t,s
- resize_n_crop_img函数
#resample有`Image.BICUBIC`,`PIL.Image.LANCZOS`,`PIL.Image.BILINEAR`,`PIL.Image.NEAREST`这四种采样方法。默认是`PIL.Image.NEAREST`
def resize_n_crop_img(img,lm,t,s,target_size = 224.):w0,h0 = img.sizew = (w0/s*102).astype(np.int32)h = (h0/s*102).astype(np.int32)img = img.resize((w,h),resample = Image.BICUBIC)left = (w/2 - target_size/2 + float((t[0] - w0/2)*102/s)).astype(np.int32)right = left + target_sizeup = (h/2 - target_size/2 + float((h0/2 - t[1])*102/s)).astype(np.int32)below = up + target_sizeimg = img.crop((left,up,right,below))img = np.array(img)img = img[:,:,::-1] #RGBtoBGRimg = np.expand_dims(img,0)lm = np.stack([lm[:,0] - t[0] + w0/2,lm[:,1] - t[1] + h0/2],axis = 1)/s*102lm = lm - np.reshape(np.array([(w/2 - target_size/2),(h/2-target_size/2)]),[1,2])return img,lm
在检测新的裁剪后图片的68landmark时候,采用的是别人已经训练好的detector模型:landmark68_detector.pb
def get_68landmark(img,detector,sess):input_img = detector.get_tensor_by_name('input_imgs:0')lm = detector.get_tensor_by_name('landmark:0')landmark = sess.run(lm,feed_dict={input_img:img})landmark = np.reshape(landmark,[68,2])landmark = np.stack([landmark[:,1],223-landmark[:,0]],axis=1)return landmark
skin.py 皮肤部分的处理(没弄懂这一块是什么意思)
- The attention mask is a binary tensor indicating the position of the padded indices so that the model does not attend to them.
- 对应的应该是论文skin attention部分。
- GMM 高斯混合模型
- Image.fromarray的作用:实现array到image的转换
- array转换成image:Image.fromarray(np.uint8(img))