Goals
- Learn to apply different geometric transformations to images, like translation, rotation, affine transformation etc.
- You will see these functions: cv.getPerspectiveTransform
- 学习将不同的变换应用到图片上,像平移,旋转,仿射变换等。
- 你将看到这些函数:cv.getPerspectiveTransform
Transformations
OpenCV provides two transformation functions, cv.warpAffine and cv.warpPerspective, with which you can perform all kinds of transformations. cv.warpAffine takes a 2x3 transformation matrix while cv.warpPerspective takes a 3x3 transformation matrix as input.
OpenCV提供两种变换函数,cv.warpAffine和cv.warpPerspective,你可以用它们进行各种变换。 cv.warpAffine采用2x3的变换矩阵,cv.warpPerspective采用3x3变换矩阵作为输入。
Scaling
Scaling is just resizing of the image. OpenCV comes with a function cv.resize() for this purpose. The size of the image can be specified manually, or you can specify the scaling factor. Different interpolation methods are used. Preferable interpolation methods are cv.INTER_AREA for shrinking and cv.INTER_CUBIC (slow) & cv.INTER_LINEAR for zooming. By default, the interpolation method cv.INTER_LINEAR is used for all resizing purposes. You can resize an input image with either of following methods:
缩放是调整图片的尺寸。OpenCV用cv.resize()函数来实现这个功能。图片尺寸可以手指定,或者你可以指定缩放因子。不同的插入方式被使用。推荐的插入方式是cv.INTER_AREA用于缩小,cv.INTER_CUBIC(慢)和cv.INTER_LINEAR用于缩放。默认的,cv.INTER_LINEAR用于所有的缩放目的。你可以用下列的任一方法对输入图像调整尺寸。
import numpy as np
import cv2 as cv
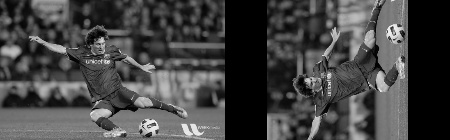
img = cv.imread("messi5.jpg")
res = cv.resize(img,None,fx=2,fy=2,interpolation = cv.INTER_CUBIC)
#OR
height,width = img.shape[:2]
res = cv.resize(img,(2widrh,2height),interpolation = cv.INTER_CUBIC)
Translation
Translation is the shifting of an object’s location. If you know the shift in the (x,y) direction and let it be (tx,ty), you can create the transformation matrix M as follows:
KaTeX parse error: Undefined control sequence: \matrix at position 13: M = \left[ \?m?a?t?r?i?x?{ 1 & 0 & …
You can take make it into a Numpy array of type np.float32 and pass it into the cv.warpAffine() function. See the below example for a shift of (100,50):
平移是对象位置的变换。如果你知道在(x,y)方向上的位移,设为(tx,ty),你可以像下面一样创建变换矩阵M:
KaTeX parse error: Undefined control sequence: \matrix at position 13: M = \left[ \?m?a?t?r?i?x?{ 1 & 0 & …
import numpy as np
import cv2 as cv
img = cv.imread("messi5.jpg",0)
rows,cols = img.shape
M = np.float32([[1,0,100],[0,1,50]])
dst=cv.warpAffine(img,M,(cols,rows))
cv.imshow("img",dst)
cv.waitKey(0)
cv.destroyAllWindows()
warning
The third argument of the cv.warpAffine() function is the size of the output image, which should be in the form of (width, height). Remember width = number of columns, and height = number of rows.
See the result below:
函数cv.warpAffine()的第三个参数是输出图片的尺寸,应该用格式(width,height)。记住:width等于列数,height等于行数。
请看下列图片。

Rotation
Rotation of an image for an angle θ is achieved by the transformation matrix of the form
KaTeX parse error: Undefined control sequence: \matrix at position 13: M = \left[ \?m?a?t?r?i?x?{ cosθ & …
一张图片角度θ 的旋转是通过下列格式的变换矩阵实现的
KaTeX parse error: Undefined control sequence: \matrix at position 13: M = \left[ \?m?a?t?r?i?x?{ cosθ & …
But OpenCV provides scaled rotation with adjustable center of rotation so that you can rotate at any location you prefer. The modified transformation matrix is given by
KaTeX parse error: Undefined control sequence: \matrix at position 13: M = \left[ \?m?a?t?r?i?x?{ α & β& …
where:
α=scale?cosθ,β=scale?sinθα=scale?cosθ,\\ β=scale?sinθ α=scale?cosθ,β=scale?sinθ
但是OpenCV提供可放缩的旋转和可调整的旋转中心,所以你可以在任何你喜欢的地点进行旋转。修改后的变换矩阵如下:
KaTeX parse error: Undefined control sequence: \matrix at position 13: M = \left[ \?m?a?t?r?i?x?{ α & β& …
其中:
α=scale?cosθ,β=scale?sinθα=scale?cosθ,\\β=scale?sinθ α=scale?cosθ,β=scale?sinθ
To find this transformation matrix, OpenCV provides a function, cv.getRotationMatrix2D. Check out the below example which rotates the image by 90 degree with respect to center without any scaling.
为了找到这个变换矩阵,OpenCV提供了一个函数,cv.getRotationMatrix2D。检查下列例子,图片相对于中心旋转90度且没有任何放缩。
img = cv.imread("messi5.jpg",0)
rows,cols = img.shape
# cols-1 and rows-1 are the coordinate limits
M = cv.getRotationMatrix2D(((cols-1)/2.0,(rows-1)/2.0),90,1)
dst = cv.warpAffine(img,M,(cols,rows))
See the result:
请看结果:
Affine Transformation
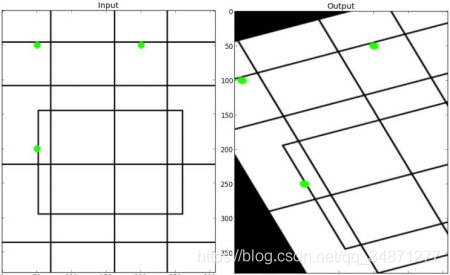
In affine transformation, all parallel lines in the original image will still be parallel in the output image. To find the transformation matrix, we need three points from the input image and their corresponding locations in the output image. Then cv.getAffineTransform will create a 2x3 matrix which is to be passed to cv.warpAffine.
Check the below example, and also look at the points I selected (which are marked in green color):
在仿射变换中,所有在原始图像中平行的线将仍然在输出图像中平行。想要找到变换矩阵,我们需要输入图像的三个点和它们在输出图像中的对应位置。然后 cv.getAffineTransform函数将创建一个 2x3的函数并传递给 cv.warpAffine。
检查下列例子,并查看我选择的点(标记为绿色的):
img = cv.imread("drawing.png")
rows,cols,ch = img.shape
pts1 = np.float32([[50,50],[200,50],[50,200]])
pts2 = np.float32([[10,100],[200,50],[100,250]])
M = cv.getAffineTransform(pts1,pts2)
dst = cv.warpAffine(img,M,(cols,rows))
plt.subplot(121),plt.imshow(img),plt.title("Input")
plt.subplot(121),plt.imshow(dst),plt.title("Output")
plt.show()
See the result:
请看结果:
Perspective Transformation
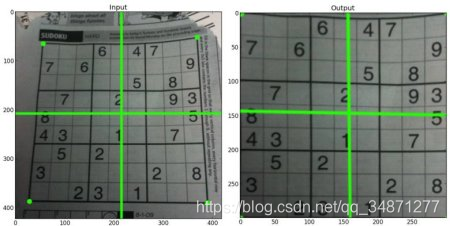
For perspective transformation, you need a 3x3 transformation matrix. Straight lines will remain straight even after the transformation. To find this transformation matrix, you need 4 points on the input image and corresponding points on the output image. Among these 4 points, 3 of them should not be collinear. Then the transformation matrix can be found by the function cv.getPerspectiveTransform. Then apply cv.warpPerspective with this 3x3 transformation matrix.
See the code below:
对于透视变换,你需要一个3x3的矩阵。直线在变换后还是会保持为直线。想找到这个变换矩阵,你需要输入图像中的四个点和它们在输出图像中相对应的位置。在这四个点之中,其中三个点不应该共线。然后变换矩阵可以用函数cv.getPerspectiveTransform来找到。然后将cv.warpPerspective应用于3x3的转换矩阵。
img = cv.imread("sudoku.png")
rows,cols,ch = img.shape
pts1 = np.float32([[56,65],[368,52],[28,387],[389,390]])
pts2 = np.float32([[0,0],[300,0],[0,300],[300,300]])
M = cv.getPerspectiveTransform(pts1,pts2)
dst = cv.warpPerspective(img,M,(300,300))
plt.subplot(121),plt.imshow(img),plt.title("Input")
plt.subplot(122),plt.imshow(dst),plt.title("Output")
plt.show()
Result:
结果:
Additional Resources
- “Computer Vision: Algorithms and Applications”, Richard Szeliski