springboot+shiro进行系统权限管理
-
- 前言
- 准备过程
- 整合shiro(重点)
- 验证权限
前言
以前在开发项目过程中都没有用到过权限管理,但是作为一个合格的后台管理系统进行权限管理是非常必要的,目前常用的java安全框架主要有shiro和spring security,但是看网上大部分人说spring security学习起来比shiro困难的多,而且它不能脱离spring独立运行。由于时间有限,考虑再三,决定先从简单的学起,以后有空再去学习spring security。下面我来分享一下自己学习过程中做的一个简单的demo。
准备过程
-
新建springboot项目,maven导入要用到的jar包
我这里导入的是shiro-spring、shiro-web,其实还可以直接导入springboot 的shiro starter包,两种方式在后面的shiro配置类写法上是有区别的,本文就只介绍第一种的案例。<dependencies><dependency><groupId>org.springframework.boot</groupId><artifactId>spring-boot-starter-web</artifactId></dependency><dependency><groupId>mysql</groupId><artifactId>mysql-connector-java</artifactId><scope>runtime</scope></dependency><dependency><groupId>org.apache.shiro</groupId><artifactId>shiro-web</artifactId><version>1.4.1</version></dependency><dependency><groupId>org.apache.shiro</groupId><artifactId>shiro-spring</artifactId><version>1.4.1</version></dependency><dependency><groupId>org.mybatis.spring.boot</groupId><artifactId>mybatis-spring-boot-starter</artifactId><version>1.3.5</version></dependency><dependency><groupId>org.springframework.boot</groupId><artifactId>spring-boot-starter-thymeleaf</artifactId></dependency><dependency><groupId>org.projectlombok</groupId><artifactId>lombok</artifactId><optional>true</optional></dependency><dependency><groupId>org.springframework.boot</groupId><artifactId>spring-boot-starter-test</artifactId><scope>test</scope><exclusions><exclusion><groupId>org.junit.vintage</groupId><artifactId>junit-vintage-engine</artifactId></exclusion></exclusions></dependency></dependencies> -
springboot配置mybatis数据库连接
#mybatis类型别名 mybatis.type-aliases-package=com.hui.entity spring.datasource.driverClassName=com.mysql.cj.jdbc.Driver spring.datasource.url=jdbc:mysql://localhost:3306/shiro?useUnicode=true&characterEncoding=utf8&serverTimezone=UTC spring.datasource.username=root spring.datasource.password=root -
创建数据库,包括用户表、权限表、角色表,我这里为了简单就直接贴图片:
(1)user表:

(2) roles表:

(3) permissions表:

-
创建数据库实体类
@Data public class User { private Integer id;private String user;private String password; }@Data public class Roles { private Integer userId;private String role; }@Data public class Permissions { private String role;private String permission; } -
编写Mapper接口
这里为了方便不使用xml配置文件的方式,直接用注解@Mapper @Repository public interface UserMapper { @Select("select password from user where user='${userName}'")public String findPasswordByName(@Param("userName") String userName);@Select("select b.role from user a inner join roles b on a.id=b.user_id where a.user=#{userName}")public List<String> findRolesByName(String userName);@Select("select permission from permissions where role=#{role}")public List<String> findPermissionByRole(String role);@Insert("insert into user values(#{user},#{password})")public int insertUser(User user); } -
编写service
@Service
public class UserService {
      @Autowiredprivate UserMapper userMapper;public String findPasswordByName(String userName) {
      return userMapper.findPasswordByName(userName);}public List<String> findRolesByName(String userName) {
      return userMapper.findRolesByName(userName);}public List<String> findPermissionByRole(String role) {
      return userMapper.findPermissionByRole(role);}
}
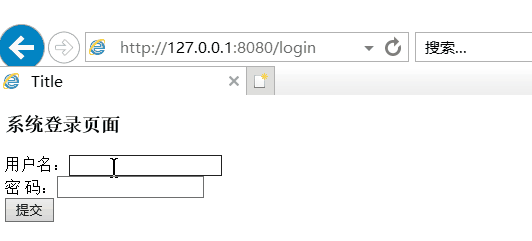
7.编写页面
(1)登录页面(login.html)
<!DOCTYPE html>
<html lang="en" xmlns:th="http://www.thymeleaf.org">
<head><meta charset="UTF-8"><title>Title</title>
</head>
<body>
<h3>系统登录页面</h3>
<form th:action="@{/checkLogin}" method="post">用户名:<input type="text" name="user"/><br/>密  码:<input type="password" name="password"><br/><input type="submit" value="提交">
</form>
</body>
</html>
(2)新增用户界面(addUser.html)
<!DOCTYPE html>
<html lang="en" xmlns:th="http://www.thymeleaf.org">
<head><meta charset="UTF-8"><title>add user</title>
</head>
<body>
<h3>添加用户页面</h3>
<form th:action="@{/addUserDeal}" method="post">用户名:<input type="text" name="user"/><br/>密  码:<input type="text" name="password"><br/><input type="submit" value="提交">
</form>
</body>
</html>
(2)首页(index.html)
<!DOCTYPE html>
<html lang="en" xmlns:th="http://www.thymeleaf.org">
<head><meta charset="UTF-8"><title>add user</title>
</head>
<body>
<h3>index界面</h3>
<H3>登录成功</H3>
</body>
</html>
整合shiro(重点)
1.编写shiro自定义Realm类
为了验证方便需要运行该类的main函数*(已注释),得到加密后的密码放到数据库中,
import com.hui.service.UserService;
import org.apache.shiro.authc.*;
import org.apache.shiro.authz.AuthorizationInfo;
import org.apache.shiro.authz.SimpleAuthorizationInfo;
import org.apache.shiro.realm.AuthorizingRealm;
import org.apache.shiro.subject.PrincipalCollection;
import org.apache.shiro.util.ByteSource;
import org.springframework.beans.factory.annotation.Autowired;public class MyRealm extends AuthorizingRealm {
    {
    super.setName("myRealm");}@Autowiredprivate UserService userService;@Overrideprotected AuthorizationInfo doGetAuthorizationInfo(PrincipalCollection principalCollection) {
    SimpleAuthorizationInfo authorizationInfo = new SimpleAuthorizationInfo();String userName  = (String) principalCollection.getPrimaryPrincipal();//获得用户的角色,及权限进行绑定for(String role: userService.findRolesByName(userName)){
    authorizationInfo.addRole(role);for(String permiss:userService.findPermissionByRole(role)){
    authorizationInfo.addStringPermission(permiss);}}return authorizationInfo;}@Overrideprotected AuthenticationInfo doGetAuthenticationInfo(AuthenticationToken authenticationToken) throws AuthenticationException {
    UsernamePasswordToken token = (UsernamePasswordToken) authenticationToken;String userName = token.getUsername();String passwod = userService.findPasswordByName(userName);if (passwod == null) {
    return null;}SimpleAuthenticationInfo authenticationInfo = new SimpleAuthenticationInfo(userName, passwod,ByteSource.Util.bytes("saltstr"), //加盐,可用随机字符super.getName());// 返回给安全管理器,由 securityManager 比对密码的正确性return authenticationInfo;}/*public static void main(String[] args) {SimpleHash hash = new Md5Hash("123456","saltstr",2);System.out.println(hash.toString());}*/
}2.spring shiro 配置类
import org.apache.shiro.authc.credential.HashedCredentialsMatcher;
import org.apache.shiro.spring.web.ShiroFilterFactoryBean;
import org.apache.shiro.web.mgt.DefaultWebSecurityManager;
import org.springframework.context.annotation.Bean;
import org.springframework.context.annotation.Configuration;import java.util.LinkedHashMap;
import java.util.Map;@Configuration
public class ShiroConfig {
    @Beanpublic HashedCredentialsMatcher getMatcher() {
    HashedCredentialsMatcher hashedCredentialsMatcher = new HashedCredentialsMatcher();hashedCredentialsMatcher.setHashAlgorithmName("md5");//散列算法:MD5算法hashedCredentialsMatcher.setHashIterations(2);//散列的次数return hashedCredentialsMatcher;}@Beanpublic MyRealm myRealm() {
    MyRealm myRealm = new MyRealm();//Shiro加密myRealm.setCredentialsMatcher(getMatcher());return myRealm;}@Beanpublic DefaultWebSecurityManager  getSecurityManager() {
    DefaultWebSecurityManager securityManager =  new DefaultWebSecurityManager();securityManager.setRealm(myRealm());return securityManager;}@Beanpublic ShiroFilterFactoryBean shirFilter() {
    ShiroFilterFactoryBean shiroFilterFactoryBean = new ShiroFilterFactoryBean();shiroFilterFactoryBean.setSecurityManager(getSecurityManager());//拦截器Map<String,String> filterChainDefinitionMap = new LinkedHashMap<String,String>();//authc:所有url都必须认证通过才可以访问; anon:所有url都都可以匿名访问filterChainDefinitionMap.put("/static/**", "anon");filterChainDefinitionMap.put("/login", "anon");filterChainDefinitionMap.put("/checkLogin", "anon");filterChainDefinitionMap.put("/addUser", "roles[admin]");//配置退出 过滤器,其中的具体的退出代码Shiro已经替我们实现了filterChainDefinitionMap.put("/logout", "logout");//其余接口一律拦截,主要这行代码必须放在所有权限设置的最后,不然会导致所有 url 都被拦截filterChainDefinitionMap.put("/**", "authc");// 如果不设置默认会自动寻找Web工程根目录下的"/login"页面shiroFilterFactoryBean.setLoginUrl("/login");// 登录成功后要跳转的链接shiroFilterFactoryBean.setSuccessUrl("/index");//未授权界面;shiroFilterFactoryBean.setUnauthorizedUrl("/403");shiroFilterFactoryBean.setFilterChainDefinitionMap(filterChainDefinitionMap);return shiroFilterFactoryBean;}
}
验证权限
1.编写controller
import com.hui.entity.User;
import com.hui.service.UserService;
import lombok.extern.slf4j.Slf4j;
import org.apache.shiro.SecurityUtils;
import org.apache.shiro.authc.DisabledAccountException;
import org.apache.shiro.authc.IncorrectCredentialsException;
import org.apache.shiro.authc.UnknownAccountException;
import org.apache.shiro.authc.UsernamePasswordToken;
import org.apache.shiro.subject.Subject;
import org.springframework.beans.factory.annotation.Autowired;
import org.springframework.stereotype.Controller;
import org.springframework.web.bind.annotation.RequestMapping;
import org.springframework.web.bind.annotation.ResponseBody;@Slf4j
@Controller
public class UserController {
    @Autowiredprivate UserService userService;@RequestMapping("/login")public String toLoginPage() {
    return "login";}@RequestMapping("/checkLogin")@ResponseBodypublic String checkLogin(User user) {
    Subject subject = SecurityUtils.getSubject();UsernamePasswordToken token = new UsernamePasswordToken(user.getUser(), user.getPassword());try {
    subject.login(token);return "login success";} catch (UnknownAccountException e) {
    return "账号不存在";} catch (DisabledAccountException e) {
    return "账号未启用";} catch (IncorrectCredentialsException e) {
    return "密码错误";} catch (Throwable e) {
    return "未知错误";}}@RequestMapping("/index")public String index() {
    return "index";}@RequestMapping("/addUser")public String addUser() {
    return "addUser";}@RequestMapping("/addUserDeal")@ResponseBodypublic String addUserDeal() {
    return "addUser";}
}
2.启动项目,校验3种情况,我们要先了解shiro自带的过滤器含义:
- authc(org.apache.shiro.web.filter.authc.FormAuthenticationFilter)
基于表单的拦截器;如"/**=authc",如果没有登录会跳到相应的登录页面登录.主要属性:usernameParam:表单提交的用户名参数名(username); passwordParam:表单提交的密码参数名(password);rememberMeParam:表单提交的密码参数名(rememberMe) loginUrl:登录页面地址(/login.jsp);successUrl:登录成功后的默认重定向地址; failureKeyAttribute:登录失败后错误信息存储key(shiroLoginFailure)- authcBasic(org.apache.shiro.web.filter.authc.BasicHttpAuthenticationFilter)
Basic HTTP身份验证拦截器,主要属性: applicationName:弹出登录框显示的信息- logout(org.apache.shiro.web.filter.authc.LogoutFilter)
退出拦截器,主要属性:redirectUrl:退出成功后重定向的地址;示例"/logout=logout"- anon(org.apache.shiro.web.filter.authc.AnonymousFilter)
匿名拦截器,即不需要登录即可访问;一般用于静态资源过滤;示例"/static/**=anon"- roles(org.apache.shiro.web.filter.authz.RolesAuthorizationFilter)
角色授权拦截器,验证用户是否拥有所有角色;主要属性: loginUrl:登录页面地址(/login.jsp);unauthorizedUrl:未授权后重定向的地址;示例“/admin/**=roles[admin]”- perms(org.apache.shiro.web.filter.authz.PermissionsAuthorizationFilter)
权限授权拦截器,验证用户是否拥有所有权限;属性和roles一样;示例"/user/**=perms[“user:create”]"- port(org.apache.shiro.web.filter.authz.PortFilter)
端口拦截器,主要属性:port(80):可以通过的端口;示例"/test= port[80]",如果用户访问该页面是非80,将自动将请求端口改为80并重定向到该80端口,其他路径/参数等都一样- rest(org.apache.shiro.web.filter.authz.HttpMethodPermissionFilter)
rest风格拦截器,自动根据请求方法构建权限字符串(GET=read, POST=create,PUT=update,DELETE=delete,HEAD=read,TRACE=read,OPTIONS=read, MKCOL=create)构建权限字符串;示例"/users=rest[user]",会自动拼出"user:read,user:create,user:update,user:delete"权限字符串进行权限匹配(所有都得匹配,isPermittedAll)- ssl(org.apache.shiro.web.filter.authz.SslFilter)
SSL拦截器,只有请求协议是https才能通过;否则自动跳转会https端口(443);其他和port拦截器一样;- user(org.apache.shiro.web.filter.authc.UserFilter)
用户拦截器,用户已经身份验证/记住我登录的都可;示例"/**=user"- noSessionCreation(org.apache.shiro.web.filter.session.NoSessionCreationFilter)
不创建会话拦截器,调用 subject.getSession(false)不会有什么问题,但是如果 subject.getSession(true)将抛出 DisabledSessionException异常
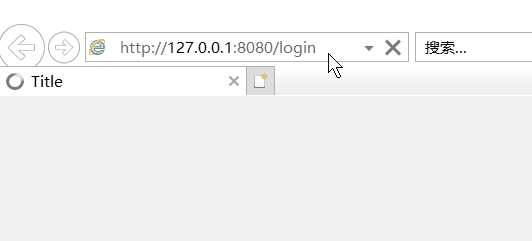
(1)不登录直接进入首页(/index):
由于在配置类中配置loginurl 路径,且设置了filterChainDefinitionMap.put("/**", “authc”) 即/index不能够匿名访问,直接访问会进入登录界面。如果想能够直接访问,需要在前面添加filterChainDefinitionMap.put("/index", “anon”)

(2)校验用户名密码
(3)校验角色权限
我们配置了添加用户界面需要admin权限:filterChainDefinitionMap.put("/addUser", “roles[admin]”)
所有根据数据库zhangsan具有权限,lisi没有权限。
参考文档
https://www.cnblogs.com/koal/p/5235379.html