前言
我们在开发后台系统,在前台需要展示报表数据时一般是通过调用后台数据接口,数据接口就去按条件查询数据库并将结果返回给前台人员。通常在数据表数据较少时,查询效率是可以的,然而一般在高用户量系统中数据库数据量是十分庞大的,通过数据表建立索引虽然能够加快查询效率,但是速度还是会显得缓慢。这时我们就可以考虑使用集群、分布式和缓存等后端技术进行解决。下面我就介绍一种常用的缓存中间件Redis,我们项目结合redis作缓存做一个简单的demo。当然其实还有其他主流的缓存中间件,如MemCached,有新兴趣的朋友可以去网上找资料。
整合代码
如果只想知道整合方式,那可以看完这节就可以了,有兴趣的朋友可以跟着继续看下去。
import com.hui.pojo.Department;
import com.hui.pojo.Employee;
import org.springframework.beans.factory.annotation.Autowired;
import org.springframework.cache.CacheManager;
import org.springframework.cache.annotation.CachingConfigurerSupport;
import org.springframework.cache.interceptor.KeyGenerator;
import org.springframework.context.annotation.Bean;
import org.springframework.context.annotation.Configuration;
import org.springframework.context.annotation.Primary;
import org.springframework.data.redis.cache.RedisCacheConfiguration;
import org.springframework.data.redis.cache.RedisCacheManager;
import org.springframework.data.redis.connection.RedisConnectionFactory;
import org.springframework.data.redis.serializer.Jackson2JsonRedisSerializer;
import org.springframework.data.redis.serializer.RedisSerializationContext;
import java.util.HashMap;
import java.util.Map;@Configuration
public class RedisConfig extends CachingConfigurerSupport {
    @Autowiredprivate RedisConnectionFactory redisConnectionFactory;/*** 缓存key生成规则,可自己定义* @return*/@Bean(name = "empKeyGen")public KeyGenerator empkeyGenerator() {
    //java8+写法 return (target, method, params) -> {
    StringBuilder sb = new StringBuilder();sb.append("emp-");sb.append(params[0]);return sb.toString();};}@Bean(name = "deptKeyGen")public KeyGenerator deptkeyGenerator() {
    return (target, method, params) -> {
    StringBuilder sb = new StringBuilder();sb.append("dept-");sb.append(params[0]);return sb.toString();};}/*** 我这里定义了两个cacheManager(缓存管理器),然后第一个缓存管理器创建了两个Cache,* 分别用于缓存员工和部门,并且两个Cache各自有自己的json序列化方式,* 大家也可以只用一个json序列化类,将泛型具体类改成Object就行* @return*/@Bean(name = "cacheManager")@Primarypublic CacheManager CacheManager() {
    //配置value序列化Jackson2JsonRedisSerializer serializer1 = new Jackson2JsonRedisSerializer(Employee.class);Jackson2JsonRedisSerializer serializer2 = new Jackson2JsonRedisSerializer(Department.class);RedisCacheConfiguration config1 = RedisCacheConfiguration.defaultCacheConfig().serializeValuesWith(RedisSerializationContext.SerializationPair.fromSerializer(serializer1));RedisCacheConfiguration config2 = RedisCacheConfiguration.defaultCacheConfig().serializeValuesWith(RedisSerializationContext.SerializationPair.fromSerializer(serializer2));// 配置多个cache(缓存空间),每个缓存空间对应不同的配置(这里只做序列化区分设置)Map<String, RedisCacheConfiguration> configMap = new HashMap<>();configMap.put("emp", config1);configMap.put("dept", config2);RedisCacheManager cacheManager = RedisCacheManager.builder(redisConnectionFactory).withInitialCacheConfigurations(configMap).build();return cacheManager;}/*** 自定义cacheManager2,此案例没有用到,只用作区分,可以删除* @return*/@Bean(name="otherCacheManager")public CacheManager deptCacheManager() {
    Jackson2JsonRedisSerializer serializer = new Jackson2JsonRedisSerializer(String.class);RedisCacheConfiguration redisCacheConfiguration = RedisCacheConfiguration.defaultCacheConfig().serializeValuesWith(RedisSerializationContext.SerializationPair.fromSerializer(serializer));RedisCacheManager cacheManager = RedisCacheManager.builder(redisConnectionFactory).cacheDefaults(redisCacheConfiguration).build();return cacheManager;}
}
项目搭建
- 创建springboot项目,导入需要用到的maven包
<dependencies><!--redis 要用到的包--><dependency><groupId>org.springframework.boot</groupId><artifactId>spring-boot-starter-data-redis</artifactId></dependency><dependency><groupId>org.springframework.boot</groupId><artifactId>spring-boot-starter-web</artifactId></dependency><dependency><groupId>org.mybatis.spring.boot</groupId><artifactId>mybatis-spring-boot-starter</artifactId><version>2.1.1</version></dependency><dependency><groupId>org.springframework.boot</groupId><artifactId>spring-boot-devtools</artifactId><scope>runtime</scope><optional>true</optional></dependency><dependency><groupId>mysql</groupId><artifactId>mysql-connector-java</artifactId><scope>runtime</scope></dependency><dependency><groupId>org.projectlombok</groupId><artifactId>lombok</artifactId><optional>true</optional></dependency></dependencies>- 数据库搭建
(1)员工表 emp
CREATE TABLE `emp` (`id` int(10) NOT NULL AUTO_INCREMENT,`name` varchar(255) NOT NULL,`sex` varchar(255) DEFAULT NULL,`age` int(11) DEFAULT NULL,PRIMARY KEY (`id`)
) ENGINE=InnoDB AUTO_INCREMENT=4 DEFAULT CHARSET=utf8;
(2)部门表 dept
CREATE TABLE `dept` (`id` int(10) NOT NULL AUTO_INCREMENT,`name` varchar(255) NOT NULL,PRIMARY KEY (`id`)
) ENGINE=InnoDB AUTO_INCREMENT=4 DEFAULT CHARSET=utf8;
3.创建相关包和类(service、pojo、mapper、controller)
(1)实体类
@Data
public class Employee implements Serializable {
    private Integer id;private String name;private String sex;private Integer age;
}@Data
public class Department {
    private Integer id;private String name;
}
(2) mapper
@Mapper
public interface EmpMapper {
    @Select("select * from emp where id = #{id}")Employee findEmpById(Integer id);@Update("update emp set name=#{name},age=#{age} where id=#{id}")int updateEmp(Employee e);@Delete("delete from emp where id=#{id}")int delEmpById(Integer id);}@Mapper
public interface DeptMapper {
    @Select("select * from dept where id=#{id}")Department findById(Integer id);@Update("update dept set name=#{name} where id=#{id}")int updateDept(Department dept);@Delete("delete from dept where id=#{id}")int delDept(Integer id);
}
(3) service
@Service
@CacheConfig(cacheManager = "cacheManager", cacheNames = "dept", keyGenerator = "deptKeyGen")
public class DeptService {
    @Autowiredprivate DeptMapper deptMapper;@Cacheablepublic Department findById(Integer id) {
    System.out.println("数据库操作查找部门");return deptMapper.findById(id);}@CachePutpublic Department updateDept(Department dept) {
    System.out.println("数据库操作更新部门");int row = deptMapper.updateDept(dept);if (row > 0) {
    return dept;} else {
    return null;}}@CacheEvictpublic int delDept(Integer id) {
    System.out.println("数据库操作删除部门");return deptMapper.delDept(id);}
}
@CacheConfig(cacheManager = "cacheManager", cacheNames = "emp", keyGenerator = "empKeyGen")
@Service
public class EmpService {
    @Autowiredprivate EmpMapper empMapper;@Cacheable()public Employee findEmpById(Integer id) {
    System.out.println("数据库查找用户");Employee emp = empMapper.findEmpById(id);return emp;}@CachePutpublic Employee updateEmp(Employee e) {
    System.out.println("数据库更新用户");int row = empMapper.updateEmp(e);if (row > 0) {
    return e;} else {
    return null;}}@CacheEvictpublic int delEmpById(Integer id) {
    int res = empMapper.delEmpById(id);return res;}
}
(4) controller
@RestController
public class TestController {
    @Autowiredprivate EmpService empService;@Autowiredprivate DeptService deptService;@RequestMapping("/emp/{id}")public Employee getEmpById(@PathVariable("id") int id) {
    return empService.findEmpById(id);}@RequestMapping("/updateEmp")public Employee updateEmp(int id, String name,int age) {
    Employee e = new Employee();e.setAge(age);e.setId(id);e.setName(name);Employee emp = empService.updateEmp(e);return emp;}@RequestMapping("/delemp/{id}")public String delEmpById(@PathVariable("id") int id) {
    if (empService.delEmpById(id) > 0) {
    return "del success";} else {
    return "del fail";}}@RequestMapping("/dept/{id}")public Department getDeptById(@PathVariable("id") int id) {
    return deptService.findById(id);}@RequestMapping("/updateDept")public Department updateDept(int id, String name) {
    Department d = new Department();d.setId(id);d.setName(name);Department dept = deptService.updateDept(d);return dept;}@RequestMapping("/delDept/{id}")public String delDeptById(@PathVariable("id") int id) {
    if (deptService.delDept(id) > 0) {
    return "del success";} else {
    return "del fail";}}
}
一些知识补充
JSR107缓存规则
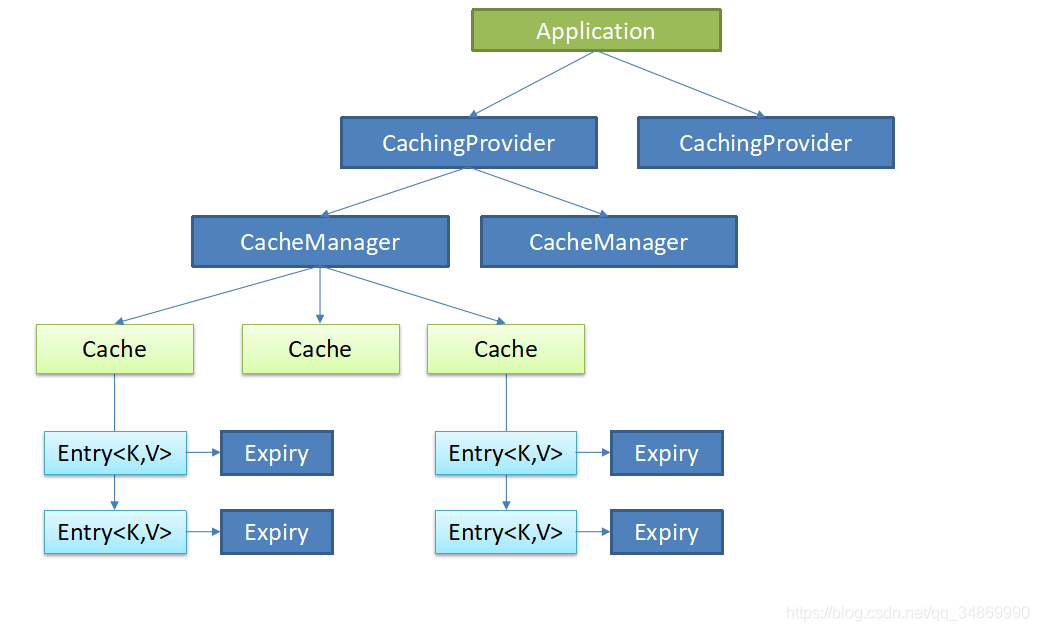
springboot是自带缓存功能的(实现了JSR107规范)实现,但是它好像是直接将缓存数据存在类似hashMap的一个地方,这样并不安全。我们整合redis作缓存,大家知道redis是一个高性能的内存数据库,就将相当于将缓存数据存在内存中,其速度肯定是快。下面图是JSR107规范图和解析:
1.CachingProvider定义了创建、配置、获取、管理和控制多个CacheManager。一个应用可以在运行期访问多个CachingProvider。
2.CacheManager定义了创建、配置、获取、管理和控制多个唯一命名的Cache,这些Cache存在于 CacheManager的上下文中。一个CacheManager仅被一个CachingProvider所拥有。
3. Cache是一个类似Map的数据结构并临时存储以Key为索引的值。一个Cache仅被一个CacheManager所拥有。
4.Entry是一个存储在Cache中的key-value对.
5.Expiry:每一个存储在Cache中的条目有一个定义的有效期。一旦超过这个时间,条目为过期的状态。一旦过期,条目将不可访问、更新和删除。缓存有效期可以通过ExpiryPolicy设置。
spring Cache注解详解
(1)@CacheConfig:用于配置该类中会用到的一些共用的缓存配置
(2)@Cacheable:用于方法返回值加入缓存。同时在查询时,会先从缓存中取,若不存在才再发起对数据库的访问。
(3)@CachePut:配置于方法上,能够根据参数定义条件进行缓存,与@Cacheable不同的是,每次回真实调用函数,所以主要用于数据新增和修改操作上。
(4)@CacheEvict:配置于函数上,通常用在删除方法上,用来从缓存中移除对应数据
(5)@Caching:配置于函数上,组合多个Cache注解使用。
测试
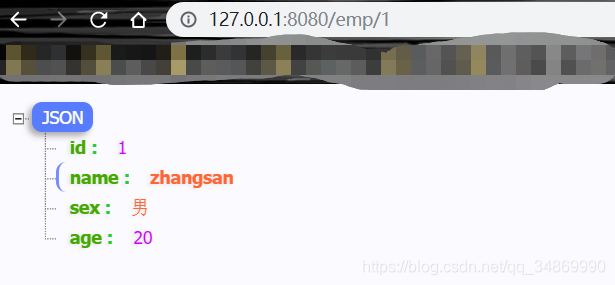
1.查询1号员工
结果:第一次查询是直接查数据库,第二次查缓存


小结
以上就是全部内容,各位大佬有什么指点的地方欢迎留言。