libUV库下载地址:
https://github.com/libuv/libuv
https://dist.libuv.org/dist/
解压之后,进入源文件打开readme.md文件就可以看到编译步骤
别人libUV的blog
Build Instructions
For GCC there are two build methods: via autotools or via GYP. GYP is a meta-build system which can generate MSVS, Makefile, and XCode backends. It is best used for integration into other projects.To build with autotools:$ sh autogen.sh
$ ./configure
$ make
$ make check
$ make install
Windows
First, Python 2.6 or 2.7 must be installed as it is required by GYP. If python is not in your path, set the environment variable PYTHON to its location. For example: set PYTHON=C:\Python27\python.exeTo build with Visual Studio, launch a git shell (e.g. Cmd or PowerShell) and run vcbuild.bat which will checkout the GYP code into build/gyp and generate uv.sln as well as related project files.To have GYP generate build script for another system, checkout GYP into the project tree manually:$ git clone https://chromium.googlesource.com/external/gyp.git build/gyp
Unix
For Debug builds (recommended) run:$ ./gyp_uv.py -f make
$ make -C out
For Release builds run:$ ./gyp_uv.py -f make
$ BUILDTYPE=Release make -C out
Run ./gyp_uv.py -f make -Dtarget_arch=x32 to build x32 binaries.OS X
Run:$ ./gyp_uv.py -f xcode
$ xcodebuild -ARCHS="x86_64" -project uv.xcodeproj \-configuration Release -target All
Using Homebrew:$ brew install --HEAD libuv
Note to OS X users:Make sure that you specify the architecture you wish to build for in the "ARCHS" flag. You can specify more than one by delimiting with a space (e.g. "x86_64 i386").Android
Run:$ source ./android-configure NDK_PATH gyp
$ make -C out
Note for UNIX users: compile your project with -D_LARGEFILE_SOURCE and -D_FILE_OFFSET_BITS=64. GYP builds take care of that automatically.Using Ninja
To use ninja for build on ninja supported platforms, run:$ ./gyp_uv.py -f ninja
$ ninja -C out/Debug     #for debug build OR
$ ninja -C out/Release
Running tests
Run:$ ./gyp_uv.py -f make
$ make -C out
$ ./out/Debug/run-tests
可以看到在OSX下,gcc编译方式和xcode编译方式都可以
使用gcc编译方式:
可以使用make check检验是否安装成功:
如果成功会有

参与编译的源文件:
sys/types.h
sys/stat.h
stdlib.h
string.h
memory.h
strings.h
inttypes.h
stdint.h
unistd.h
dlfcn.h
objdir... .libs
编译选项
gcc -g
gcc -c -o
gcc  -fvisibility=hidden
gcc -std=gnu89
gcc -pedantic
gcc -Wall
gcc -Wextra
gcc -Wno-unused-parameter
gcc -fno-rtti -fno-exceptions
gcc --fno-common
gcc -fno-common -DPIC
gcc -static
链接文件及链接选项
/usr/local/bin/gmkdir -p '/usr/local/lib'/bin/sh ./libtool   --mode=install /usr/local/bin/ginstall -c   libuv.la '/usr/local/lib'
libtool: install: /usr/local/bin/ginstall -c .libs/libuv.1.dylib /usr/local/lib/libuv.1.dylib
libtool: install: (cd /usr/local/lib && { ln -s -f libuv.1.dylib libuv.dylib || { rm -f libuv.dylib && ln -s libuv.1.dylib libuv.dylib; }; })
libtool: install: /usr/local/bin/ginstall -c .libs/libuv.lai /usr/local/lib/libuv.la
libtool: install: /usr/local/bin/ginstall -c .libs/libuv.a /usr/local/lib/libuv.a
libtool: install: chmod 644 /usr/local/lib/libuv.a
libtool: install: ranlib /usr/local/lib/libuv.a/usr/local/bin/gmkdir -p '/usr/local/include'/usr/local/bin/ginstall -c -m 644 include/uv.h include/uv-errno.h include/uv-threadpool.h include/uv-version.h include/uv-unix.h include/uv-darwin.h include/pthread-barrier.h '/usr/local/include'/usr/local/bin/gmkdir -p '/usr/local/lib/pkgconfig'/usr/local/bin/ginstall -c -m 644 libuv.pc '/usr/local/lib/pkgconfig'
libuv库的使用:
可以在源代码文件中生成的的隐藏文件.libs中找到编译后生成的libuv.a文件,这个就是我们用到的静态库文件
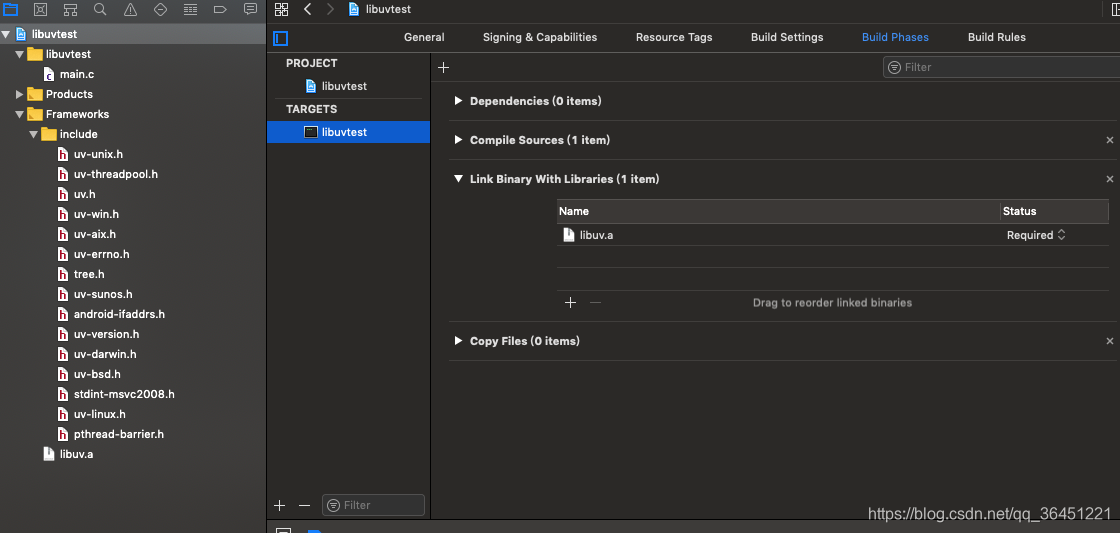
首先创建一个C项目,这个时候我们需要把我们之前编译的libuv.a的文件加入到项目的依赖中,我们在Build Phases中的 Link Binary with Libraries中添加libuv.a的路径,同时我们需要在项目根目录引入uv.h等文件头。