使用前提
搭建nacos环境: https://blog.csdn.net/qq_41463655/article/details/104002968
RPC 工具RestTemplate :https://blog.csdn.net/qq_41463655/article/details/103431953
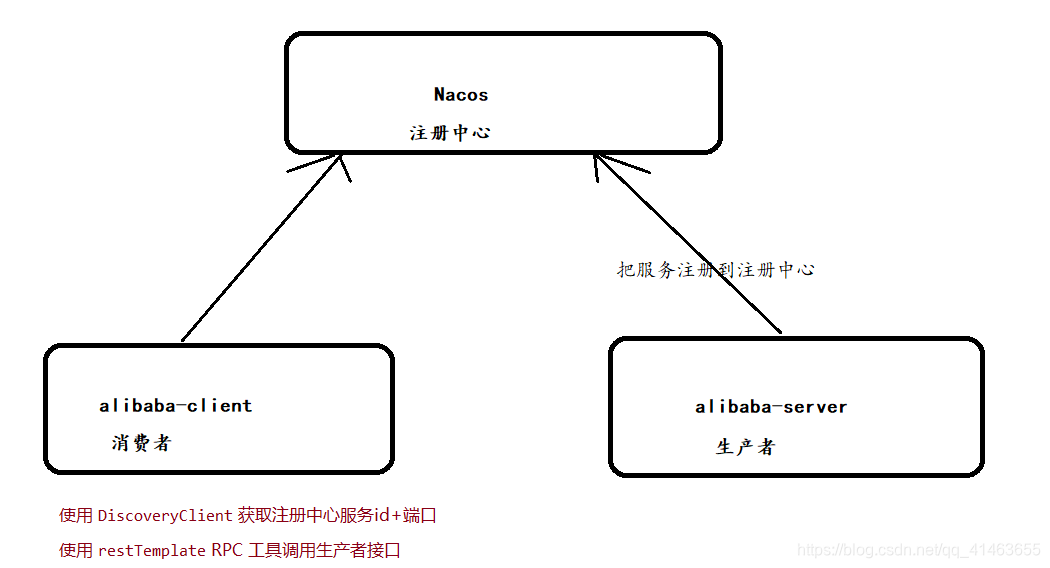
本文模拟环境如下图:
一、创建springboot 项目 alibaba-server( 版本2.0.1)
生产者项目模拟
1、pom.xom 依赖
<!-- springboot 整合web组件--><dependency><groupId>org.springframework.boot</groupId><artifactId>spring-boot-starter-web</artifactId></dependency><!-- springboot 整合 alibaba-nacos-discovery 注册中心 --><dependency><groupId>org.springframework.cloud</groupId><artifactId>spring-cloud-starter-alibaba-nacos-discovery</artifactId><version>0.2.2.RELEASE</version></dependency>
2、yml 配置
server:port: 8080
spring:application:## 服务名称name: alibaba-servercloud:nacos:discovery:## 服务注册地址server-addr: 192.168.177.128:8848
3、添加 getUserId 测试接口
import org.springframework.web.bind.annotation.GetMapping;
import org.springframework.web.bind.annotation.RestController;@RestController
public class UserService {@GetMapping("/getUserId")public String getUserId(String userId){return  "userId:"+userId;}
}
4、启动类(不需要任何配置)
alibaba-nacos-discovery 会自动把服务注入到 nacos
import org.springframework.boot.SpringApplication;
import org.springframework.boot.autoconfigure.SpringBootApplication;@SpringBootApplication
class AlibabaServerApplication {public static void main(String[] args) {SpringApplication.run(AlibabaServerApplication.class, args);}
}
二、创建springboot 项目 alibaba-client( 版本2.0.1)
消费者项目模拟
1、pom.xom 依赖
<!-- springboot 整合web组件--><dependency><groupId>org.springframework.boot</groupId><artifactId>spring-boot-starter-web</artifactId></dependency><!-- springboot 整合 alibaba-nacos-discovery 注册中心 --><dependency><groupId>org.springframework.cloud</groupId><artifactId>spring-cloud-starter-alibaba-nacos-discovery</artifactId><version>0.2.2.RELEASE</version></dependency>
2、yml 配置
server:port: 8081
spring:application:## 服务名称name: alibaba-clientcloud:nacos:discovery:## 服务注册地址server-addr: 192.168.177.128:8848
3、添加消费者接口 -> 调用生产者接口
import org.springframework.beans.factory.annotation.Autowired;
import org.springframework.cloud.client.ServiceInstance;
import org.springframework.cloud.client.discovery.DiscoveryClient;
import org.springframework.web.bind.annotation.GetMapping;
import org.springframework.web.bind.annotation.RestController;
import org.springframework.web.client.RestTemplate;import java.util.List;@RestController
public class LoginService {/*** rpc 调用工具*/@Autowiredprivate RestTemplate restTemplate;/*** 获取注册中心数据对象*/@Autowiredprivate DiscoveryClient discoveryClient;@GetMapping("/login")public String login(){// 通过服务名获取到注册到nacos 的ip+端口地址信息(集群会获取多个)List<ServiceInstance> instances = discoveryClient.getInstances("alibaba-server");String ipAddr = instances.get(0).getUri().toString();String url  = ipAddr+"/getUserId?userId=123456789";// rpc 调用String result = restTemplate.getForObject(url, String.class);System.out.println("调用alibaba-server服务,result:" + result);return result;}
}
4、启动类注入RestTemplate 模块(rpc调用工具)
@SpringBootApplication
class AlibabaClientApplication {public static void main(String[] args) {SpringApplication.run(AlibabaClientApplication.class, args);}/*** TODO   RestTemplate =  rest,http风格的,api调用工具** @return org.springframework.web.client.RestTemplate* @date 2019/12/6 0006 12:02*/@Bean              //注入springboot容器//@LoadBalanced//让RestTemplate在请求时拥有客户端负载均衡的能力RestTemplate restTemplate() {return new RestTemplate();}
}
三、测试结果
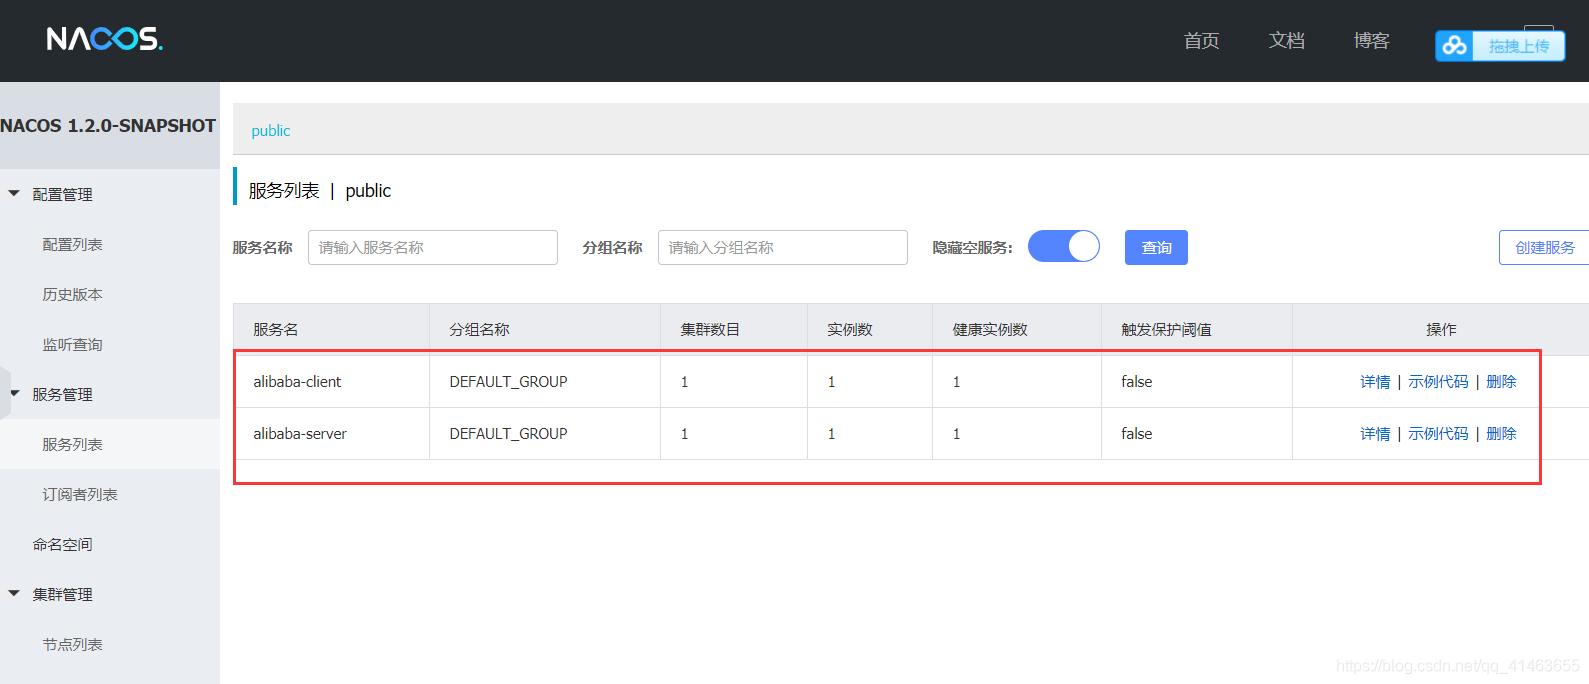
1、启动项目后Nacos 查看注册的服务
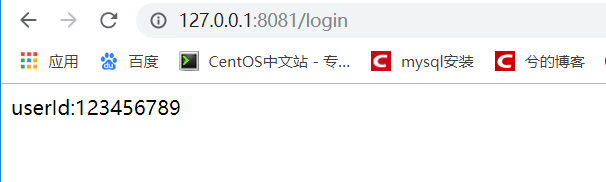
2、URL 访问 alibaba-client 服务的/login 接口
http://127.0.0.1:8081/login
输出结果: