【IOS 开发学习总结-OC-51】★★ios开发之UI控件――UITableView 与UITableViewCell
UITableView
UITableView,是个表格视图(实质上是列表),可以在表格行控件中添加多个子控件。可通过代码或者 IB 界面上拖拽添加该控件。
UITableView继承了 UIScrollView;这个UIScrollView主要封装了UIScrollViewCell 单元格控件。――默认状态下,可以对单元格进行滚动,所有的UITableViewController 实例被自动设为UIScrollView委托。
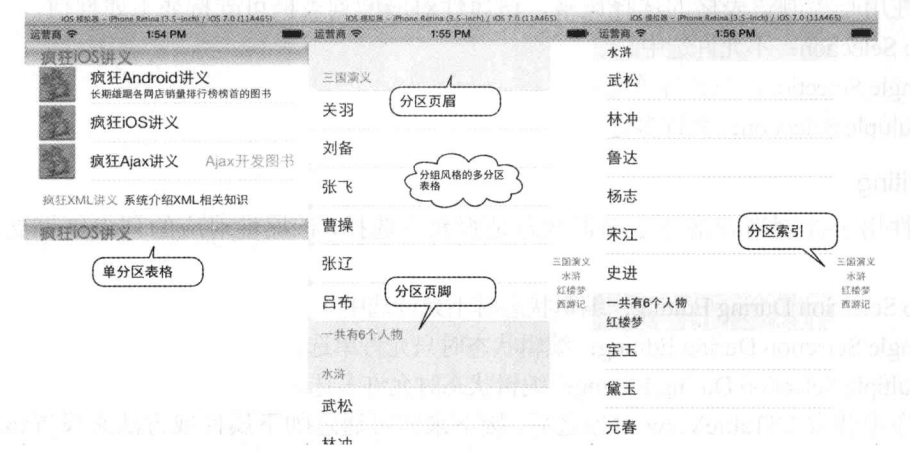
常见的表格视图效果(一般是单列效果,也可以做出多列效果):
UITableView常用属性说明
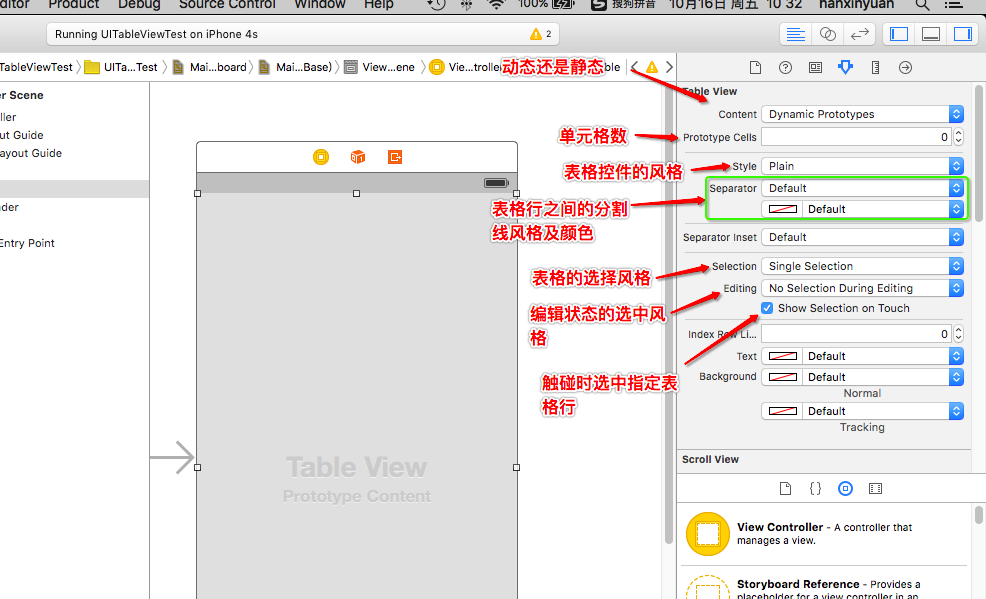
属性说明:
1. @property (nonatomic, readonly) UITableViewStyle style;――此属性有2个属性值,plain(普通风格)与 group(分组风格)
2. separatorStyle:――分割条样式。有3个属性如下,无样式;单线样式;和被蚀刻的样式(SingleLineEtched)三种。
typedef NS_ENUM(NSInteger, UITableViewCellSeparatorStyle) {
UITableViewCellSeparatorStyleNone,
UITableViewCellSeparatorStyleSingleLine,
UITableViewCellSeparatorStyleSingleLineEtched // This separator style is only supported for grouped style table views currently
};
selection:――3个属性值,不允许选中,只允许单选,允许多选。
@property (nonatomic) BOOL allowsSelection NS_AVAILABLE_IOS(3_0);// default is YES. Controls whether rows can be selected when not in editing mode
@property (nonatomic) BOOL allowsMultipleSelection NS_AVAILABLE_IOS(5_0);// default is NO. Controls whether multiple rows can be selected simultaneouslyediting:3种属性选择:①NO selection during editing:――编辑状态不允许选中;②single selection during editing:――编辑状态只允许单选;③multiple selection during editing:――编辑状态允许多选。
separatorColor:设置分割条颜色;
@property (nonatomic, weak, nullable) id <UITableViewDataSource> dataSource;――数据源@property (nonatomic, weak, nullable) id <UITableViewDelegate> delegate;――代理委托@property (nonatomic) CGFloat rowHeight;――行高 // will return the default value if unset@property (nonatomic) CGFloat sectionHeaderHeight;――页眉高度 // will return the default value if unset@property (nonatomic) CGFloat sectionFooterHeight;――页脚高度 // will return the default value if unset@property (nonatomic) CGFloat estimatedRowHeight NS_AVAILABLE_IOS(7_0);――估算行高// default is 0, which means there is no estimate@property (nonatomic) CGFloat estimatedSectionHeaderHeight NS_AVAILABLE_IOS(7_0);―― 估算的页眉高度 // default is 0, which means there is no estimate@property (nonatomic) CGFloat estimatedSectionFooterHeight NS_AVAILABLE_IOS(7_0);――古都按的页脚高度 // default is 0, which means there is no estimate@property (nonatomic) UIEdgeInsets separatorInset NS_AVAILABLE_IOS(7_0) UI_APPEARANCE_SELECTOR;――单元格分割符定制 // allows customization of the frame of cell separators@property (nonatomic, strong, nullable) UIView *backgroundView NS_AVAILABLE_IOS(3_2);――背景视图 // the background view will be automatically resized to track the size of the table view. this will be placed as a subview of the table view behind all cells and headers/footers. default may be non-nil for some devices.
UITableView常用方法
- (NSInteger)numberOfRowsInSection:(NSInteger)section;――指定分区包含的行数;@property (nonatomic, readonly) NSInteger numberOfSections;――表格所包含的分区数;- (void)reloadData;// reloads everything from scratch. redisplays visible rows. because we only keep info about visible rows, this is cheap. will adjust offset if table shrinks- (void)reloadSectionIndexTitles NS_AVAILABLE_IOS(3_0);// reloads the index bar.- (nullable __kindof UITableViewCell *)dequeueReusableCellWithIdentifier:(NSString *)identifier;// Used by the delegate to acquire an already allocated cell, in lieu of (代替)allocating a new one.
UITableView的UITableViewDataSource
UITableView与 UIPickerView 控件类似,UITableView只负责通用行为,而由UITableViewDataSource提供,分区数,每个分区有多少表格行,各表格行对应的 UI控件等内容。
使用UITableViewDataSource 前要在头文件中实现UITableViewDataSource协议。然后可以实现如下必须和可选的方法:
@protocol UITableViewDataSource<NSObject>@required- (NSInteger)tableView:(UITableView *)tableView numberOfRowsInSection:(NSInteger)section;//――指定分区的表格行数- (UITableViewCell *)tableView:(UITableView *)tableView cellForRowAtIndexPath:(NSIndexPath *)indexPath;//返回UITableViewCell对象作为指定索引对应表格行的控件@optional- (NSInteger)numberOfSectionsInTableView:(UITableView *)tableView;//――分区数,如果不调用该方法的话,默认值为1个分区 // Default is 1 if not implemented- (nullable NSString *)tableView:(UITableView *)tableView titleForHeaderInSection:(NSInteger)section; // ―― 分区的表头/页眉标题 fixed font style. use custom view (UILabel) if you want something different- (nullable NSString *)tableView:(UITableView *)tableView titleForFooterInSection:(NSInteger)section;
// ―― 分区的页脚/表尾标题- (BOOL)tableView:(UITableView *)tableView canEditRowAtIndexPath:(NSIndexPath *)indexPath;//是否可以编辑指定索引处的表格行- (BOOL)tableView:(UITableView *)tableView canMoveRowAtIndexPath:(NSIndexPath *)indexPath;//是否可以移动指定索引处的表格行- (nullable NSArray<NSString *> *)sectionIndexTitlesForTableView:(UITableView *)tableView; // ――各分区标题的索引 return list of section titles to display in section index view (e.g. "ABCD...Z#")- (NSInteger)tableView:(UITableView *)tableView sectionForSectionIndexTitle:(NSString *)title atIndex:(NSInteger)index; // tell table which section corresponds(符合) to section title/index (e.g. "B",1)),官方解释:Asks the data source to return the index of the section having the given title and section title index.// Data manipulation - insert and delete support- (void)tableView:(UITableView *)tableView commitEditingStyle:(UITableViewCellEditingStyle)editingStyle forRowAtIndexPath:(NSIndexPath *)indexPath;//――提交编辑风格// Data manipulation - reorder / moving support- (void)tableView:(UITableView *)tableView moveRowAtIndexPath:(NSIndexPath *)sourceIndexPath toIndexPath:(NSIndexPath *)destinationIndexPath;//――从一个指定索引的行移动到另一个指定索引所在的行
//官方解释:Tells the data source to move a row at a specific location in the table view to another location.@endUITableViewDataSource的使用步骤
- 代码或者 IB 界面添加一个UITableView控件;
- 为UITableView添加 dataSource 属性――必须是实现UITableViewDataSource协议的对象。
- 让指定类 (通常为控制器类)实现UITableViewDataSource协议,并实现协议中的方法。
UITableView的UITableViewDelegate
当程序需要响应表格行的选中事件时,需要借助UITableView的委托对象――该对象必须实现UITableViewDelegate协议――当表格行发生选中事件时,都会激发该委托对象的响应方法。UITableViewDelegate定义了如下方法:
- (nullable NSIndexPath *)tableView:(UITableView *)tableView willSelectRowAtIndexPath:(NSIndexPath *)indexPath;//将要选中表格中某行时激发该方法- (nullable NSIndexPath *)tableView:(UITableView *)tableView willDeselectRowAtIndexPath:(NSIndexPath *)indexPath NS_AVAILABLE_IOS(3_0);//将要取消选中表格某行时激发// Called after the user changes the selection.
- (void)tableView:(UITableView *)tableView didSelectRowAtIndexPath:(NSIndexPath *)indexPath;//完成选中表格某行时激发该方法- (void)tableView:(UITableView *)tableView didDeselectRowAtIndexPath:(NSIndexPath *)indexPath NS_AVAILABLE_IOS(3_0);//取消选中表格某行时激发
限于篇幅。其他UITableViewDelegate的方法请参见我另一篇博文:UITableViewDelegate详解
示例――简单的表格效果
上面的一个橙色图片是页眉,下面一个橙色图片是页脚。
源码下载:UITableView-简单表格.zip
代码中用到了方法- (UITableViewCell *)tableView:(UITableView *)tableView cellForRowAtIndexPath:(NSIndexPath *)indexPath:
// 该方法返回值决定各表格行的控件。
- (UITableViewCell *)tableView:(UITableView *)tableViewcellForRowAtIndexPath:(NSIndexPath *)indexPath
{// 为表格行定义一个静态字符串作为标示符static NSString* cellId = @"cellId";  // // 从可重用表格行的队列中取出一个表格行UITableViewCell* cell = [tableViewdequeueReusableCellWithIdentifier:cellId];// 如果取出的表格行为nilif(cell == nil){switch(indexPath.row % 4){case 0:// 创建一个UITableViewCell对象,使用UITableViewCellStyleSubtitle风格cell = [[UITableViewCell alloc]initWithStyle:UITableViewCellStyleSubtitlereuseIdentifier:cellId];break;case 1:// 创建一个UITableViewCell对象,使用默认风格cell = [[UITableViewCell alloc]initWithStyle:UITableViewCellStyleDefaultreuseIdentifier:cellId];break;case 2:// 创建一个UITableViewCell对象,使用UITableViewCellStyleValue1风格cell = [[UITableViewCell alloc]initWithStyle:UITableViewCellStyleValue1reuseIdentifier:cellId];break;case 3:// 创建一个UITableViewCell对象,使用UITableViewCellStyleValue2风格cell = [[UITableViewCell alloc]initWithStyle:UITableViewCellStyleValue2reuseIdentifier:cellId];break;}}// 从IndexPath参数中获取当前行的行号NSUInteger rowNo = indexPath.row;// 取出books中索引为rowNo的元素作为UITableViewCell的文本标题cell.textLabel.text = [books objectAtIndex:rowNo];// 将单元格的边框设置为圆角cell.layer.cornerRadius = 12;cell.layer.masksToBounds = YES;// 为UITableViewCell的左端设置图片cell.imageView.image = [UIImage imageNamed:@"ic_gray.png"];// 为UITableViewCell的左端设置高亮状态视时的图片cell.imageView.highlightedImage = [UIImage imageNamed:@"ic_highlight.png"];// 取出details中索引为rowNo的元素作为UITableViewCell的详细内容cell.detailTextLabel.text = [details objectAtIndex:rowNo];return cell;
}tips:上面的程序还通过对UITableView的 layer 属性的 cornerRadius,masksToBounds 2个属性赋值达到给 UIView控件增加圆角边框。为了使用 layer 属性,需要导入 QuartzCore库。
可重用表格――dequeueReusableCellWithIdentifier
在上面的方法中,使用了UITableView的方法
- (nullable __kindof UITableViewCell *)dequeueReusableCellWithIdentifier:(NSString *)identifier;// Used by the delegate to acquire an already allocated cell, in lieu of (代替)allocating a new one.
这个方法用于从UITableView管理的”可重用表格行队列”中取出一个UITableViewCell对象。
为什么这样设计呢?
毕竟 iPhone手机的屏幕尺寸有限,当UITableView需要显示很多行数据(超过手机最大尺寸)时,如果为所有表格行都创建对应的UITableViewCell,而此时大部分表格行并没有显示出来――此时,将会有大量不必要的内存开销。所以才有了”可重用表格行队列”。
UITableView会维护一个”可重用表格行队列”,当UITableView上的表格行被滚动出屏幕显示范围后,系统会将该表格行对应的UITableViewCell放入”可重用表格行队列”中,以便下次复用。 在内存紧张的情况下,UITableView可能会释放”可重用表格行队列”中的某些UITableViewCell对象――这样既可以保证运行性能,又能避免内存紧张。
上面代码的程序逻辑:先看”可重用表格行队列”中取出一个可重用的的UITableViewCell对象,如果 对象为 nil,新创建一个UITableViewCell对象。
UITableViewCell
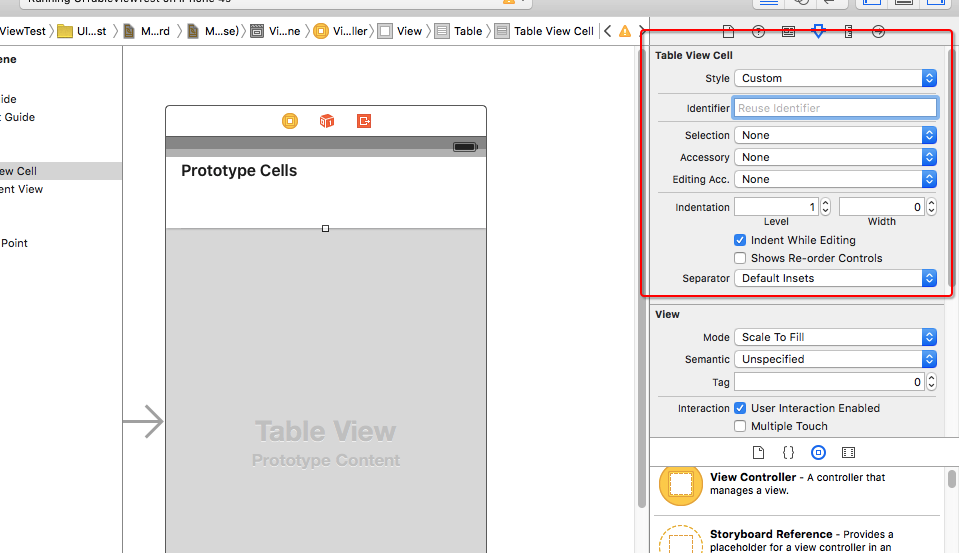
UITableViewCell属性与方法
属性说明:
1. style与 identifier :可代码设置或属性面板设置;
Cell的初始化方法,可以设置一个风格和标识符,风格的枚举如下:
typedef NS_ENUM(NSInteger, UITableViewCellStyle) {UITableViewCellStyleDefault,    // 默认风格,自带标题和一个图片视图,图片在左UITableViewCellStyleValue1,     // 只有标题和副标题 副标题在右边UITableViewCellStyleValue2,     // 只有标题和副标题,副标题在左边标题的下边UITableViewCellStyleSubtitle    // 自带图片视图和主副标题,主副标题都在左边,副标题在下
};方法:- (instancetype)initWithStyle:(UITableViewCellStyle)style reuseIdentifier:(NSString *)reuseIdentifier;
2. 其他属性与方法;
@property (nonatomic, readonly, retain) UIImageView *imageView; //图片视图,风格允许时才会创建@property (nonatomic, readonly, retain) UILabel* textLabel;//标题标签@property (nonatomic, readonly, retain) UILabel *detailTextLabel;//副标题标签@property (nonatomic, readonly, retain) UIView *contentView;//容纳视图,任何cell的子视图都应该添加在这个上面@property (nonatomic, retain) UIView* backgroundView;//背景视图@property (nonatomic, retain) UIView *selectedBackgroundView;//选中状态下的背景视图@property (nonatomic, retain) UIView *multipleSelectionBackgroundView;//多选选中时的背景视图@property (nonatomic, readonly, copy) NSString  *reuseIdentifier;//cell的复用标识符- (void)prepareForReuse; //当被重用的cell将要显示时,会调用这个方法,这个方法最大的用武之地是当你自定义的cell上面有图片时,如果产生了重用,图片可能会错乱(当图片来自异步下载时及其明显),这时我们可以重写这个方法把内容抹掉。@property (nonatomic) UITableViewCellSelectionStyle   selectionStyle;  //cell被选中时的风格,枚举如下:
typedef NS_ENUM(NSInteger, UITableViewCellSelectionStyle) {UITableViewCellSelectionStyleNone,//无UITableViewCellSelectionStyleBlue,//蓝色UITableViewCellSelectionStyleGray,//灰色UITableViewCellSelectionStyleDefault//默认 为蓝色
};@property (nonatomic, getter=isSelected) BOOL         selected;  //设置cell是否选中状态
@property (nonatomic, getter=isHighlighted) BOOL      highlighted;   //设置cell是否高亮状态- (void)setSelected:(BOOL)selected animated:(BOOL)animated;
- (void)setHighlighted:(BOOL)highlighted animated:(BOOL)animated;
//与上面的两个属性对应@property (nonatomic, readonly) UITableViewCellEditingStyle editingStyle; //获取cell的编辑状态,枚举如下:
typedef NS_ENUM(NSInteger, UITableViewCellEditingStyle) {UITableViewCellEditingStyleNone,//无编辑UITableViewCellEditingStyleDelete,//删除编辑UITableViewCellEditingStyleInsert//插入编辑
};@property (nonatomic) BOOL showsReorderControl; //设置是否显示cell自带的自动排序控件
注意:要让cell实现拖动排序的功能,除了上面设置为YES,还需实现代理中的如下方法:
-(BOOL)tableView:(UITableView *)tableView canMoveRowAtIndexPath:(NSIndexPath *)indexPath{return YES;
}-(void)tableView:(UITableView *)tableView moveRowAtIndexPath:(NSIndexPath *)sourceIndexPath toIndexPath:(NSIndexPath *)destinationIndexPath{}@property (nonatomic) BOOL shouldIndentWhileEditing;//设置编辑状态下是否显示缩进@property (nonatomic) UITableViewCellAccessoryType    accessoryType; //设置附件视图的风格(cell最右侧显示的视图) 枚举如下:
typedef NS_ENUM(NSInteger, UITableViewCellAccessoryType) {UITableViewCellAccessoryNone,       // 没有视图UITableViewCellAccessoryDisclosureIndicator,    // cell右侧显示一个灰色箭头UITableViewCellAccessoryDetailDisclosureButton, // 显示详情符号和灰色箭头UITableViewCellAccessoryCheckmark,       // cell右侧显示蓝色对号UITableViewCellAccessoryDetailButton  // cell右侧显示一个详情符号
};@property (nonatomic, retain) UIView *accessoryView;  //附件视图@property (nonatomic) UITableViewCellAccessoryType    editingAccessoryType; //cell编辑时的附件视图风格@property (nonatomic, retain) UIView  *editingAccessoryView;  //cell编辑时的附件视图@property (nonatomic) NSInteger indentationLevel; //设置内容区域的缩进级别@property (nonatomic) CGFloat   indentationWidth; //设置每个级别的缩进宽度@property (nonatomic) UIEdgeInsets  separatorInset;//设置分割线的偏移量@property (nonatomic, getter=isEditing) BOOL editing;
- (void)setEditing:(BOOL)editing animated:(BOOL)animated;
//设置是否编辑状态@property(nonatomic, readonly) BOOL showingDeleteConfirmation;//返回是否目前正在显示删除按钮- (void)willTransitionToState:(UITableViewCellStateMask)state;//cell状态将要转换时调用的函数,可以在子类中重写- (void)didTransitionToState:(UITableViewCellStateMask)state;//cell状态已经转换时调用的函数,可以在子类中重写,状态枚举如下:
typedef NS_OPTIONS(NSUInteger, UITableViewCellStateMask) {UITableViewCellStateDefaultMask                     = 0,//默认状态UITableViewCellStateShowingEditControlMask          = 1 << 0,//编辑状态UITableViewCellStateShowingDeleteConfirmationMask   = 1 << 1 //确认删除状态
};
可参考资料:IOS中UITableViewCell使用详解
获取UITableView控件后,如何访问表格控件的表格行和分区
可以通过如下方法:
1. - (nullable __kindof UITableViewCell *)cellForRowAtIndexPath:(NSIndexPath *)indexPath; //访问表格中指定索引对应的表格行―― returns nil if cell is not visible or index path is out of range
2. - (nullable NSIndexPath *)indexPathForCell:(UITableViewCell *)cell; //返回表格行对应的NSIndexPath returns nil if cell is not visible
3. - (nullable NSIndexPath *)indexPathForRowAtPoint:(CGPoint)point;――返回该表格中指定点所在的NSIndexPath
4. - (nullable NSArray<NSIndexPath *> *)indexPathsForRowsInRect:(CGRect)rect;――返回表格中指定区域内所有的NSIndexPath组成的数组;
5. @property (nonatomic, readonly) NSArray<__kindof UITableViewCell *> *visibleCells;――返回表格中所有可见区域内的表格行组成的数组;
6. @property (nonatomic, readonly, nullable) NSArray<NSIndexPath *> *indexPathsForVisibleRows;――返回表格中所有可见区域内的表格行对应的NSIndexPath组成的数组;
控制表格控件滚动的方法
- (void)scrollToRowAtIndexPath:(NSIndexPath *)indexPath atScrollPosition:(UITableViewScrollPosition)scrollPosition animated:(BOOL)animated;//控制该表格滚动到指定NSIndexPath对应的表格行的顶端,中间或下方- (void)scrollToNearestSelectedRowAtScrollPosition:(UITableViewScrollPosition)scrollPosition animated:(BOOL)animated;//控制该表格滚动到选中表格行的顶端,中间或下方UITableViewCell单元格的选中与操作
UITableView对表格的选中状态配置了如下属性:
@property (nonatomic) BOOL allowsSelection NS_AVAILABLE_IOS(3_0); //控制表格是否被选中
@property (nonatomic) BOOL allowsSelectionDuringEditing;//表格处于编辑状态时是否允许被选中
@property (nonatomic) BOOL allowsMultipleSelection NS_AVAILABLE_IOS(5_0);  //是否允许多选
@property (nonatomic) BOOL allowsMultipleSelectionDuringEditing NS_AVAILABLE_IOS(5_0);//在编辑状态时是否允许多选
操作表格中被选中表格的方法:
@property (nonatomic, readonly, nullable) NSIndexPath *indexPathForSelectedRow; //――获取选中表格行对应的NSIndexPath;
@property (nonatomic, readonly, nullable) NSArray<NSIndexPath *> *indexPathsForSelectedRows NS_AVAILABLE_IOS(5_0); //――获取所有被选中表格行对应的NSIndexPath组成的数组;selection.- (void)selectRowAtIndexPath:(nullable NSIndexPath *)indexPath animated:(BOOL)animated scrollPosition:(UITableViewScrollPosition)scrollPosition;//控制该表格指定NSIndexPath对应的表格行,scrollPosition这个参数是控制是否滚动到被选中行的顶端,中间,或底部;
- (void)deselectRowAtIndexPath:(NSIndexPath *)indexPath animated:(BOOL)animated;//控制取消选中指定NSIndexPath对应的表格行定制表格行
系统提供的UITableViewCell,表格行样式样式很少。每个表格行只有 textLabel,detailTextLabel,UIImageView这三个控件。所以,很多时候,我们需要定制表格行。
定制UITableView控件的表格行,可通过下面的方式完成:
1. 继承UITableViewCell定制表格行。――添加控件,设置样式;(思路:继承UITableViewCell后,在上面添加需要的任意控件,实现协议的控制类方法tableView cellForRowAtIndexPath:会返回定制的继承UITableViewCell)
2. 使用动态单元格定制表格行。――在 IB 设计界面设计样式;(思路:界面设计文件中拖入UITableView控件――》属性面板中设置动态单元格原型,并设置原型数量――》然后在相应的单元格原型中自定义添加控件(要拖入原型内)注意点:1. 为表格行原型 identifier设置字符串属性;2. 一个表格行原型中添加的所有 UI 控件都需指定互不相同的 Tag 属性值)
3. 使用 Xib文件定制表格行。――通过 Xib 文件设计表格行样式,然后再让UITableView加载表格行.(思路: 在 xib 文件中设计单元格后,在程序中的tableView cellForRowAtIndexPath:方法中调用方法:tableView registerNib: forCellReuseIdentifier:为表格控件注册自定义的表格行控件)
以上3种方式实例代码下载地址:
示例中三种方式的重点代码段:
方式1――继承UITableViewCell定制表格行:
// 该方法返回值决定各表格行的控件。
- (UITableViewCell *)tableView:(UITableView *)tableView cellForRowAtIndexPath:(NSIndexPath *)indexPath
{// 为表格行定义一个静态字符串作为标识符static NSString* cellId = @"cellId";// 从可重用表格行的队列中取出一个表格行FKBookTableCell* cell = [tableViewdequeueReusableCellWithIdentifier:cellId];// 如果取出的表格行为nilif(cell == nil){// 创建自定义的FKBookTableCell对象cell = [[FKBookTableCell alloc]initWithStyle:UITableViewCellStyleDefault reuseIdentifier:cellId];}// 从IndexPath参数中获取当前行的行号NSUInteger rowNo = indexPath.row;//将单元格的边框设置为圆角cell.layer.cornerRadius = 12;cell.layer.masksToBounds = YES;// 为表格行的nameField、priceField的text设置值cell.nameField.text = [books objectAtIndex:rowNo];cell.priceField.text = [prices objectAtIndex:rowNo];return cell;
}方式2――使用动态单元格定制表格行:
- (UITableViewCell *)tableView:(UITableView *)tableViewcellForRowAtIndexPath:(NSIndexPath *)indexPath
{NSInteger rowNo = indexPath.row;  // 获取行号// 根据行号的奇偶性使用不同的标识符NSString* identifier = rowNo % 2 == 0 ? @"cell1" : @"cell2";// 根据identifier获取表格行(identifier要么是cell1,要么是cell2)UITableViewCell *cell = [tableView dequeueReusableCellWithIdentifier:identifier forIndexPath:indexPath];// 获取cell内包含的Tag为1的UILabelUILabel* label = (UILabel*)[cell viewWithTag:1];label.text = [books objectAtIndex:rowNo];return cell;
}
方式3――使用 Xib文件定制表格行:
/ 该方法返回值决定各表格行的控件。
- (UITableViewCell *)tableView:(UITableView *)tableViewcellForRowAtIndexPath:(NSIndexPath *)indexPath
{// 为表格行定义一个静态字符串作为标示符static NSString* cellId = @"cellId";// 定义一个静态变量做旗标,用于保证仅为该表格注册一次单元格视图static BOOL isRegist = NO;if(!isRegist){// 加载*.xib界面设计文件UINib* nib = [UINib nibWithNibName:@"FKBookTableCell" bundle:nil];// 注册单元格[tableView registerNib:nib forCellReuseIdentifier:cellId];// 注册后将该旗标设为YESisRegist = YES;}FKBookTableCell* cell = [tableViewdequeueReusableCellWithIdentifier:cellId];// 从IndexPath参数中获取当前行的行号NSUInteger rowNo = indexPath.row;//将单元格的边框设置为圆角cell.layer.cornerRadius = 12;cell.layer.masksToBounds = YES;cell.nameField.text = [books objectAtIndex:rowNo];cell.priceField.text = [prices objectAtIndex:rowNo];return cell;
}
编辑表格
示例代码下载地址:
UITableView 表格可以作为显示控件,也可以支持对表格行进行移动,删除,插入等操作。
- 判断表格控件是否处于编辑状态,可用UITableView提供的 editing 属性,YES or NO;
- 切换表格控件的编辑状态的方法:
setEditing:animated方法。――第一个参数如果为 YES,就是将表格切换到编辑状态;
删除,插入,移动表格行用到的方法如下:
-beginUpdates:――执行多个连续的插入,删除和移动操作前,先调用该方法开始更新-endUpdates:――执行多个连续的插入,删除和移动操作后,调用该方法结束并提交更新- (void)insertRowsAtIndexPaths:(NSArray<NSIndexPath *> *)indexPaths withRowAnimation:(UITableViewRowAnimation)animation――在一个或多个 NSIndexPath 处插入表格行;- (void)deleteRowsAtIndexPaths:(NSArray<NSIndexPath *> *)indexPaths withRowAnimation:(UITableViewRowAnimation)animation;――删除一个或多个 NSIndexPath 处插入表格行;- (void)moveRowAtIndexPath:(NSIndexPath *)indexPath toIndexPath:(NSIndexPath *)newIndexPath NS_AVAILABLE_IOS(5_0);――指定NSIndexPath 处的表格移动到另一个NSIndexPath 处;- (void)insertSections:(NSIndexSet *)sections withRowAnimation:(UITableViewRowAnimation)animation;―― 在指定NSIndexPath所包含的一个或多个分区号对应的位置插入分区;- (void)deleteSections:(NSIndexSet *)sections withRowAnimation:(UITableViewRowAnimation)animation;――删除指定NSIndexPath所包含的一个或多个分区号对应的分区;- (void)moveSection:(NSInteger)section toSection:(NSInteger)newSection NS_AVAILABLE_IOS(5_0);――将指定分区移动到另一个位置;
动态编辑表格
动态编辑表格,必须实现UITableView对应的 dataSource对象中的如下方法(由UITableViewDataSource协议定义):
- (BOOL)tableView:(UITableView *)tableView canEditRowAtIndexPath:(NSIndexPath *)indexPath;//是否可以编辑指定索引处的表格行- (void)tableView:(UITableView *)tableView commitEditingStyle:(UITableViewCellEditingStyle)editingStyle forRowAtIndexPath:(NSIndexPath *)indexPath;//――对指定表格行编辑完成时激发该方法- (BOOL)tableView:(UITableView *)tableView canMoveRowAtIndexPath:(NSIndexPath *)indexPath;//是否可以移动指定索引处的表格行- (void)tableView:(UITableView *)tableView moveRowAtIndexPath:(NSIndexPath *)sourceIndexPath toIndexPath:(NSIndexPath *)destinationIndexPath;//――从一个指定索引的行移动到另一个指定索引所在的行
还有一些其他的编辑方法,可以参考另一篇博文: UITableViewDelegate详解
多分区表格以及分区索引
UITableViewDataSource 协议为建立多分区表格和分区索引定义了如下方法:
1. - (NSInteger)numberOfSectionsInTableView:(UITableView *)tableView;
//――分区数,如果不调用该方法的话,默认值为1个分区
2. - (nullable NSArray<NSString *> *)sectionIndexTitlesForTableView:(UITableView *)tableView;
// ――各分区标题的索引,该方法的返回值用于在表格右边建立一列浮动的索引 (如果采用分组风格的表格控件,一般不需显示右边浮动的分组索引列)
3. - (nullable NSString *)tableView:(UITableView *)tableView titleForHeaderInSection:(NSInteger)section;
// ―― 分区的表头/页眉标题
4. - (nullable NSString *)tableView:(UITableView *)tableView titleForFooterInSection:(NSInteger)section;
// ―― 分区的页脚/表尾标题
多分区表格以及分区索引 示例代码地址:
静态单元格
故事板中提供了:静态单元格的开发方式――不再需要UIDataSource,但可以根据需要实现UITableViewDelegate协议中的方法。静态单元格使用的情况是,比如只是想固定显示几行数据的时候。
示例代码下载地址:
UITableViewController
继承UITableViewController类, UITableViewController默认实现UITableViewDataSource,UITableViewDelegate协议。
有如下属性:
@property (nonatomic, strong, null_resettable) UITableView *tableView;//这个不用多说@property (nonatomic) BOOL clearsSelectionOnViewWillAppear NS_AVAILABLE_IOS(3_2); //清除选择 defaults to YES. If YES, any selection is cleared in viewWillAppear:@property (nonatomic, strong, nullable) UIRefreshControl *refreshControl NS_AVAILABLE_IOS(6_0);//可以用来刷新表视图内容 官方文档讲解如下图: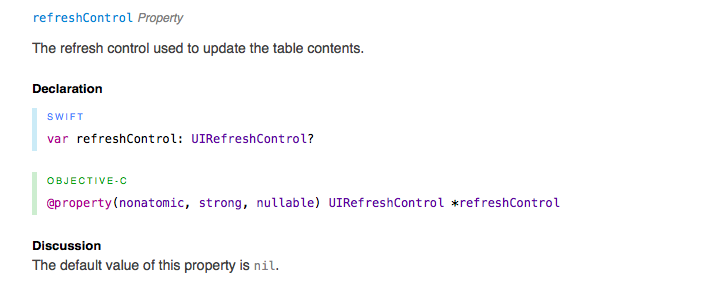
UIRefreshControl的头文件定义
NS_CLASS_AVAILABLE_IOS(6_0) @interface UIRefreshControl : UIControl- (instancetype)init;@property (nonatomic, readonly, getter=isRefreshing) BOOL refreshing;@property (null_resettable, nonatomic, strong) UIColor *tintColor;@property (nullable, nonatomic, strong) NSAttributedString *attributedTitle UI_APPEARANCE_SELECTOR;//该控件下拉刷新的提示标题- (void)beginRefreshing NS_AVAILABLE_IOS(6_0);//开始刷新
- (void)endRefreshing NS_AVAILABLE_IOS(6_0);//结束刷新@end
示例:
实现代码:
#import "FKTableViewController.h"@interface FKTableViewController ()@end@implementation FKTableViewController
NSMutableArray* list;
- (void)viewDidLoad
{[super viewDidLoad];// 初始化NSMutableArray集合list = [[NSMutableArray alloc] initWithObjects:@"张三",@"李四",@"王五",@"赵六",@"钱器",@"孙刚" , nil];// 设置refreshControl属性,该属性值应该是UIRefreshControl控件self.refreshControl = [[UIRefreshControl alloc]init];// 设置UIRefreshControl控件的颜色self.refreshControl.tintColor = [UIColor grayColor];// 设置该控件的提示标题self.refreshControl.attributedTitle = [[NSAttributedString alloc]initWithString:@"下拉刷新-好开森"];// 为UIRefreshControl控件的刷新事件设置事件处理方法[self.refreshControl addTarget:self action:@selector(refreshData)forControlEvents:UIControlEventValueChanged];
}
// 该方法返回该表格的各部分包含多少行。
- (NSInteger) tableView:(UITableView *)tableView numberOfRowsInSection:
(NSInteger)section
{return [list count];
}
// 该方法的返回值将作为指定表格行的UI控件
- (UITableViewCell*) tableView:(UITableView *)tableViewcellForRowAtIndexPath:(NSIndexPath *)indexPath
{static NSString *myId = @"moveCell";// 获取可重用的单元格UITableViewCell *cell = [tableViewdequeueReusableCellWithIdentifier:myId];// 如果单元格为nilif(cell == nil){// 创建UITableViewCell对象cell = [[UITableViewCell alloc] initWithStyle:UITableViewCellStyleDefault reuseIdentifier:myId];}NSInteger rowNo = [indexPath row];// 设置textLabel显示的文本cell.textLabel.text = [list objectAtIndex:rowNo];return cell;
}
// 刷新数据的方法
- (void) refreshData
{// 使用延迟2秒来模拟远程获取数据[self performSelector:@selector(handleData) withObject:nil afterDelay:2];
}
- (void) handleData
{// 获取一个随机数字符串NSString* randStr = [NSString stringWithFormat:@"%d", arc4random() % 10000];// 将随机数字符串添加list集合中[list addObject:randStr];self.refreshControl.attributedTitle = [[NSAttributedString alloc]initWithString:@"正在刷新..."];// 停止刷新[self.refreshControl endRefreshing];// 控制表格重新加载数据[self.tableView reloadData];
}
@end