上一篇博客说了UIScrollView(滚动视图),以及如何实现无限滚动的原理,那么这一次结合UIScrollView,以及UITableView(表格视图)做一个模拟团购的小Demon,并使用了xib以及加载pilsit文件,因为这个demon楼主做了比较久了,属于学iOS的初级demon,所以没有使用任何的约束,也没有任何的MVC思想,因为要想达到比较好的效果,用iPhone4或者IPhone4s的3.5英寸的屏幕观看,效果如下

Model类
为何会出现model类,那么请看一下plist文件
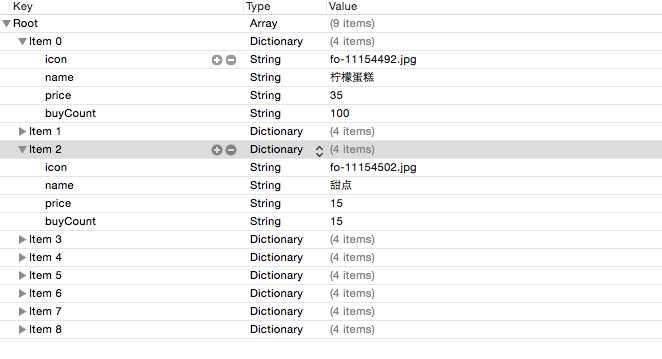
总体是一个数组,每一个数组元素是一个字典,那么字典其实就可以看做一个model,so,model类就非常简单了,Food类如下
#import <UIKit/UIKit.h>@interface Food : NSObject@property(nonatomic,strong) NSString * icon;//图片路径
@property(nonatomic,strong) NSString * name;//图片名
@property(nonatomic,strong) NSString * price;//价格
@property(nonatomic,strong) NSString * buyCount;//购买人数-(instancetype)initWithDict:(NSDictionary *)dic;//便利构造器
+(instancetype)foodWithDict:(NSDictionary *)dic;@end
实现文件也就这两个方法
- (instancetype)initWithDict:(NSDictionary *)dic
{self = [super init];if (self){//通过KVC简易赋值[self setValuesForKeysWithDictionary:dic];}return self;
}+ (instancetype)foodWithDict:(NSDictionary *)dic
{__autoreleasing Food * food = [[Food alloc]initWithDict:dic];return food;
}
HeadView(表格视图的表头视图,即滚动视图)
因为用的xib,那么什么是xib呢,在storyboard出现之前,与storyboard的作用类似,为了方便做视图上的布局,当然现在有了storyboard,功能会比xib强得多,但xib也要会,就当做练习一下。
介绍一下xib如何创建,NewFile - > User Interface - > Empty即可,一般情况下,与绑定的类命名是相同的,为了方便看
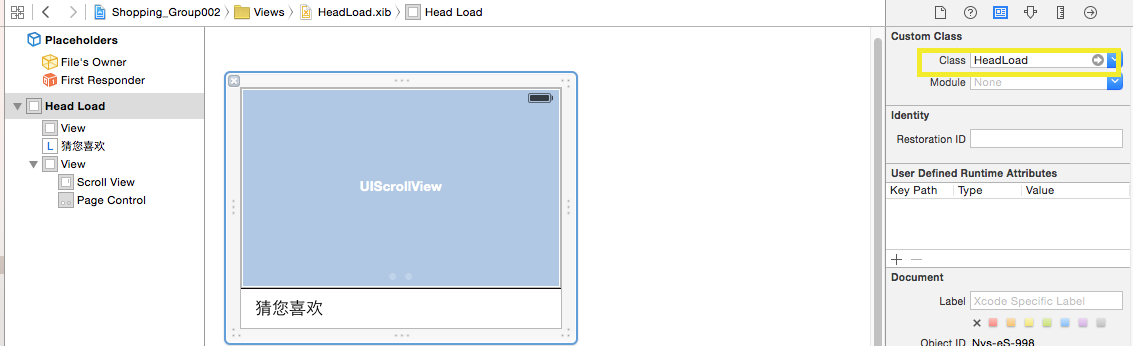
首先看一下表头的xib文件,上面是一个UIScrollView(滚动视图),中间是一个view,只不过宽度是1,所以看起来像一条线,最下面是一个label,用来显示文字“猜您喜欢”的。绑定类的位置也已经做了标注,不要绑定错了。
在声明文件中.h需要声明一个属性以及一个方法,如下
//
//  HeadLoad.h
//  团购网站
//
//  Created by YueWen on 15/9/1.
//  Copyright (c) 2015年 YueWen. All rights reserved.
//#import <UIKit/UIKit.h>@interface HeadLoad : UIView@property(nonatomic,assign,readonly) NSInteger numberOfImage;//scrollView中图片的数量-(instancetype)loadHeadView:(NSArray *)arrayImage;//加载ScrollView的图片@end
在实现文件中拖入输出口,并且加入一个计时器(NSTimer)的属性,如下
@interface HeadLoad ()<UIScrollViewDelegate>@property (strong, nonatomic) IBOutlet UIScrollView *scrollView;@property (strong, nonatomic) IBOutlet UIPageControl *pageControl;@property (strong,nonatomic) NSTimer * timer;@end因为这一部分与上一篇中的描述是一样的,所以不再做过多的解释,如想了解一下UIScrollView以及无限循环请去前一篇博客瞅瞅,3Q iOS学习-------滚动视图(UIScrollView)并实现循环滚动
这一部分有一个特别需要提及的,就是当滑动数值的tableView的时候,tableView的优先级很高,计时器由于优先级不够,所以会被抛弃,也就是不会执行timer,这里就需要几句话,提高一下timer的优先级
//提高timer的优先级
NSRunLoop * runLoop = [NSRunLoop currentRunLoop];//获得当前的运行池,现在看来和用子线程是一样的,只不过这个是将timer添加到了主线程中
[runLoop addTimer:self.timer forMode:NSRunLoopCommonModes];
其他的就不多说了。
FootView (加载更多)
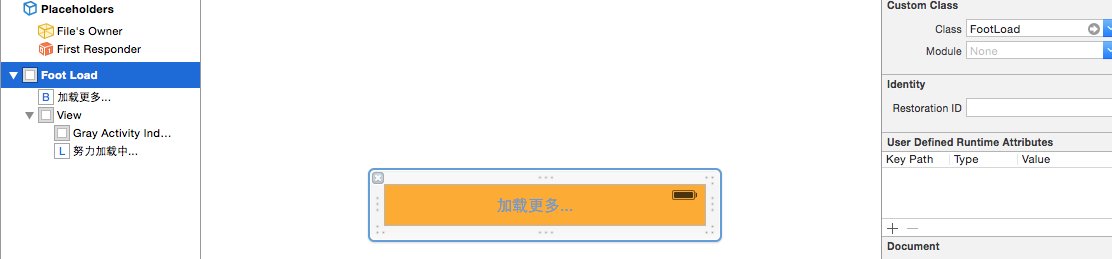
依旧是xib构造,思路是在最下层有一个风火轮(Action Indicator),也就是那么转的东西,还有一个label上显示着努力加载中,最上面是一层view,覆盖住下面的风火轮以及label,只有当点击的时候,最上面的按钮隐藏,所以会出现转的风火轮以及正在努力加载的label,依旧不要忘记绑定类,
但是他麻烦就麻烦在,点击加载更多的时候,需要tableView来刷新列表,那么这个footView中没有tableView,用到其他view的组件,所以就用到了回调,楼主用的是委托回调
所以在声明文件中声明一个协议
@protocol FootLoadDelegate <NSObject>@required//必须有-(void)loadData:(FootLoad *)foodLoad;//加载数据@end
如果有协议,那么必然会存在一个协议属性delegate,可以是任何类型,唯一的条件就是必须履行协议,代理属性如下
@property(nonatomic,weak)id<FootLoadDelegate> delegate;稍微麻烦点的东西就在实现文件中,其实也不难,首先将button组件拖入FootView,形成输出口
@interface FootLoad ()@property (strong, nonatomic) IBOutlet UIButton *footLoadLoadMore;//加载更多的按钮
@property (strong, nonatomic) IBOutlet UIView *footLoadLabelView;//最下层贴着label以及烽火轮的view@end
button的回调事件如下
//为按钮点击进行监听
- (IBAction)clickLoadMoreButton
{self.footLoadLabelView.hidden = NO;//努力加载以及风火轮出现self.footLoadLoadMore.hidden = YES;//加载更多的按钮隐藏//通过GCD延迟1.5秒后运行dispatch_after(dispatch_time(DISPATCH_TIME_NOW, (int64_t)(1.5 * NSEC_PER_SEC)), dispatch_get_main_queue(), ^{//执行代理的loadData方法[self.delegate loadData:self];//时间到self.footLoadLoadMore.hidden = NO;//加载更多的按钮出现self.footLoadLabelView.hidden = YES;//努力加载以及风火轮被覆盖});}
协议方法如下
-(void)loadData:(FootLoad *)foodLoad
{//如果代理遵守了协议,即重写了loadData方法if (![self.delegate respondsToSelector:@selector(loadData:)]){//执行代理的方法[self.delegate loadData:self];}}
自定义cell
自定义的cell也是用xib做的,和storyboard一样用,拖入一个UITableViewCell,在上面布局即可
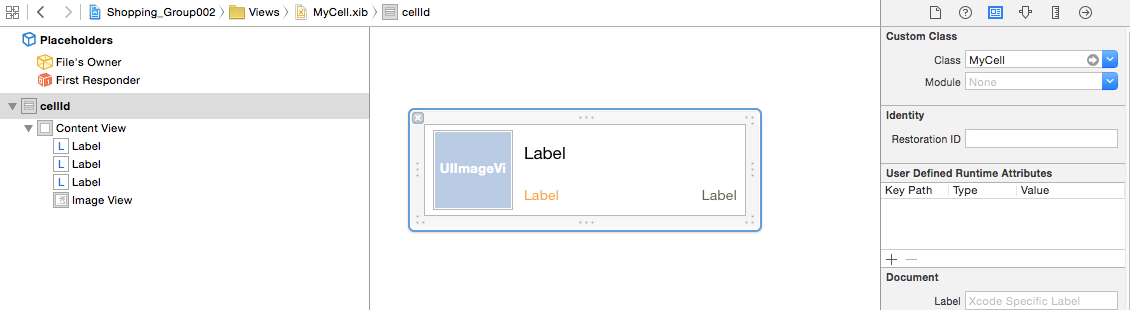
首先声明文件中声明外界调用的方法,用于设置cell的各个属性
-(void)setFood:(Food *)food;输出口不在声明文件中,所以必然会在实现文件中的延展中,如下
@interface MyCell ()
@property (strong, nonatomic) IBOutlet UIImageView *myCellImageView;//显示图片的imageView
@property (strong, nonatomic) IBOutlet UILabel *myCellFoodName;//显示食物的名字
@property (strong, nonatomic) IBOutlet UILabel *myCellFoodPrice;//显示食物的价格
@property (strong, nonatomic) IBOutlet UILabel *myCellFoodBuyCount;//显示食物的购买人数
@end
接着实现setFood:方法即可
-(void)setFood:(Food *)food
{
self.myCellImageView.image = [UIImage imageNamed:[food icon]];
self.myCellFoodName.text = [food name];
self.myCellFoodPrice.text = [NSString stringWithFormat:@"¥ %@",[food price]];
self.myCellFoodBuyCount.text = [NSString stringWithFormat:@"%@ 人已经购买",[food buyCount]];
}
接着就是在自定义的类MyCell中拖入输出口,但是不希望外界修改,那么只给外界提供一个方法接口,传入一个Food类,直接打包好一个cell即可
ViewController(控制器)
首先延展中定义两个属性,一个是显示各个食物的tableView,一个是存储plist文件中的Food对象,如下
#import "ViewController.h"
#import "Food.h"
#import "MyCell.h"
#import "FootLoad.h"
#import "HeadLoad.h"@interface ViewController ()<UITableViewDataSource,UITableViewDelegate,FootLoadDelegate>@property(nonatomic,strong)UITableView * tableView;//显示食物的表格视图
@property(nonatomic,strong)NSMutableArray * foods;//存储所有的食物对象,因为可以添加,所以是可变数组
@end
履行UITableViewDelegate协议以及UITableViewDataSource协议,是因为需要通过协议的方法设置tableView的显示属性,比较详细的tableView介绍可以去 iOS学习-------简单通讯录(UITableView和CoreData的应用)瞧一瞧
接着重写foods的getter方法,有的地方也喜欢叫做懒加载,就是说,只执行一次,如果foods没有值的时候,才会给它赋值,一旦有值了,也就是不为nil了,那么就直接返回,懒加载如下
#pragma mark - 懒加载
-(NSMutableArray *)foods
{NSMutableArray * array = [NSMutableArray array];//如果数据数组为nil的时候if (!_foods){//获得plist的文件路径NSString * path = [[NSBundle mainBundle] pathForResource:@"foods" ofType:@"plist"];//创建储存所有plist数据的数组NSArray * allData = [NSArray arrayWithContentsOfFile:path];//开始遍历数组,并添加数据for (NSDictionary * dic in allData){//创建模型Food * food = [Food foodWithDict:dic];[array addObject:food];}//为数据赋值_foods = array;}return _foods;
}
viewDidLoad如下,用来设置tableView的相关属性,以及设置表示图的表头视图和表尾视图
- (void)viewDidLoad {[super viewDidLoad];self.tableView = [[UITableView alloc] initWithFrame:self.view.frame style:UITableViewStylePlain];//设置tableView的格式为不分组self.tableView.rowHeight = 90;//每个cell的高度为90self.tableView.showsVerticalScrollIndicator = NO;//设置垂直指示器不显示[self.view addSubview:self.tableView];//设置数据源和代理对象self.tableView.delegate = self;self.tableView.dataSource = self;//加载最下侧的 加载更多 viewFootLoad * footView = [[[NSBundle mainBundle] loadNibNamed:@"FootLoad" owner:nil options:nil] firstObject];//加载xib中的组件用该方法,xib中可能右多个组件,所以会返回一个数组,自己做的xib里面只有一个组件,所以取第一个对象或者最后一个都可以//设置代理footView.delegate = self;self.tableView.tableFooterView = footView;//将tableView的footView设置成//加载最上侧的 scrollViewHeadLoad * headView = [[[NSBundle mainBundle] loadNibNamed:@"HeadLoad" owner:nil options:nil] firstObject];[headView loadHeadView:self.foods];self.tableView.tableHeaderView = headView;}接着实现UItableViewDataSource的两个方法
#pragma mark - 实现UITableViewDataSource 方法
//返回一共多少行
- (NSInteger)tableView:(UITableView *)tableView numberOfRowsInSection:(NSInteger)section
{//foods有多少个food对象既为多少行return self.foods.count;
}//返回cell
- (UITableViewCell *)tableView:(UITableView *)tableView cellForRowAtIndexPath:(NSIndexPath *)indexPath
{//创建 cell 的idstatic NSString * cellId = @"cellId";//根据id从缓冲池中查找CellMyCell * cell = [tableView dequeueReusableCellWithIdentifier:cellId];//如果没有查找到if (!cell){//从xib中加载cellcell = [[[NSBundle mainBundle] loadNibNamed:@"MyCell" owner:nil options:nil] firstObject];}//赋值[cell setFood:self.foods[indexPath.row]];return cell;}
履行footViewDelegate的方法,用于刷新当前的tableView
#pragma mark - 履行 FootLoadDelegate 的协议方法
-(void)loadData:(FootLoad *)foodLoad
{//随机的一个数字int random = arc4random()%(self.foods.count);//根据随机数字 取出模型foodFood * food = self.foods[random];//将 模型对象 添加到控制器的foods[self.foods addObject:food];//刷新tableView[self.tableView reloadData];//滚动数据NSIndexPath * indexPath = [NSIndexPath indexPathForRow:self.foods.count - 1 inSection:0];[self.tableView scrollToRowAtIndexPath:indexPath atScrollPosition:UITableViewScrollPositionTop animated:YES];//最下边的滚到最上面}#pragma mark - 隐藏信息栏
-(BOOL)prefersStatusBarHidden
{return YES;
}