给后台做缓存优化
除了商品模块要用缓存,其他模块也要用缓存 --> 抽取缓存服务供其他模块使用,并且把像缓存这样的简单服务全部封装在一个公共服务模块里面.
一、搭建环境 - 创建公共服务模块 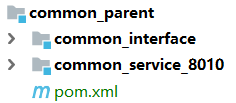
![]()
1.导入依赖以及打包插件:
<dependencies><!--公共依赖-依赖接口部分(common_interface)--><dependency><groupId>com.zhengqing</groupId><artifactId>common_interface</artifactId><version>1.0-SNAPSHOT</version></dependency><!--springboot支持--><dependency><groupId>org.springframework.boot</groupId><artifactId>spring-boot-starter-web</artifactId></dependency><!--springboot测试--><dependency><groupId>org.springframework.boot</groupId><artifactId>spring-boot-starter-test</artifactId></dependency><!--eureka客户端支持 --><dependency><groupId>org.springframework.cloud</groupId><artifactId>spring-cloud-starter-netflix-eureka-client</artifactId></dependency><!--引入swagger支持--><dependency><groupId>io.springfox</groupId><artifactId>springfox-swagger2</artifactId><version>2.9.2</version></dependency><!-- https://mvnrepository.com/artifact/io.springfox/springfox-swagger-ui --><dependency><groupId>io.springfox</groupId><artifactId>springfox-swagger-ui</artifactId><version>2.9.2</version></dependency><!--配置中心支持--><dependency><groupId>org.springframework.cloud</groupId><artifactId>spring-cloud-starter-config</artifactId></dependency><!--jedis依赖--><!-- https://mvnrepository.com/artifact/redis.clients/jedis --><dependency><groupId>redis.clients</groupId><artifactId>jedis</artifactId><version>2.9.0</version></dependency>
</dependencies><!--打包插件依赖-->
<build><plugins><plugin><groupId>org.springframework.boot</groupId><artifactId>spring-boot-maven-plugin</artifactId><configuration><mainClass>com.zhengqing.aigou.CommonApplication_8010</mainClass><layout>ZIP</layout></configuration><executions><execution><goals><goal>repackage</goal></goals></execution></executions></plugin></plugins>
</build>
2.配置: -到8001中拷贝一份修改

github上面配置:

3.入口类:
@SpringBootApplication
@EnableEurekaClient
public class CommonApplication_8010 {public static void main(String[] args) {SpringApplication.run(CommonApplication_8010.class);}
}
4.swagger配置: - 到8001中拷贝一份修改一下即可
@Configuration
@EnableSwagger2
public class Swagger2 {@Beanpublic Docket createRestApi() {return new Docket(DocumentationType.SWAGGER_2).apiInfo(apiInfo()).select()//对外暴露服务的包,以controller的方式暴露,所以就是controller的包..apis(RequestHandlerSelectors.basePackage("com.zhengqing.aigou.controller")).paths(PathSelectors.any()).build();}private ApiInfo apiInfo() {return new ApiInfoBuilder().title("公共服务api").description("公共服务接口文档说明").contact(new Contact("郑清", "", "960869719@qq.com")).version("1.0").build();}
}
5.网关配置

github上面路径配置:

二、实现缓存
1.![]() 中
中
工具类:
/*** 获取连接池对象*/
public enum RedisUtils {INSTANCE;static JedisPool jedisPool = null;static {//1 创建连接池配置对象JedisPoolConfig config = new JedisPoolConfig();//2 进行配置-四个配置config.setMaxIdle(1);//最小连接数config.setMaxTotal(11);//最大连接数config.setMaxWaitMillis(5 * 1000L);//最长等待时间  注:要弄长一点config.setTestOnBorrow(true);//测试连接时是否畅通//3 通过配置对象创建连接池对象jedisPool = new JedisPool(config, "127.0.0.1", 6379, 2 * 1000, "root");}//获取连接public Jedis getSource() {return jedisPool.getResource();}//关闭资源public void closeSource(Jedis jedis) {if (jedis != null) { jedis.close(); }}//设置字符值public void set(String key, String value) {Jedis jedis = getSource();jedis.set(key, value);closeSource(jedis);}//获取字符值public String get(String key) {Jedis jedis = getSource();try {return jedis.get(key);} catch (Exception e) {e.printStackTrace();} finally {closeSource(jedis);}return null;}}
2. ![]()
导入依赖:
<dependencies><!--springboot支持--><dependency><groupId>org.springframework.boot</groupId><artifactId>spring-boot-starter-web</artifactId></dependency><!--springboot测试--><dependency><groupId>org.springframework.boot</groupId><artifactId>spring-boot-starter-test</artifactId></dependency><!--负载均衡feign的支持--><dependency><groupId>org.springframework.cloud</groupId><artifactId>spring-cloud-starter-openfeign</artifactId></dependency>
</dependencies>
接口实现 - 负载均衡feign处理 - 对外提供的内部调用接口
@FeignClient(value = "AIGOU-COMMON",fallbackFactory = RedisClientFallbackFactory.class )//服务提供者的名称
public interface RedisClient {@RequestMapping(value = "/redis",method = RequestMethod.POST)void set(@RequestParam("key")String key, @RequestParam("value")String value);  //注:使用feign时,如果发送的是get请求,需要加@RequestParam注解修饰,controller可不加,建议加上@RequestMapping(value = "/redis",method = RequestMethod.GET)String get(@RequestParam("key")String key);
}
@Component
public class RedisClientFallbackFactory implements FallbackFactory<RedisClient> {@Overridepublic RedisClient create(Throwable throwable) {return new RedisClient() {@Overridepublic void set(String key,String value) {}@Overridepublic String get(String key) {return null;}};}
}8010中controller实现
@RestController
public class RedisController implements RedisClient {@RequestMapping(value = "/redis",method = RequestMethod.POST)@Overridepublic void set(@RequestParam("key")String key, @RequestParam("value")String value) {RedisUtils.INSTANCE.set(key, value);}@RequestMapping(value = "/redis",method = RequestMethod.GET)@Overridepublic String get(@RequestParam("key")String key) {return RedisUtils.INSTANCE.get(key);}
}
3.启动测试:

不要忘了redis启动哦:redis-server.exe redis.conf
注:redis的密码


http://127.0.0.1:7001/

http://127.0.0.1:8010/swagger-ui.html

http://127.0.0.1:9527/swagger-ui.html

4.postman测试:
 --> 测试结果图:
三、8002 中编写代码
1.导入依赖:
<dependency><groupId>com.zhengqing</groupId><artifactId>product_interface</artifactId><version>1.0-SNAPSHOT</version>
</dependency>
<!--eureka客户端支持 - 内部间调用别人接口-->
<dependency><groupId>org.springframework.cloud</groupId><artifactId>spring-cloud-starter-netflix-eureka-client</artifactId>
</dependency>
<dependency><groupId>com.zhengqing</groupId><artifactId>common_interface</artifactId><version>1.0-SNAPSHOT</version>
</dependency>
<!--json操作-->
<dependency><groupId>com.alibaba</groupId><artifactId>fastjson</artifactId><version>1.1.30</version>
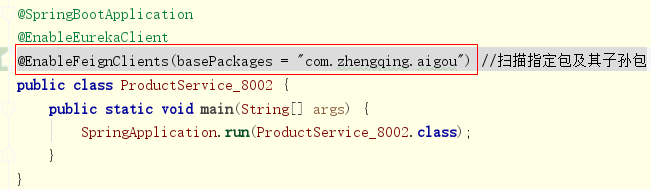
</dependency>2.别忘记8002入口类上加入扫包:
3.service实现类中代码处理 具体代码看项目源码...
@Autowired
private RedisClient redisClient;
@Override
public List<ProductType> treeData() {String productTypeInRedis = redisClient.get("productType_in_redis");if (StringUtils.isNotBlank(productTypeInRedis)) {System.out.println("cache....");return JSONArray.parseArray(productTypeInRedis, ProductType.class);}else{System.out.println("db....");// 1 递归方案效率低,要发多次sql//return getTreeDataRecursion(0L);// 2 循环方案,只需发一条sqlList<ProductType> treeDataByDb = getTreeDataLoop(0L);System.out.println(treeDataByDb);redisClient.set("productType_in_redis", JSONArray.toJSONString(treeDataByDb));return treeDataByDb;}
}//增删改已经不是传统的了,要做同步redis-清空缓存,下次查询时,自动查询数据库
@Override
public boolean insert(ProductType entity) {redisClient.set("productType_in_redis", "");return super.insert(entity);
}
@Override
public boolean deleteById(Serializable id) {redisClient.set("productType_in_redis", "");return super.deleteById(id);
}
@Override
public boolean updateById(ProductType entity) {redisClient.set("productType_in_redis", "");return super.updateById(entity);
}
4.启动前后端一起测试一把
四、类型主页页面静态化实现
1.创建一个新的module,导入已经准备好的前端资源

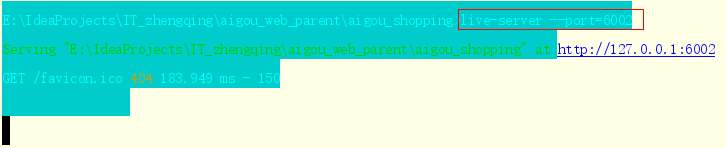
2.运行项目 - 搭建一个前端服务器
npm install -g live-server --> 热部署
live-server --port=6002 --> 启动运行http://127.0.0.1:6002


3.页面处理服务(公共服务)搭建
①![]() - 暴露一个服务,根据特定模板传入特定数据,生成静态页面到特定位置
- 暴露一个服务,根据特定模板传入特定数据,生成静态页面到特定位置
@FeignClient(value = "AIGOU-COMMON",fallbackFactory = PageClientFallbackFactory.class )//服务提供者的名称
public interface PageClient {//根据特定模板传入特定数据,生成静态页面到特定位置@RequestMapping(value = "/page",method = RequestMethod.POST)void genStaticPage(@RequestBody Map<String, Object> params);
}
@Component
public class PageClientFallbackFactory implements FallbackFactory<PageClient>{@Overridepublic PageClient create(Throwable throwable) {return new PageClient() {@Overridepublic void genStaticPage(Map<String, Object> params) {System.out.println("....");}};}
}②![]()
a: 导入velocity依赖
<dependency><groupId>org.apache.velocity</groupId><artifactId>velocity</artifactId><version>1.7</version>
</dependency>
b: VelocityUtils 工具类
public class VelocityUtils {private static Properties p = new Properties();static {p.setProperty(Velocity.FILE_RESOURCE_LOADER_PATH, "");p.setProperty(Velocity.ENCODING_DEFAULT, "UTF-8");p.setProperty(Velocity.INPUT_ENCODING, "UTF-8");p.setProperty(Velocity.OUTPUT_ENCODING, "UTF-8");}/*** 返回通过模板,将model中的数据替换后的内容* @param model* @param templateFilePathAndName* @return*/public static String getContentByTemplate(Object model, String templateFilePathAndName){try {Velocity.init(p);Template template = Velocity.getTemplate(templateFilePathAndName);VelocityContext context = new VelocityContext();context.put("model", model);StringWriter writer = new StringWriter();template.merge(context, writer);String retContent = writer.toString();writer.close();return retContent;} catch (Exception e) {e.printStackTrace();}return "";}/*** 根据模板,静态化model到指定的文件 模板文件中通过访问model来访问设置的内容* * @param model* 数据对象* @param templateFilePathAndName* 模板文件的物理路径* @param targetFilePathAndName* 目标输出文件的物理路径*/public static void staticByTemplate(Object model, String templateFilePathAndName, String targetFilePathAndName) {try {Velocity.init(p);Template template = Velocity.getTemplate(templateFilePathAndName);VelocityContext context = new VelocityContext();context.put("model", model);FileOutputStream fos = new FileOutputStream(targetFilePathAndName);BufferedWriter writer = new BufferedWriter(new OutputStreamWriter(fos, "UTF-8"));// 设置写入的文件编码,解决中文问题template.merge(context, writer);writer.close();} catch (Exception e) {e.printStackTrace();}}/*** 静态化内容content到指定的文件* * @param content* @param targetFilePathAndName*/public static void staticBySimple(Object content, String targetFilePathAndName) {VelocityEngine ve = new VelocityEngine();ve.init(p);String template = "${content}";VelocityContext context = new VelocityContext();context.put("content", content);StringWriter writer = new StringWriter();ve.evaluate(context, writer, "", template);try {FileWriter fileWriter = new FileWriter(new File(targetFilePathAndName));fileWriter.write(writer.toString());fileWriter.close();} catch (IOException e) {e.printStackTrace();}}}c: controller实现
@RestController
public class PageController implements PageClient {@Override@RequestMapping(value = "/page",method = RequestMethod.POST)public  void genStaticPage(@RequestBody Map<String,Object> params){Object model = params.get("model");String templatePath = (String) params.get("templatePath");String staticPagePath = (String) params.get("staticPagePath");System.out.println(model);System.out.println(templatePath);System.out.println(staticPagePath);VelocityUtils.staticByTemplate(model,templatePath,staticPagePath);}
}
4.postman测试:
注:map接收用对象传递

后端成功打印...

5. 商品类型服务调用
![]() 中模板
中模板

service实现类中编写代码:
@Service
public class ProductTypeServiceImpl extends ServiceImpl<ProductTypeMapper, ProductType> implements IProductTypeService {@Autowiredprivate RedisClient redisClient;@Autowiredprivate PageClient pageClient;@Autowiredprivate ProductTypeMapper productTypeMapper;@Overridepublic List<ProductType> treeData() {String productTypeInRedis = redisClient.get("productType_in_redis");if (StringUtils.isNotBlank(productTypeInRedis)) {System.out.println("cache....");return JSONArray.parseArray(productTypeInRedis, ProductType.class);}else{System.out.println("db....");// 1 递归方案效率低,要发多次sql//return getTreeDataRecursion(0L);// 2 循环方案,只需发一条sqlList<ProductType> treeDataByDb = getTreeDataLoop(0L);System.out.println(treeDataByDb);redisClient.set("productType_in_redis", JSONArray.toJSONString(treeDataByDb));return treeDataByDb;}}//增删改已经不是传统的了,要做同步redis-清空缓存,下次查询时,自动查询数据库@Overridepublic boolean insert(ProductType entity) {//方案1://redisClient.set("productType_in_redis", "");//方案2:为了配置页面静态,这种方案还要好一点super.insert(entity); //先做增删改,再做同步synchronizedOpr();return true;}@Overridepublic boolean deleteById(Serializable id) {//redisClient.set("productType_in_redis", "");super.deleteById(id);synchronizedOpr();return true;}@Overridepublic boolean updateById(ProductType entity) {//redisClient.set("productType_in_redis", "");super.updateById(entity);synchronizedOpr();return true;}//增删改让商品类型发生改变,都要重新生成静态页面还要更新缓存private void synchronizedOpr(){//更新缓存List<ProductType> allProductType = getTreeDataLoop(0L);redisClient.set("productType_in_redis", JSONArray.toJSONString(allProductType));//是否每次都要从数据库查询---是的,就可以优化原来代码,同步修改缓存. 就不用查询的时候从数据库获取//先静态化类型Map<String,Object> productTypeParams = new HashMap<>();Object model = null;productTypeParams.put("model",allProductType );productTypeParams.put("templatePath","E:\\IdeaProjects\\IT_zhengqing\\aigou_parent\\product_parent\\product_service_8002\\src\\main\\resources\\template\\productType\\product.type.vm" );productTypeParams.put("staticPagePath","E:\\IdeaProjects\\IT_zhengqing\\aigou_parent\\product_parent\\product_service_8002\\src\\main\\resources\\template\\productType\\product.type.vm.html" );pageClient.genStaticPage(productTypeParams);//在静态化主页Map<String,Object> IndexParams = new HashMap<>();Map<String, Object> modelMap = new HashMap<>();modelMap.put("staticRoot", "E:\\IdeaProjects\\IT_zhengqing\\aigou_parent\\product_parent\\product_service_8002\\src\\main\\resources\\");IndexParams.put("model",modelMap );IndexParams.put("templatePath","E:\\IdeaProjects\\IT_zhengqing\\aigou_parent\\product_parent\\product_service_8002\\src\\main\\resources\\template\\home.vm" );IndexParams.put("staticPagePath","E:\\IdeaProjects\\IT_zhengqing\\aigou_web_parent\\aigou_shopping\\home.html" );pageClient.genStaticPage(IndexParams);}//    =========================================================================private List<ProductType> getTreeDataLoop(long l) {//返回数据 一级类型,下面挂了子子孙孙类型List<ProductType> result = new ArrayList<>();//1 获取所有的类型List<ProductType> productTypes = productTypeMapper.selectList(null);//2)遍历所有的类型Map<Long,ProductType> productTypesDto = new HashMap<>();for (ProductType productType : productTypes) {productTypesDto.put(productType.getId(), productType);}for (ProductType productType : productTypes) {Long pid = productType.getPid();// ①如果没有父亲就是一级类型 放入返回列表中if (pid.longValue() == 0){result.add(productType);}else{// ②如果有父亲就是把自己当做一个儿子就ok//方案1:遍历比较所有所有里面获取 两层for 10*10
//                for (ProductType productTypeTmp : productTypes) { 1 10 2 10 310 40 10
//                    if (productTypeTmp.getId()==pid){
//                        productTypeTmp.getChildren().add(productType);
//                    }
//                }//方案2:通过Map建立id和类型直接关系,以后通过pid直接获取父亲 10+10ProductType parent = productTypesDto.get(pid);parent.getChildren().add(productType);}}return result;}/*** 递归获取无限极数据*    ①自己调用自己*    ②要有出口* @return*/private List<ProductType> getTreeDataRecursion(Long id) {//0List<ProductType> children = getAllChildren(id); //1 2//出口if (children == null || children.size()<1){return null;}for (ProductType productType : children) {//1 3 4 自己调用自己List<ProductType> children1 = getTreeDataRecursion(productType.getId());productType.setChildren(children1);}return children;}private List<ProductType> getAllChildren(Long pid){Wrapper wrapper = new EntityWrapper<ProductType>();wrapper.eq("pid", pid);return productTypeMapper.selectList(wrapper);}}
6.测试: - 注意还要启动redis哦~ 

http://127.0.0.1:6001/#/productType

postman测试: - 发送删除请求-->前端会生成![]() + 后端生成
+ 后端生成 ![]()

http://127.0.0.1:6002/home.html 查看数据是否正确
源码和文档:https://pan.baidu.com/s/1x1BpwBTSiKhSjEB9ZSGM4A