1. JDBC 基本操作
1.1 JDBC 概述
- 是一种用于执行 SQL 语句的 Java API,为多种关系型数据库提供统一访问

- SUN公司制定了规范JDBC
- DriverManager 类:管理各种不同的 JDBC 驱动
- Connection 接口:连接数据库用
- Statement 接口和 PreparedStatement 接口:发送SQL请求
- ResultSet 接口:接收返回值
JDBC访问数据库的步骤:
- 加载一个 Driver 驱动
- 创建数据库连接 (Connection)
- 创建 SQL 命令发送器 Statement
- 通过 Statement 发送 SQL 命令并得到结果 ResultSet
- 处理结果(select语句返回的结果)
- 关闭数据库资源(ResultSet、Statement、Connection)
1.2 添加、修改、删除操作
url 的一般后缀:useSSL=false&useUnicode=true&characterEncoding=utf8&serverTimezone=Asia/Shanghai
public static void main(String[] args) {
    Connection conn = null;Statement stmt = null;try {
    String driver = "com.mysql.cj.jdbc.Driver";String url = "jdbc:mysql://127.0.0.1:3306/adb?useSSL=false&useUnicode=true&characterEncoding=utf8&serverTimezone=Asia/Shanghai";String user = "root";String passwd = "root";// 1.加载驱动(添加 jar 包)Class.forName(driver);// 2.建立连接conn = DriverManager.getConnection(url, user, passwd);// 3.创建SQL命令的发送器stmt = conn.createStatement();// 4.准备一个SQL命令,并使用SQL发送器发送,并返回结果String sql = "INSERT INTO dept VALUES(50, '教学部', '北京')";                    // 插入操作String sql = "UPDATE dept SET dname = '试验部' WHERE deptno = 50";               // 更新操作String sql = "DELETE FROM dept WHERE deptno = 50";                              // 删除操作int res = stmt.executeUpdate(sql);    // INSERT、UPDATE、DELETE 操作// 5.处理结果if (res > 0) {
    System.out.println("添加成功");} else {
    System.out.println("添加失败");}} catch (SQLException e) {
    e.printStackTrace();} catch (ClassNotFoundException e) {
    e.printStackTrace();} finally {
    // 6.关闭资源try {
    if (stmt != null) {
    stmt.close();}} catch (SQLException e) {
    e.printStackTrace();}try {
    if (conn != null) {
    conn.close();}} catch (SQLException e) {
    e.printStackTrace();}}
}
1.3 查询操作
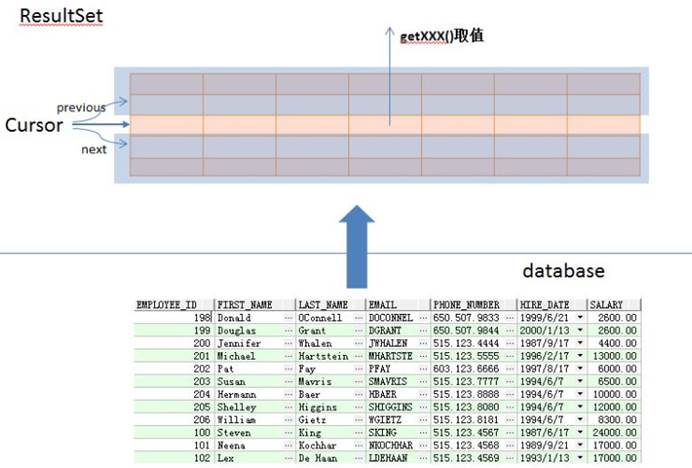
ResultSet对象自动维护指向当前数据行的游标。每调用一次next()方法,游标向下移动一行。
初始状态下记录指针指向第一条记录的前面,通过next()方法指向第一条记录。循环完毕后指向最后一条记录的后面。
public static void main(String[] args) {
    Connection conn = null;Statement stmt = null;ResultSet rs = null;try {
    String driver = "com.mysql.cj.jdbc.Driver";String url = "jdbc:mysql://127.0.0.1:3306/adb?useSSL=false&useUnicode=true&characterEncoding=utf8&serverTimezone=Asia/Shanghai";String user = "root";String passwd = "root";// 1.加载驱动(添加 jar 包)Class.forName(driver);// 2.建立连接conn = DriverManager.getConnection(url, user, passwd);// 3.创建SQL命令的发送器stmt = conn.createStatement();// 4.准备一个SQL命令,并使用SQL发送器发送,并返回结果String sql = "SELECT * FROM emp";rs = stmt.executeQuery(sql);                    // 【 executeQuery 操作】!!!!!!!!!!!!// 5.处理结果System.out.println("编号\t姓名\t入职时间\t薪水");while (rs.next()) {
    // 获取当前行各列的数据int empno = rs.getInt("empno");            // 通过名字获取值!!!!String ename = rs.getString("ename");Date hireDate = rs.getDate("hireDate");double sal = rs.getDouble("sal");// 输出数据【或者可以将数据通过 构造方法 放到实体类中,最后返回实体类的集合List】System.out.println(empno + "\t" + ename + "\t" + hireDate + "\t" + sal);}} catch (SQLException e) {
    e.printStackTrace();} catch (ClassNotFoundException e) {
    e.printStackTrace();} finally {
    // 6.关闭资源try {
    if (rs != null) {
    rs.close();}} catch (SQLException e) {
    e.printStackTrace();}try {
    if (stmt != null) {
    stmt.close();}} catch (SQLException e) {
    e.printStackTrace();}try {
    if (conn != null) {
    conn.close();}} catch (SQLException e) {
    e.printStackTrace();}}
}
可以定义实体类进行结果的封装
2. JDBC 高级操作
2.1 使用PreparedStatement
案例:模拟淘宝登录功能。在前台输入用户名和密码,后台进行验证,验证结果反馈给前台
-- 创建用户表 t_user
CREATE TABLE t_user(user_id  VARCHAR(10) PRIMARY KEY , --字符串做主键无法实现自增real_name VARCHAR(3) NOT NULL,passwd VARCHAR(6) NOT NULL,money  DOUBLE(10,2));
-- 插入用户INSERT INTO t_user VALUES('zhangsan','张三','zhangs',5000);INSERT INTO t_user VALUES('lisi','李四','******',5000);
Java代码:
public class LoginDemo {
    /** 模拟前台 */public static void main(String[] args) {
    Scanner in = new Scanner(System.in);System.out.print("输入用户名:");String userId = in.next();System.out.print("输入密码:");String pwd = in.next();// 调用后台判断登录是否成功,并返回结果User user = login(userId, pwd);// 在前台输出结果if (user != null) {
    System.out.println("欢迎您:" + user.getRealName());} else {
    System.out.println("登录失败");}}public static User login(String userId, String pwd) {
    Connection conn = null;Statement stmt = null;ResultSet rs = null;User loginUser = null;try {
    String driver = "com.mysql.cj.jdbc.Driver";String url = "jdbc:mysql://127.0.0.1:3306/adb?useSSL=false&useUnicode=true&characterEncoding=utf8&serverTimezone=Asia/Shanghai";String user = "root";String passwd = "root";Class.forName(driver);conn = DriverManager.getConnection(url, user, passwd);stmt = conn.createStatement();// 使用 Statement 需要拼接 SQL语句 !!!!!!!String sql = "SELECT * FROM t_user WHERE user_id = '" + userId+ "' AND passwd = '" + pwd + "'";rs = stmt.executeQuery(sql);if (rs.next()) {
    String realName = rs.getString("real_name");double money = rs.getDouble("money");loginUser = new User(userId, realName, pwd, money);// String userId = rs.getString("user_id"); 不需要获取,用户输入的// String passwd = rs.getString("passwd");}} catch (SQLException e) {
    e.printStackTrace();} catch (ClassNotFoundException e) {
    e.printStackTrace();} finally {
    if (rs != null) {
    try {
    rs.close();} catch (SQLException throwables) {
    throwables.printStackTrace();}}if (stmt != null) {
    try {
    stmt.close();} catch (SQLException throwables) {
    throwables.printStackTrace();}}if (conn != null) {
    try {
    conn.close();} catch (SQLException throwables) {
    throwables.printStackTrace();}}}return loginUser;}
}class User {
    private String userId;private String realName;private String passwd;private Double money;public User() {
    }public User(String userId, String realName, String passwd, Double money) {
    this.userId = userId;this.realName = realName;this.passwd = passwd;this.money = money;}// getter setter toString方法
}
此时随便输入用户名,密码后边跟 'or'1'='1,也可以登录,没有安全性
=====》 使用 PreparedStatment 进行操作
PreparedStatement pstmt = null;String sql = "SELECT * FROM t_user WHERE user_id = ? AND passwd = ?";  // ? 为占位符
pstmt = conn.prepareStatement(sql);
// 将占位符换为真正的参数
pstmt.setString(1, userId);
pstmt.setString(2, pwd);rs = pstmt.executeQuery();
- PreparedStatment 继承自 Statement
- PreparedStatment 不是字符串的拼接,需要传入参数
- PreparedStatment 安全性高,可以避免SQL 注入,性能高 (同一个sql语句,只第一次处理的时候费时,后续速度变快)
2.2 使用事务
- 在JDBC中,事务操作缺省都是自动提交的
- 一条对数据库的DML(INSERT、UPDATE、DELETE)代表一项事务操作
- 操作成功自动调用 commit() 提交,失败自动调用 rollback()
public static void main(String[] args) {
    Connection conn = null;Statement stmt = null;try {
    String driver = "com.mysql.cj.jdbc.Driver";String url = "jdbc:mysql://127.0.0.1:3306/adb?useSSL=false&useUnicode=true&characterEncoding=utf8&serverTimezone=Asia/Shanghai";String user = "root";String passwd = "root";Class.forName(driver);conn = DriverManager.getConnection(url, user, passwd);stmt = conn.createStatement();// 设置事务不再自动提交conn.setAutoCommit(false);stmt.executeUpdate("UPDATE t_user SET money = money - 2000 WHERE user_id = 'lisi'");stmt.executeUpdate("UPDATE t_user SET money = money + 2000 WHERE user_id = 'zhangsan'");// 事务成功结束conn.commit();} catch (SQLException e) {
    try {
    // 事务异常结束,则回滚conn.rollback();} catch (SQLException throwables) {
    throwables.printStackTrace();}e.printStackTrace();} catch (ClassNotFoundException e) {
    e.printStackTrace();} finally {
    try {
    if (stmt != null) {
    stmt.close();}} catch (SQLException e) {
    e.printStackTrace();}try {
    if (conn != null) {
    conn.close();}} catch (SQLException e) {
    e.printStackTrace();}}
}
3. JDBC总结
Connection接口
- 作用:代表数据库连接
DriverManager类
- 作用:管理一组 JDBC 驱动程序的基本服务
- 应用程序不再需要使用 Class.forName() 显式地加载 JDBC 驱动程序。在调用 getConnection 方法时,DriverManager 会试着从初始化时加载的那些驱动程序以及使用与当前 applet 或应用程序相同的类加载器显式加载的那些驱动程序中查找合适的驱动程序。

Statement接口
- 作用:用于将 SQL 语句发送到数据库中,或理解为执行sql语句
- 有三种 Statement对象:
- Statement:用于执行不带参数的简单SQL语句;
- PreparedStatement(从 Statement 继承):用于执行带或不带参数的预编译SQL语句;
- CallableStatement(从PreparedStatement 继承):用于执行数据库存储过程的调用。
| 方法 | 作用 |
|---|---|
| ResultSet executeQuery(String sql) | 执行SQL查询并获取到ResultSet对象 |
| boolean execute(String sql) | 可以执行任意SQL语句,然后获得一个布尔值,表示是否返回ResultSet |
| int executeUpdate(String sql) | 可以执行插入、删除、更新等操作,返回值是执行该操作所影响的行数 |
PreparedStatement接口
- 关系:public interface PreparedStatement extends Statement
- 区别
- PreparedStatment安全性高,可以避免SQL注入
- PreparedStatment简单不繁琐,不用进行字符串拼接
- PreparedStatment性能高,用在执行多个相同数据库DML操作时
ResultSet接口
- ResultSet对象是executeQuery()方法的返回值,它被称为结果集,它代表符合SQL语句条件的所有行,并且它通过一套getXXX方法(这些get方法可以访问当前行中的不同列)提供了对这些行中数据的访问
- ResultSet里的数据一行一行排列,每行有多个字段,且有一个记录指针,指针所指的数据行叫做当前数据行,我们只能来操作当前的数据行。我们如果想要取得某一条记录,就要使用ResultSet的next()方法 ,如果我们想要得到ResultSet里的所有记录,就应该使用while循环
- ResultSet对象自动维护指向当前数据行的游标。每调用一次next()方法,游标向下移动一行
- 初始状态下记录指针指向第一条记录的前面,通过next()方法指向第一条记录。循环完毕后指向最后一条记录的后面。
| 方法名 | 说 明 |
|---|---|
| boolean next() | 将光标从当前位置向下移动一行 |
| boolean previous() | 游标从当前位置向上移动一行 |
| void close() | 关闭ResultSet 对象 |
| int getInt(int colIndex) | 以int形式获取结果集当前行指定列号值 |
| int getInt(String colLabel) | 以int形式获取结果集当前行指定列名值 |
| float getFloat(int colIndex) | 以float形式获取结果集当前行指定列号值 |
| Float getFloat(String colLabel) | 以float形式获取结果集当前行指定列名值 |
| String getString(int colIndex) | 以String 形式获取结果集当前行指定列号值 |
| StringgetString(String colLabel) | 以String形式获取结果集当前行指定列名值 |
4. 员工管理系统
功能:查询所有 按照编号查询 添加员工 更新员工 删除员工
4.1 搭建项目框架
- 创建项目 empmgr
- 添加jar包
- 创建包
- com.bjsxt.dao 后台:存放访问数据库的接口 EmployeeDao
- com.bjsxt.dao.impl 后台: 存放访问数据库的实现类 EmployeeDaoImpl
- com.bjsxt.entity 后台:存放实体类 Employee
- com.bjsxt.test 前台
- com.bjsxt.util 工具类,提取数据库常用操作便于重复调用,避免代码重复
- 创建实体类Employee
- 创建后台的接口EmployeeDao和实现类EmployeeDaoImpl
public List<Employee> findAll();public Employee findById(int empno);public int save(Employee emp);public int update(Employee emp);public void delete(int empno);

4.2 查询所有员工
后台方法:
public List<Employee> findAll() {
    String driver = "com.mysql.cj.jdbc.Driver";String url = "jdbc:mysql://127.0.0.1:3306/adb?useSSL=false&useUnicode=true&characterEncoding=utf8&serverTimezone=Asia/Shanghai";String user = "root";String password = "root";Connection conn = null;Statement stmt = null;ResultSet rs = null;List<Employee> employeeList = new ArrayList<>();try {
    Class.forName(driver);conn = DriverManager.getConnection(url, user, password);stmt = conn.createStatement();String sql = "SELECT * FROM emp";rs = stmt.executeQuery(sql);while (rs.next()) {
    Employee emp = new Employee(rs.getInt("empno"), rs.getString("ename"),rs.getString("job"), rs.getInt("mgr"),rs.getDate("hireDate"), rs.getDouble("sal"),rs.getDouble("comm"), rs.getInt("deptno"));employeeList.add(emp);}} catch (ClassNotFoundException e) {
    e.printStackTrace();} catch (SQLException throwables) {
    throwables.printStackTrace();} finally {
    if (rs != null) {
    try {
    rs.close();} catch (SQLException throwables) {
    throwables.printStackTrace();}}if (stmt != null) {
    try {
    stmt.close();} catch (SQLException throwables) {
    throwables.printStackTrace();}}if (conn != null) {
    try {
    conn.close();} catch (SQLException throwables) {
    throwables.printStackTrace();}}}return employeeList;
}
前台输出:
public static void findAll() {
    EmployeeDao employeeDao = new EmployeeDaoImpl();List<Employee> employeeList = employeeDao.findAll();// 输出结果if (employeeList != null && !employeeList.isEmpty()) {
    System.out.println("编号\t姓名\t岗位\t上级编号\t入职时间\t薪水\t补助\t所属部门编号");for (Employee employee : employeeList) {
    System.out.println(employee.getEmpno() + "\t" + employee.getEname()+ "\t" + employee.getJob() + "\t" + employee.getMgr()+ "\t" + employee.getHireDate() + "\t" + employee.getSal()+ "\t" + employee.getComm() + "\t" + employee.getDeptno());}}
}
4.3 查询指定编号的员工
后台方法:
public Employee findById(int empno) {
    String driver = "com.mysql.cj.jdbc.Driver";String url = "jdbc:mysql://127.0.0.1:3306/adb?useSSL=false&useUnicode=true&characterEncoding=utf8&serverTimezone=Asia/Shanghai";String user = "root";String password = "root";Connection conn = null;PreparedStatement pstmt = null;ResultSet rs = null;Employee emp = null;try {
    Class.forName(driver);conn = DriverManager.getConnection(url, user, password);String sql = "SELECT * FROM emp WHERE empno = ?";pstmt = conn.prepareStatement(sql);pstmt.setInt(1, empno);rs = pstmt.executeQuery();if (rs.next()) {
    emp = new Employee(rs.getInt("empno"), rs.getString("ename"),rs.getString("job"), rs.getInt("mgr"),rs.getDate("hireDate"), rs.getDouble("sal"),rs.getDouble("comm"), rs.getInt("deptno"));}} catch (ClassNotFoundException e) {
    e.printStackTrace();} catch (SQLException throwables) {
    throwables.printStackTrace();} finally {
    if (rs != null) {
    try {
    rs.close();} catch (SQLException throwables) {
    throwables.printStackTrace();}}if (pstmt != null) {
    try {
    pstmt.close();} catch (SQLException throwables) {
    throwables.printStackTrace();}}if (conn != null) {
    try {
    conn.close();} catch (SQLException throwables) {
    throwables.printStackTrace();}}}return emp;
}
前台输出:
public static void findById() {
    Scanner in = new Scanner(System.in);System.out.print("请输入员工编号:");int empno = in.nextInt();EmployeeDao employeeDao = new EmployeeDaoImpl();Employee employee = employeeDao.findById(empno);if (employee == null) {
    System.out.println("查无此人");} else {
    System.out.println("编号\t姓名\t岗位\t上级编号\t入职时间\t薪水\t补助\t所属部门编号");System.out.println(employee.getEmpno() + "\t" + employee.getEname()+ "\t" + employee.getJob() + "\t" + employee.getMgr()+ "\t" + employee.getHireDate() + "\t" + employee.getSal()+ "\t" + employee.getComm() + "\t" + employee.getDeptno());}
}
4.4 初步提取 DBUtil 工具类
从上面的查询所有及查询一个员工来看,代码存在大量重复,且数据库连接的 user, password 等字段出现多次,一旦改变就需要改多地
? ===》 提取为数据库访问工具类DBUtil(第一版)
public abstract class DBUtil {
    private DBUtil() {
    }/*** 获取数据库连接* @return*/public static Connection getConnection() {
    String driver = "com.mysql.cj.jdbc.Driver";String url = "jdbc:mysql://127.0.0.1:3306/adb?useSSL=false&useUnicode=true&characterEncoding=utf8&serverTimezone=Asia/Shanghai";String user = "root";String password = "root";Connection conn = null;try {
    Class.forName(driver);conn = DriverManager.getConnection(url, user, password);} catch (ClassNotFoundException e) {
    e.printStackTrace();} catch (SQLException throwables) {
    throwables.printStackTrace();}return conn;}/*** 关闭所有连接* @param rs* @param stmt* @param conn*/public static void closeAll(ResultSet rs, Statement stmt, Connection conn) {
    if (rs != null) {
    try {
    rs.close();} catch (SQLException throwables) {
    throwables.printStackTrace();}}if (stmt != null) {
    try {
    stmt.close();} catch (SQLException throwables) {
    throwables.printStackTrace();}}if (conn != null) {
    try {
    conn.close();} catch (SQLException throwables) {
    throwables.printStackTrace();}}}
}
使用 DBUtil 工具类:
// 查询所有
public List<Employee> findAll() {
    Connection conn = null;PreparedStatement pstmt = null;ResultSet rs = null;List<Employee> employeeList = new ArrayList<>();try {
    conn = DBUtil.getConnection();String sql = "SELECT * FROM emp";pstmt = conn.prepareStatement(sql);rs = pstmt.executeQuery();while (rs.next()) {
    Employee emp = new Employee(rs.getInt("empno"), rs.getString("ename"),rs.getString("job"), rs.getInt("mgr"),rs.getDate("hireDate"), rs.getDouble("sal"),rs.getDouble("comm"), rs.getInt("deptno"));employeeList.add(emp);}} catch (SQLException throwables) {
    throwables.printStackTrace();} finally {
    DBUtil.closeAll(rs, pstmt, conn);}return employeeList;
}// 通过 empno 查询
public Employee findById(int empno) {
    Connection conn = null;PreparedStatement pstmt = null;ResultSet rs = null;Employee emp = null;try {
    conn = DBUtil.getConnection();String sql = "SELECT * FROM emp WHERE empno = ?";pstmt = conn.prepareStatement(sql);pstmt.setInt(1, empno);rs = pstmt.executeQuery();if (rs.next()) {
    emp = new Employee(rs.getInt("empno"), rs.getString("ename"),rs.getString("job"), rs.getInt("mgr"),rs.getDate("hireDate"), rs.getDouble("sal"),rs.getDouble("comm"), rs.getInt("deptno"));}} catch (SQLException throwables) {
    throwables.printStackTrace();} finally {
    DBUtil.closeAll(rs, pstmt, conn);}return emp;
}
4.5 添加员工
添加员工时,需要提前设置 emp 表的 empno 为自动递增的
后台代码:
public int save(Employee emp) {
    Connection conn = null;PreparedStatement pstmt = null;ResultSet rs = null;int res = 0;try {
    conn = DBUtil.getConnection();String sql = "INSERT INTO emp VALUES(null, ?, ?, ?, ?, ?, ?, ?)";pstmt = conn.prepareStatement(sql);pstmt.setString(1, emp.getEname());pstmt.setString(2, emp.getJob());pstmt.setInt(3, emp.getMgr());/*** java.sql.Date/Time/Timestamp extends java.util.Date* java.sql.Date yyyyMMdd* java.sql.Time hhmmss* java.sql.Timestamp yyyyMMddhhmmss 更精确** new java.sql.Date(emp.getHireDate().getTime()) !!!!这样处理*/pstmt.setDate(4, new java.sql.Date(emp.getHireDate().getTime()));pstmt.setDouble(5, emp.getSal());pstmt.setDouble(6, emp.getComm());pstmt.setInt(7, emp.getDeptno());res = pstmt.executeUpdate();} catch (SQLException throwables) {
    throwables.printStackTrace();} finally {
    DBUtil.closeAll(rs, pstmt, conn);}return res;
}
前台代码:
public static void save() {
    // 从键盘输入要添加的员工信息Scanner sc = new Scanner(System.in);System.out.print("输入员工姓名:");String ename = sc.next();System.out.print("输入岗位:");String job = sc.next();System.out.print("输入上级编号:");int mgr = sc.nextInt();System.out.print("输入入职时间(yyyy-MM-dd):");String dateString = sc.next();SimpleDateFormat sdf = new SimpleDateFormat("yyyy-MM-dd");Date hireDate = null;try {
    hireDate = sdf.parse(dateString);} catch (ParseException e) {
    e.printStackTrace();}System.out.print("输入薪水:");double sal = sc.nextDouble();System.out.print("输入津贴:");double comm = sc.nextDouble();System.out.print("输入部门编号:");int deptno = sc.nextInt();// 调用后台完成添加操作并返回结果Employee emp = new Employee(ename, job, mgr, hireDate, sal, comm, deptno);EmployeeDao employeeDao = new EmployeeDaoImpl();int res = employeeDao.save(emp);if (res > 0) {
    System.out.println("添加成功");} else {
    System.out.println("添加失败");}
}
4.6 修改、删除员工
后台代码:
// 修改员工信息
public int update(Employee emp) {
    Connection conn = null;PreparedStatement pstmt = null;ResultSet rs = null;int res = 0;try {
    conn = DBUtil.getConnection();String sql = "UPDATE emp SET job = ?, sal = ?, deptno = ? WHERE empno = ?";pstmt = conn.prepareStatement(sql);pstmt.setString(1, emp.getJob());pstmt.setDouble(2, emp.getSal());pstmt.setInt(3, emp.getDeptno());pstmt.setInt(4, emp.getEmpno());res = pstmt.executeUpdate();} catch (SQLException throwables) {
    throwables.printStackTrace();} finally {
    DBUtil.closeAll(rs, pstmt, conn);}return res;
}// 删除员工信息
public int delete(int empno) {
    Connection conn = null;PreparedStatement pstmt = null;ResultSet rs = null;int res = 0;try {
    conn = DBUtil.getConnection();String sql = "DELETE FROM emp WHERE empno = ?";pstmt = conn.prepareStatement(sql);pstmt.setInt(1, empno);res = pstmt.executeUpdate();} catch (SQLException throwables) {
    throwables.printStackTrace();} finally {
    DBUtil.closeAll(rs, pstmt, conn);}return res;
}
前台代码:
/*** 修改员工*/
public static void update() {
    // 从键盘输入要添加的员工信息Scanner sc = new Scanner(System.in);System.out.print("要修改的员工编号:");int empno = sc.nextInt();System.out.print("输入岗位:");String job = sc.next();System.out.print("输入薪水:");double sal = sc.nextDouble();System.out.print("输入部门编号:");int deptno = sc.nextInt();// 调用后台完成添加操作并返回结果Employee emp = new Employee(empno, job, sal, deptno);EmployeeDao employeeDao = new EmployeeDaoImpl();int res = employeeDao.update(emp);if (res > 0) {
    System.out.println("修改成功");} else {
    System.out.println("修改失败");}
}/*** 删除员工*/
public static void delete() {
    // 从键盘输入要添加的员工信息Scanner sc = new Scanner(System.in);System.out.print("要删除的员工编号:");int empno = sc.nextInt();// 调用后台完成添加操作并返回结果EmployeeDao employeeDao = new EmployeeDaoImpl();int res = employeeDao.delete(empno);if (res > 0) {
    System.out.println("删除成功");} else {
    System.out.println("删除失败");}
}
4.7 完善 DBUtil 工具类
修改、删除员工的功能代码和添加员工非常相似,只是 SQL 语句和传递的具体参数不同,可以提取代码
public abstract class DBUtil {
    private DBUtil() {
    }public static Connection getConnection() {
     //TODO 没有改变}public static void closeAll(ResultSet rs, Statement stmt, Connection conn) {
    //TODO 没有改变}/*** 完成DML操作* @param sql* @param params* @return*/public static int executeUpdate(String sql, Object[] params) {
    Connection conn = null;PreparedStatement pstmt = null;ResultSet rs = null;int res = 0;try {
    conn = DBUtil.getConnection();pstmt = conn.prepareStatement(sql);for (int i = 0; i < params.length; i++) {
    pstmt.setObject(i + 1, params[i]);}res = pstmt.executeUpdate();} catch (SQLException throwables) {
    throwables.printStackTrace();} finally {
    DBUtil.closeAll(rs, pstmt, conn);}return res;}
}
对应的添加、修改、删除语句变为:
public int save(Employee emp) {
    String sql = "INSERT INTO emp VALUES(null, ?, ?, ?, ?, ?, ?, ?)";Object[] params = {
    emp.getEname(), emp.getJob(), emp.getMgr(),new java.sql.Date(emp.getHireDate().getTime()), emp.getSal(),emp.getComm(), emp.getDeptno()};return DBUtil.executeUpdate(sql, params);
}public int update(Employee emp) {
    String sql = "UPDATE emp SET job = ?, sal = ?, deptno = ? WHERE empno = ?";Object[] params = {
    emp.getJob(), emp.getSal(), emp.getDeptno(), emp.getEmpno()};return DBUtil.executeUpdate(sql, params);
}public int delete(int empno) {
    String sql = "DELETE FROM emp WHERE empno = ?";return DBUtil.executeUpdate(sql, new Object[]{
    empno});
}
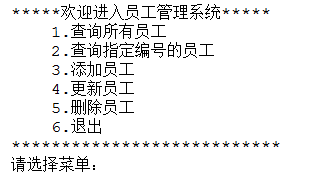
4.8 加入主菜单整合功能
public static void main(String[] args) {
    Scanner input = new Scanner(System.in);do {
    System.out.println("");System.out.println("*****欢迎进入员工管理系统*****");System.out.println("\t1.查询所有员工");System.out.println("\t2.查询指定编号员工");System.out.println("\t3.添加员工信息");System.out.println("\t4.修改员工信息");System.out.println("\t5.删除员工信息");System.out.println("\t6.退出");System.out.println("***************************");System.out.print("请选择菜单:");int choice = input.nextInt();switch (choice) {
    case 1: EmployeeDemo.findAll(); break;case 2: EmployeeDemo.findById(); break;case 3: EmployeeDemo.save(); break;case 4: EmployeeDemo.update();  break;case 5: EmployeeDemo.delete(); break;case 6:System.out.println("谢谢使用");return;default:System.out.println("输入错误");}System.out.println("按任意键继续.........");input.nextLine();input.nextLine(); // 接收任意键继续} while(true);
}
4.9 添加 Properties 类读取数据
避免发布后如果想修改连接属性,还需要去找源文件代码,修改后还需要重新编译的问题
? ==》 增加 jdbc.properties 属性文件,直接从文件中读数据,后期直接修改属性文件中的值即可。
driver=com.mysql.cj.jdbc.Driver
url=jdbc:mysql://127.0.0.1:3306/adb?useSSL=false&useUnicode=true&characterEncoding=utf8&serverTimezone=Asia/Shanghai
user=root
password=root
认识 Properties 类
-
publicclass Properties extends Hashtable一种 map,存储键值对 -
key、value 都是 String
-
获取值: getProperty()
-
设置值: setProperty()
-
写数据到属性文件中: store()
OutputStream os = new FileOutputStream("e:/jdbc.properties"); // 写到磁盘中 Properties props = new Properties(); props.setProperty("user", "root"); props.store(os, "jdbc param"); -
读取属性文件中的值: load()
InputStream is = new FileInputStream("e:/jdbc.properties"); // 从磁盘中读取文件 props.load(is); -
读取项目中的属性文件
Properties props = new Properties();
props.load(DBUtil.class.getResourceAsStream("/jdbc.properties"));
props.getProperty("driver");
通过反射获取内容
在DBUtil中,添加静态代码块,实现类启动后,只获取一次属性文件中的值即可,无需每次创建连接都获取;
static String driver = null;
static String url = null;
static String user = null;
static String password = null;static {
    InputStream is = DBUtil.class.getResourceAsStream("/jdbc.properties");   // DBUtil为当前类类名Properties props = new Properties();try {
    props.load(is);} catch (IOException e) {
    e.printStackTrace();}driver = props.getProperty("driver");url = props.getProperty("url");user = props.getProperty("user");password = props.getProperty("password");
}
4.10 使用 log4j 记录日志
记录异常信息、登录成功失败信息、重要的操作信息等,直接使用 log4j 框架记录日志(注意log4j漏洞,请使用最新版)
log4j日志级别:
FATAL: 非常严重的错误事件,可以会导致应用程序异常中止ERROR: 虽有错误,但仍允许应用程序继续运行WARN: 提示运行环境潜藏着危害INFO: 报告信息,这些信息在粗粒度级别上突出显示应用程序的进程DEBUG: 指细粒度信息事件,对于应用程序的调试最有用
日志格式化字符的含义:
%p:输出日志信息的优先级,即DEBUG,INFO,WARN,ERROR,FATAL。%d:输出日志时间点的日期或时间,默认格式为ISO8601,也可以在其后指定格式,如:%d{yyyy/MM/dd HH:mm:ss,SSS}。%r:输出自应用程序启动到输出该log信息耗费的毫秒数。%t:输出产生该日志事件的线程名。%l:输出日志事件的发生位置,相当于%c.%M(%F:%L)的组合,包括类全名、方法、文件名以及在代码中的行数。例如test.TestLog4j.main(TestLog4j.java:10)。%c:输出日志信息所属的类目,通常就是所在类的全名。%M:输出产生日志信息的方法名。%F:输出日志消息产生时所在的文件名称。%L:输出代码中的行号。%m:输出代码中指定的具体日志信息。%n:输出一个回车换行符,Windows平台为"rn",Unix平台为"n"。%x:输出和当前线程相关联的NDC(嵌套诊断环境),尤其用到像java servlets这样的多客户多线程的应用中。%%:输出一个"%"字符
使用步骤:
-
添加一个 jar包
-
加入属性文件 src 下 log4j.properties
# 记录日志的级别, error及以上的 logfile 代表只启用下面的配置,将日志写到文件中 log4j.rootLogger=error,logfile# 将日志写到控制台 log4j.appender.stdout=org.apache.log4j.ConsoleAppender log4j.appender.stdout.Target=System.err log4j.appender.stdout.layout=org.apache.log4j.SimpleLayout# 将日志写到文件 log4j.appender.logfile=org.apache.log4j.FileAppender log4j.appender.logfile.File=磁盘上的地址 log4j.appender.logfile.layout=org.apache.log4j.PatternLayout log4j.appender.logfile.layout.ConversionPattern=%d{yyyy-MM-dd HH:mm:ss} %l %F %p %m%n -
在代码中记录日志
// 定义一个日志记录器
private static Logger logger = Logger.getLogger(DBUtil.class.getName()); // DBUtil为当前类类名// 使用日志
logger.info("正确的执行了代码");
logger.error("执行出错了" + e); // 输出异常信息
4.11 数据库连接池
连接池解决方案:
- 在应用程序启动时,就预先建立多个数据库连接对象,然后将连接对象保存到连接池中;
- 当用户请求到来时,从池中取出一个连接对象为客户服务,避免了频繁创建
- 当请求完成后,调用 close() 方法,将连接对象放回池中
- 当有多于连接池中连接数的请求时,排队等待
- 应用程序还可根据连接池中连接的使用率,动态增加或减少连接的数量

public class ConnectionPool {
    private static String driver;private static String url;private static String user;private static String password;private static int connNum = 10;/*** 存放多个数据库的连接(频繁的添加删除,使用LinkedList)* 获取连接:出队 删除 删除第一个* 关闭连接:入队 添加 添加到末尾*/private static LinkedList<Connection> list = new LinkedList<>();/*** 第一次加载类的时候执行一次,就执行一次*/static {
    Properties props = new Properties();try {
    props.load(ConnectionPool.class.getResourceAsStream("/jdbc.properties"));} catch (IOException e) {
    e.printStackTrace();}driver = props.getProperty("driver");url = props.getProperty("url");user = props.getProperty("user");password = props.getProperty("password");try {
    Class.forName(driver);for (int i = 0; i < connNum; i++) {
    list.addLast(newConnection());}} catch (ClassNotFoundException e) {
    e.printStackTrace();}}/*** 创建一个新的连接* @return*/private static Connection newConnection() {
    Connection conn = null;try {
    conn = DriverManager.getConnection(url, user, password);} catch (SQLException throwables) {
    throwables.printStackTrace();}return conn;}/*** 从连接池中获取连接,如果有直接返回,如果没有新创建一个* @return*/public static Connection getConnection() {
    if (list.size() > 0) {
    return list.getFirst();}return newConnection();}/*** 数据库连接使用完毕,放回连接池*/public static void returnConnection(Connection conn) {
    if (list.size() < connNum) {
    list.addLast(conn);} else {
    // 如果连接池满,直接物理关闭try {
    conn.close();} catch (SQLException throwables) {
    throwables.printStackTrace();}}}
}
注意:增加连接池后,创建数据库连接应该是:ConnectionPool.getConnection(),使用完关闭时,应该为 ConnectionPool.returnConnection(conn),将连接放回到连接池。