?知识普及
Angular 指令根据其创建形式分为内置指令和自定义指令,指令按照类型分:
模板指令――组件就是模板指令(只能自定义)
属性型指令 ―― 更改元素、组件或其他指令的外观或行为的指令(有内置和自定义两类)
结构型指令 ―― 通过添加和删除 DOM 元素来更改 DOM 布局的指令(有内置和自定义两类)
举例:
内置属性型指令常用的有:
NgClass ―― 添加和删除一组 CSS 类
NgStyle ―― 添加和删除一组 HTML 样式
NgModel ―― 将数据双向绑定添加到 HTML 表单元素
内置结构型指令常用的有:
NgIf ―― 从模板中创建或销毁子视图
NgFor ―― 为列表中的每个条目重复渲染一个节点
NgSwitch ―― 一组在备用视图之间切换的指令
本节我们主要介绍如何自定义创建模板指令、属性型指令、结构型指令
1、创建自定义模板指令(组件)
ng g c <component-name> 默认情况下,该命令会创建以下内容:
一个以该组件命名的文件夹
一个组件文件 <component-name>.component.ts
一个模板文件<component-name>.component.html
一个CSS文件<component-name>.component.css
测试文件<component-name>.component.spec.ts
其中<component-name> 是组件的名称。由于组件超级简单,这里就不展开模板组件的细节了。
2、创建自定义属性型指令
ng g d <directive-name>例如使用 ng g d dir就会创建一个dir.directive.ts文件
import { Directive, ElementRef } from '@angular/core';
@Directive({selector: '[changeYellowBackgroundColor]'//这个指令名可以自己修改
})
export class DirDirective {constructor(el: ElementRef) {el.nativeElement.style.backgroundColor = 'yellow';//背景色修改为黄色}
}
app.component.html
<h1 changeYellowBackgroundColor>指令用于改变文本背景色 </h1>渲染效果

上面dir.directive.ts代码中的[changeYellowBackgroundColor]可以修改为[changeYellowBackgroundColor=yellow],这样在html里面使用指令就必须要写changeYellowBackgroundColor="yellow"
<h1 changeYellowBackgroundColor="yellow">指令用于改变文本背景色 </h1>OK!上面这个骚操作知识入门级,接下来我们研究下如何处理用户事件,将dir.directive.ts修改为:
import { Directive, ElementRef, HostListener } from '@angular/core';
@Directive({selector: '[changeYellowBackgroundColor]'//这个指令名可以自己修改
})
export class DirDirective {constructor(private el: ElementRef) { }@HostListener('mouseenter') onMouseEnter() {this.el.nativeElement.style.backgroundColor = 'yellow';}@HostListener('mouseleave') onMouseLeave() {this.el.nativeElement.style.backgroundColor = '';}}
然后渲染效果如下

步步为营,我们怎么能止步于这种简单玩法,搞点高级的――将值传递给属性型指令,让指令能够接收外部的参数值,就如同组件的input参数一样,看代码↓
import { Directive, ElementRef, HostListener, Input } from '@angular/core';
@Directive({selector: '[changeYellowBackgroundColor]'//这个指令名可以自己修改
})
export class DirDirective {constructor(private el: ElementRef) { }@Input() changeYellowBackgroundColor = '';//外部传参@Input() defaultColor = 'gray';//外部传参(默认颜色)@HostListener('mouseenter') onMouseEnter() {this.el.nativeElement.style.backgroundColor = this.changeYellowBackgroundColor || this.defaultColor;}@HostListener('mouseleave') onMouseLeave() {this.el.nativeElement.style.backgroundColor = '';}}
app.component.html
<h1 changeYellowBackgroundColor='red'>指令用于改变文本背景色(红色) </h1>
<h1 changeYellowBackgroundColor='orange'>指令用于改变文本背景色(橙色) </h1>
<h1 changeYellowBackgroundColor='yellow'>指令用于改变文本背景色(黄色) </h1>
<h1 changeYellowBackgroundColor defaultColor='gray'>指令用于改变文本背景色(默认灰色) </h1>
渲染效果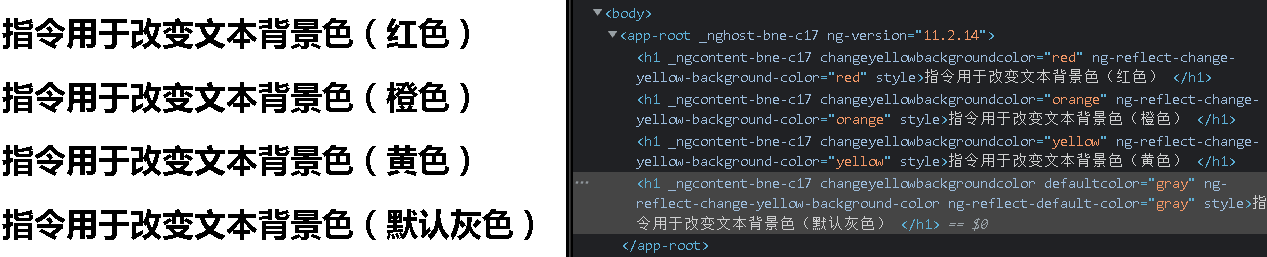
3、创建自定义结构型指令
让我们试试如何实现*ngIf的功能
dir.directive.ts
import { Directive, Input, TemplateRef, ViewContainerRef } from '@angular/core';
@Directive({selector: '[if]'//这个指令名可以自己修改
})
export class DirDirective {constructor(private templateRef: TemplateRef<any>,private viewContainer: ViewContainerRef) { }@Input() set if(condition: boolean) {condition ? this.viewContainer.createEmbeddedView(this.templateRef) : this.viewContainer.clear();}
}
app.component.html
<p>实现类似*ngIf的功能</p>
<h1 *if="condition" style="color:red;">当表达式condition的值为true的时候显示这句</h1>
<h1 *if="!condition" style="color:orange;">当表达式condition的值为false的时候显示这句</h1>
<button (click)="condition = !condition">切换显示if内容,condition变为{
   {condition}}</button>
app.component.ts
…condition=true;…渲染效果
