本篇blog我们将来重点看文章编辑页面story.php,因为这个页面说实话代码量是挺多的,还涉及到了图片的上传。
从页面上来直观的体验:
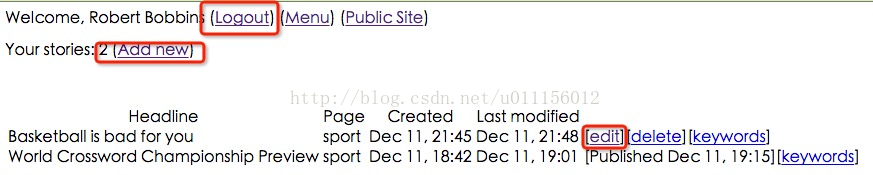
add new 和 edit都是打开的story.php页面,所以我们应该能提前想到,这个页面会先检测下是哪种请求。
首先我们来搞定比较简单的logout.php页面
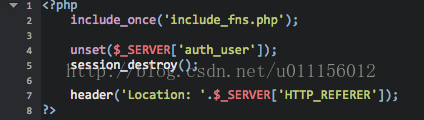
这个页面其实很简单了,主要是几个函数
unset函数其实就是将一些特定的变量置为空;
session_destroy函数是销毁当前的session,当然,当前session中的数据也随着一并销毁了;
接下来再执行header函数,也就是writer.php,当然就会执行到这个代码块中去了:

Menu和Public Site都很简单,一个是返回到admin文件夹下的index页面,另一个是返回当上级目录,默认是index.php,就是我们整个网站的主页面。
接下来看重头戏,
story.php
因为这部分的代码算是比较长的,我们还是先把代码贴出来,先整体讲解下,然后再就个别细节进行深入讲解。
<?php # Script User to Create or Edit a Story include_once('include_fns.php'); if (isset($_REQUEST['story'])) { $story = get_story_record($_REQUEST['story']); }?><form action = "story_submit.php" method = "POST" enctype="multipart/form-data"> <input type = "hidden" name="story" value = "<?php echo $_REQUEST['story'];?>"> <input type = "hidden" name = "destination" value = "<?php echo $_SERVER['HTTP_REFERER']; ?>"> <table> <tr> <td>Headline</td> </tr> <tr> <td><input size="80" name="headline" value ="<?php echo $story['headline'];?>" ></td> </tr> <tr> <td>Page</td> </tr> <tr> <td> <?php if (isset($_REQUEST['story'])) { # code... $query = "select p.code, p.description from pages p, writer_permissions wp, stories s where p.code = wp.page and wp.writer = s.writer and s.id = ".$_REQUEST['story']; }else{ $query = "select p.code, p.description from pages p, writer_permissions wp where p.code = wp.page and wp.writer = '{$_SESSION['auth_user']}'"; } echo query_select('page', $query , $story['page']); ?> </td> </tr> <tr> <td>Story text (can contain HTML tags)</td> </tr> <tr> <td> <textarea cols = "80" rows="7" name="story_text" wrap="virtual"> <?php echo $story['story_text'];?> </textarea> </td> </tr> <tr> <td> Or upload HTML file </td> </tr> <tr> <td> <input type = "file" name = "html" size="40"> </td> </tr> <tr> <td>Picture</td> </tr> <tr> <td><input type="file" name= "picture" size="40"></td> </tr> <?php if ($story[picture]) { $size = getimagesize('../'.$story['picture']); $width = $size[0]; $height = $size[1]; ?> <tr> <td> <img src="<?php echo '../'.$story['picture'];?>" width="<?php echo $width;?>" height="<?php echo $height;?>"> </td> </tr> <?php } ?> <tr> <td algin="center"><input type="submit" value="Submit"></td> </tr> </table> </form>因为代码比较长,所以就不整个截图了,然后我们来走一遍代码:第5行
我们之前有提到过,无论点击add new 还是edit,显示的都是story.php页面,所以,这里就是根据request中有没有story这个变量来决定到底是add new还是edit了。当然,我们很容易能够想到,如果没有参数story,那就是add new,如果有story参数,那一定是edit了。
这也可以从writer.php的代码中看出来。
第6行
我们用get_story_record函数来获取当前story的各个详细信息,包括id,作者,主体内容,创建时间,修改时间,发布时间,图片内容等等。。。
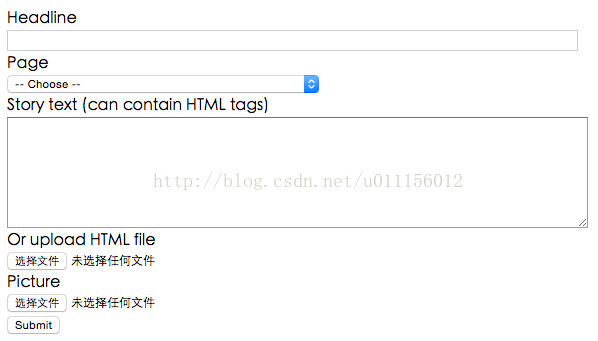
接下去的整个代码构造出来的是一个表单内容 form
看到表单submit的请求页面是story_submit.php,请求方式是POST,关于enctype,我们来看一下stackoverflow上面大神的解答吧:
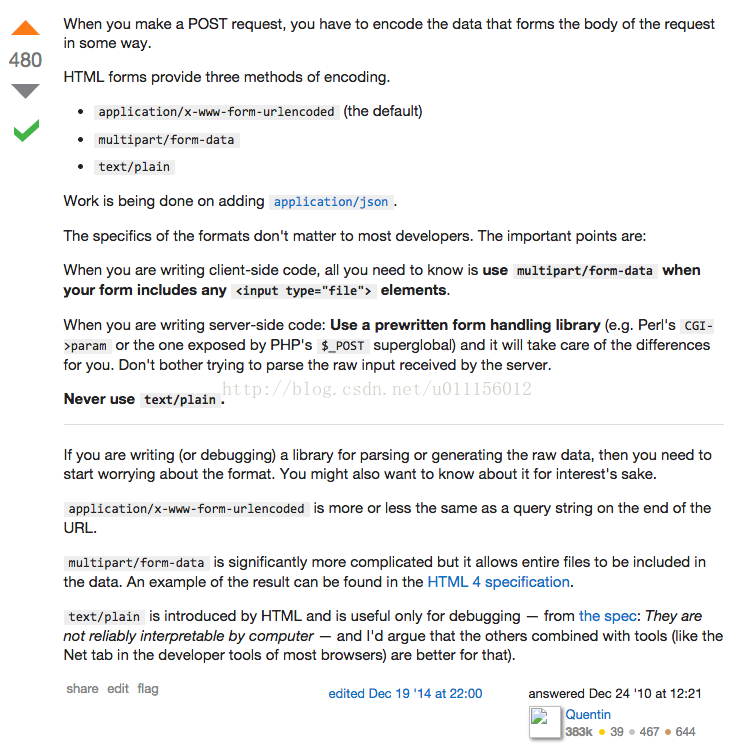
因为我们这个页面可能会传文件上去,所以enctype要是 multipart/form-data。
接下来,页面输入了两个属性为hidden的参数,一个是story,一个是destination。story不用多解释,如果是新建的话,那story是空的;而destination是为了在story_submit.php页面可以直接返回到当前页面的前一个页面(其实准确的说法,这里并不是前一个页面,而是The address of the page (if any) which referred the user agent to the current page. This is set by the user agent.),也就是writer.php页面,其实这里 _SERVER['HTTP_REFERER']里面其实就是writer.php页面。
关于更多_SERVER的内容,参见:
http://php.net/manual/en/reserved.variables.server.php
16-23行
是headline的表单行,这部分比较简单
25-48行
是page类别的下拉选择项
这里依旧是根据参数中有无story来判断,如果有,则根据当前story的id号来找到属于哪一类别的,并且显示出来;如果没有,则查看当前用户有发表那几种文章的权限,例如当前我登陆的用户,只有两个权限:

当然,这个权限是存储在writer_permissions 表中的,
然后select语句写好了之后,我们就通过query_select函数来显示下拉框
50-60行
这部分用来显示story的主体部分,和headline类似。
62-80行
是用来上传文件的部分,第一部分是上传html格式的文件,第2部分是上传图片
81-96行
这部分php代码用来显示已经存储于服务器上的图片,当然前提是要能从story表中获取到picture字段的内容
好了,整个代码走完了一遍,我们来看具体用到的几个函数吧:
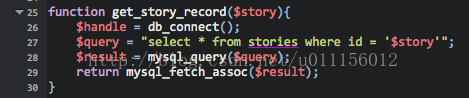
get_story_record函数
这个函数存在于db_fns.php,你知道它是存放在根目录的对吧?
query_select 函数
依旧是在db_fns.php中

这部分组合成了最终要显示的HTML格式的内容,我们可以查看下源代码:
<select name = 'page'><option value="" selected>-- Choose --</option><option value='news'>[news] The Top News Stories From Around the World</option><option value='sport'>[sport] Sports Latest - All The Winners and Losers</option></select>
好了,这部分的内容就到此为止,我们下一章章节来看我们新输入的内容是如何上传到服务器上的。