������ں����ģ��о���һ��tomcat��Ⱥ���ã�������nginx��ʵ�ָ��ؾ��⣬session������дƪ��¼����ֹ������---------�˼�������������
˵������������һ��web��Ŀͬʱ������̨tomcat�£���tomcat-A��tomca-B����ʹ��nginx������������������õ�Ȩֵ��������ַ�����̨��tomcatA/tomcatB������ʵ��session������
���úñ�������ָ����host�ļ������� 127.0.0.1 www.domain.com.cn
�½���Ŀ��tiny-demo-operation ����springmvc ���ú�springmvc.xml�����ļ�
����SessionShareSetController��SessionShareGetController
Ŀ¼���£�

SessionShareSetController���룺


1 package com.tiny.session.share.controller; 2 3 import javax.servlet.http.HttpServletRequest; 4 import javax.servlet.http.HttpServletResponse; 5 import javax.servlet.http.HttpSession; 6 7 import org.springframework.stereotype.Controller; 8 import org.springframework.web.bind.annotation.RequestMapping; 9 10 @Controller11 @RequestMapping("/sessionShare")12 public class SessionShareSetController {13 14 @RequestMapping("/sessionSet")15 public String sessionSet(HttpServletRequest request,16 HttpServletResponse response) throws Exception {17 18 HttpSession session = request.getSession();19 String name = "tinyseven-demo-operation"+"---";20 String remote = request.getRemoteHost() + "---"21 + request.getRemoteAddr() + "---" + request.getRemotePort()22 + "---";23 String local = request.getLocalName() + "---" + request.getLocalAddr()24 + "---" + request.getLocalPort() + "---";25 String server = request.getServerName() + "---"26 + request.getServerPort() + "---";27 request.setAttribute("name", name);28 request.setAttribute("remote", remote);29 request.setAttribute("local", local);30 request.setAttribute("server", server);31 32 session.setAttribute("name", name);33 return "sessionshare/sessionSet";34 }35 36 }SessionShareGetController���룺
1 package com.tiny.session.share.controller; 2 3 import javax.servlet.http.HttpServletRequest; 4 5 import org.springframework.stereotype.Controller; 6 import org.springframework.web.bind.annotation.RequestMapping; 7 8 @Controller 9 @RequestMapping("/sessionShare")10 public class SessionShareGetController {11 12 @RequestMapping("/sessionGet")13 public String sessionGet(HttpServletRequest request) throws Exception {14 15 String name = (String) request.getSession().getAttribute("name")16 + "---";17 String remote = request.getRemoteHost() + "---"18 + request.getRemoteAddr() + "---" + request.getRemotePort()19 + "---";20 String local = request.getLocalName() + "---" + request.getLocalAddr()21 + "---" + request.getLocalPort() + "---";22 String server = request.getServerName() + "---"23 + request.getServerPort() + "---";24 request.setAttribute("name", name);25 request.setAttribute("remote", remote);26 request.setAttribute("local", local);27 request.setAttribute("server", server);28 return "sessionshare/sessionGet";29 30 }31 }�½�jspҳ�棺
Ŀ¼���£�
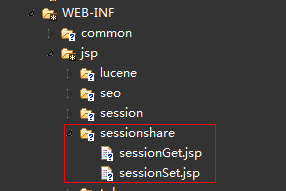
sessionSet.jsp���ִ��룺
<body> ��ǰ�û�����session--server-->>${server}</br> ��ǰ�û�����session--remote-->>${remote}</br> ��ǰ�û�����session--local-->>${local}</br> ��ǰ�û�����session--name-->>${name}</br></body>sessionGet.jsp���ִ��룺
1 <body>2 ��ǰ�û������server-->>${server}</br>3 ��ǰ�û������remote-->>${remote}</br>4 ��ǰ�û������local-->>${local}</br>5 ��ǰ�û������name-->>${name}</br>6 </body>
һ������̨tomcat��������tomcat��Ⱥ��
����ʹ�� apache-tomcat-6.0.37
·���ֱ�Ϊ��E:\Server\apache-tomcat-6.0.37-node-A
E:\Server\apache-tomcat-6.0.37-node-B
�ֱ���A/B��server.xml��֤��̨tomcat������������������˿ڳ�ͻ�����ҽ�������̨tomcat�ļ�Ⱥ��
1.��A��server.xml��������portǰ���1�����磨<Server port="8005" shutdown="SHUTDOWN">�ij�<Server port="18005" shutdown="SHUTDOWN">����������
��<Engine name="Catalina" defaultHost="localhost" >Ϊ<Engine name="Catalina" defaultHost="localhost" jvmRoute="tomcat1">
2.��B��server.xml��������portǰ���2�����磨<Server port="8005" shutdown="SHUTDOWN">�ij�<Server port="28005" shutdown="SHUTDOWN">����������
��<Engine name="Catalina" defaultHost="localhost" >Ϊ<Engine name="Catalina" defaultHost="localhost" jvmRoute="tomcat2">
��ʱ��̨tomcatӦ�ö����Գɹ������ˡ�
3.��������̨tomcat�ļ�Ⱥ����
�ֱ�ȡ����A/B server.xml�ļ���
<!--
<Cluster className="org.apache.catalina.ha.tcp.SimpleTcpCluster"/>
-->
��ע�͡�
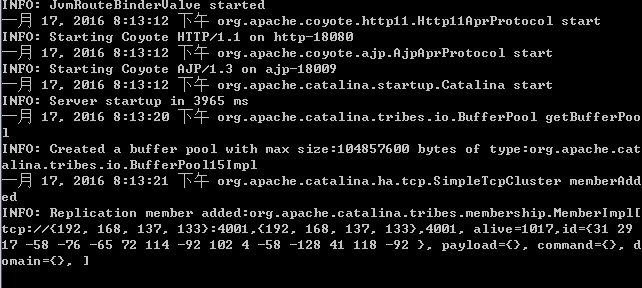
��������A��B tomcat������bin�е�startup.bat����������������ϴζ���������Ϣ����ʾ����tomcat�ڵ��Ѿ��������˹�����
����������Ŀ��tomcatA��tomcatB�£���������session������
1.��tomcaA��tomcatB��server.xml�ļ���
<Host name="localhost" appBase="webapps"
unpackWARs="true" autoDeploy="true"
xmlValidation="false" xmlNamespaceAware="false">
<!-- SingleSignOn valve, share authentication between web applications
Documentation at: /docs/config/valve.html -->
<!--
<Valve className="org.apache.catalina.authenticator.SingleSignOn" />
-->
<!-- Access log processes all example.
Documentation at: /docs/config/valve.html -->
<!--
<Valve className="org.apache.catalina.valves.AccessLogValve" directory="logs"
prefix="localhost_access_log." suffix=".txt" pattern="common" resolveHosts="false"/>
-->
<Context docBase="E:\javaWorkspace\tiny-demo-operation\WebRoot" reloadable="true" path="/tiny-demo-operation" crossContext="true" source="org.eclipse.jst.jee.server:tiny-demo-operation"/> �˴�Ϊ��������
</Host>
2������������Ŀ��web.xml�ļ�
��web.xml�ļ���</web-app>֮ǰ����
<!-- session�������� -->
<distributable />
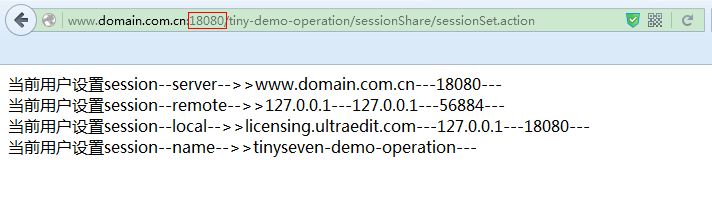
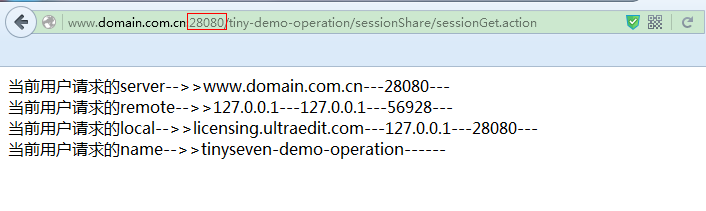
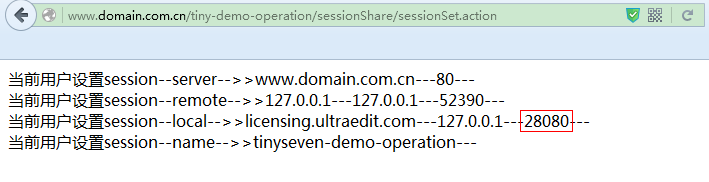
��ʱ��ǰ��Ŀ����̨tomcat��������session�����ˣ�Ч�����£�
����tomcatA�µ���Ŀ������session��
����tomcatB�µ���Ŀ����ȡsession��
��������nginx��ʵ������ַ����˴�ʹ�õ���nginx1.5.0�汾
1.��nginx.conf �ĺ�
1 #Nginx�����û����飬window�²�ָ�� 2 #user niumd niumd; 3 #�������ӽ���������ͨ������CPU��������2����CPU�� 4 5 worker_processes 2; 6 7 #������־���·�� 8 #error_log logs/error.log; 9 #error_log logs/error.log notice;10 11 error_log logs/error.log info;12 13 #ָ��pid����ļ�14 15 pid logs/nginx.pid;16 17 events {18 #ʹ������IOģ��linux����epoll��FreeBSD�������kqueue��window�²�ָ����19 #use epoll;20 #�������������21 worker_connections 2048;22 }23 24 http {25 26 include mime.types;27 default_type application/octet-stream;28 #������־��ʽ29 #log_format main '$remote_addr - $remote_user [$time_local] $request '30 # '"$status" $body_bytes_sent "$http_referer" '31 # '"$http_user_agent" "$http_x_forwarded_for"';32 #access_log off;33 access_log logs/access.log;34 client_header_timeout 3m;35 client_body_timeout 3m;36 send_timeout 3m;37 client_header_buffer_size 1k;38 large_client_header_buffers 4 4k;39 sendfile on;40 tcp_nopush on;41 tcp_nodelay on;42 #keepalive_timeout 75 20;43 include gzip.conf;44 include proxy.conf;45 46 upstream localhost {47 #����ip���㽫���������Ǹ����tomcat������������Ϊ���Խ��session���⣬��ʵ�����ܡ�48 #ͬһ�����ڶ�������£�·���л���ip���ܲ�ͬ49 #ip_hash;50 #weigth������ʾȨֵ��ȨֵԽ�߱����䵽�ļ���Խ��51 server localhost:18080 weight=5;52 server localhost:28080 weight=5;53 54 }55 56 server {57 58 listen 80;59 server_name localhost;60 61 location / { 62 root E:/javaWorkspace/tiny-demo-operation/WebRoot;63 index index.html index.htm;64 65 }66 67 location ~ \.(html|js|css|png|gif)$ { 68 root E:/javaWorkspace/tiny-demo-operation/WebRoot;69 } 70 71 location ~ \.(jsp|action)$ {72 proxy_connect_timeout 3;73 proxy_send_timeout 30;74 proxy_read_timeout 30;75 proxy_pass http://localhost;76 }77 }78 }2.��������nginx
�������������µĵ�ǰ��Ŀ��nginx�Զ�ʵ������ַ���Ч�����£�
�ַ���tomcatB�µ�tiny-demo-operation������session�е�����ֵname��
�ַ�tomcatA�µ�tiny-demo-operation����ȡsession�е�����ֵname��

���ˣ���ʵ����nginx����tomcat��Ⱥ��ʵ�ָ��ؾ��⣬session�����IJ�������