?
1,android编码规范
Android官方并没有给出相应编码规范。以下都是我从源码?、示例中总结的所谓规范。若公司有相应规范以公司为准。
?
首先从布局文件说起,布局文件名称的定义必须为小写字母,否者无法生成R类,尽量不要用缩写。以表达清楚该文件用途为本,通常情况下用下划线连接各语义单词,例如dialog_title_icons.xml?或者list_menu_item_checkbox.xml。
控件ID的定义,ID的定义一律为小写,例如:一用户名?TextView??可以定义为:@+id/username_view?。以“名词_控件名称”这种形式定义。
?
其次是图片的定义格式,图片的定义也是为解释清楚用途为准,参照这种定义格式“btn_background_ok.png”
???????string类的name定义,这里可以按照JAVA中变量的定义方式定义。首字母小写,驼峰命名法。例 ? ? ? ?如: ? <string?name="userName_view">用户名:</string>
?
最后类名与变量的定义?,定义与用户交互的类,××Activity.java?。自定义变量一律以小写m开头?例如:?EditText?mUserName=(EditText)findViewById(R.id.username_edit);
?
2,常用布局
Android提供了一组视图类来充当视图的容器,这些容器类称为布局或者布局管理器,每一个都实现一种具体的策略来管理其子控件的大小和位置。最常用的布局有以下这几种:
LinearLayout,RleativeLayout,TableLayout,FrameLayout?等。有两种方式可以声明布局,一种是编码的方式,另外一中通过XML配置的方式。Android默认是通过xml的方式构建应用程序的。这种方式最大的优点是代码与视图分离,这意味着你可以修改或调整,而无需修改源代码并重新编译。例如?你可以创建不同的屏幕方向,支持不同分辨率的设备。也更直观更容易调试。
? ? (1)LinearLayout?:线性布局?
? ? ? ? 最常用的一种布局方式,所有子控件的对齐方式,取决于如何定义?orientation的属性:vertical ? ? ? ? ? ? ? ? ? ??垂直方向?,如果按照这种方向所有的子控件将按照垂直的方式分布在布局上,每行只允许有 ? ? ? ? ? ? 一 个子元素,horizontal水平方向?,这时子控件将会以水平的方向分布在布局中。以下线性布 ? ? ? ? ? 局的简单例子。先上图:
?
?
<?xml version="1.0" encoding="utf-8"?><!--线性布局,最外面包裹一个水平线性布局--><!--orientation表示线性布局的方向,horizontal:水平方向 vertical:垂直方向 --><!-- @代表R类,如果是自定义的ID 则用@+id/××× 表示,[email protected]/×××--><LinearLayout xmlns:android="http://schemas.android.com/apk/res/android" android:orientation="horizontal" android:background="@drawable/bg" android:layout_width="fill_parent" android:layout_height="fill_parent" > <LinearLayout android:layout_width="wrap_content" android:layout_height="wrap_content" android:orientation="vertical" > <TextView android:layout_width="fill_parent" android:layout_height="wrap_content" android:text="@string/linear" /> <Button android:id="@+id/button" android:layout_width="183dp" android:layout_height="wrap_content" android:text="@string/button" /> <ImageButton android:id="@+id/imagebutton" android:layout_width="180dp" android:layout_height="48dp" android:src="@drawable/imagebutton" /> </LinearLayout> <!-- android:layout_gravity与android:gravity区别,拿一个button作为例子 前者的意思,是这个按钮的位置,如果设置为right则表示这个按钮整体位置靠右; 后者的意思,这个按钮上显示内容的位置。 --> <LinearLayout android:gravity="right" android:layout_width="fill_parent" android:layout_height="wrap_content" android:orientation="horizontal" > <ImageView android:id="@+id/imageview" android:layout_marginTop="5dp" android:src="@drawable/imageview" android:layout_width="131dp" android:layout_height="131dp" /> </LinearLayout> </LinearLayout>
?package net.csdn.blog.androidtoast;
?
import android.app.Activity;import android.os.Bundle;import android.view.View;import android.view.View.OnClickListener;import android.widget.Toast;public class MainActivity extends Activity implements OnClickListener { /** Called when the activity is first created. */ @Override public void onCreate(Bundle savedInstanceState) { super.onCreate(savedInstanceState); setContentView(R.layout.linearlayout); //实例化以下控件,并设置监听事件,传入实现了OnClickListener接口的对象 findViewById(R.id.button).setOnClickListener(this); findViewById(R.id.imagebutton).setOnClickListener(this); findViewById(R.id.imageview).setOnClickListener(this); } /** * 点击事件判断所点击是哪个控件并toast提示。 */ @Override public void onClick(View v) { int id=v.getId();//得到所点对象ID if(id==R.id.button){ Toast.makeText(getApplicationContext(), R.string.promptButton, 1).show(); }else if(id==R.id.imagebutton){ Toast.makeText(getApplicationContext(), R.string.promptImageButton, 1).show(); }else if(id==R.id.imageview){ Toast.makeText(getApplicationContext(), R.string.promptImageView, 1).show(); } }}?(2)RleativeLayout?:相对布局
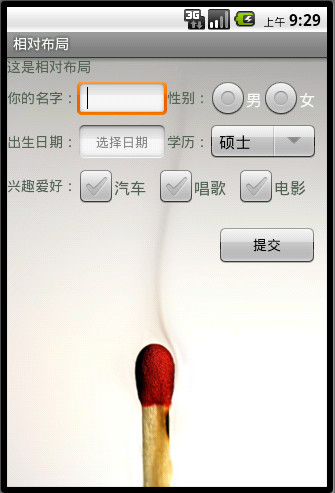
?如果你的程序中出现了多个LinearLayout嵌套,就应该考虑使用相对布局了。相对局部顾名思义一个控件的位置相对于其他控件或者容器的位置。使用很简单?直接上示例:

?
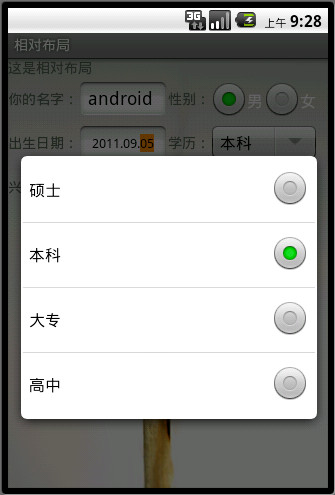
<?xml version="1.0" encoding="utf-8"?><!-- 相对布局 一个控件相对于另一个控件或者容器的位置。 --><RelativeLayout xmlns:android="http://schemas.android.com/apk/res/android" android:orientation="vertical" android:background="@drawable/bg" android:layout_width="fill_parent" android:layout_height="fill_parent" > <TextView android:id="@+id/describe_view" android:layout_width="fill_parent" android:layout_height="wrap_content" android:text="@string/hello" android:textColor="#556055" /> <!-- 这个TextView相对于上一个TextView 在 它的下方所以设置属性为layout_below--> <TextView android:id="@+id/username_view" android:layout_width="wrap_content" android:layout_height="wrap_content" android:layout_marginTop="12dp" android:text="@string/username" android:textColor="#556055" android:layout_below="@id/describe_view" /> <EditText android:id="@+id/username_edit" android:layout_width="90dp" android:layout_height="40dp" android:layout_marginTop="4dp" android:layout_toRightOf="@id/username_view" android:layout_below="@id/describe_view" /> <TextView android:id="@+id/sex_view" android:layout_width="wrap_content" android:layout_height="wrap_content" android:layout_marginTop="12dp" android:text="@string/sex" android:textColor="#556055" android:layout_below="@id/describe_view" android:layout_toRightOf="@id/username_edit" /> <RadioGroup android:id="@+id/sex_radiogroup" android:orientation="horizontal" android:layout_width="wrap_content" android:layout_height="wrap_content" android:layout_toRightOf="@id/sex_view" android:layout_below="@id/describe_view" > <!--第一个RadioButton --> <RadioButton android:id="@+id/male_radiobutton" android:layout_width="wrap_content" android:layout_height="wrap_content" android:text="男" /> <!--第二个RadioButton --> <RadioButton android:id="@+id/woman_radiobutton" android:layout_width="wrap_content" android:layout_height="wrap_content" android:text="女" /> </RadioGroup> <TextView android:id="@+id/age_view" android:layout_width="wrap_content" android:layout_height="wrap_content" android:paddingTop="25dp" android:text="@string/age" android:textColor="#556055" android:layout_below="@id/username_view" /> <EditText android:id="@+id/brithday_edit" android:layout_width="90dp" android:layout_height="40dp" android:layout_marginTop="4dp" android:hint="@string/selectdate" android:textSize="13sp" android:gravity="center" android:editable="false" android:layout_toRightOf="@id/age_view" android:layout_below="@id/username_edit" /> <TextView android:id="@+id/education_view" android:layout_width="wrap_content" android:layout_height="wrap_content" android:paddingTop="25dp" android:text="@string/education" android:textColor="#556055" android:layout_below="@id/sex_view" android:layout_toRightOf="@id/brithday_edit" /> <!-- 下拉列表控件 --> <Spinner android:id="@+id/edu_spinner" android:layout_width="108dp" android:layout_height="38dp" android:layout_below="@id/sex_radiogroup" android:layout_toRightOf="@id/education_view" /> <TextView android:id="@+id/interest_view" android:layout_width="wrap_content" android:layout_height="wrap_content" android:paddingTop="25dp" android:text="@string/interest" android:textColor="#556055" android:layout_below="@id/age_view" /> <!-- 复选框控件 --> <CheckBox android:id="@+id/car_check" android:layout_width="wrap_content" android:layout_height="wrap_content" android:text="@string/car" android:textColor="#566156" android:layout_toRightOf="@id/interest_view" android:layout_below="@id/brithday_edit" /> <CheckBox android:id="@+id/sing_check" android:layout_width="wrap_content" android:layout_height="wrap_content" android:layout_marginLeft="11dp" android:text="@string/sing" android:textColor="#566156" android:layout_toRightOf="@id/car_check" android:layout_below="@id/brithday_edit" /> <CheckBox android:id="@+id/movie_check" android:layout_width="wrap_content" android:layout_height="wrap_content" android:layout_marginLeft="11dp" android:text="@string/movie" android:textColor="#566156" android:layout_toRightOf="@id/sing_check" android:layout_below="@id/brithday_edit" /> <Button android:id="@+id/submit_button" android:layout_width="100dp" android:layout_height="40dp" android:text="@string/submit" android:gravity="center" android:layout_below="@id/movie_check" android:layout_marginLeft="210dp" android:layout_marginTop="15dp" /></RelativeLayout>?
?
?(3)TableLayout:表格布局
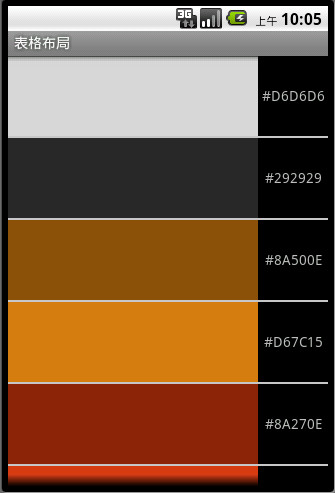
?TableLayout布局是LinearLayout的扩展,以行和列的形式组织其子控件。与HTML中得Table相似。每一个TableRow元素代表一行。TableRow中包含几个控件代表几列。尽管使用TableRow来填充TableLayout是最常见的模式,但是该布局中可以放置任何子控件。需要指出的是TableLayout的子控件不能指定android:layout_width="wrap_content",它们被强制设定为fill_parent。但是可以设置高度。还有两个不太好理解的属性的说一下,android:stretchColums?此属性指要被拉伸的列。取值可以单个列的索引也可以是一组列的索引值。例如:如果一行有三列。stretchColums="1"?这表示拉伸第二列填充剩余空间。android:layout_column="1"?这个属性指定子控件放置在哪一列上。例如
<TextView???android:layout_column="1"???android:text="Open..."???android:padding="3dip"?/>?指该控放置在第二列。上图:
?
?
<?xml version="1.0" encoding="utf-8"?><!-- android:stretchColumns="1"是设置 TableLayout所有行的第二列为拉伸列。 也就是说如果每行都有三列的话,剩余的空间由第二列补齐 --> <!-- 最外层包裹一个滚动条 --> <ScrollView xmlns:android="http://schemas.android.com/apk/res/android" android:layout_width="fill_parent" android:layout_height="wrap_content"> <TableLayout android:layout_width="fill_parent" android:layout_height="fill_parent" android:stretchColumns="1"> <TableRow> <View android:layout_height="80dp" android:layout_width="250dp" android:background="#D6D6D6" /> <TextView android:layout_height="80dp" android:text="#D6D6D6" android:gravity="center"/> </TableRow> <!-- 此处的View控件充当着一个分割条的作用 --> <View android:layout_height="2dip" android:background="#C4C4C4" /> <TableRow> <View android:layout_height="80dp" android:layout_width="250dp" android:background="#292929" /> <TextView android:layout_height="80dp" android:text="#292929" android:gravity="center"/> </TableRow> <View android:layout_height="2dip" android:background="#C4C4C4" /> <TableRow> <View android:layout_height="80dp" android:layout_width="250dp" android:background="#8A500E" /> <TextView android:layout_height="80dp" android:text="#8A500E" android:gravity="center"/> </TableRow> <View android:layout_height="2dip" android:background="#C4C4C4" /> <TableRow> <View android:layout_height="80dp" android:layout_width="250dp" android:background="#D67C15" /> <TextView android:layout_height="80dp" android:text="#D67C15" android:gravity="center"/> </TableRow> <View android:layout_height="2dip" android:background="#C4C4C4" /> <TableRow> <View android:layout_height="80dp" android:layout_width="250dp" android:background="#8A270E" /> <TextView android:layout_height="80dp" android:text="#8A270E" android:gravity="center"/> </TableRow> <View android:layout_height="2dip" android:background="#C4C4C4" /> <TableRow> <View android:layout_height="80dp" android:layout_width="250dp" android:background="#D63C16" /> <TextView android:layout_height="80dp" android:text="#D63C16" android:gravity="center"/> </TableRow> </TableLayout></ScrollView>?
?
?
(4)FrameLayout:帧布局
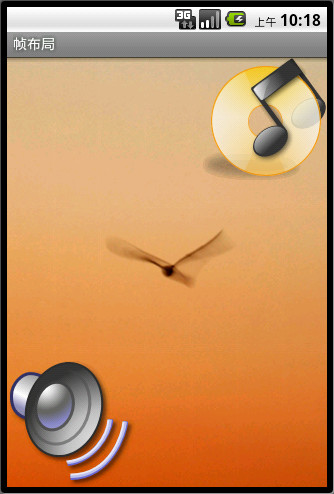
?最简单的一个布局对象。它被定制为你屏幕上的一个空白备用区域,之后你可以在其中填充一个单一对象?—?比如,一张你要发布的图片。所有的子元素将会固定在屏幕的左上角;你不能为FrameLayout中的一个子元素指定一个位置。但是你可以通过子控件自身控制其位置。后一个子元素将会直接在前一个子元素之上进行覆盖填充,把它们部份或全部挡住(除非后一个子元素是透明的)。此布局通常用于游戏或者处理一些画廊程序。如图:
?
?
?
?<?xml version="1.0" encoding="utf-8"?>
<!-- 帧布局,所以子控件均显示在屏幕的左上角,层叠式排列。此布局无法控制子控件的大小与位置, 但是子控件自身可以控制其位置大小 --><FrameLayout xmlns:android="http://schemas.android.com/apk/res/android" android:orientation="vertical" android:layout_width="fill_parent" android:layout_height="fill_parent" android:background="@drawable/bg" > <!-- 图片显示控件 并且在容器的右侧显示 --> <ImageView android:id="@+id/one_imageview" android:src="@drawable/one" android:layout_width="wrap_content" android:layout_height="wrap_content" android:layout_gravity="right" /> <!-- 第二张图片显示在左侧底部 --> <ImageView android:id="@+id/two_imageview" android:src="@drawable/two" android:layout_width="wrap_content" android:layout_height="fill_parent" android:scaleType="fitEnd" /></FrameLayout>
?package net.csdn.blog.androidtoast;
import android.app.Activity;import android.os.Bundle;import android.view.View;import android.widget.ImageView;public class MainActivity extends Activity { ImageView mOneImageView; ImageView mTwoImageView; /** Called when the activity is first created. */ @Override public void onCreate(Bundle savedInstanceState) { super.onCreate(savedInstanceState); setContentView(R.layout.main); mOneImageView=(ImageView) findViewById(R.id.one_imageview); mTwoImageView=(ImageView) findViewById(R.id.two_imageview); //添加点击监听事件 mOneImageView.setOnClickListener(new ImageView.OnClickListener(){ @Override public void onClick(View v) { //点击one时隐藏自身 显示two mTwoImageView.setVisibility(View.VISIBLE); v.setVisibility(View.GONE); } }); mTwoImageView.setOnClickListener(new ImageView.OnClickListener(){ @Override public void onClick(View v) { mOneImageView.setVisibility(View.VISIBLE); v.setVisibility(View.GONE); } }); }}??
这个是为什么呢?是android的规范?java中没有的。
这个是为什么呢?是android的规范?java中没有的。
不是java的规范 也不是android的硬性规定,只是android命名的一种习惯。多用于findViewById实例化出你那个控件时的定义。我猜这个m应该是my的意思。说明这个控件自定义的。
这个是为什么呢?是android的规范?java中没有的。
不是java的规范 也不是android的硬性规定,只是android命名的一种习惯。多用于findViewById实例化出你那个控件时的定义。我猜这个m应该是my的意思。说明这个控件自定义的。
我以为是manual的意思...