半小时搞定Android Animation 之一
作者:Legend
QQ:158067568
Android提供了两种动画的机制,可以通过SurfaceView来一帧一帧的绘制,同样也可以通过Animation机制。
Animations分类
Animations分为两种机制:Tweened Animations和Frame-by-FrameAnimations。
Tweened类似于flash,通过旋转、移动、缩放等实现动画效果,而Frame-by-FrameAnimations是类似于电影,通过改变每一帧的显示来实现动画效果。
其实Animation就是先写好对象要发生的动作,比如说平移,变形等。然后你需要哪个View或者View的子类,来完成这些预定义好的动作,只要给他们添加,就可以了。这部分的内容还是蛮多的,但是相对简单,本节只介绍Tweened Animations。
Tweened Animations
如图1所示,Tweened Animations有如下四种方式实现动画,对于每一种方式,Android都提供了一个类来实现。AlphaAnimation, AnimationSet, RotateAnimation, ScaleAnimation, TranslateAnimation 。
?
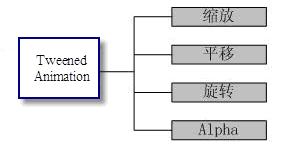
图1 Tweened Animations四种方式实现动画
对于每一种,笔者都会给出例子来详细解释。出于由简到难的考虑,首先介绍Alpha。
Alpha
alpha这个词详细如果有过opengl 开发经验的朋友一定不会陌生,没错,他就是设置透明度的。让我们先看一组图标,这样你就会加深对alpha的认识。如图2所示,实现了透明度变化的图标和按钮的效果。
?
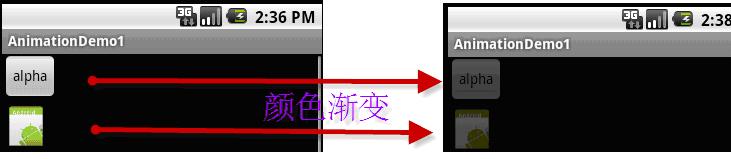
图2 颜色渐变demo
如果要实现view的透明度变化,就要去实现alpha 的Animation。具体方法分为如下4部分:
q????? 实例化AnimationSet对象
q????? 实例化Animation对象
q????? 设置Animation对象属性
q????? 为View添加AnimationSet
这里要强调的就是Animation的构造方法如下:
AlphaAnimation aa = new AlphaAnimation(1, 0);//2.创建需要的animation
相对来说,alpha的构造方法最为简单。其第一个参数是出示时的透明度,0为完全透明,1为不透明。第二个参数为动画结束时的透明度。
aa.setDuration(2000);//设置动画的时间
通过上面这句可以设置动画播放的时间。
具体代码我会在最后给出。
Scale
scale为缩放,在了解Scale之前我们先看看其运行效果。如图3所示。
?
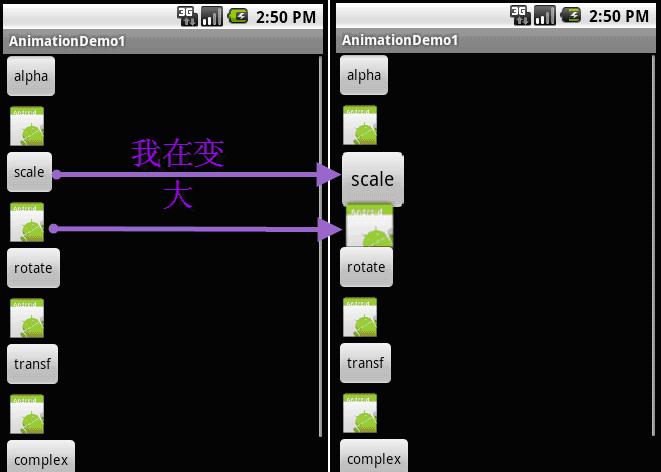
图3 scale demo
以上是Scale最简单的构造方法:
ScaleAnimation aa = new ScaleAnimation(1, 2, 1, 2);//2.创建需要的animation,这种构造方法是以自身为pivot
q????? 第1个参数为初始时x的大小,其中1为自身长度,同一2为自身长度的2倍,下同
q????? 第2个参数为结束动画时x的大小
q????? 第3个参数为初始时y的大小
q????? 第4个参数为结束动画时y的大小
如果你以为你已经学会了Scale,那我只能说你是浅尝辄止。下面介绍其另一个构造方法,该方法更加灵活。
ScaleAnimation aa = new ScaleAnimation(0, 1, 0, 1, Animation.RELATIVE_TO_PARENT, 0.5f, Animation.RELATIVE_TO_PARENT, 0.5f);
q????? 其四个参数同上,不解释
q????? 第五个参数是设置枢轴,可以是以自身,亦可以使用父view的,甚至可以谁用绝对数值。这里之后会解释。如果不明白可先忽略。
q????? 第六个参数是设置x枢轴的坐标。
q????? 接下来的两个参数同上,是设置y坐标的。
也许这里读者肯定不会明白枢轴的意思,那么我就用上面的方法来构造Animation并运行看看效果。请看图4.
?

图4 scale Demo2
如图所示,View控件在自身大小变化的同时,位置也在改变。后面的几个参数是设置其初始位置。如果以父view为参考,值为0.5f的话,那么就是当前父View的中间。
读者可能会问到,怎么不是屏幕的中心位置,我认为他是根据布局文件来决定位置的,当前的布局文件为LinearLayout,其设置为向下一次添加内容,如果设置y坐标为0.5f,则Android会认为你是要在当前布局接下来添加内容的位置的y轴中间。
Transfer
如果明白了枢轴的概念,那么Transfer平移就很简单了,如图5所示,为平移的例子。
?
?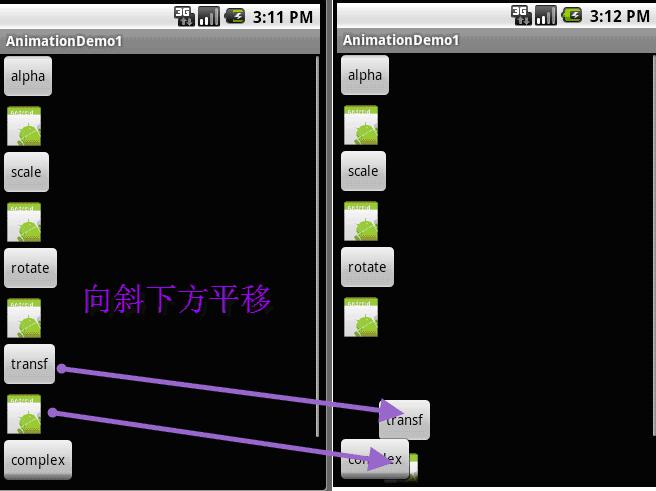
图5 平移 demo
以上平移的实例化方法如下:
TranslateAnimation aa = new TranslateAnimation(Animation.RELATIVE_TO_PARENT, 0, Animation.RELATIVE_TO_PARENT, 1, Animation.RELATIVE_TO_PARENT, 0, Animation.RELATIVE_TO_PARENT, 1);
读者结合api,相信理解这个方法应该还是比较容易的,这里就不在赘述,如果有问题,可以给留言。
Rotate
旋转,这个也是比较容易,看演示,如图6所示。
?
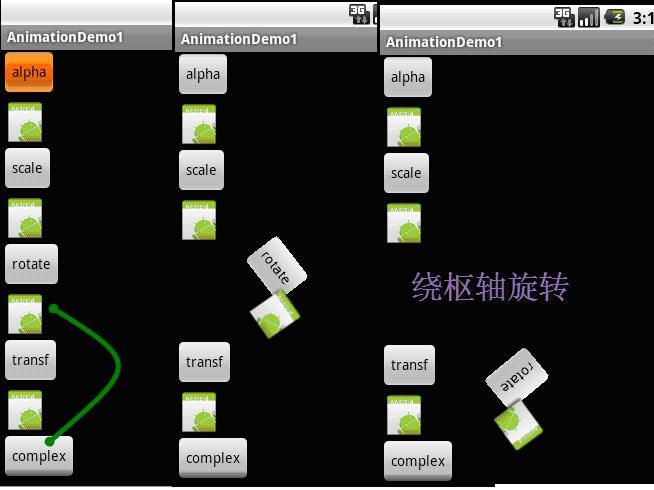
图6 旋转demo
其构造方法如下:
RotateAnimation aa = new RotateAnimation(0, 270, Animation.RELATIVE_TO_PARENT, 0.2f, Animation.RELATIVE_TO_PARENT, 0.2f);
综合
Animation不但可以单独使用,还可以设置多个Animation然后添加到AnimationSet中。在对View调用,在例子中我给出了一个综合的例子,读者自行查看,检测自己是否已经明白这块知识。
代码
本节参考AnimationDemo1例子。
限于本人水平有限,如有不足之处,请多多指正。
?
<?xml version="1.0" encoding="utf-8"?><ScrollView xmlns:android="http://schemas.android.com/apk/res/android" android:layout_width="fill_parent" android:layout_height="wrap_content" > <LinearLayout android:orientation="vertical" android:layout_width="fill_parent" android:layout_height="fill_parent" > <Button android:text="alpha" android:id="@+id/Button01" android:layout_width="wrap_content" android:layout_height="wrap_content"> </Button> <ImageView android:id="@+id/iv1" android:layout_width="wrap_content" android:layout_height="wrap_content" android:src = "@drawable/icon" > </ImageView> <Button android:text="scale" android:id="@+id/Button02" android:layout_width="wrap_content" android:layout_height="wrap_content"> </Button> <ImageView android:id="@+id/iv2" android:layout_width="wrap_content" android:layout_height="wrap_content" android:src = "@drawable/icon" > </ImageView> <Button android:text="rotate" android:id="@+id/Button03" android:layout_width="wrap_content" android:layout_height="wrap_content"> </Button> <ImageView android:id="@+id/iv3" android:layout_width="wrap_content" android:layout_height="wrap_content" android:src = "@drawable/icon" > </ImageView> <Button android:text="transf" android:id="@+id/Button04" android:layout_width="wrap_content" android:layout_height="wrap_content"> </Button> <ImageView android:id="@+id/iv4" android:layout_width="wrap_content" android:layout_height="wrap_content" android:src = "@drawable/icon" > </ImageView> <Button android:text="complex" android:id="@+id/Button05" android:layout_width="wrap_content" android:layout_height="wrap_content"> </Button> <ImageView android:id="@+id/iv5" android:layout_width="wrap_content" android:layout_height="wrap_content" android:src = "@drawable/icon" > </ImageView> </LinearLayout> </ScrollView>
?
package cn.edu.heut.zcl;import android.app.Activity;import android.os.Bundle;import android.view.View;import android.view.View.OnClickListener;import android.view.animation.AlphaAnimation;import android.view.animation.Animation;import android.view.animation.AnimationSet;import android.view.animation.RotateAnimation;import android.view.animation.ScaleAnimation;import android.view.animation.TranslateAnimation;import android.widget.Button;import android.widget.ImageButton;import android.widget.ImageView;public class DemoActivity extends Activity implements OnClickListener{ /** Called when the activity is first created. */ Button alphaBut ; Button scaleBut ; Button rotateBut ; Button transfBut ; Button complexBut ; ImageView iv1; ImageView iv2; ImageView iv3; ImageView iv4; ImageView iv5; AnimationSet as ; @Override public void onCreate(Bundle savedInstanceState) { super.onCreate(savedInstanceState); setContentView(R.layout.main); alphaBut = (Button)findViewById(R.id.Button01); scaleBut = (Button)findViewById(R.id.Button02); rotateBut = (Button)findViewById(R.id.Button03); transfBut = (Button)findViewById(R.id.Button04); complexBut = (Button)findViewById(R.id.Button05); alphaBut.setOnClickListener(this); scaleBut.setOnClickListener(this); rotateBut.setOnClickListener(this); transfBut.setOnClickListener(this); complexBut.setOnClickListener(this); iv1 = (ImageView)findViewById(R.id.iv1); iv2 = (ImageView)findViewById(R.id.iv2); iv3 = (ImageView)findViewById(R.id.iv3); iv4 = (ImageView)findViewById(R.id.iv4); iv5 = (ImageView)findViewById(R.id.iv5); } @Override public void onClick(View v) { Button b = (Button)v; switch(b.getId()){ case R.id.Button01://alpha alphaAnimation(); break; case R.id.Button02://scale scaleAnimation(); break; case R.id.Button03://rotate rotateAnimation(); break; case R.id.Button04 ://transf transfAnimation(); break; case R.id.Button05 ://complex complexAnimation(); break; } } /** * 综合例子 */ private void complexAnimation() { as = new AnimationSet(true);//1.实例化AnimationSet TranslateAnimation ta = new TranslateAnimation(Animation.RELATIVE_TO_PARENT, 0, Animation.RELATIVE_TO_PARENT, 0.5f, Animation.RELATIVE_TO_PARENT, 0, Animation.RELATIVE_TO_PARENT, 0); ta.setDuration(5000);//设置动画的时间 AlphaAnimation aa = new AlphaAnimation(1, 0.3f);//2.创建需要的animation aa.setDuration(3000); as.addAnimation(ta);//3.将animation加入AnimationSet as.addAnimation(aa);//3.将animation加入AnimationSet as.setFillAfter(true);//最终停止 complexBut.startAnimation(as);//4.开始动画 iv5.startAnimation(as);//开始动画 } /** * 平移 */ private void transfAnimation() { as = new AnimationSet(true);//1.实例化AnimationSet TranslateAnimation aa = new TranslateAnimation(Animation.RELATIVE_TO_PARENT, 0, Animation.RELATIVE_TO_PARENT, 1, Animation.RELATIVE_TO_PARENT, 0, Animation.RELATIVE_TO_PARENT, 1); aa.setDuration(5000);//设置动画的时间 as.addAnimation(aa);//3.将animation加入AnimationSet transfBut.startAnimation(as);//4.开始动画 iv4.startAnimation(as);//开始动画 } /** * 旋转 */ private void rotateAnimation() { as = new AnimationSet(true);//1.实例化AnimationSet RotateAnimation aa = new RotateAnimation(0, 270, Animation.RELATIVE_TO_PARENT, 0.2f, Animation.RELATIVE_TO_PARENT, 0.2f); aa.setDuration(5000);//设置动画的时间 as.addAnimation(aa);//3.将animation加入AnimationSet rotateBut.startAnimation(as);//4.开始动画 iv3.startAnimation(as);//开始动画 } /** * 变化大小 */ private void scaleAnimation() { as = new AnimationSet(true);//1.实例化AnimationSet// ScaleAnimation aa = new ScaleAnimation(1, 2, 1, 2);//2.创建需要的animation,这种构造方法是以自身为pivot ScaleAnimation aa = new ScaleAnimation(0, 1, 0, 1, Animation.RELATIVE_TO_PARENT, 0.5f, Animation.RELATIVE_TO_PARENT, 0.5f); aa.setDuration(7000);//设置动画的时间 as.addAnimation(aa);//3.将animation加入AnimationSet scaleBut.startAnimation(as);//4.开始动画 iv2.startAnimation(as);//开始动画 } /** * 透明度渐变 */ private void alphaAnimation(){ as = new AnimationSet(true);//1.实例化AnimationSet AlphaAnimation aa = new AlphaAnimation(1, 0);//2.创建需要的animation aa.setDuration(2000);//设置动画的时间 as.addAnimation(aa);//3.将animation加入AnimationSet alphaBut.startAnimation(as);//4.开始动画 iv1.startAnimation(as);//开始动画 } }?
?
?
?
?
?
?
图片平移动画时,比如从(0,0)点开始到(480,0)点结束【x轴,y轴】,现在想实现能够从另外一边出来(即感觉是一张图片的效果)???
<translate android:fromXDelta="0" android:toXDelta="480"
android:fromYDelta="0" android:toYDelta="0" android:duration="5000" />
TranslateAnimation(0, 200, 0, 0),下次在希望这个View从这个地方开始动画,怎么做?求指导。