首届Google暑期大学生博客分享大赛――2010 Andriod篇
做了一个小应用智能情景的切换,这个应用是学习android开发以来应用类开发的比较满意的一个。虽然它只有一个view 一个activity,但是却囊括了android的很多特性。借此机会,和大家分享一下这个小应用。
?
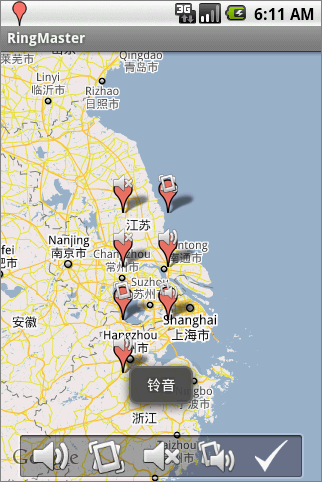
先上截图:
?
应用的主要功能是根据适当的情景(如地点,手机状态等)为用户自动的切换情景模式。
比方说:手机向上是铃音+震动,当开会时,将手机翻转,将自动切换成静音模式。
还可以根据经纬度,到达一个地方后自动切换成用户预先设置的情景模式。
(当然,由于没找到合适的经纬度换算工具,经纬度的判断目前只能是精确位置,不是范围值。
因此只能算是个学习的小应用了,实际的应用还有待完善啊。如果有高手知道的话,麻烦告诉我下。万分感谢)
?
-------------------------废话不多说开始代码部分-----------------------------------------------------
虽然是一个只有一个页面的小应用,但是
麻雀虽小,五脏俱全
这个应用的功能点主要有:
???? 改变情景模式
???? 实时获取地理位置
???? 实时判断手机重力状态
用到的技术包括:
1.android Google map的应用
2.Android组件的使用
??? Activity(MapActivity)
??? Service
??? Broadcastreceiver
3.Xml解析
4.文件存储
5.传感器使用
6.底层绘图
7.自定义view
?
由于使回头看代码,我就从简单的部分一步步介绍。
?
首先是权限问题,很多新手都犯了这个毛病,程序出错,往往是权限没有添加。
<!-- 网络链接 --> <uses-permission android:name="android.permission.INTERNET"/> <!-- 地图 --> <uses-permission android:name="android.permission.ACCESS_COARSE_LOCATION"/> <uses-permission android:name="android.permission.ACCESS_FINE_LOCATION"/> <!-- 读写权限 --> <uses-permission android:name="android.permission.WRITE_EXTERNAL_STORAGE" /> <uses-permission android:name="android.permission.WRITE" />
?这个应用需要网络连接的权限,因为Google map是实时更新的么。然后是GPS传感器关于地理位置的权限。最后需要存储用户的记录点,所以有文件读写的权限。
?
为了记录用户记录的情景地点,我使用了XML作为存储的标准,并将文件存在了SD卡上
XML解析
网络上有很详细的各种解析方式,我采用了其中的一种。如果想了解其他的请Google。。。。。
记录地点信息,我定义了一个POJO类
public class RecordLocation { private String location_Id; private String location_ring; private double location_latitude; private double location_longitude; private GeoPoint point;...篇幅关系,其他的略?XML的解析器,和网络上的其他文章一样就不多说了。能拿来用就成。
public List<RecordLocation> parse(String xml) { final RecordLocation currentMessage = new RecordLocation(); RootElement root = new RootElement("Locations"); final List<RecordLocation> messages = new ArrayList<RecordLocation>(); // Element channel = root.getChild("RespInfo"); Element item = root.getChild("Location"); item.setEndElementListener(new EndElementListener(){ public void end() { messages.add(currentMessage.copy()); } }); item.getChild("id").setEndTextElementListener(new EndTextElementListener(){ public void end(String body) { currentMessage.setLocation_Id(body); } }); item.getChild("ring").setEndTextElementListener(new EndTextElementListener(){ public void end(String body) { currentMessage.setLocation_ring(body); } }); item.getChild("latitude").setEndTextElementListener(new EndTextElementListener(){ public void end(String body) { currentMessage.setLocation_latitude(Double.valueOf(body)); } }); item.getChild("longitude").setEndTextElementListener(new EndTextElementListener(){ public void end(String body) { currentMessage.setLocation_longitude(Double.valueOf(body)); } }); try { InputStream inputStream = new ByteArrayInputStream(xml.getBytes()); Xml.parse(inputStream, Xml.Encoding.UTF_8, root.getContentHandler()); } catch (Exception e) { throw new RuntimeException(e); } return messages; }?POJO类转化成XML字符串
public static String writeXml(List<RecordLocation> data){ XmlSerializer serializer = Xml.newSerializer(); StringWriter writer = new StringWriter(); try{ serializer.setOutput(writer); // <?xml version=”1.0″ encoding=”UTF-8″ standalone=”yes”?> serializer.startDocument("UTF-8",true); serializer.startTag("","Locations"); for(int i=0;i<data.size();i++){ serializer.startTag("","Location"); serializer.startTag("","id"); serializer.text(data.get(i).getLocation_Id()); serializer.endTag("","id"); serializer.startTag("","ring"); serializer.text(data.get(i).getLocation_ring()); serializer.endTag("","ring"); serializer.startTag("","latitude"); serializer.text(String.valueOf(data.get(i).getLocation_latitude())); serializer.endTag("","latitude"); serializer.startTag("","longitude"); serializer.text(String.valueOf(data.get(i).getLocation_longitude())); serializer.endTag("","longitude"); serializer.endTag("","Location"); } serializer.endTag("","Locations"); serializer.endDocument(); return writer.toString(); } catch(Exception e) { throw new RuntimeException(e); } }?有了XML的字符串后只要将它存储起来就行,需要使用是再读取
以下是存储和读取文件函数。由于SD卡的读取还需要判断SD卡的状态,函数比较长,就贴存手机内存的代码
反正大同小异
public static InputStream readInternalFileInputStream(Context context,String fileName){ /** * 读取手机内存文件 * */ try{ FileInputStream fis = context.openFileInput(fileName); return fis; }catch(Exception e){ return null; } } public static String readInternalFile(Context context,String fileName){ /** * 读取手机内存文件 * */ try{ byte[] buffer = new byte[512]; int read =0; StringBuffer stringbuffer = new StringBuffer(); FileInputStream fis = context.openFileInput(fileName); do{ read = fis.read(buffer); if(read>0) stringbuffer.append(new String(buffer, 0, read, "utf-8")); }while(read!=-1); fis.close(); return stringbuffer.toString(); }catch(Exception e){ return null; } }?数据存储部分完毕了。接下来是关于切换手机情景的功能
?
手机的铃音设置
AudioManager audio = (AudioManager)context.getSystemService(Context.AUDIO_SERVICE);// 铃声和震动 protected void ringAndVibrate(AudioManager audio){ audio.setRingerMode(AudioManager.RINGER_MODE_NORMAL); audio.setVibrateSetting(AudioManager.VIBRATE_TYPE_RINGER, AudioManager.VIBRATE_SETTING_ON); audio.setVibrateSetting(AudioManager.VIBRATE_TYPE_NOTIFICATION, AudioManager.VIBRATE_SETTING_ON); } // 铃声 protected void ring(AudioManager audio){ audio.setRingerMode(AudioManager.RINGER_MODE_NORMAL); audio.setVibrateSetting(AudioManager.VIBRATE_TYPE_RINGER, AudioManager.VIBRATE_SETTING_OFF); audio.setVibrateSetting(AudioManager.VIBRATE_TYPE_NOTIFICATION, AudioManager.VIBRATE_SETTING_OFF); } // 震动 protected void vibrate(AudioManager audio){ audio.setRingerMode(AudioManager.RINGER_MODE_VIBRATE); audio.setVibrateSetting(AudioManager.VIBRATE_TYPE_RINGER, AudioManager.VIBRATE_SETTING_ON); audio.setVibrateSetting(AudioManager.VIBRATE_TYPE_NOTIFICATION, AudioManager.VIBRATE_SETTING_ON); } // 静音 protected void silent(AudioManager audio){ audio.setRingerMode(AudioManager.RINGER_MODE_SILENT); audio.setVibrateSetting(AudioManager.VIBRATE_TYPE_RINGER, AudioManager.VIBRATE_SETTING_OFF); audio.setVibrateSetting(AudioManager.VIBRATE_TYPE_NOTIFICATION, AudioManager.VIBRATE_SETTING_OFF); } // 改变声音-----减小 protected void lowerVoice(AudioManager audio, int voice){ audio.setRingerMode(AudioManager.ADJUST_LOWER); audio.adjustVolume(AudioManager.ADJUST_LOWER, voice); } // 改变声音-----增加 protected void addVoice(AudioManager audio, int voice){ audio.setRingerMode(AudioManager.ADJUST_RAISE); audio.adjustVolume(AudioManager.ADJUST_RAISE, voice); }?这里我使用了BroadcastReceiver(广播接收器)。当需要更改情景模式时,发送一个intent出来,BroadcastReceiver接收到这个intent后根据intent内携带的值判断切换成那种情景模式
?
BroadcastReceiver的使用需要在androidmanifest文件中申明
<receiver android:name=".RingBroadcastReceiver"> <intent-filter> <action android:name="cn.zucc.yoyo.ringmaster.RING_RECEIVER" /> </intent-filter> </receiver>
?当触发一定情景时只要发送一个Intent。广播接收器就可以接受到,然后执行相应代码
Intent intent = new Intent("cn.zucc.yoyo.ringmaster.RING_RECEIVER"); Bundle bundle = new Bundle(); bundle.putDouble("latitude", currentGeoPoint.getLatitudeE6()); bundle.putDouble("longitude", currentGeoPoint.getLongitudeE6()); intent.putExtra("location", bundle); // 发送广播 sendBroadcast(intent);?
接下来是实时获取用户当前的位置
?
我们的activity是时常被用户打断的。即被置到后台,用户处理其他事情去了。所以实时更新位置信息就需要使用service组件。该组件将一直运行在后台,除非你停止它。
?
service的使用也需要在androidmanifest文件中定义
<service android:name=".RingService" android:process=":remote"> <intent-filter> <action android:name="cn.zucc.yoyo.ringmaster.RING_SERVICE" /> </intent-filter> </service>?
?
对于service我们只需要知道它的5个生命周期,然后在相应的周期中干我们需要的事情即可。
而启动一个service,和停止service也很简单
?
startService(new Intent(
??????????? ??? "cn.zucc.yoyo.ringmaster.RING_SERVICE2"));
startService(new Intent( "cn.zucc.yoyo.ringmaster.RING_SERVICE2"));stopService(new Intent( "cn.zucc.yoyo.ringmaster.RING_SERVICE2"));
?
补充一点,关于手机重力感应,因为也是需要实时判断,所以我也将它添加在service中。
private SensorManager sensorMgr ; private SensorEventListener lsn ;sensorMgr = (SensorManager) getSystemService(SENSOR_SERVICE); Sensor sensor = sensorMgr.getDefaultSensor(Sensor.TYPE_ACCELEROMETER); lsn = new SensorEventListener() { public void onSensorChanged(SensorEvent e) { //x = e.values[SensorManager.DATA_X]; // y = e.values[SensorManager.DATA_Y]; z = (int) e.values[SensorManager.DATA_Z]; if(z>5&&(audio.getRingerMode()!=AudioManager.RINGER_MODE_NORMAL)){ Intent intent = new Intent("android.provider.Telephony.SMS_RECEIVER"); intent.putExtra("ringmode", 4); // 发送广播 sendBroadcast(intent); }else if(z<-5&&(audio.getRingerMode()!=AudioManager.RINGER_MODE_SILENT)){ Intent intent = new Intent("android.provider.Telephony.SMS_RECEIVER"); intent.putExtra("ringmode", 3); // 发送广播 sendBroadcast(intent); } // setTitle("x="+(int)x+","+"y="+(int)y+","+"z="+(int)z); } public void onAccuracyChanged(Sensor s, int accuracy) { } }; ?当手机状态变化时就发送相应的intent广播。。广播接收器接收到后根据intent携带的值,改变情景模式。
?
而用户当前位置的更新问题也和上面的重力感应更新差不多
private LocationManager mLocationManager;mLocationManager = (LocationManager)getSystemService(Context.LOCATION_SERVICE); updateMyLocation(mLocationManager);/**更新我的位置 * * */ String strLocationProvider="test"; public void updateMyLocation(LocationManager lm){ /* 第一次运行向Location Provider取得Location */ Location mLocation01 = getLocationProvider(lm); if(mLocation01!=null) { processLocationUpdated(mLocation01); } else { Toast.makeText(this,"位置初始化出错", Toast.LENGTH_SHORT).show(); } /* 创建LocationManager对象,监听Location更改时事件,更新MapView */ lm.requestLocationUpdates (strLocationProvider, 2000, 10, mLocationListener01); } public Location getLocationProvider(LocationManager lm) {//设定:地理位置获取的参数信息 Location retLocation = null; try { Criteria mCriteria01 = new Criteria(); mCriteria01.setAccuracy(Criteria.ACCURACY_FINE); mCriteria01.setAltitudeRequired(false); mCriteria01.setBearingRequired(false); mCriteria01.setCostAllowed(true); mCriteria01.setPowerRequirement(Criteria.POWER_LOW); strLocationProvider = lm.getBestProvider(mCriteria01, true); retLocation = lm.getLastKnownLocation(strLocationProvider); } catch(Exception e) { // mTextView01.setText(e.toString()); e.printStackTrace(); } return retLocation; } /**位置监听器*/ public final LocationListener mLocationListener01 = new LocationListener() { public void onLocationChanged(Location location) { // TODO Auto-generated method stub /* 当手机收到位置更改时,将location传入取得地理坐标 */ processLocationUpdated(location); } public void onProviderDisabled(String provider) { // TODO Auto-generated method stub /* 当Provider已离开服务范围时 */ Toast.makeText(RingService.this, "无地理位置信息可用", Toast.LENGTH_SHORT).show(); } public void onProviderEnabled(String provider) { // TODO Auto-generated method stub } public void onStatusChanged (String provider, int status, Bundle extras) { // TODO Auto-generated method stub } }; /* 当手机收到位置更改,将location传入GeoPoint及MapView */ private void processLocationUpdated(Location location) { /* 传入Location对象,取得GeoPoint地理坐标 */ GeoPoint currentGeoPoint = getGeoByLocation(location); /** * */ Log.i("service--------",currentGeoPoint.getLatitudeE6()+":"+currentGeoPoint.getLongitudeE6()); //读取记录的位置信息 Intent intent = new Intent("android.provider.Telephony.SMS_RECEIVER2"); Bundle bundle = new Bundle(); bundle.putDouble("latitude", currentGeoPoint.getLatitudeE6()); bundle.putDouble("longitude", currentGeoPoint.getLongitudeE6()); intent.putExtra("location", bundle); // 发送广播 sendBroadcast(intent); Log.i("service--------", "been send"); Intent intent2 = new Intent("cn.yoyo.locationupdate"); Bundle bundle2 = new Bundle(); bundle2.putDouble("latitude", currentGeoPoint.getLatitudeE6()); bundle2.putDouble("longitude", currentGeoPoint.getLongitudeE6()); intent2.putExtra("location", bundle2); // 发送广播 sendBroadcast(intent2); Log.i("service--------", "been send"); // Toast.makeText(this, "情景已切换", Toast.LENGTH_SHORT).show(); } /**location->geopoint*/ public static GeoPoint getGeoByLocation(Location location) { GeoPoint gp = null; try { /* 当Location存在 */ if (location != null) { double geoLatitude = location.getLatitude()*1E6; double geoLongitude = location.getLongitude()*1E6; gp = new GeoPoint((int) geoLatitude, (int) geoLongitude); } } catch(Exception e) { e.printStackTrace(); } return gp; }?最后就是使用android Google map .使用关于如何使用Google map网上也有很详细的介绍,有时间我将专门详细的写一篇关于Google map的。
?
这里重点介绍下如何在Mapview上添加自定义标记的问题,当我在查找相关资料时,由于他们用的就是旧版的SDK,所以代码没有运行起来。
要向Mapview添加标记只要如下代码即可。
MapLocationOverlay overlay = new MapLocationOverlay(this); mapView.getOverlays().add(overlay);
?这里我继承Overlay,实现了自己的一个标记MapLocationOverlay
public class MapLocationOverlay extends Overlay { private Bitmap bubbleIcon, shadowIcon; private Bitmap bubbleVolume,bubbleVolumeOff,bubbleVibrate,bubbleVolumeeVibrate; private MapLocationViewer mapLocationViewer; private Paint innerPaint, borderPaint, textPaint; private RecordLocation selectedMapLocation; private Handler mHandler; public void setinfowindow(Handler handler){ this.mHandler = handler; } public MapLocationOverlay(MapLocationViewer mapLocationViewer) { this.mapLocationViewer = mapLocationViewer; bubbleIcon = BitmapFactory.decodeResource(mapLocationViewer.getResources(),R.drawable.bubble); bubbleVolume = BitmapFactory.decodeResource(mapLocationViewer.getResources(),R.drawable.bubble_volume); bubbleVolumeOff = BitmapFactory.decodeResource(mapLocationViewer.getResources(),R.drawable.bubble_volumeoff); bubbleVibrate = BitmapFactory.decodeResource(mapLocationViewer.getResources(),R.drawable.bubble_vibrate); bubbleVolumeeVibrate = BitmapFactory.decodeResource(mapLocationViewer.getResources(),R.drawable.bubble_volumevibrate); shadowIcon = BitmapFactory.decodeResource(mapLocationViewer.getResources(),R.drawable.shadow); } @Override public boolean onTap(GeoPoint p, MapView mapView) { // Store whether prior popup was displayed so we can call invalidate() & remove it if necessary. boolean isRemovePriorPopup = selectedMapLocation != null; // Next test whether a new popup should be displayed selectedMapLocation = getHitMapLocation(mapView,p); if ( isRemovePriorPopup || selectedMapLocation != null) { if(selectedMapLocation==null){ //发送消息 Message msg = mHandler.obtainMessage(); msg.what = RingMaster.REFERSH_LOCATION; Bundle b = new Bundle(); b.putInt("view",android.view.View.GONE); msg.setData(b); mHandler.sendMessage(msg); }else{ //发送消息 Message msg = mHandler.obtainMessage(); msg.what = RingMaster.REFERSH_LOCATION; Bundle b = new Bundle(); b.putString("location", selectedMapLocation.getLocation_Id()); //b.putString("ringmode", selectedMapLocation.getLocation_ring()); b.putDouble("latitude", selectedMapLocation.getLocation_latitude()); b.putDouble("longitude", selectedMapLocation.getLocation_longitude()); b.putInt("view", android.view.View.VISIBLE); msg.setData(b); mHandler.sendMessage(msg); mapView.getController().animateTo(p); mapView.invalidate(); } } // Lastly return true if we handled this onTap() return selectedMapLocation != null; } @Override public void draw(Canvas canvas, MapView mapView, boolean shadow) { drawMapLocations(canvas, mapView, shadow); //drawInfoWindow(canvas, mapView, shadow); } private RecordLocation getHitMapLocation(MapView mapView, GeoPoint tapPoint) { // Track which MapLocation was hit...if any RecordLocation hitMapLocation = null; RectF hitTestRecr = new RectF(); Point screenCoords = new Point(); Iterator<RecordLocation> iterator = mapLocationViewer.getMapLocations().iterator(); while(iterator.hasNext()) { RecordLocation testLocation = iterator.next(); // Translate the MapLocation's lat/long coordinates to screen coordinates mapView.getProjection().toPixels(testLocation.getPoint(), screenCoords); // Create a 'hit' testing Rectangle w/size and coordinates of our icon // Set the 'hit' testing Rectangle with the size and coordinates of our on screen icon hitTestRecr.set(-bubbleIcon.getWidth()*2,-bubbleIcon.getHeight()*2,bubbleIcon.getWidth()*2,0); hitTestRecr.offset(screenCoords.x,screenCoords.y); // Finally test for a match between our 'hit' Rectangle and the location clicked by the user mapView.getProjection().toPixels(tapPoint, screenCoords); if (hitTestRecr.contains(screenCoords.x,screenCoords.y)) { hitMapLocation = testLocation; break; } } // Lastly clear the newMouseSelection as it has now been processed tapPoint = null; return hitMapLocation; } private static final int VOLUME=1,VIBRATE=2,VOLUMEOFF=3,VOLUMEVIBRATE=4; private void drawMapLocations(Canvas canvas, MapView mapView, boolean shadow) { if(mapLocationViewer.getMapLocations()!=null){ Iterator<RecordLocation> iterator = mapLocationViewer.getMapLocations().iterator(); Point screenCoords = new Point(); while(iterator.hasNext()) { RecordLocation location = iterator.next(); mapView.getProjection().toPixels(location.getPoint(), screenCoords); if (shadow) { // Only offset the shadow in the y-axis as the shadow is angled so the base is at x=0; canvas.drawBitmap(shadowIcon, screenCoords.x, screenCoords.y - shadowIcon.getHeight(),null); } else { switch(Integer.valueOf(location.getLocation_ring())){ case VOLUME: canvas.drawBitmap(bubbleVolume, screenCoords.x - bubbleVolume.getWidth()/2, screenCoords.y - bubbleVolume.getHeight(),null); break; case VIBRATE: canvas.drawBitmap(bubbleVibrate, screenCoords.x - bubbleVibrate.getWidth()/2, screenCoords.y - bubbleVibrate.getHeight(),null); break; case VOLUMEOFF: canvas.drawBitmap(bubbleVolumeOff, screenCoords.x - bubbleVolumeOff.getWidth()/2, screenCoords.y - bubbleVolumeOff.getHeight(),null); break; case VOLUMEVIBRATE: canvas.drawBitmap(bubbleVolumeeVibrate, screenCoords.x - bubbleVolumeeVibrate.getWidth()/2, screenCoords.y - bubbleVolumeeVibrate.getHeight(),null); break; default: canvas.drawBitmap(bubbleIcon, screenCoords.x - bubbleIcon.getWidth()/2, screenCoords.y - bubbleIcon.getHeight(),null); break; } } } } } public Paint getInnerPaint() { if ( innerPaint == null) { innerPaint = new Paint(); innerPaint.setARGB(225, 75, 75, 75); //gray innerPaint.setAntiAlias(true); } return innerPaint; } public Paint getBorderPaint() { if ( borderPaint == null) { borderPaint = new Paint(); borderPaint.setARGB(255, 255, 255, 255); borderPaint.setAntiAlias(true); borderPaint.setStyle(Style.STROKE); borderPaint.setStrokeWidth(2); } return borderPaint; } public Paint getTextPaint() { if ( textPaint == null) { textPaint = new Paint(); textPaint.setARGB(255, 255, 255, 255); textPaint.setAntiAlias(true); } return textPaint; }?注:这里可能有些函数是无用的,因为这个类还实现在Mapview上出现infowindow的效果。不过这里为了简化起见我就删了。
?
?
最后总结一下:其实开发一个应用,我都是先从view开始,然后更具应用需要的,进行单个功能的开发,最后就是ctrl+c和V了呵呵。
但这里正好是反过来了。想从易道难成列。。。哈哈毕竟是新手,第一次写这种文章,大家见谅吧。
?
这个应用只有一个activity,既只有一个view。在这个view中有Mapview。
而使用Google map 基本上就是让这个activity继承MapActivity,然后对这个Mapview对象进行操作了。
这个应用通过两个service分别运行在后台,其一实时更新用户的位置,其二实时跟新手机的重力状态。进而发送相应的intent广播,而这个intent广播携带了情景模式的信息,当boardcastreceiver(广播接收器)接受到这个广播后就调用相应函数并根据intent携带的信息改变手机的情景。而用户每次记录的地点和情景,则使用了XML文件进行读写。
在mapview上的自定义标记采用了重写ondraw方法的方式,在底层自己绘制。
?
或者能不能给我相信说下 service的数据接收 谢谢 [email protected]