Android驱动入门系列(一) ―― Android驱动简介及编写第一个Android驱动
以下文章参考网上搜到的《Android驱动开发全过程(有图有真相)》一文,其中根据自己的实际编写情况作了部分修改,不用作商业用途
前言
意外在网上发现了这扁文章,看后感觉很有必要分享,所以整理并上传,希望大家喜欢。
Android 硬件抽象层(HAL)概要介绍和学习计划
Android 的硬件抽象层,简单来说,就是对Linux内核驱动程序的封装,向上提供接口,屏蔽低层的实现细节。也就是说,把
对硬件的支持分成了两层,一层放在用户空间(User Space),一层放在内核空间(Kernel Space),其中,硬件抽象层运行在
用户空间,而Linux内核驱动程序运行在内核空间。为什么要这样安排呢?把硬件抽象层和内核驱动整合在一起放在内核空间
不可行吗?从技术实现的角度来看,是可以的,然而从商业的角度来看,把对硬件的支持逻辑都放在内核空间,可能会损害
厂家的利益。我们知道,Linux内核源代码版权遵循GNU License,而Android源代码版权遵循Apache License,前者在发布产
品时,必须公布源代码,而后者无须发布源代码。如果把对硬件支持的所有代码都放在Linux驱动层,那就意味着发布时要公
开驱动程序的源代码,而公开源代码就意味着把硬件的相关参数和实现都公开了,在手机市场竞争激烈的今天,这对厂家来
说,损害是非常大的。因此,Android才会想到把对硬件的支持分成硬件抽象层和内核驱动层,内核驱动层只提供简单的访问
硬件逻辑,例如读写硬件寄存器的通道,至于从硬件中读到了什么值或者写了什么值到硬件中的逻辑,都放在硬件抽象层中
去了,这样就可以把商业秘密隐藏起来了。也正是由于这个分层的原因,Android被踢出了Linux 内核主线代码树中。大家想
想,Android放在内核空间的驱动程序对硬件的支持是不完整的,把Linux内核移植到别的机器上去时,由于缺乏硬件抽象层
的支持,硬件就完全不能用了,这也是为什么说Android是开放系统而不是开源系统的原因。撇开这些争论,学习Android硬
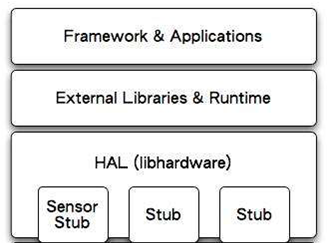
件抽象层,对理解整个Android整个系统,都是极其有用的,因为它从下到上涉及到了Android系统的硬件驱动层、硬件抽象
层、运行时库和应用程序框架层等等,下面这个图阐述了硬件抽象层在Android系统中的位置,以及它和其它层的关系:
在学习Android硬件抽象层的过程中,我们将会学习如何在内核空间编写硬件
驱动程序、如何在硬件抽象层中添加接口支持访问硬件、如何在系统启动时
提供硬件访问服务以及 如何编写JNI使得可以通过Java 接口来访问硬件,而
作为中间的一个小插曲,我们还将学习一下如何在Android系统中添加一个C
可执行程序来访问硬件驱动程序。由于这是一个系统的学习过程,笔者将分
成六篇文章来描述每一个学习过程,包括:
一. 在Android 内核源代码工程中编写硬件驱动程序。
二. 在Android 系统中增加C可执行程序来访问硬件驱动程序。
三. 在Android 硬件抽象层增加接口模块访问硬件驱动程序。
四. 在Android 系统中编写JNI方法在应用程序框架层提供Java接口访问硬件。
五. 在Android 系统的应用程序框架层增加硬件服务接口。
六. 在Android 系统中编写APP通过应用程序框架层访问硬件服务。
学习完这六篇文章,相信大家对Android系统就会有一个更深刻的认识了,敬请关注。
在Ubuntu 上为Android 系统编写Linux 内核驱动程序
这里,我们不会为真实的硬件设备编写内核驱动程序。为了方便描述为Android系统编写内核驱动程序的过程,我们使用一
个虚拟的硬件设备,这个设备只有一个4字节的寄存器,它可读可写。想起我们第一次学习程序语言时,都喜欢用“Hello, World”
作为例子,这里,我们就把这个虚拟的设备命名为“hello”,而这个内核驱动程序也命名为hello驱动程序。其实,Android内
核驱动程序和一般Linux内核驱动程序的编写方法是一样的,都是以Linux模块的形式实现的,具体可参考前面Android学习
启动篇一文中提到的Linux Device Drivers一书。不过,这里我们还是从Android系统的角度来描述Android内核驱动程序的编
写和编译过程。
一. 参照这两篇文章在Ubuntu 上下载、编译和安装Android 最新源代码和在Ubuntu 上下载、编译和安装Android 最新内核源
代码(Linux Kernel)准备好Android内核驱动程序开发环境。(我这里使用的Android 4.0.4版本)
二. 进入到samsung_android_kernel_3.0/drivers目录,新建hello 目录:
[email protected]:~/workspace/samsung_android_kernel_3.0# cd drivers/[email protected]:~/workspace/samsung_android_kernel_3.0/drivers# mkdir hello
三. 在hello 目录中增加hello.h 文件:
#ifndef _HELLO_ANDROID_H_#define _HELLO_ANDROID_H_#include <linux/cdev.h>#include <linux/semaphore.h>#define HELLO_DEVICE_NODE_NAME "hello"#define HELLO_DEVICE_FILE_NAME "hello"#define HELLO_DEVICE_PROC_NAME "hello"#define HELLO_DEVICE_CLASS_NAME "hello"struct hello_android_dev{ int val; struct semaphore sem; struct cdev dev;};#endif这个头文件定义了一些字符串常量宏,在后面我们要用到。此外,还定义了一个字符设备结构体hello_Android_dev,这个就
是我们虚拟的硬件设备了,val成员变量就代表设备里面的寄存器,它的类型为int,sem成员变量是一个信号量,是用同步
访问寄存器val的,dev 成员变量是一个内嵌的字符设备,这个Linux驱动程序自定义字符设备结构体的标准方法。
四.在hello 目录中增加hello.c 文件,这是驱动程序的实现部分。驱动程序的功能主要是向上层提供访问设备的寄存器的值,
包括读和写。这里,提供了三种访问设备寄存器的方法,一是通过proc文件系统来访问,二是通过传统的设备文件的方法来
访问,三是通过devfs文件系统来访问。下面分段描述该驱动程序的实现。
首先是包含必要的头文件和定义三种访问设备的方法:hello.c
#include <linux/init.h>#include <linux/module.h>#include <linux/types.h>#include <linux/fs.h>#include <linux/proc_fs.h>#include <linux/device.h>#include <asm/uaccess.h>#include "hello.h"// * Master and slave devices number variablesstatic int hello_major = 0;static int hello_minor = 0;// * device types and device variablesstatic struct class* hello_class = NULL;static struct hello_android_dev* hello_dev = NULL;// * traditional method of operation of the device filestatic int hello_open(struct inode* inode, struct file* flip);static int hello_release(struct inode* inode, struct file* flip);static ssize_t hello_read(struct file* flip, char __user* buf, size_t count, loff_t* f_pos);static ssize_t hello_write(struct file* flip, const char __user* buf, size_t count, loff_t* f_pos);// * the method of operation of the device file tablestatic struct file_operations hello_fops = { .owner = THIS_MODULE, .open = hello_open, .release = hello_release, .read = hello_read, .write = hello_write,};// * access to set property methodsstatic ssize_t hello_val_show(struct device* dev, struct device_attribute* attr, char* buf);static ssize_t hello_val_store(struct device* dev, struct device_attribute* attr, const char* buf, size_t count);// * define the device propertiesstatic DEVICE_ATTR(val, S_IRUGO | S_IWUSR, hello_val_show, hello_val_store);// * open the device methodsstatic int hello_open(struct inode* inode, struct file* flip){ struct hello_android_dev* dev; // save the device struct to the private area dev = container_of(inode->i_cdev, struct hello_android_dev, dev); flip->private_data = dev; return 0;}// * releasestatic int hello_release(struct inode* inode, struct file* filp){ return 0;}// * readstatic ssize_t hello_read(struct file* filp, char __user* buf, size_t count, loff_t* f_pos){ ssize_t err = 0; struct hello_android_dev* dev = filp->private_data; // async access if(down_interruptible( &(dev->sem) )){ return -ERESTARTSYS; } if(count < sizeof(dev->val) ){ goto out; } // if(copy_to_user(buf, &(dev->val), sizeof(dev->val) )){ err = -EFAULT; goto out; } err = sizeof(dev->val);out: up(&(dev->sem)); return err;}// * writestatic ssize_t hello_write(struct file* filp, const char __user* buf, size_t count, loff_t* f_pos){ struct hello_android_dev* dev = filp->private_data; ssize_t err = 0; // async access if(down_interruptible( &(dev->sem) )){ return -ERESTARTSYS; } if(count != sizeof(dev->val) ){ goto out; } // save the buffer value to device registers if( copy_from_user( &(dev->val), buf, count) ){ err = -EFAULT; goto out; } err = sizeof(dev->val);out: up(&(dev->sem)); return err;}// * read the registers value val to the buffer buf, innerstatic ssize_t __hello_get_val(struct hello_android_dev* dev, char* buf){ int val = 0; // async access if(down_interruptible( &(dev->sem) )){ return -ERESTARTSYS; } val = dev->val; up( &(dev->sem) ); return snprintf(buf, PAGE_SIZE, "%d\n", val);}// * write the buffer value buf to the device registers val, innerstatic ssize_t __hello_set_val(struct hello_android_dev* dev, const char* buf, size_t count){ int val = 0; // translate the string to number val = simple_strtol(buf, NULL, 10); // async access if(down_interruptible( &(dev->sem) )){ return -ERESTARTSYS; } dev->val = val; up( &(dev->sem)); return count;}// * read the device properties valstatic ssize_t hello_val_show(struct device* dev, struct device_attribute* attr, char* buf){ struct hello_android_dev* hdev = (struct hello_android_dev*)dev_get_drvdata(dev); return __hello_get_val(hdev, buf);}// * write the device properties valstatic ssize_t hello_val_store(struct device* dev, struct device_attribute* attr, const char* buf, size_t count){ struct hello_android_dev* hdev = (struct hello_android_dev*)dev_get_drvdata(dev); return __hello_set_val(hdev, buf, count);}// * read the device registers val, and save to the page bufferstatic ssize_t hello_proc_read(char* page, char** start, off_t off, int count, int* eof, void* data){ if(off > 0){ *eof = 1; return 0; } return __hello_get_val(hello_dev, page);}// * save the buffer value buff to the device registers valstatic ssize_t hello_proc_write(struct file* filp, const char __user* buff, unsigned long len, void* data){ int err = 0; char* page = NULL; if(len > PAGE_SIZE){ printk(KERN_ALERT"The buff is too large:%lu.\n", len); return -EFAULT; } page = (char*)__get_free_page(GFP_KERNEL); if(!page){ printk(KERN_ALERT"Failed to alloc page.\n"); return -ENOMEM; } // copy the user buffer value to kernel buffer if(copy_from_user(page, buff, len) ){ printk(KERN_ALERT"Failed to copy buff from user.\n"); err = -EFAULT; goto out; } err = __hello_set_val(hello_dev, page, len); out: free_page( (unsigned long)page); return err;}// * create /proc/hello filestatic void hello_create_proc(void){ struct proc_dir_entry* entry; entry = create_proc_entry(HELLO_DEVICE_PROC_NAME, 0, NULL); if(entry){ entry->owner = THIS_MODULE; entry->read_proc = hello_proc_read; entry->write_proc = hello_proc_write; }}// * delete /proc/hello filestatic void hello_remove_proc(void){ remove_proc_entry(HELLO_DEVICE_PROC_NAME, NULL);}// * init devicestatic int __hello_setup_dev(struct hello_android_dev* dev){ int err; dev_t devno = MKDEV(hello_major, hello_minor); memset(dev, 0, sizeof(struct hello_android_dev) ); cdev_init( &(dev->dev), &hello_fops); dev->dev.owner = THIS_MODULE; dev->dev.ops = &hello_fops; // registe charater device err = cdev_add( &(dev->dev), devno, 1); if(err){ return err; } // init single and registers value val init_MUTEX(&(dev->sem)); dev->val = 0; return 0;}// * load modulestatic int __init hello_init(void){ int err = -1; dev_t dev = 0; struct device* temp = NULL; printk(KERN_ALERT"Initializing hello device.\n"); // malloc master and slave device number err = alloc_chrdev_region( &dev, 0, 1, HELLO_DEVICE_NODE_NAME); if(err < 0){ printk(KERN_ALERT"Failed to alloc char dev region.\n"); goto fail; } hello_major = MAJOR(dev); hello_minor = MINOR(dev); // alloc hello device struct valiriable hello_dev = kmalloc( sizeof(struct hello_android_dev), GFP_KERNEL); if(!hello_dev){ err = -ENOMEM; printk(KERN_ALERT"Failed to alloc hello_dev.\n"); goto unregister; } // init device err = __hello_setup_dev(hello_dev); if(err){ printk(KERN_ALERT"Failed to setup dev:%d.\n", err); goto cleanup; } // create device type directory hello on /sys/class/ hello_class = class_create(THIS_MODULE, HELLO_DEVICE_CLASS_NAME); if(IS_ERR(hello_class)){ err = PTR_ERR(hello_class); printk(KERN_ALERT"Failed to create hello class.\n"); goto destroy_cdev; } // create device file hello on /dev/ and /sys/class/hello temp = device_create(hello_class, NULL, dev, "%s", HELLO_DEVICE_FILE_NAME); if(IS_ERR(temp)){ err = PTR_ERR(temp); printk(KERN_ALERT"Failed to create hello device.\n"); goto destroy_class; } // create property file val on /sys/class/hello/hello err = device_create_file(temp, &dev_attr_val); if(err < 0){ printk(KERN_ALERT"Failed to create attribute val.\n"); goto destroy_device; } dev_set_drvdata(temp, hello_dev); // create /proc/hello file hello_create_proc(); printk(KERN_ALERT"Successed to initialize hello device.\n"); return 0; destroy_device: device_destroy(hello_class, dev);destroy_class: class_destroy(hello_class);destroy_cdev: cdev_del(&hello_dev->dev);cleanup: kfree(hello_dev);unregister: unregister_chrdev_region(MKDEV(hello_major, hello_minor), 1);fail: return err;}// * unload modulestatic void __exit hello_exit(void){ dev_t devno = MKDEV(hello_major, hello_minor); printk(KERN_ALERT"Destroy hello device.\n"); // delete /proc/hello file hello_remove_proc(); // destroy device type and device if(hello_class){ device_destroy(hello_class, MKDEV(hello_major, hello_minor) ); class_destroy(hello_class); } // delete character device and release device memory if(hello_dev){ cdev_del(&(hello_dev->dev) ); kfree(hello_dev); } // destroy device number unregister_chrdev_region(devno, 1);}MODULE_LICENSE("GPL");MODULE_DESCRIPTION("First Android Device");module_init(hello_init);module_exit(hello_exit);
五.在hello 目录中新增Kconfig 和Makefile 两个文件,其中Kconfig 是在编译前执行配置命令make menuconfig 时用到的,而
Makefile 是执行编译命令make是用到的:
Kconfig 文件的内容:
config HELLOtristate "First Android Driver"default nhelpThis is brantyou first Android driver.
Makefile 文件的内容:
obj-$(CONFIG_HELLO) += hello.o
在Kconfig文件中,tristate 表示编译选项HELLO 支持在编译内核时,hello模块支持以模块、内建和不编译三种编译方
法,默认是不编译,因此,在编译内核前,我们还需要执行make menuconfig命令来配置编译选项,使得hello可以以模块或
者内建的方法进行编译。
在Makefile 文件中,根据选项HELLO的值,执行不同的编译方法。
六. 修改arch/arm/Kconfig 和drivers/Kconfig 两个文件,在menu "Device Drivers"和endmenu 之间添加一行:
source "drivers/hello/Kconfig"
这样,执行make menuconfig时,就可以配置hello 模块的编译选项了。.
(PS:在我的操作中发现,arch/arm/Kconfig里面不需要修改,因为其中有个菜单选项关于Device的已经指向了drivers/Kconfig这里,所以只需要修改这里就OK)
七. 修改drivers/Makefile 文件,添加一行:
obj-$(CONFIG_HELLO) += hello/
八. 配置编译选项:
[email protected]:~/workspace/samsung_android_kernel_3.0# make menuconfig
找到"Device Drivers" => "First Android Drivers"选项,设置为y。
注意,如果内核不支持动态加载模块,这里不能选择m,虽然我们在Kconfig文件中配置了HELLO 选项为tristate。
要支持动态加载模块选项,必须要在配置菜单中选择Enable loadable module support选项;在支持动态卸载模块选项,必须
要在Enable loadable module support菜单项中,选择Module unloading选项。
九. 编译:
[email protected]:~/workspace/samsung_android_kernel_3.0# make
编译成功后,就可以在hello 目录下看到hello.o 文件了,这时候编译出来的zImage已经包含了hello 驱动。
十. 运行新编译的内核文件,验证hello 驱动程序是否已经正常安装:
PS: 我这里是重新烧写zImage到板子上测试的,下面两句是直接在模拟器上测试的。
[email protected]:~/Android$ emulator -kernel ./kernel/common/arch/arm/boot/zImage &
[email protected]:~/Android$ adb shell
进入到dev目录,可以看到hello 设备文件:
[email protected]:/ # cd dev
[email protected]:/dev # ls
进入到proc目录,可以看到hello 文件:
[email protected]:/ # cd proc
[email protected]:/proc # ls
访问hello文件的值:
[email protected]:/proc # cat hello
0
[email protected]:/proc # echo '5' > hello
[email protected]:/proc # cat hello
5
进入到sys/class目录,可以看到hello 目录:
[email protected]:/ # cd sys/class
[email protected]:/sys/class # ls
进入到hello目录,可以看到hello 目录:
[email protected]:/sys/class # cd hello
[email protected]:/sys/class/hello # ls
进入到下一层hello目录,可以看到val 文件:
[email protected]:/sys/class/hello # cd hello
[email protected]:/sys/class/hello/hello # ls
访问属性文件val的值:
[email protected]:/sys/class/hello/hello # cat val
5
[email protected]:/sys/class/hello/hello # echo '0' > val
[email protected]:/sys/class/hello/hello # cat val
0
至此,我们的hello内核驱动程序就完成了,并且验证一切正常。这里我们采用的是系统提供的方法和驱动程序进行
交互,也就是通过proc文件系统和devfs 文件系统的方法,下一篇文章中,我们将通过自己编译的C语言程序来访问/dev/hello
文件来和hello 驱动程序交互,敬请期待。
如过程中碰到问题,可参考我的其他blog。