今天学习的控件是Toast 。 Toast 可以说是android开发中最方便的提示方式了。今天主要学习如何自定义一个Toast控件(自定义的Toast不是那么美观,凑合着用吧^_^)。
先来看看效果图
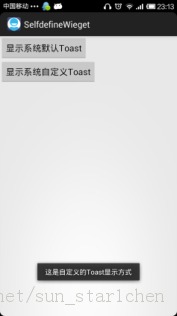
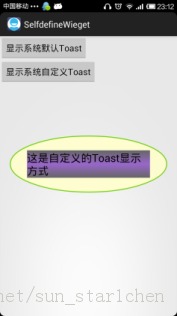
(图一)系统默认Toast (图二)自定义Toast
图一使用常用的方法
Toast.makeText(this, R.string.customer_toast_content, Toast.LENGTH_LONG)创建的Toast,一切都是用系统默认设置,也是我们最常看到的效果。
图二如下语句来创建一个Toast
mCustomerToast = new Toast(this); View tmpView = mInflater.inflate(R.layout.toast_customer_layout, null); TextView tv = (TextView)tmpView.findViewById(R.id.toast_customer_content_view); tv.setText(R.string.customer_toast_content); mCustomerToast.setView(tmpView); mCustomerToast.setDuration(Toast.LENGTH_LONG); mCustomerToast.setGravity(Gravity.CENTER, 0, 0);这段代码的第二句使用了一个布局文件toast_customer_layout.xml
<?xml version="1.0" encoding="utf-8"?><LinearLayout xmlns:android="http://schemas.android.com/apk/res/android" android:layout_width="match_parent" android:layout_height="wrap_content" android:background="@drawable/widget_text_view_bg" > <TextView android:id="@+id/toast_customer_content_view" android:layout_width="wrap_content" android:layout_height="wrap_content" android:layout_margin="20dp" android:background="@drawable/button_bg_normal" android:textAppearance="?android:attr/textAppearanceLarge" /></LinearLayout>
主要代码片段到这里就结束了。想要带图片的Toast ,ok ,添加一个可以容纳图片的“容器”;想要自定义Toast的位置,setGravity方法就可以搞定。下面还是一步一步完成上面的功能:
1、布局文件 toast_customer_layout.xml 见上面内容
2、创建布局文件widget_different_toast.xml , 就是图一图二中看到的两个button
<?xml version="1.0" encoding="utf-8"?><LinearLayout xmlns:android="http://schemas.android.com/apk/res/android" android:layout_width="match_parent" android:layout_height="match_parent" android:orientation="vertical" > <Button android:id="@+id/default_toast_btn" android:layout_width="wrap_content" android:layout_height="wrap_content" android:text="@string/default_toast_str" /> <Button android:id="@+id/customer_toast_btn" android:layout_width="wrap_content" android:layout_height="wrap_content" android:text="@string/customer_toast_str" /></LinearLayout>3、准备使用到的字符串资源 strings.xml
<!-- strings for Toast --> <string name="default_toast_str">显示系统默认Toast</string> <string name="default_toast_content">这是系统默认的Toast显示方式</string> <string name="customer_toast_str">显示系统自定义Toast</string> <string name="customer_toast_content">这是自定义的Toast显示方式</string> <!-- end -->4、创建activity――WidgetToastActivity.java
package com.xy.zt.selfdefinewieget;import android.app.Activity;import android.os.Bundle;import android.view.Gravity;import android.view.LayoutInflater;import android.view.View;import android.view.View.OnClickListener;import android.widget.Button;import android.widget.TextView;import android.widget.Toast;public class WidgetToastActivity extends Activity implements OnClickListener{ private Button mDefault; private Button mCustomer; private Toast mDefaultToast ; private Toast mCustomerToast; private LayoutInflater mInflater ; @Override public void onCreate(Bundle savedInstanceState) { super.onCreate(savedInstanceState); this.setContentView(R.layout.widget_different_toast); init(); mInflater = LayoutInflater.from(this); } private void init() { mDefault = (Button) findViewById(R.id.default_toast_btn); mDefault.setOnClickListener(this); mCustomer = (Button) findViewById(R.id.customer_toast_btn); mCustomer.setOnClickListener(this); } public void onClick(View v) { switch(v.getId()){ case R.id.default_toast_btn: mDefaultToast = Toast.makeText(this, R.string.customer_toast_content, Toast.LENGTH_LONG); mDefaultToast.show(); break; case R.id.customer_toast_btn: mCustomerToast = new Toast(this); View tmpView = mInflater.inflate(R.layout.toast_customer_layout, null); TextView tv = (TextView)tmpView.findViewById(R.id.toast_customer_content_view); tv.setText(R.string.customer_toast_content); mCustomerToast.setView(tmpView); mCustomerToast.setDuration(Toast.LENGTH_LONG); mCustomerToast.setGravity(Gravity.CENTER, 0, 0); mCustomerToast.show(); break; } }}5、完善工程添加的内容 ,对有疑问的地方参见一步一步学android控件(之一) ―― 开始篇
5.1 View.Data 添加如下内容 ,
public static final int TOAST_ID = MULTI_AUTO_COMPLETE_TEXTVIEW_ID + 1; public static final String TOAST_NAME = "Toast"; private static final ViewData mToast = new ViewData(TOAST_NAME, TOAST_ID);View_Datas.add(mToast);5.2 在WidgetsAdapter的handleItemClicked函数中添加如下代码
case ViewData.TOAST_ID: intent.setClass(mContext, WidgetToastActivity.class); mContext.startActivity(intent); break;
今天就到这里了,下一个控件 ImageView 。