前两讲中,我们分别大体的了解了适配器是什么,和它的一些基本知识。
并且分别讲解了了ArrayAdapter和SimpleCursorAdapter这两种常用的安卓原生适配器,这两种适配器都是封装好了的,他们虽然使用起来非常简单,但是可扩展性较差。
现在我们继续向下深入学习安卓的适配器,这一次我们将会一同学习SimpleAdapter
simpleAdapter的扩展性最好,可以定义各种各样的布局出来,可以放上ImageView(图片),还可以放上Button(按钮),CheckBox(复选框)等等,当然也有它做不到的事情,这些我们后来再说。
tip:有些代码继承了ListActivity,ListActivity和普通的Activity没有太大的差别,不同就是对显示ListView做了许多优化,方面显示而已。我们还是继承自普通的Activity。
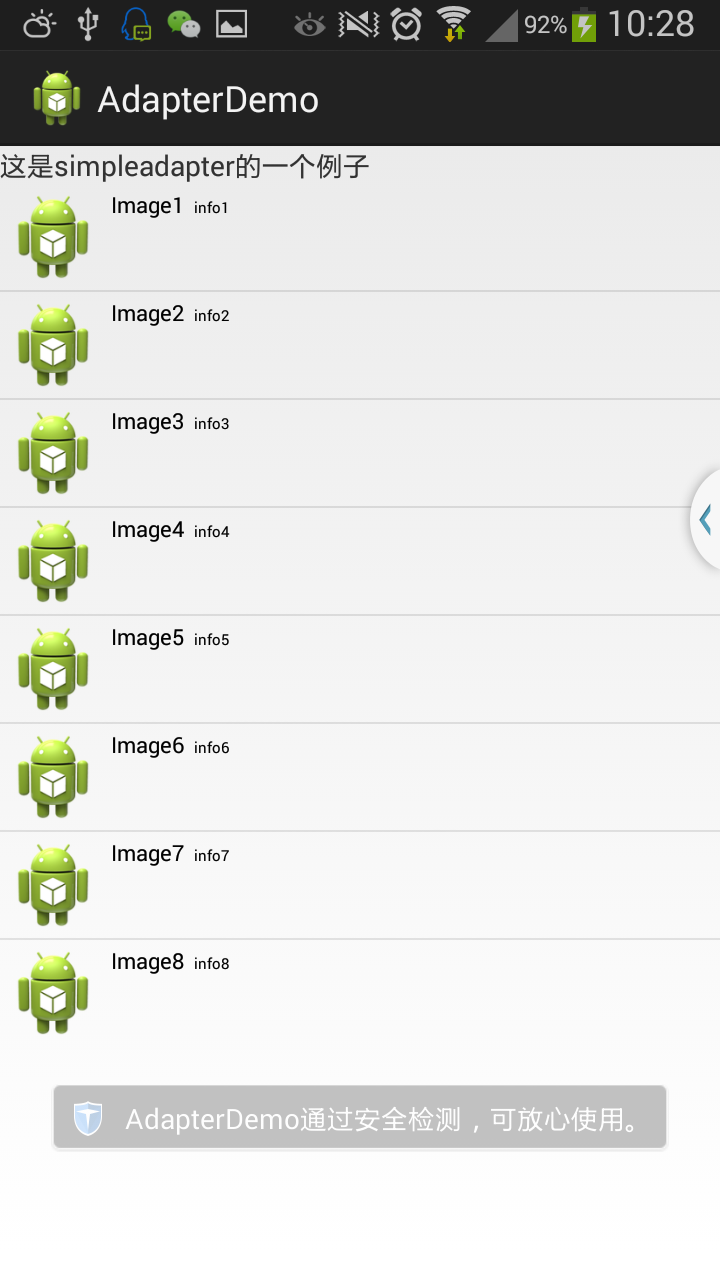
下面我们要写的实例程序是实现一个带有图片的类表。当然会用上SimpleAdapter
程序开始!
(1)也还是先在activity_main.xml里添加一个button,一会跳转的时候使用。
(2)然后新建一个类SimpleAdapterDemo继承自Activity作为我们第三个例子的Activity,@Override 我们的onCreate方法。
(3)新建一个xml文件simpleadapterdemo.xml作为我们的布局文件,其中也是包含一个文本域和一个ListView:
代码如下:
simpleadapterdemo.xml:
<?xml version="1.0" encoding="utf-8"?><LinearLayout xmlns:android="http://schemas.android.com/apk/res/android" android:layout_width="match_parent" android:layout_height="match_parent" android:orientation="vertical" > <TextView android:layout_width="wrap_content" android:layout_height="wrap_content" android:text="这是simpleadapter的一个例子" > </TextView> <ListView android:id="@+id/simpleadapterdemolistview" android:layout_width="wrap_content" android:layout_height="wrap_content" > </ListView></LinearLayout>
注意啦!这里和前两次可有区别啦:
(4)我们需要定义好一个用来显示每一个列内容的xml
listitem1.xml 包含横向的图片与文字,这里可扩展性就体现出来了哦!
我们完全可以定义每一列的内容了,比如我可以让每一列都是图片并在图片下面加文字。
代码如下:
listitem1.xml
<?xml version="1.0" encoding="utf-8"?><LinearLayout xmlns:android="http://schemas.android.com/apk/res/android" android:layout_width="match_parent" android:layout_height="match_parent" android:orientation="horizontal" > <ImageView android:id="@+id/imgview1" android:layout_width="wrap_content" android:layout_height="wrap_content" android:layout_margin="5px"/> <TextView android:id="@+id/text1" android:layout_width="wrap_content" android:layout_height="wrap_content" android:textColor="#000000" android:textSize="22px" android:layout_margin="5px"/> <TextView android:id="@+id/text2" android:layout_width="wrap_content" android:layout_height="wrap_content" android:textColor="#000000" android:textSize="15px" android:layout_margin="5px"/></LinearLayout>
(5)还是再回到SimpleAdapterDemo,定义一个Listview暂且叫做lv,并使用刚才的ID,setContentView()为刚才的xml布局,然后为lv设置一个适配器:
使用simpleAdapter的数据用一般都是HashMap构成的List,list的每一节对应ListView的每一行。HashMap的每个键值数据映射到布局文件中对应id的组件上。因为系统没有对应的布局文件可用,我们可以自己定义一个布局listitem1.xml。
下面做适配,new一个SimpleAdapter
SimpleAdapter adapter = new SimpleAdapter(this,data,resource,from, to);
参数依次是:this,HashMap的 title和 info,布局文件(listitem1.xml),至于from和to,有木有很熟悉,对我们上一篇刚刚使用过了:From是你查询出的数据,to是单行布局中的单独控件,一对一的关系,用起来非常方便。布局文件的各组件分别映射到HashMap的各元素上,完成适配。
下面是具体代码:
package com.example.adapterdemo;import java.util.ArrayList;import java.util.HashMap;import java.util.List;import java.util.Map;import android.app.Activity;import android.os.Bundle;import android.widget.ListView;import android.widget.SimpleAdapter;public class SimpleAdapterDemo extends Activity { private ListView lv; @Override protected void onCreate(Bundle savedInstanceState) { super.onCreate(savedInstanceState); setContentView(R.layout.simpleadapterdemo); lv = (ListView) findViewById(R.id.simpleadapterdemolistview); SimpleAdapter adapter = new SimpleAdapter(this, getData(), R.layout.listitem1, new String[] { "text1", "text2", "img" }, new int[] { R.id.text1, R.id.text2, R.id.imgview1}); lv.setAdapter(adapter); } public List<Map<String, Object>> getData(){ List<Map<String, Object>> list = new ArrayList<Map<String, Object>>(); Map<String, Object> map = new HashMap<String, Object>(); map.put("text1", "Image1"); map.put("text2", "info1"); map.put("img", R.drawable.ic_launcher); list.add(map); map = new HashMap<String, Object>(); map.put("text1", "Image2"); map.put("text2", "info2"); map.put("img", R.drawable.ic_launcher); list.add(map); map = new HashMap<String, Object>(); map.put("text1", "Image3"); map.put("text2", "info3"); map.put("img", R.drawable.ic_launcher); list.add(map); map = new HashMap<String, Object>(); map.put("text1", "Image4"); map.put("text2", "info4"); map.put("img", R.drawable.ic_launcher); list.add(map); map = new HashMap<String, Object>(); map.put("text1", "Image5"); map.put("text2", "info5"); map.put("img", R.drawable.ic_launcher); list.add(map); map = new HashMap<String, Object>(); map.put("text1", "Image6"); map.put("text2", "info6"); map.put("img", R.drawable.ic_launcher); list.add(map); map = new HashMap<String, Object>(); map.put("text1", "Image7"); map.put("text2", "info7"); map.put("img", R.drawable.ic_launcher); list.add(map); map = new HashMap<String, Object>(); map.put("text1", "Image8"); map.put("text2", "info8"); map.put("img", R.drawable.ic_launcher); list.add(map); return list; }}最后又是看结果的时候了:
效果图:
这样三种常用的安卓原生适配器就算讲完了,随着一步步的学习,相信大家对适配器的使用已经比较有心得了。大家有没有发现我们所使用的适配器威力越来越大,当然实现过程也更加繁琐一些。
还有一些安卓的原生适配器,我们就杀鸡儆猴的学习了用的最多的三个原生适配器,其他的也就是小菜了,接下来我们就要自定义适配器了,自定义的适配器能适应更多的情况,功能更加强大,当然也需要我们更加深入的学习才能应用自如,请大家不要错过哦!
源码我会在最后一篇写完的时候一并上传,以内我也是边写博客边写代码,这样我觉得思路清晰一些。
我也是学生,水平有限,还请多多指教~