前面文章讲述的都是"随手拍"中图像处理的操作,此篇文章主要讲述GridView控件实现添加本地图片并显示.主要是关于GridView控件的基本操作,通常可以通过自定义继承BaseAdapter的适配器加载图片,而下面讲述的不是自定义的适配器,而是调用SimpleAdapter实现的.至于上传发布与网络交互此处不讲述,后面文章会讲!
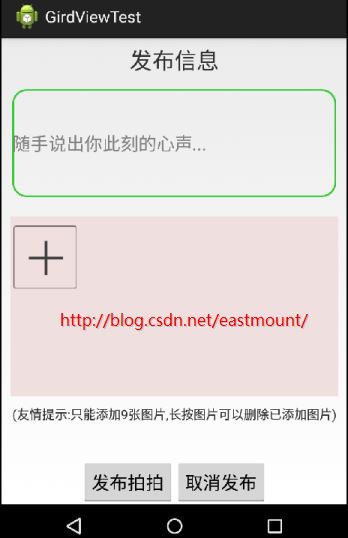
一. 实现效果
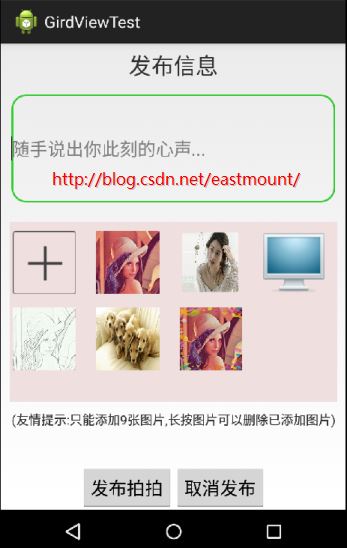
主要是通过点击+从本地相册中添加图片,同时显示图片至GridView.点击图片可以进行删除操作,同时界面中的发布EditView控件也很好看,不足之处在于+好没有移动至最后,但原理相同.
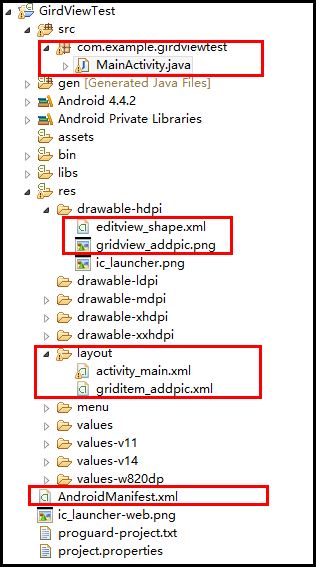
二. 项目工程结构
三. 界面布局详细代码
1.主界面activity_main.xml
主要通过相对布局实现,第一部分是底部的TextView,中间是EditView和GridView相对布局,下面是两个按钮.同时EditView调用res/drawable-hdpi中的editview_shape.xml,GridView显示的每张图片通过griditem_addpic.xml实现.
<RelativeLayout xmlns:android="http://schemas.android.com/apk/res/android" xmlns:tools="http://schemas.android.com/tools" android:id="@+id/container" android:layout_width="match_parent" android:layout_height="match_parent" tools:context="com.example.suishoupaipublish.MainActivity" tools:ignore="MergeRootFrame" > <!-- 顶部添加文字 --> <RelativeLayout android:id="@+id/Layout_top" android:orientation="horizontal" android:layout_width="fill_parent" android:layout_height="40dp" android:layout_marginTop="5dp" android:layout_alignParentTop="true" android:gravity="center"> <TextView android:layout_width="fill_parent" android:layout_height="wrap_content" android:textSize="25sp" android:gravity="center" android:text="发布信息" /> </RelativeLayout> <!-- 底部按钮 --> <RelativeLayout android:id="@+id/Layout_bottom" android:layout_alignParentBottom="true" android:layout_width="fill_parent" android:layout_height="50dp" android:gravity="center" > <Button android:id="@+id/button1" android:layout_width="wrap_content" android:layout_height="fill_parent" android:textSize="20sp" android:text="发布拍拍" /> <Button android:id="@+id/button2" android:layout_width="wrap_content" android:layout_height="fill_parent" android:layout_toRightOf="@+id/button1" android:textSize="20sp" android:text="取消发布" /> </RelativeLayout> <!-- 显示图片 --> <RelativeLayout android:id="@+id/Content_Layout" android:layout_width="fill_parent" android:layout_height="fill_parent" android:layout_above="@id/Layout_bottom" android:layout_below="@id/Layout_top" android:gravity="center"> <LinearLayout android:layout_width="match_parent" android:layout_height="match_parent" android:orientation="vertical" android:layout_alignParentBottom="true" > <!-- 设置运行多行 设置圆角图形 黑色字体--> <EditText android:id="@+id/editText1" android:layout_height="120dp" android:layout_width="fill_parent" android:textColor="#000000" android:layout_margin="12dp" android:textSize="20sp" android:hint="随手说出你此刻的心声..." android:maxLength="500" android:singleLine="false" android:background="@drawable/editview_shape" /> <!-- 网格显示图片 行列间距5dp 每列宽度90dp --> <GridView android:id="@+id/gridView1" android:layout_width="fill_parent" android:layout_height="200dp" android:layout_margin="10dp" android:background="#EFDFDF" android:horizontalSpacing="5dp" android:verticalSpacing="5dp" android:numColumns="4" android:columnWidth="90dp" android:stretchMode="columnWidth" android:gravity="center" > </GridView> <TextView android:layout_width="fill_parent" android:layout_height="wrap_content" android:text="(友情提示:只能添加9张图片,长按图片可以删除已添加图片)" android:gravity="center" /> </LinearLayout> </RelativeLayout> </RelativeLayout>2.显示ImageView图片布局griditem_addpic.xml
<?xml version="1.0" encoding="utf-8"?><LinearLayout xmlns:android="http://schemas.android.com/apk/res/android" android:layout_width="match_parent" android:layout_height="match_parent" android:gravity="center" android:descendantFocusability="blocksDescendants" android:orientation="vertical" > <RelativeLayout android:layout_gravity="center" android:layout_width="80dp" android:layout_height="80dp" android:orientation="vertical" > <ImageView android:layout_marginTop="10dp" android:layout_marginRight="10dp" android:id="@+id/imageView1" android:layout_width="fill_parent" android:layout_height="fill_parent" android:scaleType="fitXY" android:src="@drawable/gridview_addpic" /> </RelativeLayout></LinearLayout>3.设置EditView控件圆角和颜色 editview_shape.xml
<?xml version="1.0" encoding="utf-8"?><shape xmlns:android="http://schemas.android.com/apk/res/android" android:shape="rectangle" android:padding="10dp"> <!-- 填充editView的颜色 --> <soild android:color="#ffffff"/> <!-- 设置圆角的弧度,radius半径越大,editView的边角越圆 --> <corners android:radius="15dp" android:bottomRightRadius="15dp" android:bottomLeftRadius="15dp" android:topLeftRadius="15dp" android:topRightRadius="15dp"/> <stroke android:color="#32CD32" android:width="4px" /> </shape>
四. 代码详解
它主要是思想如下:
1.通过SimpleAdapter适配器实现实现加载图片,在gridView1.setOnItemClickListener()点击函数中响应不同操作.
2.当点击加号图片(+)时,调用本地相册通过Intent实现获取图片路径存于字符串pathImage.
3.获取图片路径后在onResume中刷新图片,通过GridView的setAdapter()和notifyDataSetChanged()()函数刷新加载图片.
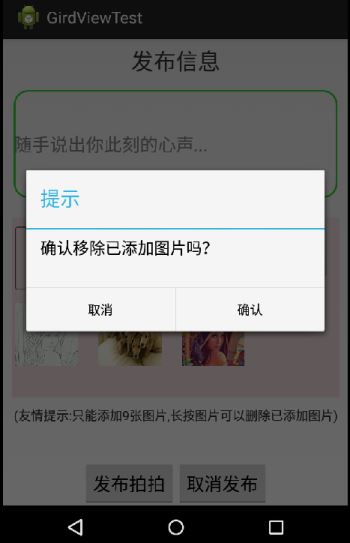
4.点击图片时会获取其position,通过dialog()函数弹出对话框提示是否删除,通过remove实现删除.
具体代码如下所示:
1.通过SimpleAdapter适配器实现实现加载图片,在gridView1.setOnItemClickListener()点击函数中响应不同操作.
2.当点击加号图片(+)时,调用本地相册通过Intent实现获取图片路径存于字符串pathImage.
3.获取图片路径后在onResume中刷新图片,通过GridView的setAdapter()和notifyDataSetChanged()()函数刷新加载图片.
4.点击图片时会获取其position,通过dialog()函数弹出对话框提示是否删除,通过remove实现删除.
具体代码如下所示:
public class MainActivity extends Activity { private GridView gridView1; //网格显示缩略图 private Button buttonPublish; //发布按钮 private final int IMAGE_OPEN = 1; //打开图片标记 private String pathImage; //选择图片路径 private Bitmap bmp; //导入临时图片 private ArrayList<HashMap<String, Object>> imageItem; private SimpleAdapter simpleAdapter; //适配器 @Override protected void onCreate(Bundle savedInstanceState) { super.onCreate(savedInstanceState); setContentView(R.layout.activity_main); /* * 防止键盘挡住输入框 * 不希望遮挡设置activity属性 android:windowSoftInputMode="adjustPan" * 希望动态调整高度 android:windowSoftInputMode="adjustResize" */ getWindow().setSoftInputMode(WindowManager.LayoutParams. SOFT_INPUT_ADJUST_PAN); //锁定屏幕 setRequestedOrientation(ActivityInfo.SCREEN_ORIENTATION_PORTRAIT); setContentView(R.layout.activity_main); //获取控件对象 gridView1 = (GridView) findViewById(R.id.gridView1); /* * 载入默认图片添加图片加号 * 通过适配器实现 * SimpleAdapter参数imageItem为数据源 R.layout.griditem_addpic为布局 */ //获取资源图片加号 bmp = BitmapFactory.decodeResource(getResources(), R.drawable.gridview_addpic); imageItem = new ArrayList<HashMap<String, Object>>(); HashMap<String, Object> map = new HashMap<String, Object>(); map.put("itemImage", bmp); imageItem.add(map); simpleAdapter = new SimpleAdapter(this, imageItem, R.layout.griditem_addpic, new String[] { "itemImage"}, new int[] { R.id.imageView1}); /* * HashMap载入bmp图片在GridView中不显示,但是如果载入资源ID能显示 如 * map.put("itemImage", R.drawable.img); * 解决方法: * 1.自定义继承BaseAdapter实现 * 2.ViewBinder()接口实现 * 参考 http://blog.csdn.net/admin_/article/details/7257901 */ simpleAdapter.setViewBinder(new ViewBinder() { @Override public boolean setViewValue(View view, Object data, String textRepresentation) { // TODO Auto-generated method stub if(view instanceof ImageView && data instanceof Bitmap){ ImageView i = (ImageView)view; i.setImageBitmap((Bitmap) data); return true; } return false; } }); gridView1.setAdapter(simpleAdapter); /* * 监听GridView点击事件 * 报错:该函数必须抽象方法 故需要手动导入import android.view.View; */ gridView1.setOnItemClickListener(new OnItemClickListener() { @Override public void onItemClick(AdapterView<?> parent, View v, int position, long id) { if( imageItem.size() == 10) { //第一张为默认图片 Toast.makeText(MainActivity.this, "图片数9张已满", Toast.LENGTH_SHORT).show(); } else if(position == 0) { //点击图片位置为+ 0对应0张图片 Toast.makeText(MainActivity.this, "添加图片", Toast.LENGTH_SHORT).show(); //选择图片 Intent intent = new Intent(Intent.ACTION_PICK, android.provider.MediaStore.Images.Media.EXTERNAL_CONTENT_URI); startActivityForResult(intent, IMAGE_OPEN); //通过onResume()刷新数据 } else { dialog(position); //Toast.makeText(MainActivity.this, "点击第"+(position + 1)+" 号图片", // Toast.LENGTH_SHORT).show(); } } }); } //获取图片路径 响应startActivityForResult protected void onActivityResult(int requestCode, int resultCode, Intent data) { super.onActivityResult(requestCode, resultCode, data); //打开图片 if(resultCode==RESULT_OK && requestCode==IMAGE_OPEN) { Uri uri = data.getData(); if (!TextUtils.isEmpty(uri.getAuthority())) { //查询选择图片 Cursor cursor = getContentResolver().query( uri, new String[] { MediaStore.Images.Media.DATA }, null, null, null); //返回 没找到选择图片 if (null == cursor) { return; } //光标移动至开头 获取图片路径 cursor.moveToFirst(); pathImage = cursor.getString(cursor .getColumnIndex(MediaStore.Images.Media.DATA)); } } //end if 打开图片 } //刷新图片 @Override protected void onResume() { super.onResume(); if(!TextUtils.isEmpty(pathImage)){ Bitmap addbmp=BitmapFactory.decodeFile(pathImage); HashMap<String, Object> map = new HashMap<String, Object>(); map.put("itemImage", addbmp); imageItem.add(map); simpleAdapter = new SimpleAdapter(this, imageItem, R.layout.griditem_addpic, new String[] { "itemImage"}, new int[] { R.id.imageView1}); simpleAdapter.setViewBinder(new ViewBinder() { @Override public boolean setViewValue(View view, Object data, String textRepresentation) { // TODO Auto-generated method stub if(view instanceof ImageView && data instanceof Bitmap){ ImageView i = (ImageView)view; i.setImageBitmap((Bitmap) data); return true; } return false; } }); gridView1.setAdapter(simpleAdapter); simpleAdapter.notifyDataSetChanged(); //刷新后释放防止手机休眠后自动添加 pathImage = null; } } /* * Dialog对话框提示用户删除操作 * position为删除图片位置 */ protected void dialog(final int position) { AlertDialog.Builder builder = new Builder(MainActivity.this); builder.setMessage("确认移除已添加图片吗?"); builder.setTitle("提示"); builder.setPositiveButton("确认", new DialogInterface.OnClickListener() { @Override public void onClick(DialogInterface dialog, int which) { dialog.dismiss(); imageItem.remove(position); simpleAdapter.notifyDataSetChanged(); } }); builder.setNegativeButton("取消", new DialogInterface.OnClickListener() { @Override public void onClick(DialogInterface dialog, int which) { dialog.dismiss(); } }); builder.create().show(); }} 同时需要在AndroidMainfest.xml中添加权限操作SD卡和网络上传至服务器.<!-- 申明网络权限 --><uses-permission android:name="android.permission.INTERNET" /><!-- 申明权限 操作SD卡 --> <uses-permission android:name="android.permission.WRITE_EXTERNAL_STORAGE" />
五. 总结
该文章需要注意一个地方:在使用SimpleAdapter适配器加载bmp图片时,可能在GridView中不显示.即HashMap中map.put("itemImage",bmp)不显示图片,而使用put装入R.drawable.img却能显示.
这时有两种解决方法,一种是自定义继承BaseAdapter的适配器实现;另一种方法则是如上所示通过ViewBinder()接口实现,感谢博主dmin_提供的方法.
下载地址:http://download.csdn.net/detail/eastmount/8237429
最后希望文章对大家有所帮助,如果有错误或不足之处,请海涵~最近学校网比较差,回复别人都不行.
(By:Eastmount 2014-12-8 晚9点 http://blog.csdn.net/eastmount/)
这时有两种解决方法,一种是自定义继承BaseAdapter的适配器实现;另一种方法则是如上所示通过ViewBinder()接口实现,感谢博主dmin_提供的方法.
下载地址:http://download.csdn.net/detail/eastmount/8237429
最后希望文章对大家有所帮助,如果有错误或不足之处,请海涵~最近学校网比较差,回复别人都不行.
(By:Eastmount 2014-12-8 晚9点 http://blog.csdn.net/eastmount/)