友盟用户反馈SDK是友盟为开发者提供的组件之一,用户反馈也是每款应用必不可少的模块。如果你想方便的收集用户的反馈建议,并且与发送反馈的用户进行沟通交流,那么友盟用户反馈SDK是你不错的选择,使用友盟用户反馈SDK两行代码实现开发者和用户轻松高效沟通。从友盟BBS看到许多开发者都希望通过自定义UI,来实现用户反馈功能。下面就为大家来讲解如何使用友盟用户反馈SDK来制定UI。这里以一个demo来说明。
首先上图,这是自定义的UI界面:
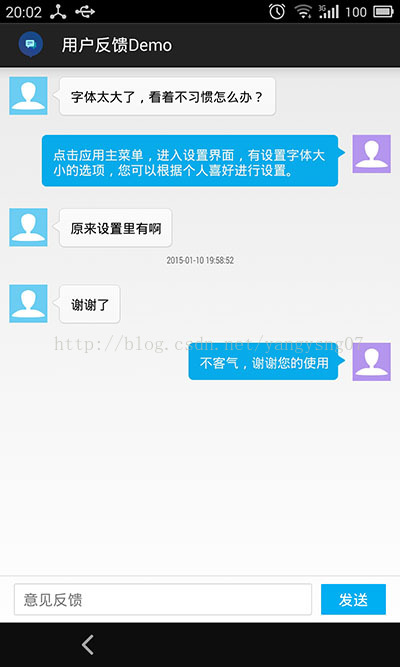
注:部分资源文件来源于某开源App
使用友盟用户反馈的数据接口,首先需要了解,SDK都提供了那些接口。根据集成文档,我们可以知道,对于用户反馈SDK来说,用户和开发者或者客服交流的整个内容是一个Conversation,其中包含了用户的反馈、追问以及客服的回复,而整个Conversation是由Reply组成的,用户的一条反馈或者是客服的一条回复都是一个Reply,每个Reply都有一些属性来表明Reply的各种信息。其中有:
type :
Reply.TYPE_DEV_REPLY : 表示这是一条开发者的回复
Reply.TYPE_SUER_REPLY : 表示这是一条用户的回复
Reply.TYPE_NEW_FEEDBACK : 表示这是一条反馈 相当于用户的第一条回复
status:
Reply.STATUS_NOT_SENT :表示该条回复没有发送成功或者还未发送
Reply.STATUS_SENDING :表示该条回复正在发送
Reply.STATUS_SENT :表示该条回复已发送成功
created_at : 表示回复的时间,以毫秒为单位
Conversation类提供了getReplyList()方法来获取整个会话的内容,返回的是List<Reply>,同时也提供了addUserReply()方法,将用反馈内容加入到Conversation,那么Conversation实例怎么得到呢?
FeedbackAgent类中提供了一个getDefaultConversation()方法来获取默认的Conversation(),对于不需要创建多个会话的App来讲有这个就够了。
最重要的一个接口:
Comversation.sync()方法,该方法实现了数据的同步,即可以通过该方法发送用户反馈、回复也可以通过该方法获取来自开发者的回复。下面会详细介绍。
另外FeedbackAgent接口也提供了setUserInfo()方法来设置用户信息,以及getUserInfo()方法获取用户信息,关于用户信息的操作方法可以查看友盟用户反馈SDK集成文档,这里不做演示。
了解了这些,下面我们就开始噼里啪啦敲代码。
第一步当然是布局了,下面是自定义会话界面的布局
<RelativeLayout xmlns:android="http://schemas.android.com/apk/res/android" xmlns:tools="http://schemas.android.com/tools" android:layout_width="match_parent" android:layout_height="match_parent" > <LinearLayout android:id="@+id/fb_input_layout" android:layout_width="fill_parent" android:layout_height="wrap_content" android:layout_alignParentBottom="true" android:orientation="vertical" > <View android:layout_width="match_parent" android:layout_height="@dimen/umeng_fb_item_line_height" android:background="@color/umeng_fb_line" /> <RelativeLayout android:layout_width="match_parent" android:layout_height="wrap_content" android:clickable="true" android:focusable="true" android:focusableInTouchMode="true" android:orientation="horizontal" android:paddingBottom="8dp" android:paddingLeft="15dp" android:paddingRight="15dp" android:paddingTop="8dp" > <Button android:id="@+id/fb_send_btn" android:layout_width="70dp" android:layout_height="33dp" android:layout_alignParentEnd="true" android:layout_alignParentRight="true" android:layout_centerVertical="true" android:background="@drawable/fb_send_btn_bg" android:gravity="center" android:text="@string/umeng_fb_send" android:textColor="@android:color/white" android:textSize="16sp" /> <EditText android:id="@+id/fb_send_content" android:layout_width="match_parent" android:layout_height="wrap_content" android:layout_centerVertical="true" android:layout_marginRight="10dp" android:layout_toLeftOf="@id/fb_send_btn" android:layout_toStartOf="@id/fb_send_btn" android:background="@drawable/fb_input_bg" android:hint="@string/umeng_fb_feedback" android:minHeight="33dp" android:paddingLeft="10dp" android:paddingRight="10dp" android:scrollbars="vertical" android:textSize="16sp" /> </RelativeLayout> </LinearLayout> <android.support.v4.widget.SwipeRefreshLayout android:id="@+id/fb_reply_refresh" android:layout_width="match_parent" android:layout_height="match_parent" android:layout_above="@id/fb_input_layout" > <ListView android:id="@+id/fb_reply_list" android:layout_width="match_parent" android:layout_height="match_parent" android:divider="@null" android:listSelector="#00000000" > </ListView> </android.support.v4.widget.SwipeRefreshLayout></RelativeLayout>
布局文件就不多说了,这里包含了一个ListView来展示整个会话内容,还有一个输入框和发送按钮。
然后在Activity中开始利用友盟用户反馈SDK的数据接口干活。
要实现UI,这些View自然是少不了的
mListView = (ListView) findViewById(R.id.fb_reply_list);sendBtn = (Button) findViewById(R.id.fb_send_btn);inputEdit = (EditText) findViewById(R.id.fb_send_content);//下拉刷新组件mSwipeRefreshLayout = (SwipeRefreshLayout) findViewById(R.id.fb_reply_refresh);
获取Conversation对象,所有会话数据都在这里
Conversation mComversation = new FeedbackAgent(this).getDefaultConversation();
然后为ListView创建Adapter,代码比较简单,直接看注释吧
class ReplyAdapter extends BaseAdapter { @Override public int getCount() { return mComversation.getReplyList().size(); } @Override public Object getItem(int arg0) { return mComversation.getReplyList().get(arg0); } @Override public long getItemId(int arg0) { return arg0; } @Override public int getViewTypeCount() { // 两种不同的Item布局 return VIEW_TYPE_COUNT; } @Override public int getItemViewType(int position) { // 获取单条回复 Reply reply = mComversation.getReplyList().get(position); if (Reply.TYPE_DEV_REPLY.equals(reply.type)) { // 开发者回复Item布局 return VIEW_TYPE_DEV; } else { // 用户反馈、回复Item布局 return VIEW_TYPE_USER; } } @Override public View getView(int position, View convertView, ViewGroup parent) { ViewHolder holder = null; // 获取单条回复 Reply reply = mComversation.getReplyList().get(position); if (convertView == null) { // 根据Type的类型来加载不同的Item布局 if (Reply.TYPE_DEV_REPLY.equals(reply.type)) { // 开发者的回复 convertView = LayoutInflater.from(mContext).inflate( R.layout.custom_fb_dev_reply, null); } else { // 用户的反馈、回复 convertView = LayoutInflater.from(mContext).inflate( R.layout.custom_fb_user_reply, null); } // 创建ViewHolder并获取各种View holder = new ViewHolder(); holder.replyContent = (TextView) convertView .findViewById(R.id.fb_reply_content); holder.replyProgressBar = (ProgressBar) convertView .findViewById(R.id.fb_reply_progressBar); holder.replyStateFailed = (ImageView) convertView .findViewById(R.id.fb_reply_state_failed); holder.replyData = (TextView) convertView .findViewById(R.id.fb_reply_date); convertView.setTag(holder); } else { holder = (ViewHolder) convertView.getTag(); } // 以下是填充数据 // 设置Reply的内容 holder.replyContent.setText(reply.content); // 在App界面,对于开发者的Reply来讲status没有意义 if (!Reply.TYPE_DEV_REPLY.equals(reply.type)) { // 根据Reply的状态来设置replyStateFailed的状态 if (Reply.STATUS_NOT_SENT.equals(reply.status)) { holder.replyStateFailed.setVisibility(View.VISIBLE); } else { holder.replyStateFailed.setVisibility(View.GONE); } // 根据Reply的状态来设置replyProgressBar的状态 if (Reply.STATUS_SENDING.equals(reply.status)) { holder.replyProgressBar.setVisibility(View.VISIBLE); } else { holder.replyProgressBar.setVisibility(View.GONE); } } // 回复的时间数据,这里仿照QQ两条Reply之间相差100000ms则展示时间 if ((position + 1) < mComversation.getReplyList().size()) { Reply nextReply = mComversation.getReplyList() .get(position + 1); if (nextReply.created_at - reply.created_at > 100000) { Date replyTime = new Date(reply.created_at); SimpleDateFormat sdf = new SimpleDateFormat( "yyyy-MM-dd HH:mm:ss"); holder.replyData.setText(sdf.format(replyTime)); holder.replyData.setVisibility(View.VISIBLE); } } return convertView; } class ViewHolder { TextView replyContent; ProgressBar replyProgressBar; ImageView replyStateFailed; TextView replyData; } }创建Adapter并为ListView设置Adapter
adapter = new ReplyAdapter();mListView.setAdapter(adapter);
会话列表完成了,接下来是发送反馈和App端与服务器数据的同步。
创建Handler对象来实现数据的刷新,用于Conversation或者Reply有更新时,刷新ListView。
private Handler mHandler = new Handler() { @Override public void handleMessage(Message msg) { adapter.notifyDataSetChanged(); } };然后是监听发送按钮的点击事件
sendBtn.setOnClickListener(new OnClickListener() { @Override public void onClick(View v) { String content = inputEdit.getText().toString(); inputEdit.getEditableText().clear(); if (!TextUtils.isEmpty(content)) { // 将内容添加到会话列表 mComversation.addUserReply(content); //刷新新ListView mHandler.sendMessage(new Message()); //数据同步 sync(); } } });下拉刷新操作
// 下拉刷新mSwipeRefreshLayout.setOnRefreshListener(new OnRefreshListener() { @Override public void onRefresh() { sync(); } });// 数据同步private void sync() { mComversation.sync(new SyncListener() { @Override public void onSendUserReply(List<Reply> replyList) { } @Override public void onReceiveDevReply(List<Reply> replyList) { // SwipeRefreshLayout停止刷新 mSwipeRefreshLayout.setRefreshing(false); // 发送消息,刷新ListView mHandler.sendMessage(new Message()); } }); // 更新adapter,刷新ListView adapter.notifyDataSetChanged(); }ListView Item的布局比较简单就不贴了,需要的话可以下载代码查看。
到这里一个利用友盟用户反馈SDK自定义的UI就实现了。
工程下载地址