说到TextView 效果,相信大家一定熟悉跑马灯。
先来看看 Ellipsize是什么,Ellipsize 从开发技术上翻译为省略效果。故名思议,就是当文本无法显示全部时,用什么效果来显示未显示的部分。
一,What is Ellipsize and How to use ?
首先我们在Android XML中需要这样定义
<TextView android:id="@+id/textView" android:layout_width="wrap_content" android:layout_height="30dp" android:text="@string/hello_world" //全部文字为:Hello world!这是一个跑马灯专门用来测试的,所以字数一定要多,不过肯定超过15字了。 android:ellipsize="end" android:singleLine="true" android:textSize="20sp" />
显示效果:

可以看到在这段文字后面有三个"..."来表示这段话没有显示完毕,后面还有一部分。所以问题来了这个效果怎么来的呢?
android:ellipsize="end" android:singleLine="true"起作用的就是这两行代码。
android:singleLine="true"用来指定当前TextView为单行显示,意思就是无论字数多少,都要一行来显示,这个也是显示Ellipsize效果的必须条件。
至于为什么需要android:singleLine="true"后面讲解源码会说到。我们再来看android:ellipsize这个属性。
它是由TextView中的一个枚举定义的,我们看看这个数据结构:
public enum TruncateAt { START, MIDDLE, END, MARQUEE, /** * @hide */ END_SMALL }
从枚举名TruncateAt的意思:在什么地方截断。顾名思义就是在TextView的内容中哪个位置显示截断效果。下面几个图分别代表每个变量的效果:
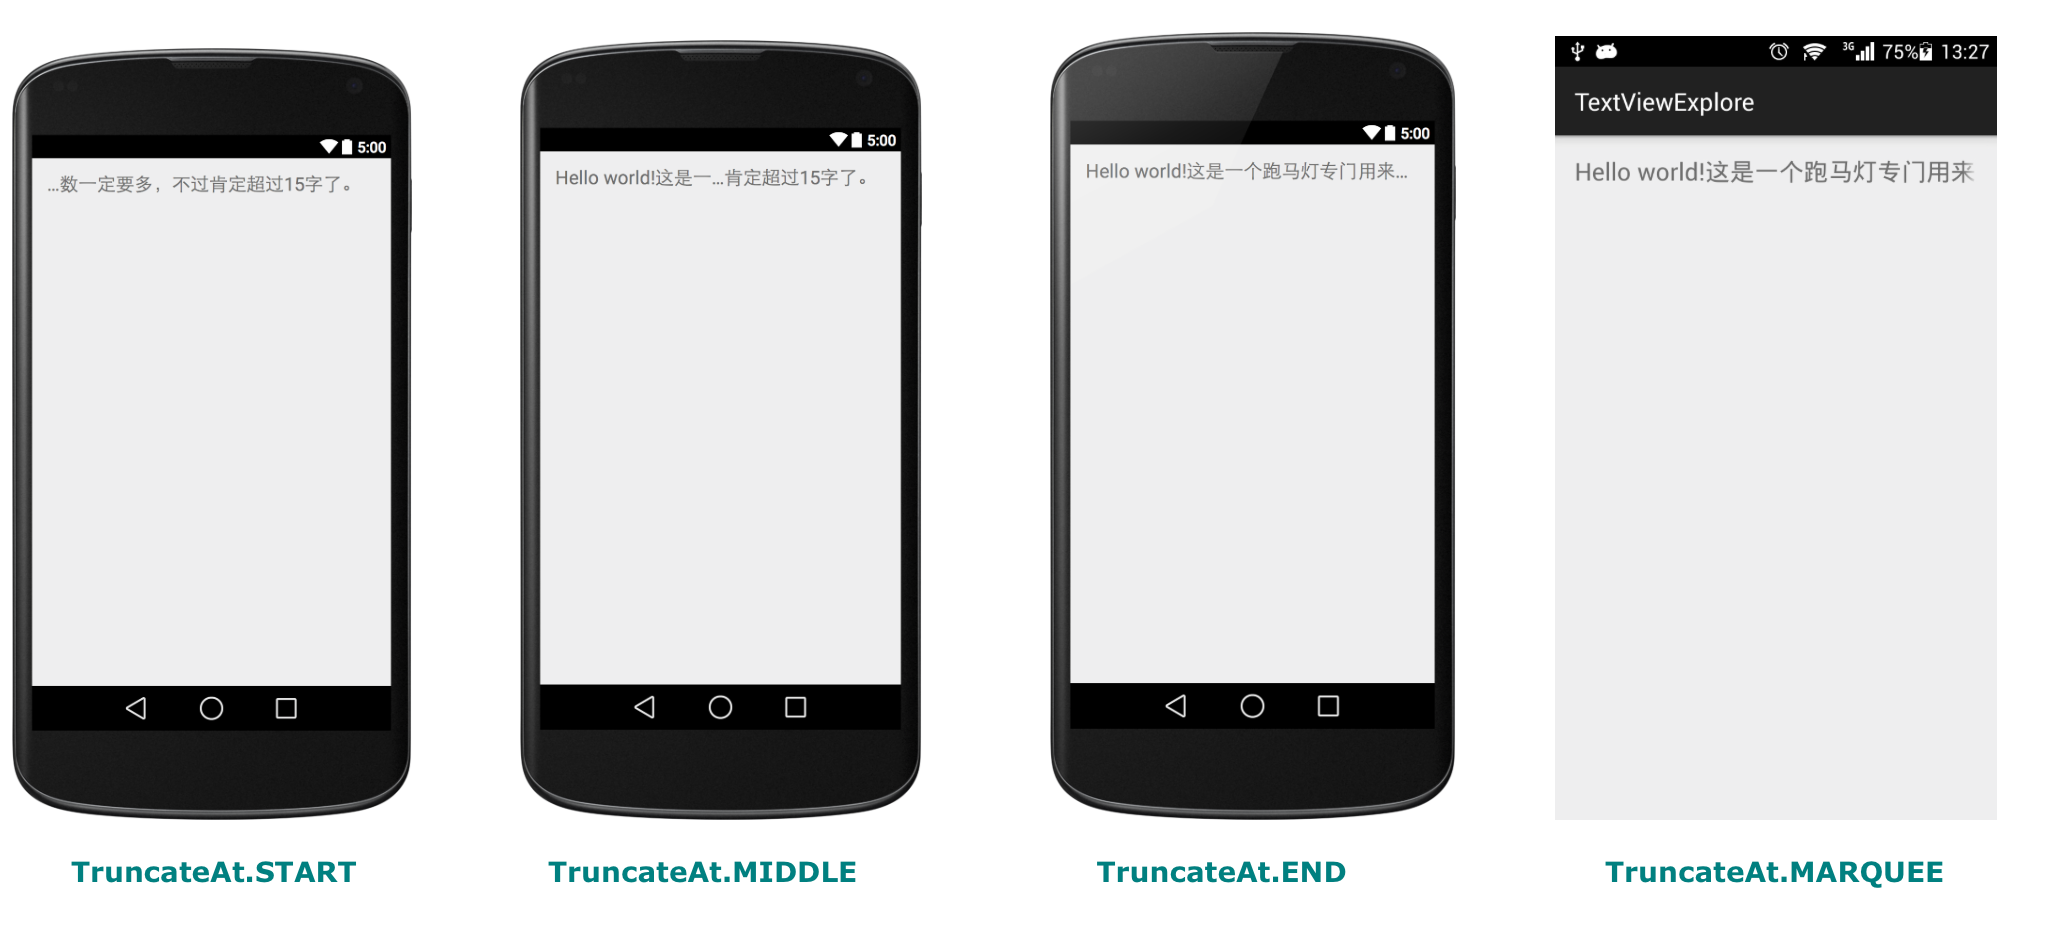
TruncateAt.MARQUEE就是跑马灯效果。但是本该是一行文字从坐往右的滚动,但是实际上只添加
android:ellipsize="marquee"android:singleLine="true"
这两个属性,看到就是上图那个样子。仔细一点你会发现那个其实不是普通的效果:"来"字后半部有渐进透明,后面会讲解跑马灯效果不显示的原因。
其实在实际Android XML中还有一个属性android:ellipsize="none",这个意思是不指定省略效果:
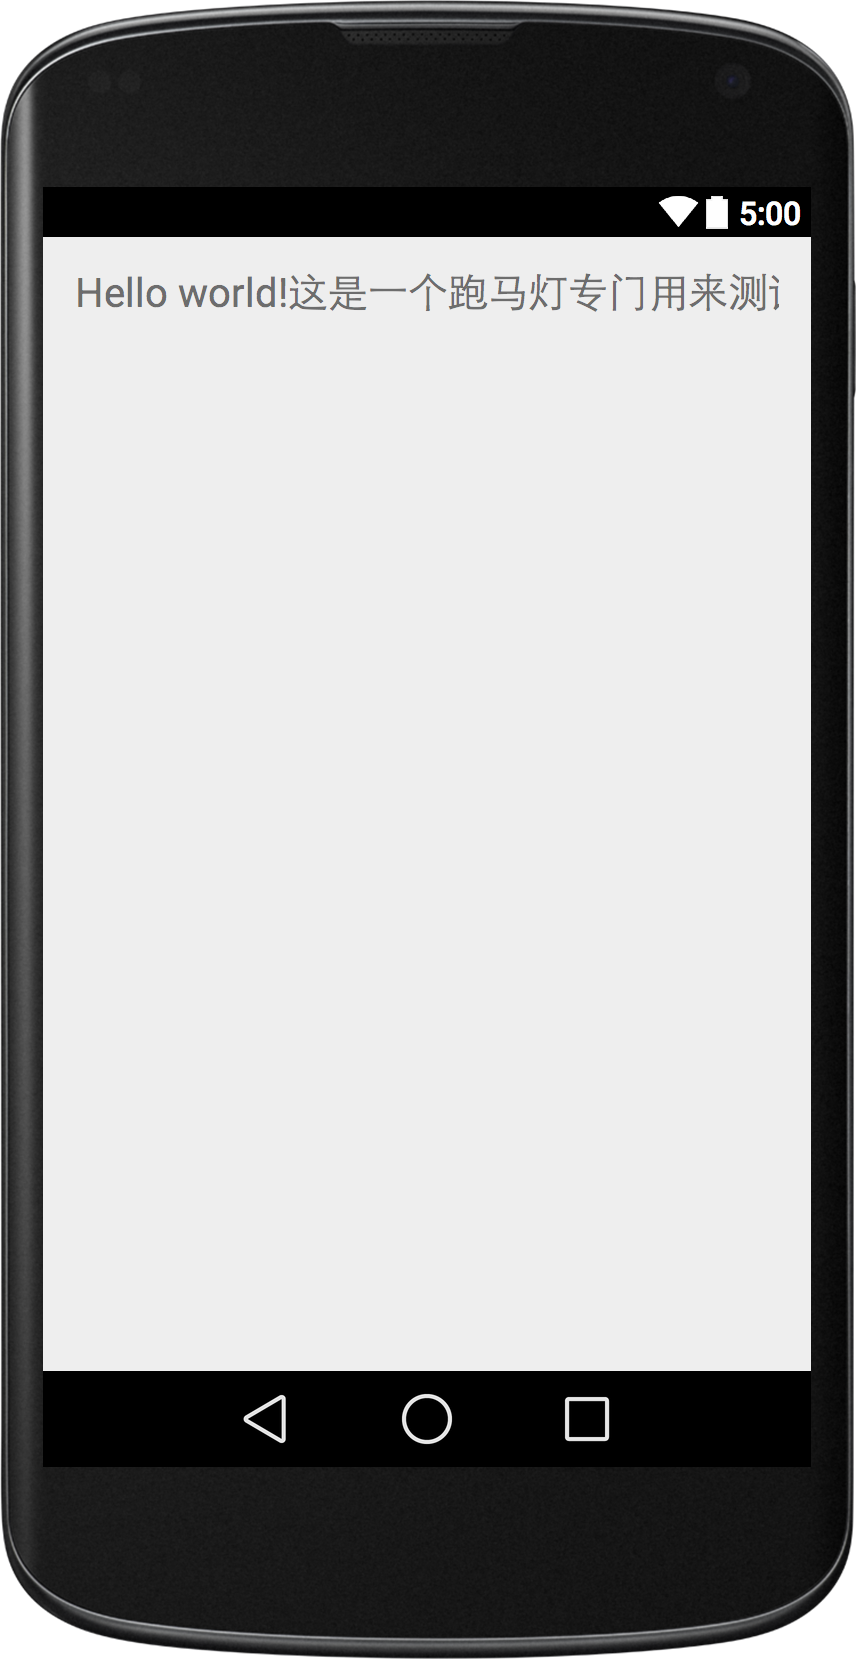
我们可以看到这段话多出了"测试"两个字,但是"试"被截断了。其实android:ellipsize的默认值为end。因为在TextView的构造函数中有这样一行代码:
if (singleLine && getKeyListener() == null && ellipsize < 0) { ellipsize = 3; // END }
意思是即使你只设定了 android:singleLine="true"。那么也会显示android:ellipsize="end"时的效果。
二,为什么跑马灯无效果?
对于这个问题,相比大家都知道,当我们写了如下代码时:
<TextView android:id="@+id/textView" android:layout_width="wrap_content" android:layout_height="30dp" android:text="@string/hello_world" android:ellipsize="marquee" android:singleLine="true" android:textSize="20sp" />
却发现应用运行时跑马灯效果却没有。妈蛋,这是为毛。这个时候相比大家都能百度到解法。下面有两个网上最流行的解法
1.重写TextView
2.需要调用TextViews一大堆的函数。
起初我看到这个非常不爽,还能不能好好的玩耍了,妈蛋,android:ellipsize="start|middle|end"都能一行代码显示,为毛这个不行。想要知道问题原因很简单。
知道了why,你就知道了how。
谈到跑马灯,里面还是有点复杂的的。Android SDK将TextView 的跑马灯封装起来了。
TextView继承至View。所以它中元素的绘制都在onDraw()中。在TextView中有段代码:
final int layoutDirection = getLayoutDirection(); final int absoluteGravity = Gravity.getAbsoluteGravity(mGravity, layoutDirection); if (mEllipsize == TextUtils.TruncateAt.MARQUEE && mMarqueeFadeMode != MARQUEE_FADE_SWITCH_SHOW_ELLIPSIS) { if (!mSingleLine && getLineCount() == 1 && canMarquee() && (absoluteGravity & Gravity.HORIZONTAL_GRAVITY_MASK) != Gravity.LEFT) { final int width = mRight - mLeft; final int padding = getCompoundPaddingLeft() + getCompoundPaddingRight(); final float dx = mLayout.getLineRight(0) - (width - padding); canvas.translate(layout.getParagraphDirection(0) * dx, 0.0f); } if (mMarquee != null && mMarquee.isRunning()) { final float dx = -mMarquee.getScroll(); canvas.translate(layout.getParagraphDirection(0) * dx, 0.0f); } }
其中final float dx = -mMarquee.getScroll();就是TextView的位移量,而canvas.translate(layout.getParagraphDirection(0) * dx, 0.0f);这行代码通过位移画布
来做到跑马灯效果。但是这个mMarquee.getScroll()到底是什么呢?
查阅源码便可发现TextView 中有一个内部类Marquee
private static final class Marquee { // TODO: Add an option to configure this private static final float MARQUEE_DELTA_MAX = 0.07f; private static final int MARQUEE_DELAY = 1200; private static final int MARQUEE_RESTART_DELAY = 1200; private static final int MARQUEE_DP_PER_SECOND = 30; private static final byte MARQUEE_STOPPED = 0x0; private static final byte MARQUEE_STARTING = 0x1; private static final byte MARQUEE_RUNNING = 0x2; private final WeakReference<TextView> mView; private final Choreographer mChoreographer; private byte mStatus = MARQUEE_STOPPED; private final float mPixelsPerSecond; private float mMaxScroll; private float mMaxFadeScroll; private float mGhostStart; private float mGhostOffset; private float mFadeStop; private int mRepeatLimit; private float mScroll; private long mLastAnimationMs; Marquee(TextView v) { final float density = v.getContext().getResources().getDisplayMetrics().density; mPixelsPerSecond = MARQUEE_DP_PER_SECOND * density; mView = new WeakReference<TextView>(v); mChoreographer = Choreographer.getInstance(); } private Choreographer.FrameCallback mTickCallback = new Choreographer.FrameCallback() { @Override public void doFrame(long frameTimeNanos) { tick(); } }; private Choreographer.FrameCallback mStartCallback = new Choreographer.FrameCallback() { @Override public void doFrame(long frameTimeNanos) { mStatus = MARQUEE_RUNNING; mLastAnimationMs = mChoreographer.getFrameTime(); tick(); } }; private Choreographer.FrameCallback mRestartCallback = new Choreographer.FrameCallback() { @Override public void doFrame(long frameTimeNanos) { if (mStatus == MARQUEE_RUNNING) { if (mRepeatLimit >= 0) { mRepeatLimit--; } start(mRepeatLimit); } } }; void tick() { if (mStatus != MARQUEE_RUNNING) { return; } mChoreographer.removeFrameCallback(mTickCallback); final TextView textView = mView.get(); if (textView != null && (textView.isFocused() || textView.isSelected())) { long currentMs = mChoreographer.getFrameTime(); long deltaMs = currentMs - mLastAnimationMs; mLastAnimationMs = currentMs; float deltaPx = deltaMs / 1000f * mPixelsPerSecond; mScroll += deltaPx; if (mScroll > mMaxScroll) { mScroll = mMaxScroll; mChoreographer.postFrameCallbackDelayed(mRestartCallback, MARQUEE_DELAY); } else { mChoreographer.postFrameCallback(mTickCallback); } textView.invalidate(); } } void stop() { mStatus = MARQUEE_STOPPED; mChoreographer.removeFrameCallback(mStartCallback); mChoreographer.removeFrameCallback(mRestartCallback); mChoreographer.removeFrameCallback(mTickCallback); resetScroll(); } private void resetScroll() { mScroll = 0.0f; final TextView textView = mView.get(); if (textView != null) textView.invalidate(); } void start(int repeatLimit) { if (repeatLimit == 0) { stop(); return; } mRepeatLimit = repeatLimit; final TextView textView = mView.get(); if (textView != null && textView.mLayout != null) { mStatus = MARQUEE_STARTING; mScroll = 0.0f; final int textWidth = textView.getWidth() - textView.getCompoundPaddingLeft() - textView.getCompoundPaddingRight(); final float lineWidth = textView.mLayout.getLineWidth(0); final float gap = textWidth / 3.0f; mGhostStart = lineWidth - textWidth + gap; mMaxScroll = mGhostStart + textWidth; mGhostOffset = lineWidth + gap; mFadeStop = lineWidth + textWidth / 6.0f; mMaxFadeScroll = mGhostStart + lineWidth + lineWidth; textView.invalidate(); mChoreographer.postFrameCallback(mStartCallback); } } float getGhostOffset() { return mGhostOffset; } float getScroll() { return mScroll; } float getMaxFadeScroll() { return mMaxFadeScroll; } boolean shouldDrawLeftFade() { return mScroll <= mFadeStop; } boolean shouldDrawGhost() { return mStatus == MARQUEE_RUNNING && mScroll > mGhostStart; } boolean isRunning() { return mStatus == MARQUEE_RUNNING; } boolean isStopped() { return mStatus == MARQUEE_STOPPED; } }
其中getScroll值返回的是 mScroll。所以我们要找到这个值在哪被改变的。所以我们又很容易找mScroll现在start()中进行初始化:但是未正向或者负向改变mScroll的值,只是进行其他变量值的赋值。
但是在start()函数最后面有行代码:mChoreographer.postFrameCallback(mStartCallback);mChoreographer又是什么?如果再扯上Choreographer,那就说很多了。
下面引用一篇文章的介绍:http://www.360doc.com/content/14/0827/10/10366845_405038717.shtml
所有的图像显示输出都是由时钟驱动的,这个驱动信号称为VSYNC。这个名词来源于模拟电视时代,在那个年代,因为带宽的限制,每一帧图像都有分成两次传输,先扫描偶数行(也称偶场)传输,再回到头部扫描奇数行(奇场),扫描之前,发送一个VSYNC同步信号,用于标识这个这是一场的开始。场频,也就是VSYNC 频率决定了帧率(场频/2). 在现在的数字传输中,已经没有了场的概念,但VSYNC这一概念得于保持下来,代表了图像的刷新频率,意味着收到VSYNC信号后,我们必须将新的一帧进行显示。VSYNC一般由硬件产生,也可以由软件产生(如果够准确的话),Android 中VSYNC来着于HWComposer,接收者没错,就是Choreographer。Choreographer英文意思是编舞者,跳舞很讲究节奏不是吗,必须要踩准点。Choreographer 就是用来帮助Android的动画,输入,还是显示刷新按照固定节奏来完成工作的。
即Marquee使用Choreographer来进行每一桢的绘制。mChoreographer.postFrameCallback(mStartCallback)有个回调:
private Choreographer.FrameCallback mStartCallback = new Choreographer.FrameCallback() { @Override public void doFrame(long frameTimeNanos) { mStatus = MARQUEE_RUNNING; mLastAnimationMs = mChoreographer.getFrameTime(); tick(); } };
我们看到mStatus值 由start()中设定的MARQUEE_STARTING改为:MARQUEE_RUNNING。说明这个时候开始执行这个动作。其调用了tick()函数:
void tick() { if (mStatus != MARQUEE_RUNNING) { return; } mChoreographer.removeFrameCallback(mTickCallback); final TextView textView = mView.get(); if (textView != null && (textView.isFocused() || textView.isSelected())) { long currentMs = mChoreographer.getFrameTime(); long deltaMs = currentMs - mLastAnimationMs; mLastAnimationMs = currentMs; float deltaPx = deltaMs / 1000f * mPixelsPerSecond; mScroll += deltaPx; if (mScroll > mMaxScroll) { mScroll = mMaxScroll; mChoreographer.postFrameCallbackDelayed(mRestartCallback, MARQUEE_DELAY); } else { mChoreographer.postFrameCallback(mTickCallback); } textView.invalidate(); } }
定位到这个函数,我们一下子明了。这个方法通过mChoreographer.getFrameTime()得到当前帧时间,然后和上一次的时间帧做减法。得到偏移量。然后进行转换,得到跑马灯应该
位置的偏移量mScroll。但是mScroll的改变也是有前提的:textView != null && (textView.isFocused() || textView.isSelected()
textView.isFocused()与textView.isSelected()使用的是短路或(||)。就说明两个方法的返回值有一定的独立性。这两个方法均为View中的方法,TextView均未重写,
再看:
textView.isFocused():
/** * Returns true if this view has focus * * @return True if this view has focus, false otherwise. */ @ViewDebug.ExportedProperty(category = "focus") public boolean isFocused() { return (mPrivateFlags & PFLAG_FOCUSED) != 0; }
源码中:
static final int PFLAG_FOCUSED = 0x00000002;
PFLAG_FOCUSED是个常量,不能被改变,而能改变的只有mPrivateFlags了。mPrivateFlags在TextView中是个变量,所以只要mPrivateFlags不等于0.则
isFocused()便返回true。
查看isSelected()方法源码:
/** * Indicates the selection state of this view. * * @return true if the view is selected, false otherwise */ @ViewDebug.ExportedProperty public boolean isSelected() { return (mPrivateFlags & PFLAG_SELECTED) != 0; }
static final int PFLAG_SELECTED = 0x00000004;
PFLAG_SELECTED也是个常量,所以这个返回值也取决于mPrivateFlags。妈蛋,越扯越大,这下子扯到View层去了。想想TextView应该有某个方法能够启动这个效果。所以折回去看看哪个地方调用了mQuereen.start()方法了。
经过查看源码,start()方法被封装了:
private void startMarquee() { // Do not ellipsize EditText if (getKeyListener() != null) return; if (compressText(getWidth() - getCompoundPaddingLeft() - getCompoundPaddingRight())) { return; } if ((mMarquee == null || mMarquee.isStopped()) && (isFocused() || isSelected()) && getLineCount() == 1 && canMarquee()) { if (mMarqueeFadeMode == MARQUEE_FADE_SWITCH_SHOW_ELLIPSIS) { mMarqueeFadeMode = MARQUEE_FADE_SWITCH_SHOW_FADE; final Layout tmp = mLayout; mLayout = mSavedMarqueeModeLayout; mSavedMarqueeModeLayout = tmp; setHorizontalFadingEdgeEnabled(true); requestLayout(); invalidate(); } if (mMarquee == null) mMarquee = new Marquee(this); mMarquee.start(mMarqueeRepeatLimit); } }
但是这个startMarquee()又是在哪调用的呢?经过分析,我绘制了下面的图例:
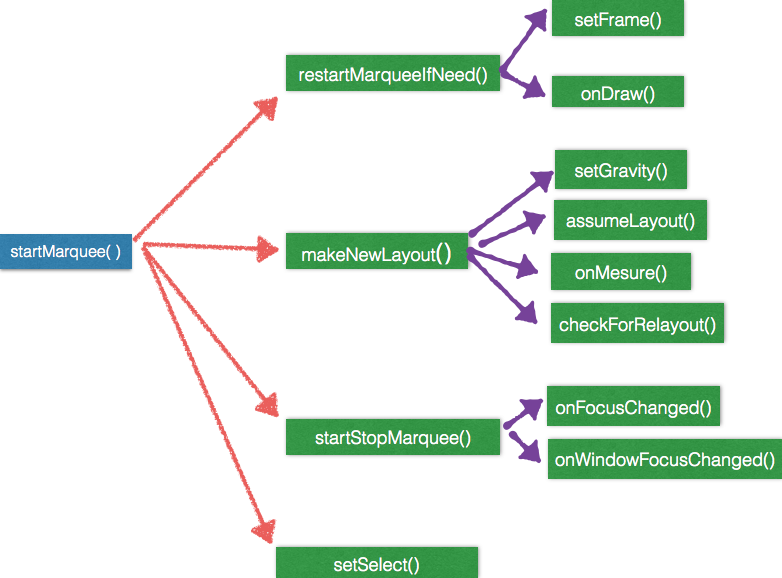
上面的方法中只有一个是提供给我们调用的:setSelect()。查看其源码:
@Override public void setSelected(boolean selected) { boolean wasSelected = isSelected(); super.setSelected(selected); if (selected != wasSelected && mEllipsize == TextUtils.TruncateAt.MARQUEE) { if (selected) { startMarquee(); } else { stopMarquee(); } } }
这尼玛不是赤裸裸的在开启这个效果嘛。shit!.
到此,应该就应该结束了。只需要设置setSelected(true)。便可让跑马灯跑起来。
但是!!突发奇想,在android XML是不是也可以使用这个属性呢。所以又找到另一个让其跑其他的方法:
android:textIsSelectable="true"
这个属性用来设定当前的TextView是否可以被选中的。用途就是当你看到一段文字时,你可以长按它,然后会弹出一个对话框,你是想复制它呢,还是剪切它呢还是怎么地。
看它所对应的setTextIsSelectabe()的源码:
public void setTextIsSelectable(boolean selectable) { if (!selectable && mEditor == null) return; // false is default value with no edit data createEditorIfNeeded(); if (mEditor.mTextIsSelectable == selectable) return; mEditor.mTextIsSelectable = selectable; setFocusableInTouchMode(selectable); setFocusable(selectable); setClickable(selectable); setLongClickable(selectable); // mInputType should already be EditorInfo.TYPE_NULL and mInput should be null setMovementMethod(selectable ? ArrowKeyMovementMethod.getInstance() : null); setText(mText, selectable ? BufferType.SPANNABLE : BufferType.NORMAL); // Called by setText above, but safer in case of future code changes mEditor.prepareCursorControllers(); }
这个方法里只有上面加粗的那行 setFocusableInTouchMode(selectable);是起到触发跑马灯走起的效果。
再看其源码:
/** * Set whether this view can receive focus while in touch mode. * * Setting this to true will also ensure that this view is focusable. * * @param focusableInTouchMode If true, this view can receive the focus while * in touch mode. * * @see #setFocusable(boolean) * @attr ref android.R.styleable#View_focusableInTouchMode */ public void setFocusableInTouchMode(boolean focusableInTouchMode) { // Focusable in touch mode should always be set before the focusable flag // otherwise, setting the focusable flag will trigger a focusableViewAvailable() // which, in touch mode, will not successfully request focus on this view // because the focusable in touch mode flag is not set setFlags(focusableInTouchMode ? FOCUSABLE_IN_TOUCH_MODE : 0, FOCUSABLE_IN_TOUCH_MODE); if (focusableInTouchMode) { setFlags(FOCUSABLE, FOCUSABLE_MASK); } }
这个方法是View中定义的,TextView并没有重写。它设定当这个View在接收到用户触摸时是否能接收到焦点。
其调用了setFlags()方法,setFlags()源码有很多,我们再看其中几段源码:
final int newVisibility = flags & VISIBILITY_MASK; if (newVisibility == VISIBLE) { if ((changed & VISIBILITY_MASK) != 0) { /* * If this view is becoming visible, invalidate it in case it changed while * it was not visible. Marking it drawn ensures that the invalidation will * go through. */ mPrivateFlags |= PFLAG_DRAWN; invalidate(true); needGlobalAttributesUpdate(true); // a view becoming visible is worth notifying the parent // about in case nothing has focus. even if this specific view // isn't focusable, it may contain something that is, so let // the root view try to give this focus if nothing else does. if ((mParent != null) && (mBottom > mTop) && (mRight > mLeft)) { mParent.focusableViewAvailable(this); } } }
其中有行:
/* * If this view is becoming visible, invalidate it in case it changed while * it was not visible. Marking it drawn ensures that the invalidation will * go through. */ mPrivateFlags |= PFLAG_DRAWN;
意思是说如果这个View是可见的,那我们就应该在它的可视状态改变时去刷新它。PFLAG_DRAWN是个常量:
static final int PFLAG_DRAWN = 0x00000020;
所以 :
mPrivateFlags = mPrivateFlags | PFLAG_DRAWN;
mPrivateFlags的值必定不等于0.还记得我们上面追踪到的isFocused()和isSelected()方法吗,要让其返回truem则PrivateFlags的值一定不能为0。
所以这个方法能达到让跑马灯有效果。
当然这只是一中投机取巧,因为在xml设定:android:focusableInTouchMode="true",这个和上面的那个方法是一样的功能,但是却依然没效果。
我们还是使用setSelect(true)即可。
总结:
要想让textView的跑马灯有效果,则有下面几种方法:
1.xml中指定android:textIsSelectable="true"
2.setSelected(true);
上面的随便使用一个即可,不需要重写TextView,也不需要一大堆的方法。Just Line of code!!这才像话!
- 1楼^-^antoon^-^
- 测试了一下,不是100%有效,与TextView设置的宽度有关。,Text都没显示完全的状态啊下,width设为30dp,获取焦点后可以显示跑马灯效果。width设为100dp时,没效果。