在我们的手机应用开发时候,我们经常会遇到大数据访问的时候,我们通常会考虑以下几个方面的情况。一、手机内存的限制还必须保证应用反应的流畅;二、尽量小的流量消耗,不然,你的应用流畅度再好体验再好,用户还是会毫不犹豫的卸载掉你的应用。大数据量访问的情况下,数据缓存是我们一定会考虑到的解决方案。而作为缓存,我们很重要的会考虑以下几点:1.访问速度;2.逐出旧的缓存策略;3.最好还能考虑到一定的并发度。这篇我们主要说说LRU策略的缓存算法实现,我们就用图片缓存为例来谈谈Android应用开发中的缓存实现。
首先我们来看看谷歌官方的推荐的缓存:在Android3.0加入的LruCache和 DiskLruCache(硬盘缓存结构)类。我们从代码的实现知道,LruCache和DiskLruCache缓存的实现都是基于JDK的LinkedHashMap集合来实现。下面我们来从LinkedHashMap的源码的分析来开始学习。
通过源码我们知道,LinkedHashMap是继承HashMap,底层结构不仅使用HashMap来保存元素,同时通过继承HashMapEntry 实现双向链表的结构来关联其他的元素。我们先来看LInkedHashMap的节点实现:
/** * LinkedHashMap entry. */ private static class Entry<K,V> extends HashMap.Entry<K,V> { // These fields comprise the doubly linked list used for iteration. Entry<K,V> before, after; LinkedHashMap的节点Entry继承自HashMap.Entry来实现,增加两个引用来分别指向前一个元素和后一个元素。LinkedHashMap的实现是在HashMap的基础上增加双链表的结构。我们再来看看LinkedHashMap的初始化,我们看到构造函数参数最多的情况:
/** * Constructs an empty <tt>LinkedHashMap</tt> instance with the * specified initial capacity, load factor and ordering mode. * * @param initialCapacity the initial capacity * @param loadFactor the load factor * @param accessOrder the ordering mode - <tt>true</tt> for * access-order, <tt>false</tt> for insertion-order * @throws IllegalArgumentException if the initial capacity is negative * or the load factor is nonpositive */ public LinkedHashMap(int initialCapacity, float loadFactor, boolean accessOrder) { super(initialCapacity, loadFactor); this.accessOrder = accessOrder; //accessOrder指定排序,默认为false,为fasle的时候,插入顺序排序,为true时候,访问顺序排序 }我们看到重写的基类的初始化方法init实习:/** * Called by superclass constructors and pseudoconstructors (clone, * readObject) before any entries are inserted into the map. Initializes * the chain. */ void init() { header = new Entry<K,V>(-1, null, null, null); header.before = header.after = header; }此处初始化头指针给循环指定。下面我们重点来看看集合最总要的两个方法put和get的实现。我们先看put方法,LinkedHashMap的put方法并没有重写HashMap的put方法。只是重写了put方法下的addEntry方法,addEntry方法执行时候是当LinkedHashMap插入新的结点的时候执行。/** * This override alters behavior of superclass put method. It causes newly * allocated entry to get inserted at the end of the linked list and * removes the eldest entry if appropriate. */ void addEntry(int hash, K key, V value, int bucketIndex) { createEntry(hash, key, value, bucketIndex); // Remove eldest entry if instructed, else grow capacity if appropriate Entry<K,V> eldest = header.after; if (removeEldestEntry(eldest)) { removeEntryForKey(eldest.key); } else { if (size >= threshold) resize(2 * table.length); } } /** * This override differs from addEntry in that it doesn't resize the * table or remove the eldest entry. */ void createEntry(int hash, K key, V value, int bucketIndex) { HashMap.Entry<K,V> old = table[bucketIndex]; Entry<K,V> e = new Entry<K,V>(hash, key, value, old); table[bucketIndex] = e; e.addBefore(header); size++; } 我们看我们产生新结点的方法creatEntry实现,我们先给找到哈希表上对应的位置,然后给新的Entry指定前后的节点。执行方法e.addBefore(header)代码如下: /** * Inserts this entry before the specified existing entry in the list. */ private void addBefore(Entry<K,V> existingEntry) { after = existingEntry; before = existingEntry.before; before.after = this; after.before = this; } 我们看到代码实现的功能就是把新结点添加到header结点前。我们再回到addEntry的代码实现,我们看 Entry<K,V> eldest = header.after;if (removeEldestEntry(eldest))的执行,我们把header后结点理解成我们最旧的节点,removeEldestEntry(eldest)方法的实现:protected boolean removeEldestEntry(Map.Entry<K,V> eldest) { return false; }removeEldestEntry方法执行默认返回false,意思就是我们LinkedHashMap默认不会逐去旧的节点。我们可以通过在子类重载来重写removeEldestEntry的实现,来修改LRU策略。下面我们用图示来表示put方法的执行一下代码的执行过程:
map.put("22", "xxx"); 首先map执行前的结构是这样: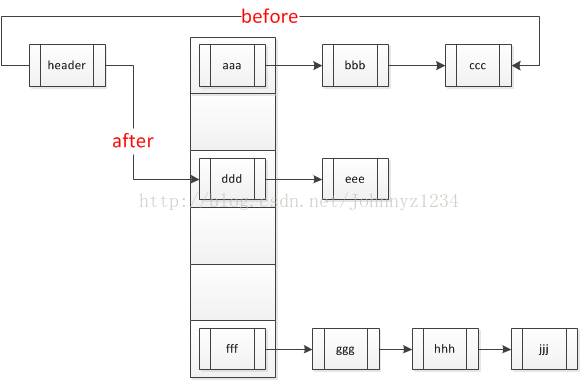
为了不让图上密密麻麻的都是引用箭头乱窜,我省略了HashMap的很多Entry结点的before和after的指向,我们只是重点表示header的引用指向。我们执行方法map.put("22","xxx")后的数据结构变成这样:
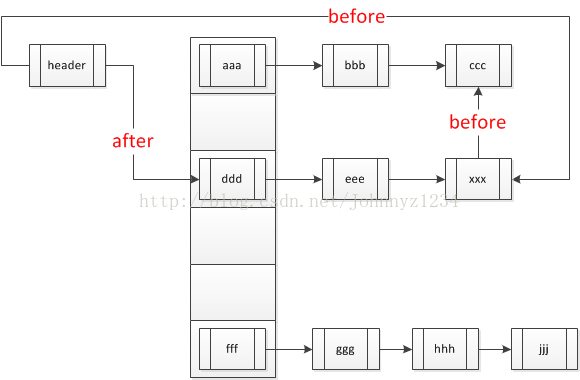
我们把key为22的节点通过hash算法,指定到eee的后面,同时我们把header的before指向修改为指向key为22的节点。分析完我们的put方法,我们接着来分析get方法的实现,代码如下:
public V get(Object key) { Entry<K,V> e = (Entry<K,V>)getEntry(key); if (e == null) return null; e.recordAccess(this); return e.value; }我们看到get方法很简单,首先我们去Map取key对应的value是否存在,如果不存在,我们返回null。如果存在,我们执行e.recoedAccess(this)方法。 /** * This method is invoked by the superclass whenever the value * of a pre-existing entry is read by Map.get or modified by Map.set. * If the enclosing Map is access-ordered, it moves the entry * to the end of the list; otherwise, it does nothing. */ void recordAccess(HashMap<K,V> m) { LinkedHashMap<K,V> lm = (LinkedHashMap<K,V>)m; if (lm.accessOrder) { //此处的判断LinkedHashMap的排序顺序 lm.modCount++; remove(); addBefore(lm.header); } } recodeAccess方法中,当我们的排序顺序为false,为按插入排序顺序的时候,我们直接退出方法。当我们的排序顺序为访问排序顺序的时候,我们执行remove方法,把结点从链表里切除出来,然后执行addBefore方法时候,我们把结点插入到header结点的前面。这样,我们就实习每次根据访问位置来排序的操作。下面我们通过图的例子来说明,当LinkedHashMap的排序为访问排序的时候,我们get操作的过程,LinkedHashMap的数据结构的变化。我们执行的代码如下:
put.get("15");//我们假设key为15对应的value为"bbb"我们在执行完map.put("22","xxx")后,再执行put.get("15")的变化如下:
以上为执行get方法之后的代码发生变化,"bbb”对应的节点其实没有发生变化,只是在链表结构中的指针发生了变化,因此对应的迭代器访问的时候,我们读取位置不一样。
因为我们可以知道我们LRU的节点肯定是在header的after指向节点。当我们重写removeEldestEntry来修改LRU策略的时候,我们也是首先逐出header的after所指向的节点。然后,我们最后来看LinkedHashmap的迭代器的实现如下:
private abstract class LinkedHashIterator<T> implements Iterator<T> { Entry<K,V> nextEntry = header.after; Entry<K,V> lastReturned = null; /** * The modCount value that the iterator believes that the backing * List should have. If this expectation is violated, the iterator * has detected concurrent modification. */ int expectedModCount = modCount; public boolean hasNext() { return nextEntry != header; } public void remove() { if (lastReturned == null) throw new IllegalStateException(); if (modCount != expectedModCount) throw new ConcurrentModificationException(); LinkedHashMap.this.remove(lastReturned.key); lastReturned = null; expectedModCount = modCount; } Entry<K,V> nextEntry() { if (modCount != expectedModCount) throw new ConcurrentModificationException(); if (nextEntry == header) throw new NoSuchElementException(); Entry<K,V> e = lastReturned = nextEntry; nextEntry = e.after; //此处我们可知我们的迭代器实现访问节点的after引用指向的节点。 return e; } } 从LinkedHashMap实现的实现的迭代器内部类LinkedHashIterator看,我们迭代器的元素访问顺序是从header节点开始往after方向开始迭代。以上为对LinkedHashMap的分析简单分析,下一节我们会针对LinkedHashMap的数据结构的特性来说说,用LinkedHashMap结构实现缓冲的快速访问的优势,还会结合常用的开源实现,来说说实现一定并发的Android下缓存实现。- 1楼footballclub7小时前
- DiskLruCache android3.0中谷歌官方并没有提供,博主可以查查