只有你学会把自己已有的成绩都归零,才能腾出空间去接纳更多的新东西,如此才能使自己不断的超越自己。
本讲内容:介面滑动倒影效果
一、倒影原理:
倒影效果是主要由原图+间距+倒影三部分组成,高度大约为原图的3/2(原图为1、倒影为1/2)
原图,就是我们看到了最开始的图片
间距,是原图与倒影之间的间隙,如:reflectionGap = 4;
倒影,是原图下半部分1/2高度,通过矩阵变换matrix.preScale(1, -1); 获取倒立图片,然后再加上线性遮罩和阴影实现
示例一效果图:
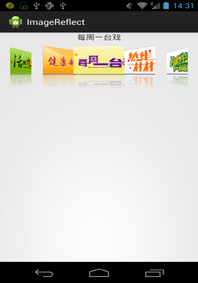

下面是res/layout/activity_main.xml 布局文件:
<?xml version="1.0" encoding="utf-8"?><RelativeLayout xmlns:android="http://schemas.android.com/apk/res/android" android:layout_width="fill_parent" android:layout_height="fill_parent" android:orientation="vertical" > <TextView android:id="@+id/tvTitle" android:layout_width="wrap_content" android:layout_height="wrap_content" android:layout_centerHorizontal="true" android:textSize="16sp" /> <com.example.imagereflect.myGallery android:id="@+id/mygallery" android:layout_width="fill_parent" android:layout_height="wrap_content" android:layout_below="@id/tvTitle" android:layout_marginTop="10dip" /></RelativeLayout>
com.example.imagereflect 是包名
下面是myGallery.java文件:
public class myGallery extends Gallery { private Camera mCamera = new Camera(); private int mMaxRotationAngle = 60; // 最大旋转角度 60 private int mMaxZoom = -120; private int mCoveflowCenter; public myGallery(Context context) { super(context); this.setStaticTransformationsEnabled(true); } public myGallery(Context context, AttributeSet attrs) { super(context, attrs); this.setStaticTransformationsEnabled(true); } public myGallery(Context context, AttributeSet attrs, int defStyle) { super(context, attrs, defStyle); this.setStaticTransformationsEnabled(true); } public int getMaxRotationAngle() { return mMaxRotationAngle; } public void setMaxRotationAngle(int maxRotationAngle) { mMaxRotationAngle = maxRotationAngle; } public int getMaxZoom() { return mMaxZoom; } public void setMaxZoom(int maxZoom) { mMaxZoom = maxZoom; } /** 获取Gallery的中心x */ private int getCenterOfCoverflow() { return (getWidth() - getPaddingLeft() - getPaddingRight()) / 2 + getPaddingLeft(); } /** 获取View的中心x */ private static int getCenterOfView(View view) { return view.getLeft() + view.getWidth() / 2; } @Override protected void onSizeChanged(int w, int h, int oldw, int oldh) { mCoveflowCenter = getCenterOfCoverflow(); super.onSizeChanged(w, h, oldw, oldh); } @Override protected boolean getChildStaticTransformation(View child, Transformation trans) { final int childCenter = getCenterOfView(child); final int childWidth = child.getWidth(); int rotationAngle = 0; trans.clear(); trans.setTransformationType(Transformation.TYPE_BOTH); // alpha 和 matrix 都变换 if (childCenter == mCoveflowCenter) { // 正中间的childView transformImageBitmap((ImageView) child, trans, 0); } else { // 两侧的childView rotationAngle = (int) ( ( (float) (mCoveflowCenter - childCenter) / childWidth ) * mMaxRotationAngle ); if (Math.abs(rotationAngle) > mMaxRotationAngle) { rotationAngle = (rotationAngle < 0) ? -mMaxRotationAngle : mMaxRotationAngle; } transformImageBitmap((ImageView) child, trans, rotationAngle); } return true; } private void transformImageBitmap(ImageView child, Transformation trans, int rotationAngle) { mCamera.save(); final Matrix imageMatrix = trans.getMatrix(); final int imageHeight = child.getLayoutParams().height; final int imageWidth = child.getLayoutParams().width; final int rotation = Math.abs(rotationAngle); // 在Z轴上正向移动camera的视角,实际效果为放大图片; 如果在Y轴上移动,则图片上下移动; X轴上对应图片左右移动。 mCamera.translate(0.0f, 0.0f, 100.0f); // As the angle of the view gets less, zoom in if (rotation < mMaxRotationAngle) { float zoomAmount = (float) (mMaxZoom + (rotation * 1.5)); mCamera.translate(0.0f, 0.0f, zoomAmount); } mCamera.rotateY(rotationAngle); // rotationAngle 为正,沿y轴向内旋转; 为负,沿y轴向外旋转 mCamera.getMatrix(imageMatrix); imageMatrix.preTranslate(-(imageWidth / 2), -(imageHeight / 2)); imageMatrix.postTranslate((imageWidth / 2), (imageHeight / 2)); mCamera.restore(); }}下面是ImageAdapter.java文件:
public class ImageAdapter extends BaseAdapter { private ImageView[] mImages; // 保存倒影图片的数组 private Context mContext; public List<Map<String, Object>> list; public Integer[] imgs = { R.drawable.img01, R.drawable.img02, R.drawable.img03, R.drawable.img04, R.drawable.img05, R.drawable.img06, R.drawable.img07 }; public String[] titles = { "乡村季风", "活到九十九", "健康超市", "每周一台戏", "热线村村通", "快乐生活", "戏迷时间" }; public ImageAdapter(Context c) { this.mContext = c; list = new ArrayList<Map<String, Object>>(); for (int i = 0; i < imgs.length; i++) { HashMap<String, Object> map = new HashMap<String, Object>(); map.put("image", imgs[i]); list.add(map); } mImages = new ImageView[list.size()]; } /** 反射倒影 */ public boolean createReflectedImages() { final int reflectionGap = 4; int index = 0; for (Map<String, Object> map : list) { Integer id = (Integer) map.get("image"); Bitmap originalImage = BitmapFactory.decodeResource(mContext.getResources(), id); // 获取原始图片 int width = originalImage.getWidth(); int height = originalImage.getHeight(); Matrix matrix = new Matrix(); matrix.preScale(1, -1); // 图片矩阵变换(从低部向顶部的倒影) Bitmap reflectionImage = Bitmap.createBitmap(originalImage, 0, height/2, width, height/2, matrix, false); // 截取原图下半部分 Bitmap bitmapWithReflection = Bitmap.createBitmap(width, (height + height / 2), Config.ARGB_8888); // 创建倒影图片(高度为原图3/2) Canvas canvas = new Canvas(bitmapWithReflection); // 绘制倒影图(原图 + 间距 + 倒影) canvas.drawBitmap(originalImage, 0, 0, null); // 绘制原图 Paint paint = new Paint(); canvas.drawRect(0, height, width, height + reflectionGap, paint); // 绘制原图与倒影的间距 canvas.drawBitmap(reflectionImage, 0, height + reflectionGap, null); // 绘制倒影图 paint = new Paint(); LinearGradient shader = new LinearGradient(0, originalImage.getHeight(), 0, bitmapWithReflection.getHeight() + reflectionGap, 0x70ffffff, 0x00ffffff, TileMode.CLAMP); paint.setShader(shader); // 线性渐变效果 paint.setXfermode(new PorterDuffXfermode(Mode.DST_IN)); // 倒影遮罩效果 canvas.drawRect(0, height, width, bitmapWithReflection.getHeight() + reflectionGap, paint); // 绘制倒影的阴影效果 ImageView imageView = new ImageView(mContext); imageView.setImageBitmap(bitmapWithReflection); // 设置倒影图片 imageView.setLayoutParams(new myGallery.LayoutParams(180, 240)); imageView.setScaleType(ScaleType.MATRIX); mImages[index++] = imageView; } return true; } @Override public int getCount() { return imgs.length; } @Override public Object getItem(int position) { return mImages[position]; } @Override public long getItemId(int position) { return position; } @Override public View getView(int position, View convertView, ViewGroup parent) { return mImages[position]; // 显示倒影图片(当前获取焦点) } public float getScale(boolean focused, int offset) { return Math.max(0, 1.0f / (float) Math.pow(2, Math.abs(offset))); }}下面是MainActivity.java主界面文件:
public class MainActivity extends Activity { private TextView tvTitle; private myGallery gallery; private ImageAdapter adapter; @Override public void onCreate(Bundle savedInstanceState) { super.onCreate(savedInstanceState); setContentView(R.layout.activity_main); initRes(); } private void initRes(){ tvTitle = (TextView) findViewById(R.id.tvTitle); gallery = (myGallery) findViewById(R.id.mygallery); adapter = new ImageAdapter(this); adapter.createReflectedImages(); // 创建倒影效果 gallery.setAdapter(adapter); gallery.setOnItemSelectedListener(new OnItemSelectedListener() { // 设置选择事件监听 @Override public void onItemSelected(AdapterView<?> parent, View view, int position, long id) { tvTitle.setText(adapter.titles[position]); } @Override public void onNothingSelected(AdapterView<?> parent) { } }); gallery.setOnItemClickListener(new OnItemClickListener() { // 设置点击事件监听 @Override public void onItemClick(AdapterView<?> parent, View view, int position, long id) { Toast.makeText(MainActivity.this, "img " + (position+1) + " selected", Toast.LENGTH_SHORT).show(); } }); }}Take your time and enjoy it