本文围绕以下十个部分展开:
一、一些基本概念
二、更改App默认图标
三、一些基本控件
四、UI开发步骤
五、TextView
六、EditText
七、Button
八、ImageView
九、Widgets(其他控件)
附 关于在Android真机上部署
一、一些基本概念
1.UI
User Interface - 用户接口/用户界面
UI是用户能看见并可交互的组件。
分为:系统UI,自定义UI。
UI放在View和ViewGroup里面。
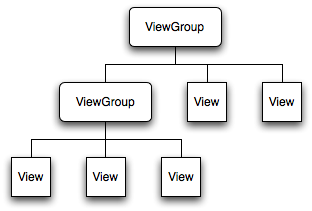
2.View和ViewGroup
View是屏幕上的一个矩形区域,负责绘制和事件处理;它是控件(widget)的基类。
ViewGroup是View的子类,是不可见的容器,负责管理其他View及它们的布局属性;它是布局和视图容器的基类。

二、更改App默认图标
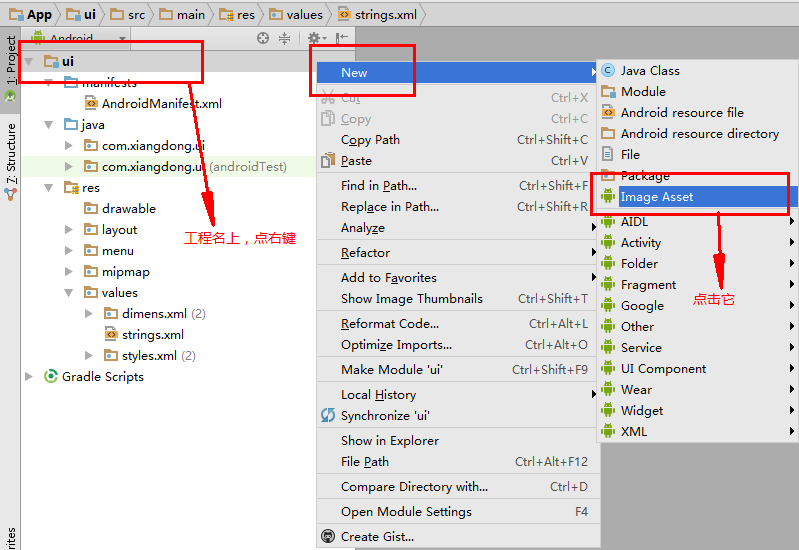
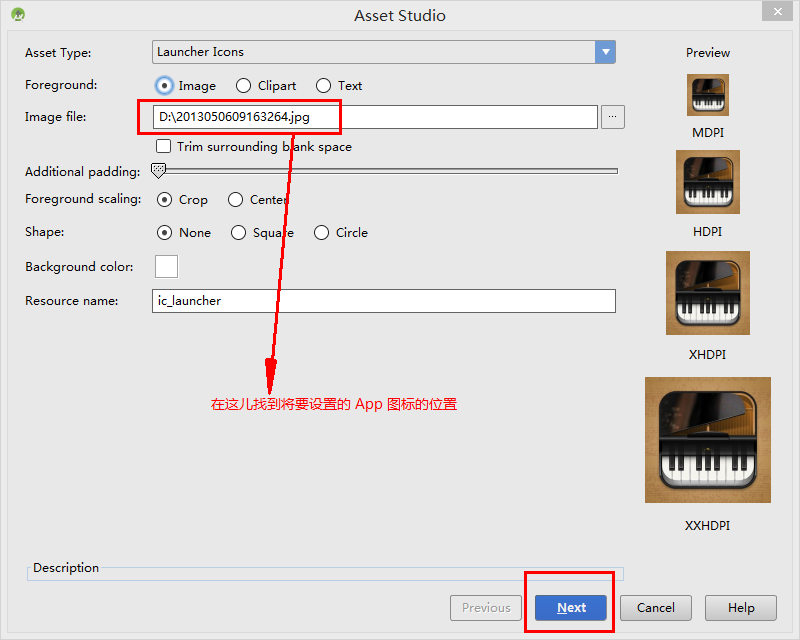
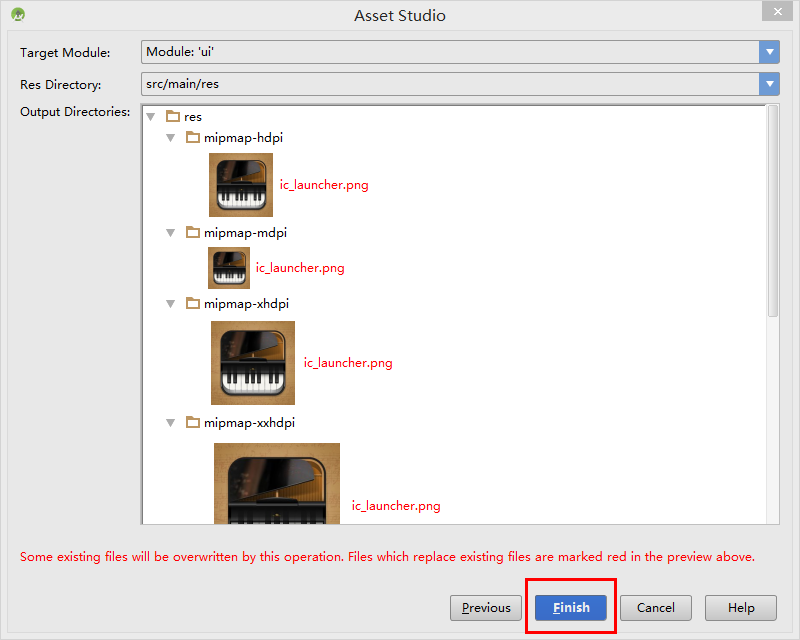
更改之后,就会看到App图标已变为下图所示:

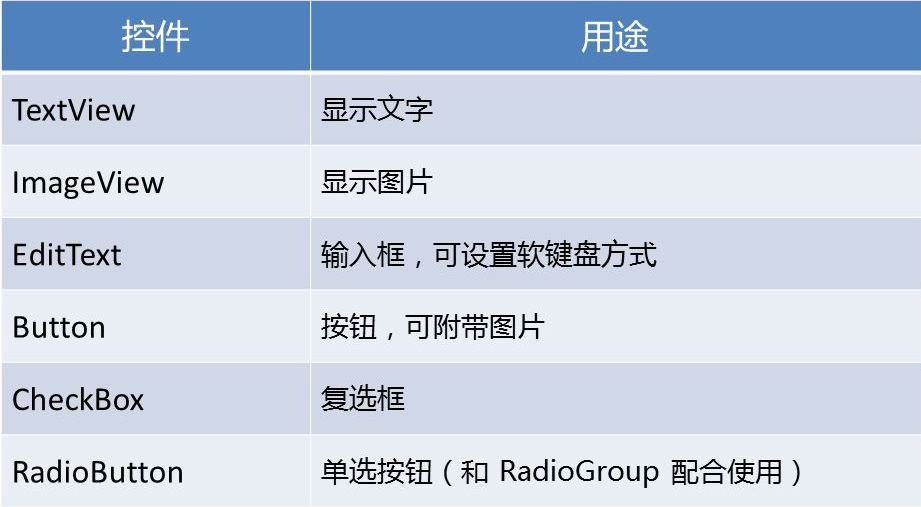
三、一些基本控件
四、UI开发步骤
1.在 res -> values -> strings.xml 中,定义所有所需的文本 【字符串】
<resources> <string name="app_name">UI</string> <string name="hello_world">Hello world!</string> <string name="action_settings">Settings</string> <string name="text_view">TextView</string> <string name="edit_text">EditText</string> <string name="button">Button</string> <string name="image_view">ImageView</string> <string name="widgets">Widgets</string></resources>
2.在 res -> layout -> activity_main.xml 布局文件中,设计主活动布局 【布局】
<RelativeLayout xmlns:android="http://schemas.android.com/apk/res/android" xmlns:tools="http://schemas.android.com/tools" android:layout_width="match_parent" android:layout_height="match_parent" android:paddingLeft="@dimen/activity_horizontal_margin" android:paddingRight="@dimen/activity_horizontal_margin" android:paddingTop="@dimen/activity_vertical_margin" android:paddingBottom="@dimen/activity_vertical_margin" tools:context=".MainActivity"> <!-- ListView :显示列表 (类似于HTML中的多行下拉列表框) --> <ListView android:id="@+id/listView" android:layout_width="match_parent" android:layout_height="wrap_content"> </ListView></RelativeLayout>
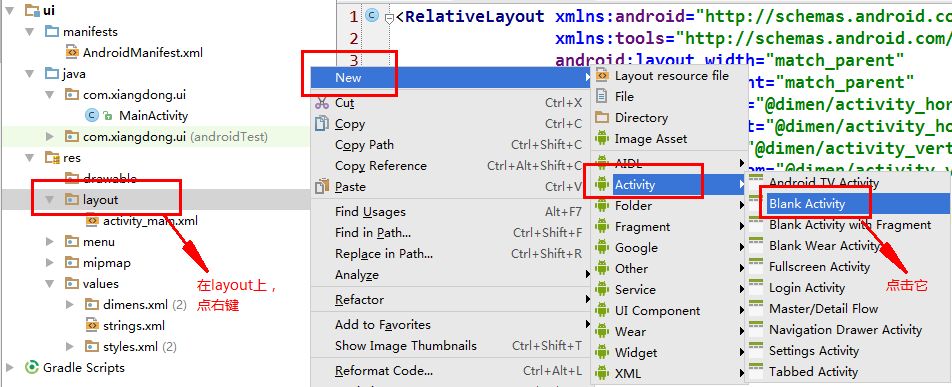
3.创建主活动里面包含的其他Activity 【界面】
创建一个新的Activity,需要进行以下三部分内容:
(1)创建布局文件,如 activity_text_view
(2)创建活动类,如 TextViewActivity
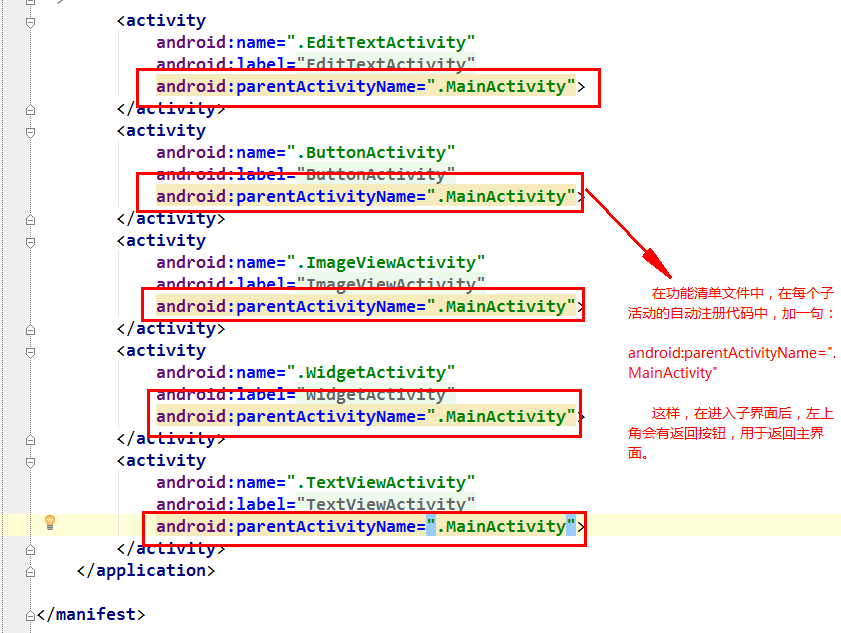
(3)在功能清单文件 AndroidManifest.xml 中,注册该Activity
如下是创建 TextViewActivity 的步骤:
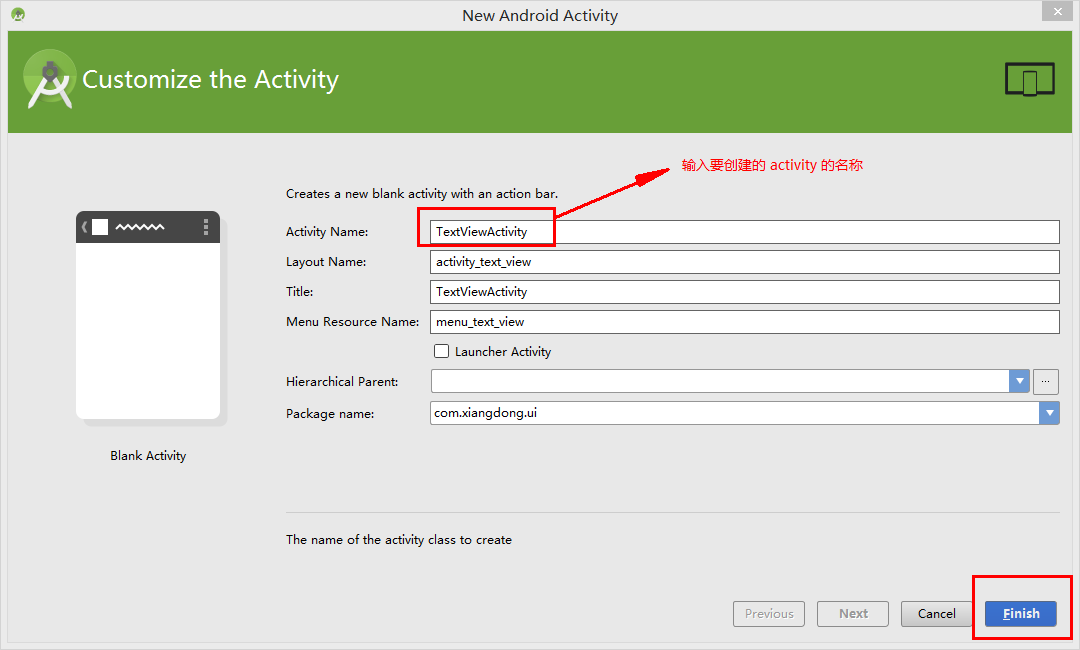

同样的,以同样的方法接着创建 ButtonActivity、EditTextActivity、ImageViewActivity和WidgetsActivity。
4.填写主活动类的事件,将主活动与其他活动关联起来 【事件】
在活动类中写事件的时候,有以下几个小步骤:
(1)声明变量(所用到、要关联的控件都在此声明)
(2)初始化控件
(3)初始化适配器(将适配器关联数据)
(4)控件与适配器关联
(5)写控件的事件
(6)弹出显示指定文本(看是否需要弹出显示指定文本)
(7)指定意图(由当前界面跳转至指定界面)
(8)启动意图
package com.xiangdong.ui;import android.app.Activity;import android.content.Intent;import android.os.Bundle;import android.view.Menu;import android.view.MenuItem;import android.view.View;import android.widget.AdapterView;import android.widget.ArrayAdapter;import android.widget.ListView;public class MainActivity extends Activity { // 1.声明变量 private ListView listView; private String[] data = {"TextView", "EditText", "Button", "ImageView", "Widgets"}; private Class[] actions = {TextViewActivity.class, EditTextActivity.class, ButtonActivity.class, ImageViewActivity.class, WidgetActivity.class}; // 创建适配器 private ArrayAdapter<String> adapter; @Override protected void onCreate(Bundle savedInstanceState) { super.onCreate(savedInstanceState); // 加载布局文件 setContentView(R.layout.activity_main); // 2.初始化控件 (加载布局文件之后才能找到 id) listView = (ListView) findViewById(R.id.listView); // 3.初始化适配器(关联数据) // 参数:上下文,资源id显示方式,显示数据 adapter = new ArrayAdapter<String>(this, android.R.layout.simple_list_item_1, data); // 4.控件与适配器关联 listView.setAdapter(adapter); // 5.控件的事件 listView.setOnItemClickListener(new AdapterView.OnItemClickListener() { @Override public void onItemClick(AdapterView<?> parent, View view, int position, long id) { // 6.弹出显示指定文本(类似于 JS 中 alert,但停留时间后自动隐藏) // 参数:上下文,指定显示文本,停留时间 // 在内部类中显示当前活动的上下文:MainActivity.this // Toast.makeText(MainActivity.this, data[position],Toast.LENGTH_SHORT).show(); // 7.指定意图(由当前界面跳转至指定界面) // position 是 ListView 控件选中选项的下标值 Intent intent = new Intent(MainActivity.this, actions[position]); // 8.启动意图 startActivity(intent); } }); // 6.在本类显示指定文本 // Toast.makeText(this, R.string.text_view,Toast.LENGTH_LONG).show(); // Toast.makeText(this, "asdf",Toast.LENGTH_SHORT).show(); } @Override public boolean onCreateOptionsMenu(Menu menu) { // Inflate the menu; this adds items to the action bar if it is present. getMenuInflater().inflate(R.menu.menu_main, menu); return true; } @Override public boolean onOptionsItemSelected(MenuItem item) { // Handle action bar item clicks here. The action bar will // automatically handle clicks on the Home/Up button, so long // as you specify a parent activity in AndroidManifest.xml. int id = item.getItemId(); //noinspection SimplifiableIfStatement if (id == R.id.action_settings) { return true; } return super.onOptionsItemSelected(item); }}代码说明:
数据要显示到视图上,中间得有适配器。如下图所示。

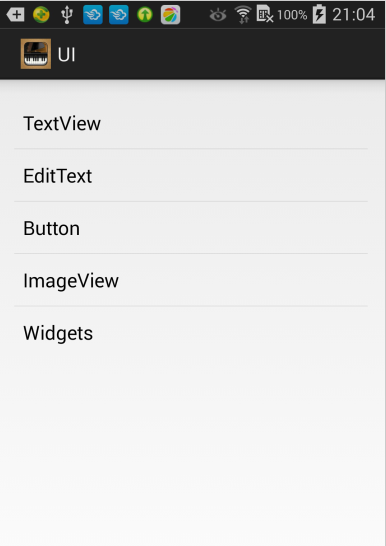
经过以上步骤开发之后的界面如下所示:
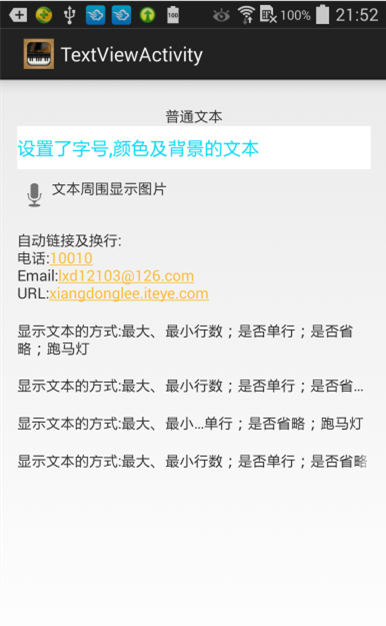
五、TextView
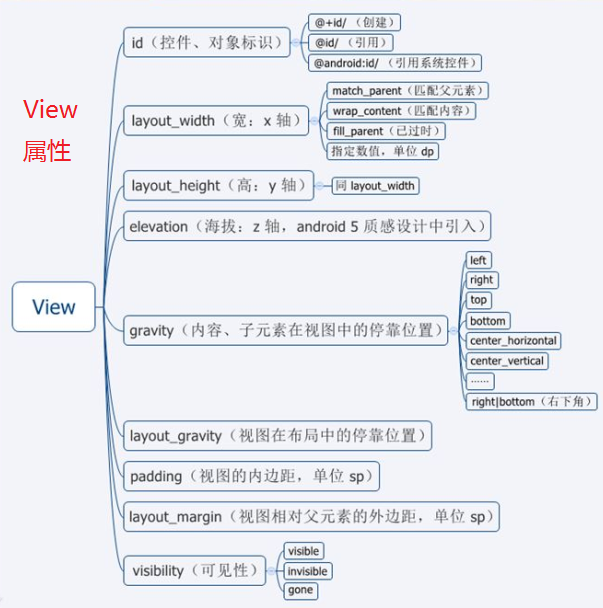
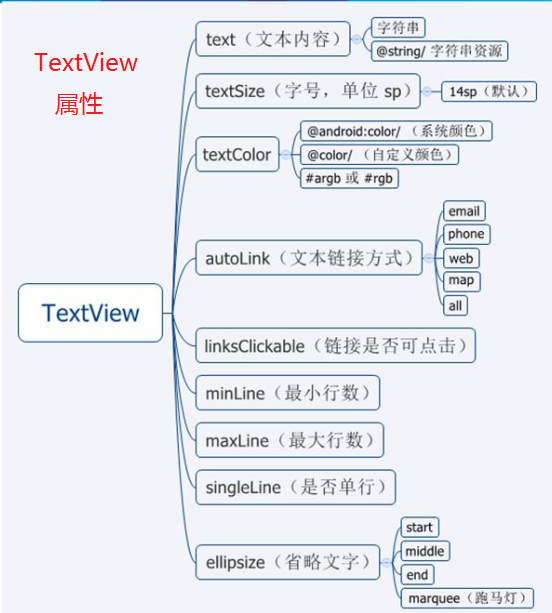
1.TextView属性
2.用代码实现,展示效果
(1)在 strings.xml 中添加需要的文本
<!-- TextView --> <string name="normal_text">普通文本</string> <string name="font_text">设置了字号,颜色及背景的文本</string> <string name="image_text">文本周围显示图片</string> <string name="link_text">自动链接及换行:\n电话:10010\nEmail:[email protected]\nURL:xiangdonglee.iteye.com</string> <string name="show_text">显示文本的方式:最大、最小行数;是否单行;是否省略;跑马灯</string>
(2)在 activity_text_view.xml 布局文件中,设计布局
<LinearLayout xmlns:android="http://schemas.android.com/apk/res/android" xmlns:tools="http://schemas.android.com/tools" android:layout_width="match_parent" android:layout_height="match_parent" android:orientation="vertical" android:paddingBottom="@dimen/activity_vertical_margin" android:paddingLeft="@dimen/activity_horizontal_margin" android:paddingRight="@dimen/activity_horizontal_margin" android:paddingTop="@dimen/activity_vertical_margin" tools:context=".TextViewActivity"> <!--LinearLayout 线性布局 orientation:定位/方向 horizontal:水平线性布局(基于 X 轴对齐) vertical:垂直线性布局(基于 Y 轴对齐) --> <TextView android:layout_width="match_parent" android:layout_height="wrap_content" android:gravity="center" android:paddingTop="8dp" android:text="@string/normal_text"/> <TextView android:layout_width="match_parent" android:layout_height="wrap_content" android:background="@android:color/white" android:paddingBottom="8dp" android:paddingTop="8dp" android:text="@string/font_text" android:textColor="@android:color/holo_blue_bright" android:textSize="18sp"/> <TextView android:layout_width="match_parent" android:layout_height="wrap_content" android:drawableLeft="@android:drawable/ic_btn_speak_now" android:paddingBottom="8dp" android:paddingTop="8dp" android:text="@string/image_text"/> <TextView android:layout_width="match_parent" android:layout_height="wrap_content" android:autoLink="all" android:linksClickable="true" android:paddingBottom="8dp" android:paddingTop="8dp" android:text="@string/link_text" android:textColorLink="@android:color/holo_orange_light"/> <TextView android:layout_width="match_parent" android:layout_height="wrap_content" android:maxLines="3" android:paddingBottom="8dp" android:paddingTop="8dp" android:text="@string/show_text"/> <TextView android:layout_width="match_parent" android:layout_height="wrap_content" android:paddingBottom="8dp" android:paddingTop="8dp" android:singleLine="true" android:text="@string/show_text"/> <TextView android:layout_width="match_parent" android:layout_height="wrap_content" android:ellipsize="middle" android:paddingBottom="8dp" android:paddingTop="8dp" android:singleLine="true" android:text="@string/show_text"/> <!-- ellipsize 省略的位置 (start/end/middle)--> <!-- 跑马灯效果 --> <!-- ellipsize=marquee:跑马灯效果 --> <!-- focusableInTouchMode:触控获得焦点--> <!-- focusable:可触控--> <TextView android:layout_width="match_parent" android:layout_height="wrap_content" android:ellipsize="marquee" android:focusable="true" android:focusableInTouchMode="true" android:paddingBottom="8dp" android:paddingTop="8dp" android:singleLine="true" android:text="@string/show_text"/></LinearLayout>
效果如下所示:
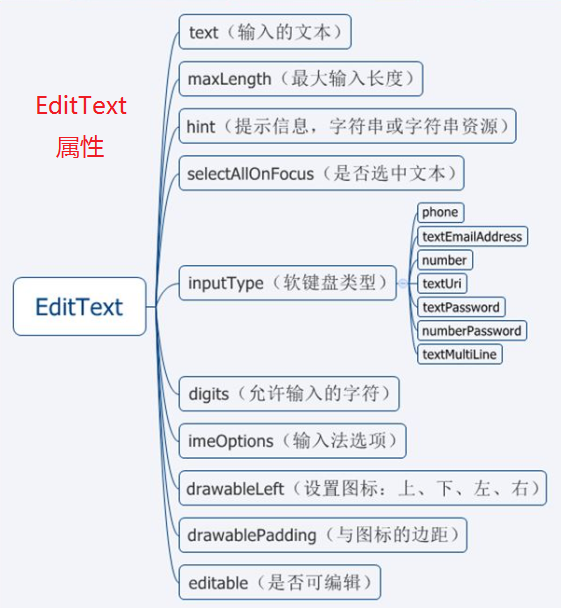
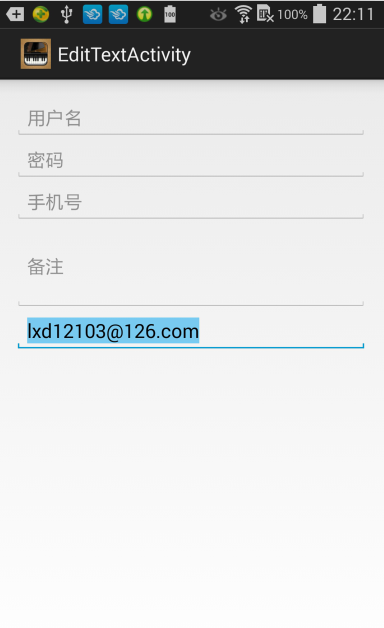
六、EditText
1.EditText属性
2.用代码实现,展示效果
(1)在 strings.xml 中添加需要的文本
<!-- EditText--> <string name="username_hint">用户名</string> <string name="password_hint">密码</string> <string name="phone_hint">手机号</string> <string name="email">[email protected]</string> <string name="remark_hint">备注</string>
(2)在activity_edit_text.xml 布局文件中,设计布局
<RelativeLayout xmlns:android="http://schemas.android.com/apk/res/android" xmlns:tools="http://schemas.android.com/tools" android:layout_width="match_parent" android:layout_height="match_parent" android:paddingLeft="@dimen/activity_horizontal_margin" android:paddingRight="@dimen/activity_horizontal_margin" android:paddingTop="@dimen/activity_vertical_margin" android:paddingBottom="@dimen/activity_vertical_margin" tools:context=".EditTextActivity"> <EditText android:id="@+id/txtUsername" android:layout_width="match_parent" android:layout_height="wrap_content" android:hint="@string/username_hint" android:imeOptions="actionNext"/> <EditText android:id="@+id/txtPassword" android:layout_width="match_parent" android:layout_height="wrap_content" android:layout_below="@+id/txtUsername" android:hint="@string/password_hint" android:inputType="textPassword"/> <EditText android:id="@+id/txtPhone" android:layout_width="match_parent" android:layout_height="wrap_content" android:layout_below="@+id/txtPassword" android:hint="@string/phone_hint" android:inputType="phone"/> <EditText android:id="@+id/txtRemark" android:layout_width="match_parent" android:layout_height="wrap_content" android:layout_below="@+id/txtPhone" android:hint="@string/remark_hint" android:minLines="3"/> <EditText android:id="@+id/txtEmail" android:layout_width="match_parent" android:layout_height="wrap_content" android:layout_below="@+id/txtRemark" android:hint="@string/phone_hint" android:text="@string/email" android:inputType="textEmailAddress" android:selectAllOnFocus="true"/></RelativeLayout>
效果如下所示:
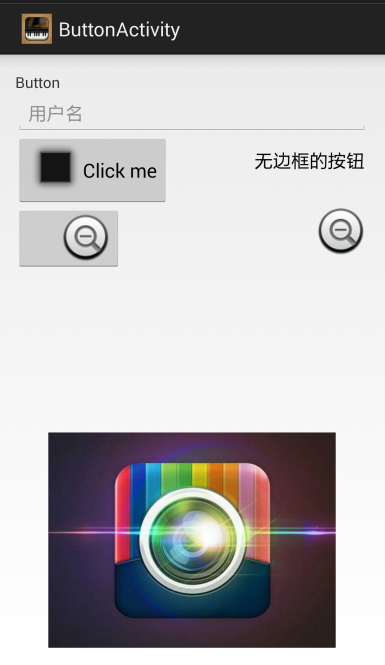
七、Button和ImageButton
1.用代码实现,展示效果
(1)在 strings.xml 中添加需要的文本
<!-- Button --> <string name="btn_ok">Click me</string> <string name="btn_less_border">无边框的按钮</string>
(2)在activity_button.xml 布局文件中,设计布局
<RelativeLayout xmlns:android="http://schemas.android.com/apk/res/android" xmlns:tools="http://schemas.android.com/tools" android:layout_width="match_parent" android:layout_height="match_parent" android:paddingLeft="@dimen/activity_horizontal_margin" android:paddingRight="@dimen/activity_horizontal_margin" android:paddingTop="@dimen/activity_vertical_margin" android:paddingBottom="@dimen/activity_vertical_margin" tools:context="com.xiangdong.ui.ButtonActivity"> <TextView android:id="@+id/tvUsername" android:text="@string/button" android:layout_width="wrap_content" android:layout_height="wrap_content"/> <EditText android:id="@+id/txtUsername" android:layout_width="match_parent" android:layout_height="wrap_content" android:layout_below="@+id/tvUsername" android:hint="@string/username_hint"/> <Button android:id="@+id/btnOK" android:layout_width="wrap_content" android:layout_height="wrap_content" android:layout_below="@+id/txtUsername" android:text="@string/btn_ok" android:drawableLeft="@android:drawable/alert_dark_frame" android:onClick="clickMe"/> <Button android:id="@+id/btnLessBorder" android:layout_width="wrap_content" android:layout_height="wrap_content" android:layout_below="@+id/txtUsername" android:layout_alignParentRight="true" android:text="@string/btn_less_border" style="?android:borderlessButtonStyle"/> <ImageButton android:layout_width="wrap_content" android:layout_height="wrap_content" android:layout_below="@id/btnOK" android:src="@android:drawable/btn_minus"/> <ImageButton android:layout_width="wrap_content" android:layout_height="wrap_content" android:layout_alignParentRight="true" android:layout_below="@id/btnOK" android:src="@android:drawable/btn_minus" style="?android:borderlessButtonStyle"/> <!-- 图片的文件名只能是字母 或 字母+数字 --> <ImageView android:layout_width="wrap_content" android:layout_height="200dp" android:layout_alignParentBottom="true" android:src="@drawable/cameraapp" android:contentDescription="@string/camera"/></RelativeLayout>
效果如下所示:
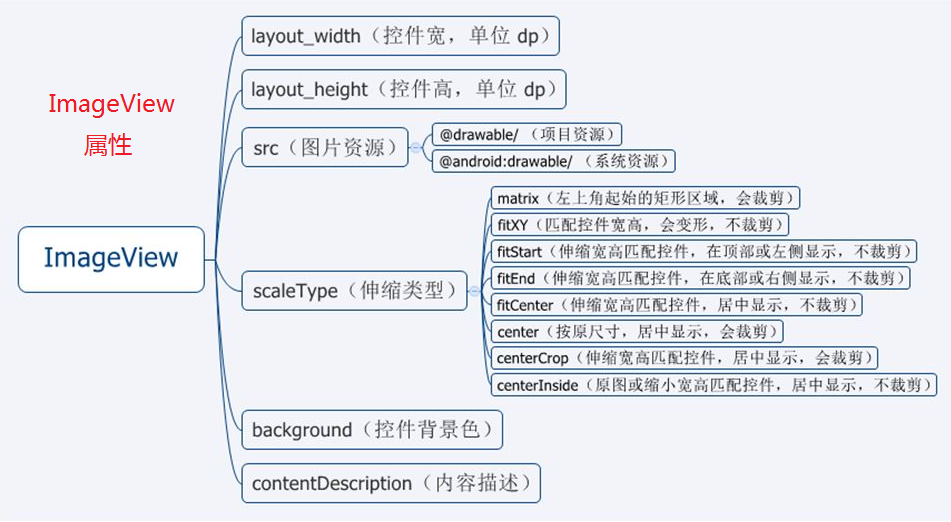
八、ImageView
1.ImageView属性
2.用代码实现,展示效果
(1)在 strings.xml 中添加需要的文本
<!-- ImageView --> <string name="camera">Camera</string>
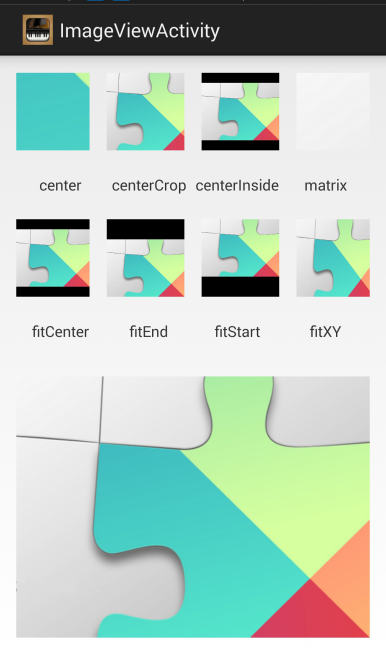
(2)在activity_image_view.xml 布局文件中,设计布局
<RelativeLayout xmlns:android="http://schemas.android.com/apk/res/android" xmlns:tools="http://schemas.android.com/tools" android:layout_width="match_parent" android:layout_height="match_parent" android:paddingLeft="@dimen/activity_horizontal_margin" android:paddingRight="@dimen/activity_horizontal_margin" android:paddingTop="@dimen/activity_vertical_margin" android:paddingBottom="@dimen/activity_vertical_margin" tools:context="com.xiangdong.ui.ImageViewActivity"> <LinearLayout android:id="@+id/linearLayout1" android:layout_width="fill_parent" android:layout_height="wrap_content" android:layout_alignParentLeft="true" android:layout_alignParentStart="true" android:layout_alignParentTop="true" android:gravity="center" android:orientation="horizontal"> <ImageView android:layout_width="72dp" android:layout_height="72dp" android:background="@android:color/black" android:scaleType="center" android:src="@drawable/gps" android:contentDescription="gps"/> <View android:layout_width="16dp" android:layout_height="fill_parent" /> <ImageView android:layout_width="72dp" android:layout_height="72dp" android:background="@android:color/black" android:scaleType="centerCrop" android:src="@drawable/gps" /> <View android:layout_width="16dp" android:layout_height="fill_parent" /> <ImageView android:layout_width="72dp" android:layout_height="72dp" android:background="@android:color/black" android:scaleType="centerInside" android:src="@drawable/gps" /> <View android:layout_width="16dp" android:layout_height="fill_parent" /> <ImageView android:layout_width="72dp" android:layout_height="72dp" android:background="@android:color/black" android:scaleType="matrix" android:src="@drawable/gps" /> </LinearLayout> <LinearLayout android:id="@+id/linearLayout2" android:layout_width="fill_parent" android:layout_height="64dp" android:layout_alignParentLeft="true" android:layout_alignParentStart="true" android:layout_below="@+id/linearLayout1" android:gravity="center_vertical" android:orientation="horizontal"> <TextView android:layout_width="0dp" android:layout_height="wrap_content" android:layout_weight="1" android:gravity="center" android:text="center" /> <TextView android:layout_width="0dp" android:layout_height="wrap_content" android:layout_weight="1" android:gravity="center" android:text="centerCrop" /> <TextView android:layout_width="0dp" android:layout_height="wrap_content" android:layout_weight="1" android:gravity="center" android:text="centerInside" /> <TextView android:layout_width="0dp" android:layout_height="wrap_content" android:layout_weight="1" android:gravity="center" android:text="matrix" /> </LinearLayout> <LinearLayout android:id="@+id/linearLayout3" android:layout_width="fill_parent" android:layout_height="wrap_content" android:layout_alignParentLeft="true" android:layout_alignParentStart="true" android:layout_below="@+id/linearLayout2" android:gravity="center" android:orientation="horizontal"> <ImageView android:layout_width="72dp" android:layout_height="72dp" android:background="@android:color/black" android:scaleType="fitCenter" android:src="@drawable/gps" /> <View android:layout_width="16dp" android:layout_height="fill_parent" /> <ImageView android:layout_width="72dp" android:layout_height="72dp" android:background="@android:color/black" android:scaleType="fitEnd" android:src="@drawable/gps" /> <View android:layout_width="16dp" android:layout_height="fill_parent" /> <ImageView android:layout_width="72dp" android:layout_height="72dp" android:background="@android:color/black" android:scaleType="fitStart" android:src="@drawable/gps" /> <View android:layout_width="16dp" android:layout_height="fill_parent" /> <ImageView android:layout_width="72dp" android:layout_height="72dp" android:background="@android:color/black" android:scaleType="fitXY" android:src="@drawable/gps" /> </LinearLayout> <LinearLayout android:id="@+id/linearLayout4" android:layout_width="fill_parent" android:layout_height="64dp" android:layout_alignParentLeft="true" android:layout_alignParentStart="true" android:layout_below="@+id/linearLayout3" android:gravity="center_vertical" android:orientation="horizontal"> <TextView android:layout_width="0dp" android:layout_height="wrap_content" android:layout_weight="1" android:gravity="center" android:text="fitCenter" /> <TextView android:layout_width="0dp" android:layout_height="wrap_content" android:layout_weight="1" android:gravity="center" android:text="fitEnd" /> <TextView android:layout_width="0dp" android:layout_height="wrap_content" android:layout_weight="1" android:gravity="center" android:text="fitStart" /> <TextView android:layout_width="0dp" android:layout_height="wrap_content" android:layout_weight="1" android:gravity="center" android:text="fitXY" /> </LinearLayout> <ImageView android:layout_width="wrap_content" android:layout_height="wrap_content" android:layout_below="@+id/linearLayout4" android:layout_centerHorizontal="true" android:src="@drawable/gps" /></RelativeLayout>
效果如下所示:
九、Widgets(其他控件)
1.用代码实现,展示效果
(1)在 strings.xml 中添加需要的文本
<!-- Widgets --> <string name="cb_sports">Sports</string> <string name="cb_read">Read</string> <string name="cb_game">Game</string> <string name="rb_male">Male</string> <string name="rb_female">Female</string> <string name="switch_text">开关控件</string>
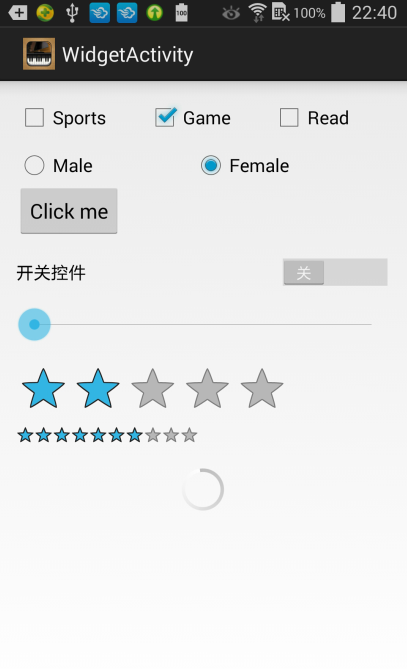
(2)在activity_widgets.xml 布局文件中,设计布局
<RelativeLayout xmlns:android="http://schemas.android.com/apk/res/android" xmlns:tools="http://schemas.android.com/tools" android:layout_width="match_parent" android:layout_height="match_parent" android:paddingLeft="@dimen/activity_horizontal_margin" android:paddingRight="@dimen/activity_horizontal_margin" android:paddingTop="@dimen/activity_vertical_margin" android:paddingBottom="@dimen/activity_vertical_margin" tools:context="com.xiangdong.ui.WidgetActivity"> <LinearLayout android:id="@+id/hobbyLayout" android:layout_width="match_parent" android:layout_height="wrap_content" android:orientation="horizontal"> <!-- 在线性布局中设置 权重:layout_weight 占整个的几份 --> <CheckBox android:id="@+id/cbSports" android:layout_width="wrap_content" android:layout_height="wrap_content" android:text="@string/cb_sports" android:layout_weight="1"/> <CheckBox android:id="@+id/cbGame" android:layout_width="wrap_content" android:layout_height="wrap_content" android:text="@string/cb_game" android:checked="true" android:layout_weight="1"/> <CheckBox android:id="@+id/cbRead" android:layout_width="wrap_content" android:layout_height="wrap_content" android:text="@string/cb_read" android:layout_weight="1"/> </LinearLayout> <!-- RadioGroup类似于线性布局,只是进行了封装。 --> <RadioGroup android:id="@+id/sexGroup" android:layout_width="match_parent" android:layout_height="wrap_content" android:layout_below="@+id/hobbyLayout" android:orientation="horizontal" android:paddingTop="10dp"> <RadioButton android:id="@+id/rbMale" android:layout_width="wrap_content" android:layout_height="wrap_content" android:layout_weight="1" android:text="@string/rb_male"/> <RadioButton android:id="@+id/rbFemale" android:layout_width="wrap_content" android:layout_height="wrap_content" android:layout_weight="1" android:checked="true" android:text="@string/rb_female" /> </RadioGroup> <!--可以重用Button--> <Button android:id="@+id/btnOK" android:layout_width="wrap_content" android:layout_height="wrap_content" android:text="@string/btn_ok" android:layout_below="@+id/sexGroup" android:onClick="onClick"/> <Switch android:id="@+id/switch1" android:layout_width="match_parent" android:layout_height="wrap_content" android:layout_below="@+id/btnOK" android:layout_marginBottom="16dp" android:layout_marginTop="16dp" android:checked="false" android:text="开关控件"/> <SeekBar android:id="@+id/seekBar" android:layout_width="match_parent" android:layout_height="wrap_content" android:layout_below="@+id/switch1" android:layout_marginBottom="16dp"/> <RatingBar android:id="@+id/ratingBar" android:layout_width="wrap_content" android:layout_height="wrap_content" android:layout_below="@+id/seekBar" android:rating="2"/> <!--numStars:星星数量--> <!--rating:评分数--> <!--stepSize:步长,可以是 0.5 --> <!--style:默认为大的星星,可用点击--> <RatingBar android:id="@+id/ratingBar2" style="@android:style/Widget.DeviceDefault.Light.RatingBar.Small" android:layout_width="wrap_content" android:layout_height="wrap_content" android:layout_below="@+id/ratingBar" android:layout_marginBottom="16dp" android:numStars="10" android:rating="7" android:stepSize="1"/> <ProgressBar android:id="@+id/progressBar" android:layout_width="wrap_content" android:layout_height="wrap_content" android:layout_below="@+id/ratingBar2" android:layout_centerHorizontal="true"/></RelativeLayout>
效果如下所示:
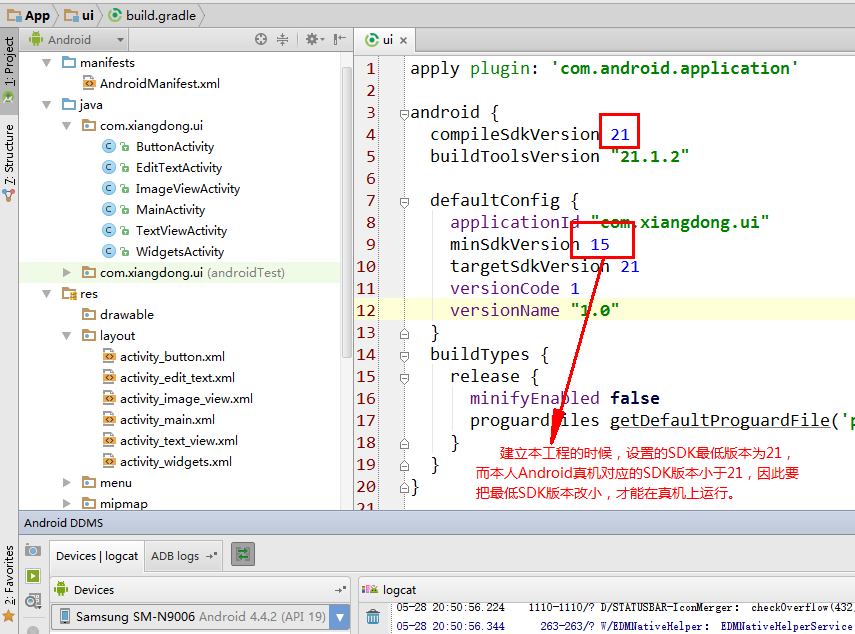
附 关于在Android真机上部署