本文围绕以下八个部分展开:
一、布局(Layout)
二、线性布局(Linear Layout)
三、相对布局(Relative Layout)
四、帧布局(Frame Layout)
五、表格布局(Table Layout)
六、网格布局(Grid Layout)
七、小结
附 补充代码
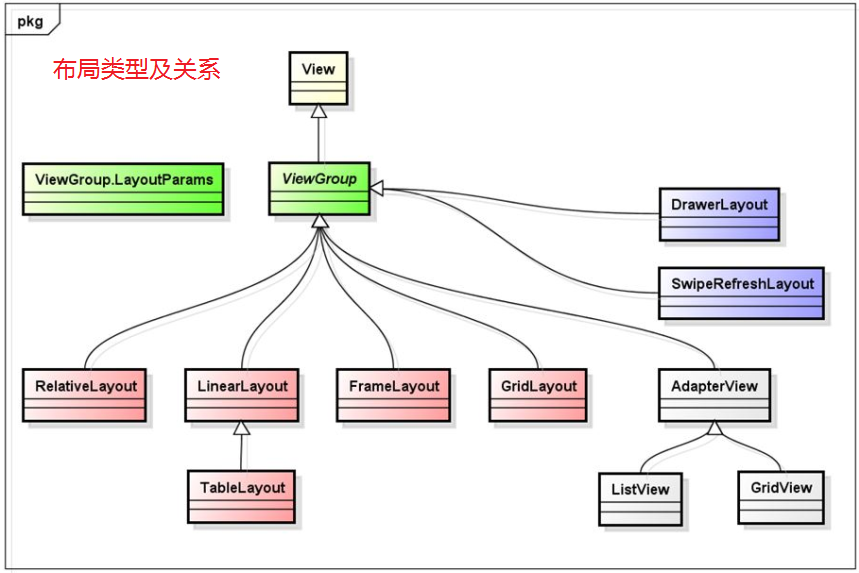
一、布局
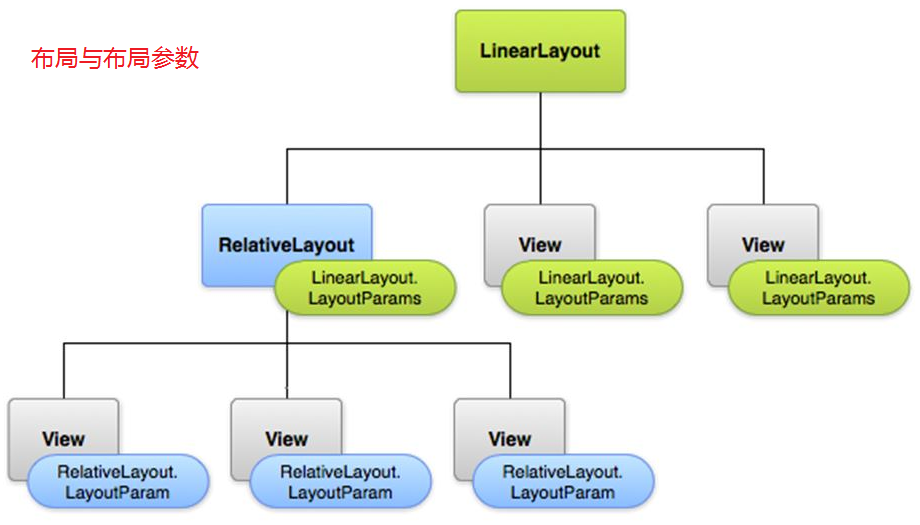
布局是不可见的容器(ViewGroup),它定义UI的可视化结构,通过布局参数(LayoutParams)定义子元素的尺寸、位置。
二、线性布局(Linear Layout)
子元素被排成一行或一列。使用orientation属性设置方向:horizontal(水平)、vertical(垂直)
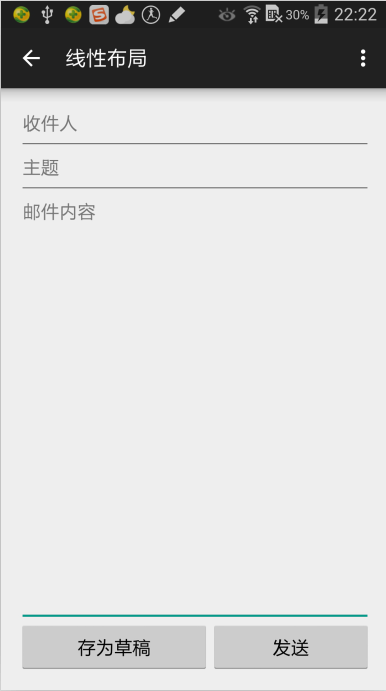
1.实现以下效果:
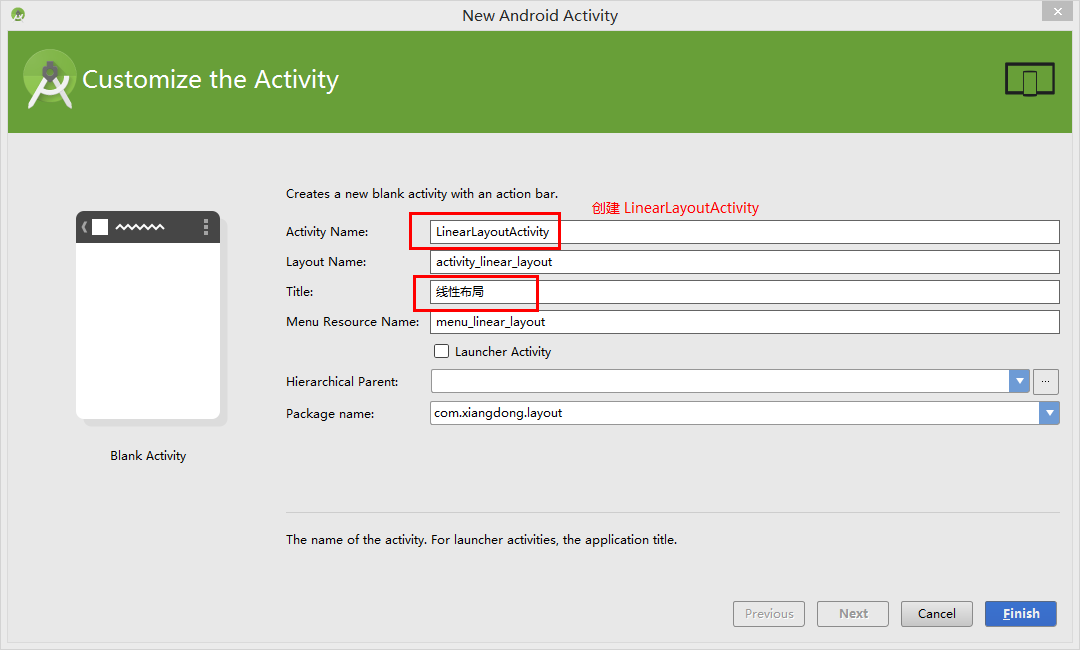
(1)新建 LinearLayoutActivity ,然后在 AndroidManifest.xml 配置文件中,添加返回主界面的功能。
<activity android:name=".LinearLayoutActivity" android:label="@string/title_activity_linear_layout" android:parentActivityName=".MainActivity" > </activity>
(2)在 strings.xml 中添加需要的文本。
<!--线性布局--> <string name="to">收件人</string> <string name="subject">主题</string> <string name="message">邮件内容</string> <string name="btn_save">存为草稿</string> <string name="btn_send">发送</string> <string name="title_activity_linear_layout">线性布局1</string>
(3)在主界面(activity_main.xml)中,放一个按钮,点击该按钮,可跳至该线性布局界面。
<LinearLayout xmlns:android="http://schemas.android.com/apk/res/android" xmlns:tools="http://schemas.android.com/tools" android:layout_width="match_parent" android:layout_height="match_parent" android:orientation="vertical" android:paddingLeft="@dimen/activity_horizontal_margin" android:paddingRight="@dimen/activity_horizontal_margin" android:paddingTop="@dimen/activity_vertical_margin" android:paddingBottom="@dimen/activity_vertical_margin" tools:context=".MainActivity"> <Button android:id="@+id/btnLinearLayout" android:layout_width="match_parent" android:layout_height="wrap_content" android:text="@string/title_activity_linear_layout" android:onClick="onClick"/></LinearLayout>
(4)在主活动(MainActivity)中写事件,实现点击主界面按钮,可跳至线性布局界面。
package com.xiangdong.layout;import android.content.Intent;import android.support.v7.app.ActionBarActivity;import android.os.Bundle;import android.view.Menu;import android.view.MenuItem;import android.view.View;public class MainActivity extends ActionBarActivity { @Override protected void onCreate(Bundle savedInstanceState) { super.onCreate(savedInstanceState); setContentView(R.layout.activity_main); } public void onClick(View view){ Intent intent = null; switch (view.getId()){ case R.id.btnLinearLayout: intent = new Intent(this,LinearLayoutActivity.class); break; } startActivity(intent); } @Override public boolean onCreateOptionsMenu(Menu menu) { // Inflate the menu; this adds items to the action bar if it is present. getMenuInflater().inflate(R.menu.menu_main, menu); return true; } @Override public boolean onOptionsItemSelected(MenuItem item) { // Handle action bar item clicks here. The action bar will // automatically handle clicks on the Home/Up button, so long // as you specify a parent activity in AndroidManifest.xml. int id = item.getItemId(); //noinspection SimplifiableIfStatement if (id == R.id.action_settings) { return true; } return super.onOptionsItemSelected(item); }}(5)在 activity_linear_layout.xml 中写该线性布局界面。
<LinearLayout xmlns:android="http://schemas.android.com/apk/res/android" xmlns:tools="http://schemas.android.com/tools" android:layout_width="match_parent" android:layout_height="match_parent" android:orientation="vertical" android:paddingBottom="@dimen/activity_vertical_margin" android:paddingLeft="@dimen/activity_horizontal_margin" android:paddingRight="@dimen/activity_horizontal_margin" android:paddingTop="@dimen/activity_vertical_margin" tools:context="com.android.layout.LinearLayoutActivity"> <EditText android:id="@+id/txtTo" android:layout_width="match_parent" android:layout_height="wrap_content" android:hint="@string/to"/> <EditText android:id="@+id/txtSubject" android:layout_width="match_parent" android:layout_height="wrap_content" android:hint="@string/subject" android:singleLine="true"/> <EditText android:id="@+id/txtMessage" android:layout_width="match_parent" android:layout_height="0dp" android:layout_weight="1" android:gravity="top" android:hint="@string/message" android:inputType="textMultiLine"/> <LinearLayout android:layout_width="match_parent" android:layout_height="wrap_content" android:orientation="horizontal"> <Button android:id="@+id/btnSave" android:layout_width="wrap_content" android:layout_height="wrap_content" android:layout_weight="1" android:text="@string/btn_save"/> <Button android:id="@+id/btnSend" android:layout_width="wrap_content" android:layout_height="wrap_content" android:layout_weight="1" android:text="@string/btn_send"/> </LinearLayout></LinearLayout>
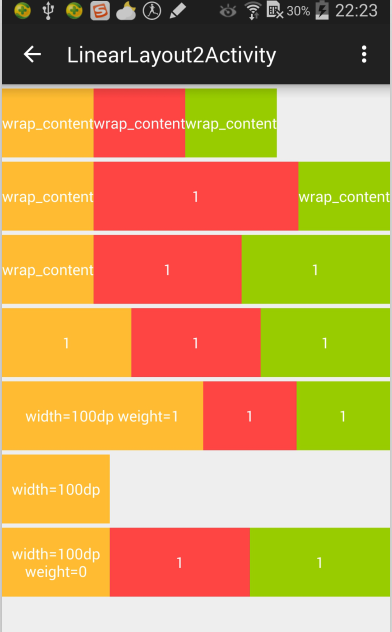
2.权重
线性布局给子元素分配空间(宽或高)后,把剩余空间按比例分配给设置了 layout_weight 的元素。
当布局orientation="horizontal",设置子元素layout_width="0dp"
当布局orientation="vertical",设置子元素layout_height="0dp"
实现以下效果:
(1)新建 LinearLayout2Activity ,然后在 AndroidManifest.xml 配置文件中,添加返回主界面的功能。
(2)在主界面(activity_main.xml)中,加一个按钮,点击该按钮,可跳至该线性布局界面。
(3)在主活动(MainActivity)中加一个switch判断的事件,实现点击主界面按钮,可跳至线性布局界面。
(4)在 activity_linear_layout2.xml 中写该线性布局界面。
<?xml version="1.0" encoding="utf-8"?><LinearLayout xmlns:android="http://schemas.android.com/apk/res/android" android:layout_width="match_parent" android:layout_height="match_parent" android:orientation="vertical"> <LinearLayout android:layout_width="match_parent" android:layout_height="64dp" android:layout_marginTop="4dp" android:orientation="horizontal"> <TextView android:layout_width="wrap_content" android:layout_height="match_parent" android:background="@android:color/holo_orange_light" android:gravity="center" android:text="wrap_content" android:textColor="@android:color/white"/> <TextView android:layout_width="wrap_content" android:layout_height="match_parent" android:background="@android:color/holo_red_light" android:gravity="center" android:text="wrap_content" android:textColor="@android:color/white"/> <TextView android:layout_width="wrap_content" android:layout_height="match_parent" android:background="@android:color/holo_green_light" android:gravity="center" android:text="wrap_content" android:textColor="@android:color/white"/> </LinearLayout> <LinearLayout android:layout_width="match_parent" android:layout_height="64dp" android:layout_marginTop="4dp" android:orientation="horizontal"> <TextView android:layout_width="wrap_content" android:layout_height="match_parent" android:background="@android:color/holo_orange_light" android:gravity="center" android:text="wrap_content" android:textColor="@android:color/white"/> <TextView android:layout_width="0dp" android:layout_height="match_parent" android:layout_weight="1" android:background="@android:color/holo_red_light" android:gravity="center" android:text="1" android:textColor="@android:color/white"/> <TextView android:layout_width="wrap_content" android:layout_height="match_parent" android:background="@android:color/holo_green_light" android:gravity="center" android:text="wrap_content" android:textColor="@android:color/white"/> </LinearLayout> <LinearLayout android:layout_width="match_parent" android:layout_height="64dp" android:layout_marginTop="4dp" android:orientation="horizontal"> <TextView android:layout_width="wrap_content" android:layout_height="match_parent" android:background="@android:color/holo_orange_light" android:gravity="center" android:text="wrap_content" android:textColor="@android:color/white"/> <TextView android:layout_width="0dp" android:layout_height="match_parent" android:layout_weight="1" android:background="@android:color/holo_red_light" android:gravity="center" android:text="1" android:textColor="@android:color/white"/> <TextView android:layout_width="0dp" android:layout_height="match_parent" android:layout_weight="1" android:background="@android:color/holo_green_light" android:gravity="center" android:text="1" android:textColor="@android:color/white"/> </LinearLayout> <LinearLayout android:layout_width="match_parent" android:layout_height="64dp" android:layout_marginTop="4dp" android:orientation="horizontal"> <TextView android:layout_width="0dp" android:layout_height="match_parent" android:layout_weight="1" android:background="@android:color/holo_orange_light" android:gravity="center" android:text="1" android:textColor="@android:color/white"/> <TextView android:layout_width="0dp" android:layout_height="match_parent" android:layout_weight="1" android:background="@android:color/holo_red_light" android:gravity="center" android:text="1" android:textColor="@android:color/white"/> <TextView android:layout_width="0dp" android:layout_height="match_parent" android:layout_weight="1" android:background="@android:color/holo_green_light" android:gravity="center" android:text="1" android:textColor="@android:color/white"/> </LinearLayout> <LinearLayout android:layout_width="match_parent" android:layout_height="64dp" android:layout_marginTop="4dp" android:orientation="horizontal"> <TextView android:layout_width="100dp" android:layout_height="match_parent" android:layout_weight="1" android:background="@android:color/holo_orange_light" android:gravity="center" android:text="width=100dp weight=1" android:textColor="@android:color/white"/> <TextView android:layout_width="0dp" android:layout_height="match_parent" android:layout_weight="1" android:background="@android:color/holo_red_light" android:gravity="center" android:text="1" android:textColor="@android:color/white"/> <TextView android:layout_width="0dp" android:layout_height="match_parent" android:layout_weight="1" android:background="@android:color/holo_green_light" android:gravity="center" android:text="1" android:textColor="@android:color/white"/> </LinearLayout> <LinearLayout android:layout_width="match_parent" android:layout_height="64dp" android:layout_marginTop="4dp" android:orientation="horizontal"> <TextView android:layout_width="100dp" android:layout_height="match_parent" android:background="@android:color/holo_orange_light" android:gravity="center" android:text="width=100dp" android:textColor="@android:color/white"/> </LinearLayout> <LinearLayout android:layout_width="match_parent" android:layout_height="64dp" android:layout_marginTop="4dp" android:orientation="horizontal"> <TextView android:layout_width="100dp" android:layout_height="match_parent" android:layout_weight="0" android:background="@android:color/holo_orange_light" android:gravity="center" android:text="width=100dp weight=0" android:textColor="@android:color/white"/> <TextView android:layout_width="0dp" android:layout_height="match_parent" android:layout_weight="1" android:background="@android:color/holo_red_light" android:gravity="center" android:text="1" android:textColor="@android:color/white"/> <TextView android:layout_width="0dp" android:layout_height="match_parent" android:layout_weight="1" android:background="@android:color/holo_green_light" android:gravity="center" android:text="1" android:textColor="@android:color/white"/> </LinearLayout></LinearLayout>
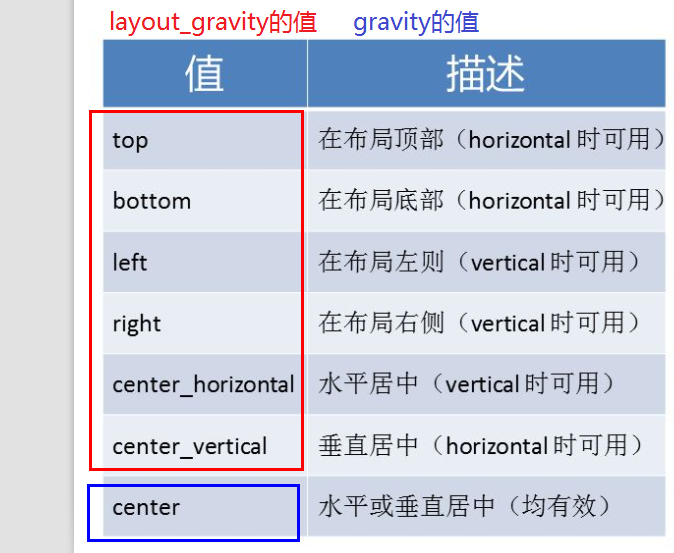
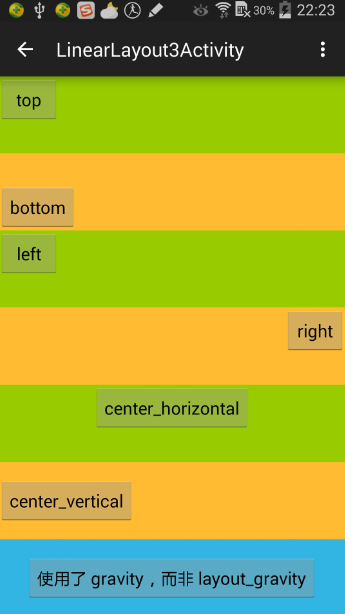
3.layout_gravity 和 gravity
layout_gravity:元素在父元素(布局)中的位置。
gravity:内容或子元素在元素(布局或控件)中的位置。
二者各自可以取的值如下:
实现以下效果:
(1)新建 LinearLayout3Activity ,然后在 AndroidManifest.xml 配置文件中,添加返回主界面的功能。
(2)在主界面(activity_main.xml)中,加一个按钮,点击该按钮,可跳至该线性布局界面。
(3)在主活动(MainActivity)中加一个switch判断的事件,实现点击主界面按钮,可跳至线性布局界面。
(4)在 activity_linear_layout3.xml 中写该线性布局界面。
<?xml version="1.0" encoding="utf-8"?><LinearLayout xmlns:android="http://schemas.android.com/apk/res/android" android:layout_width="match_parent" android:layout_height="match_parent" android:orientation="vertical"> <LinearLayout android:orientation="horizontal" android:layout_width="match_parent" android:layout_height="0dp" android:layout_weight="1" android:background="@android:color/holo_green_light"> <Button android:layout_width="wrap_content" android:layout_height="wrap_content" android:text="top" android:layout_gravity="top" /> </LinearLayout> <LinearLayout android:orientation="horizontal" android:layout_width="match_parent" android:layout_height="0dp" android:layout_weight="1" android:background="@android:color/holo_orange_light"> <Button android:layout_width="wrap_content" android:layout_height="wrap_content" android:text="bottom" android:layout_gravity="bottom" /> </LinearLayout> <LinearLayout android:orientation="vertical" android:layout_width="match_parent" android:layout_height="0dp" android:layout_weight="1" android:background="@android:color/holo_green_light"> <Button android:layout_width="wrap_content" android:layout_height="wrap_content" android:text="left" android:layout_gravity="left" /> </LinearLayout> <LinearLayout android:orientation="vertical" android:layout_width="match_parent" android:layout_height="0dp" android:layout_weight="1" android:background="@android:color/holo_orange_light"> <Button android:layout_width="wrap_content" android:layout_height="wrap_content" android:text="right" android:layout_gravity="right" /> </LinearLayout> <LinearLayout android:orientation="vertical" android:layout_width="match_parent" android:layout_height="0dp" android:layout_weight="1" android:background="@android:color/holo_green_light"> <Button android:layout_width="wrap_content" android:layout_height="wrap_content" android:text="center_horizontal" android:layout_gravity="center_horizontal" /> </LinearLayout> <LinearLayout android:orientation="horizontal" android:layout_width="match_parent" android:layout_height="0dp" android:layout_weight="1" android:background="@android:color/holo_orange_light"> <Button android:layout_width="wrap_content" android:layout_height="wrap_content" android:text="center_vertical" android:layout_gravity="center_vertical" /> </LinearLayout> <LinearLayout android:orientation="vertical" android:layout_width="match_parent" android:layout_height="0dp" android:layout_weight="1" android:background="@android:color/holo_blue_light" android:gravity="center"> <Button android:layout_width="wrap_content" android:layout_height="wrap_content" android:text="使用了 gravity,而非 layout_gravity" /> </LinearLayout></LinearLayout>
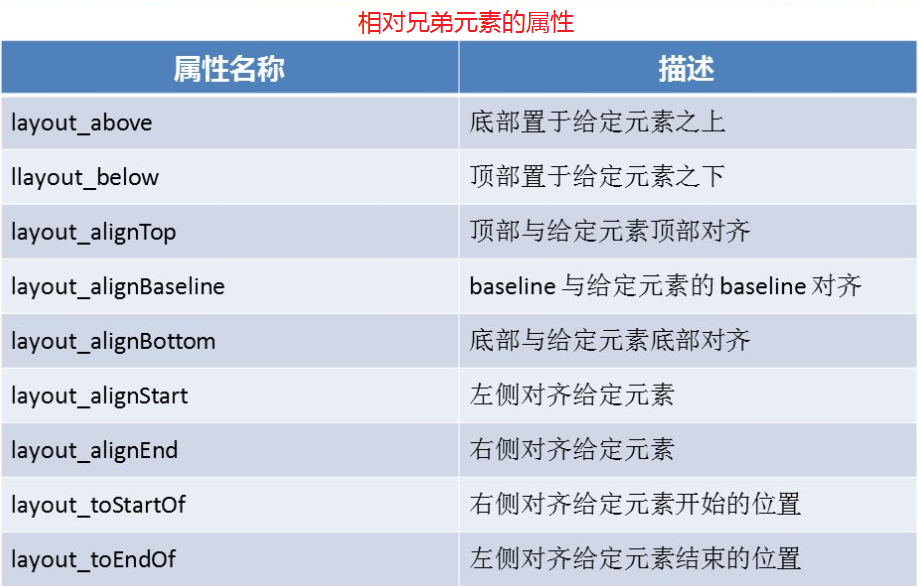
三、相对布局(Relative Layout)
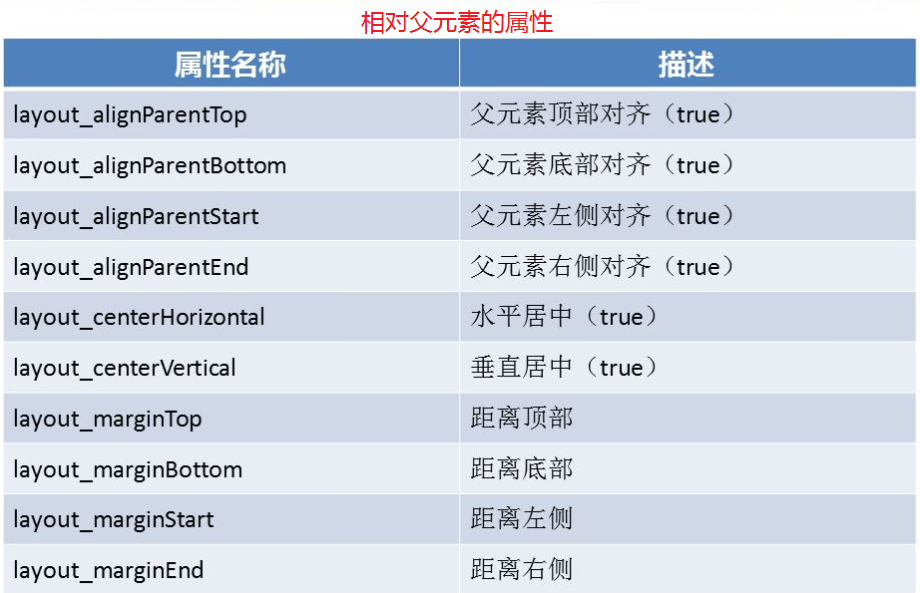
元素在相对位置显示。可相对父元素(布局),也可以相对兄弟元素。
可避免嵌套,保持简洁的层次结构,提升性能。
实现以下效果:
(1)新建 RelativeLayoutActivity ,然后在 AndroidManifest.xml 配置文件中,添加返回主界面的功能。
(2)在 strings.xml 中添加需要的文本。
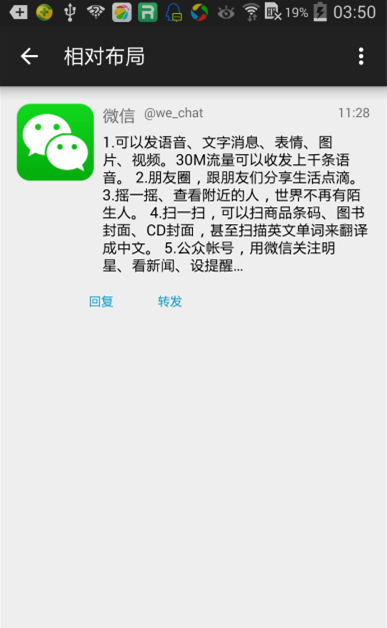
<!--相对布局--> <string name="we_chat">微信</string> <string name="at_we_chat">\@we_chat</string> <string name="we_chat_time">11:28</string> <string name="reply">回复</string> <string name="forward">转发</string> <string name="content"> 1.可以发语音、文字消息、表情、图片、视频。30M流量可以收发上千条语音。 2.朋友圈,跟朋友们分享生活点滴。 3.摇一摇、查看附近的人,世界不再有陌生人。 4.扫一扫,可以扫商品条码、图书封面、CD封面,甚至扫描英文单词来翻译成中文。 5.公众帐号,用微信关注明星、看新闻、设提醒… </string> <string name="title_activity_relative_layout">相对布局</string>
(3)在主界面(activity_main.xml)中,加一个按钮,点击该按钮,可跳至该线性布局界面。
(4)在主活动(MainActivity)中加一个switch判断的事件,实现点击主界面按钮,可跳至线性布局界面。
(5)在 activity_relative_layout.xml 中写该线性布局界面。
<RelativeLayout xmlns:android="http://schemas.android.com/apk/res/android" xmlns:tools="http://schemas.android.com/tools" android:layout_width="match_parent" android:layout_height="match_parent" android:paddingBottom="@dimen/activity_vertical_margin" android:paddingLeft="@dimen/activity_horizontal_margin" android:paddingRight="@dimen/activity_horizontal_margin" android:paddingTop="@dimen/activity_vertical_margin" tools:context="com.android.layout.RelativeLayoutActivity"> <ImageView android:id="@+id/imageView" android:layout_width="72dp" android:layout_height="72dp" android:layout_alignParentLeft="true" android:layout_alignParentTop="true" android:layout_marginRight="8dp" android:src="@drawable/we_chat"/> <TextView android:id="@+id/tvWeChat" android:layout_width="wrap_content" android:layout_height="wrap_content" android:layout_alignParentTop="true" android:layout_toRightOf="@+id/imageView" android:text="@string/we_chat" android:textSize="16sp"/> <TextView android:id="@+id/tvAtWeChat" android:layout_width="wrap_content" android:layout_height="wrap_content" android:layout_alignParentTop="true" android:layout_toRightOf="@+id/tvWeChat" android:paddingLeft="8dp" android:text="@string/at_we_chat" android:textSize="12sp"/> <TextView android:id="@+id/tvWeChatTime" android:layout_width="wrap_content" android:layout_height="wrap_content" android:layout_alignParentRight="true" android:text="@string/we_chat_time" android:textSize="12sp"/> <TextView android:id="@+id/tvContent" android:layout_width="match_parent" android:layout_height="wrap_content" android:layout_below="@+id/tvWeChat" android:layout_marginTop="4dp" android:layout_toRightOf="@+id/imageView" android:text="@string/content" android:textColor="@android:color/black" android:textSize="14sp"/> <Button android:id="@+id/btnReply" style="@android:style/Widget.Holo.Button.Borderless.Small" android:layout_width="wrap_content" android:layout_height="wrap_content" android:layout_below="@+id/tvContent" android:layout_toLeftOf="@+id/tvAtWeChat" android:layout_toStartOf="@+id/tvAtWeChat" android:text="@string/reply" android:textColor="@android:color/holo_blue_dark" android:textSize="12dp"/> <Button android:id="@+id/btnForward" style="@android:style/Widget.Holo.Button.Borderless.Small" android:layout_width="wrap_content" android:layout_height="wrap_content" android:layout_below="@+id/tvContent" android:layout_toRightOf="@+id/btnReply" android:text="@string/forward" android:textColor="@android:color/holo_blue_dark" android:textSize="12dp"/></RelativeLayout>
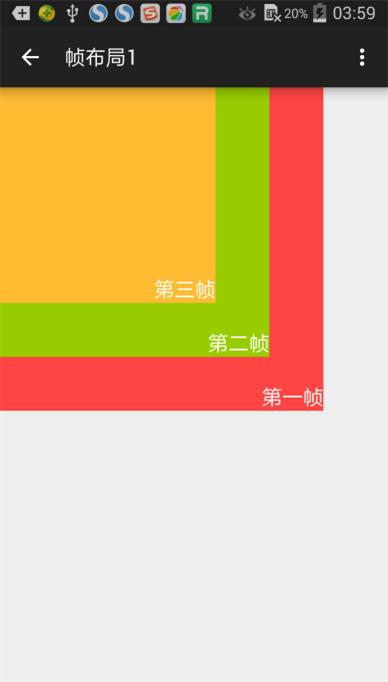
四、帧布局(Frame Layout)
子元素逐个放入栈中(会重叠),最后添加的子元素显示在最上面
1.实现以下效果:
(1)新建 FrameLayoutActivity ,然后在 AndroidManifest.xml 配置文件中,添加返回主界面的功能。
(2)在主界面(activity_main.xml)中,加一个按钮,点击该按钮,可跳至该线性布局界面。
(3)在主活动(MainActivity)中加一个switch判断的事件,实现点击主界面按钮,可跳至线性布局界面。
(4)在 activity_frame_layout.xml 中写该线性布局界面。
<?xml version="1.0" encoding="utf-8"?><FrameLayout xmlns:android="http://schemas.android.com/apk/res/android" android:layout_width="match_parent" android:layout_height="match_parent"> <TextView android:layout_width="300dp" android:layout_height="300dp" android:layout_gravity="left|top" android:background="@android:color/holo_red_light" android:gravity="right|bottom" android:text="第一帧" android:textColor="@android:color/white" android:textSize="20sp"/> <TextView android:layout_width="250dp" android:layout_height="250dp" android:layout_gravity="left|top" android:background="@android:color/holo_green_light" android:gravity="right|bottom" android:text="第二帧" android:textColor="@android:color/white" android:textSize="20sp"/> <TextView android:layout_width="200dp" android:layout_height="200dp" android:layout_gravity="left|top" android:background="@android:color/holo_orange_light" android:gravity="right|bottom" android:text="第三帧" android:textColor="@android:color/white" android:textSize="20sp"/></FrameLayout>
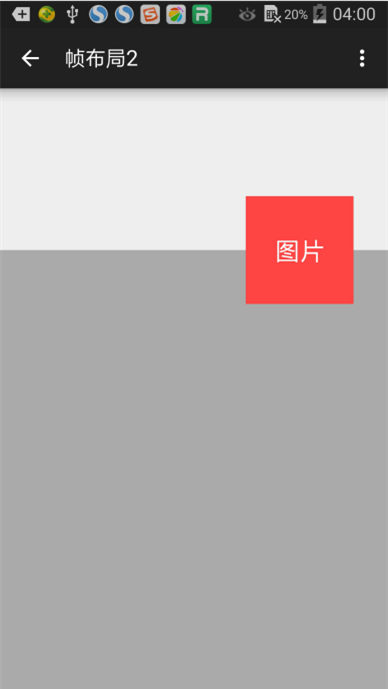
2.实现以下效果:
(1)新建 FrameLayout2Activity ,然后在 AndroidManifest.xml 配置文件中,添加返回主界面的功能。
(2)在主界面(activity_main.xml)中,加一个按钮,点击该按钮,可跳至该线性布局界面。
(3)在主活动(MainActivity)中加一个switch判断的事件,实现点击主界面按钮,可跳至线性布局界面。
(4)在 activity_frame_layout2.xml 中写该线性布局界面。
<FrameLayout xmlns:android="http://schemas.android.com/apk/res/android" xmlns:tools="http://schemas.android.com/tools" android:layout_width="match_parent" android:layout_height="match_parent" tools:context=".MainActivity"> <LinearLayout android:layout_width="match_parent" android:layout_height="match_parent" android:orientation="vertical"> <LinearLayout android:layout_width="match_parent" android:layout_height="150dp" android:orientation="vertical"/> <LinearLayout android:layout_width="match_parent" android:layout_height="0dp" android:layout_weight="1" android:background="@android:color/darker_gray" android:orientation="vertical"/> </LinearLayout> <RelativeLayout android:layout_width="match_parent" android:layout_height="match_parent"> <TextView android:id="@+id/textView" android:layout_width="100dp" android:layout_height="100dp" android:layout_alignParentRight="true" android:layout_alignParentTop="true" android:layout_marginRight="32dp" android:layout_marginTop="100dp" android:background="@android:color/holo_red_light" android:gravity="center" android:text="图片" android:textColor="@android:color/white" android:textSize="24sp"/> </RelativeLayout></FrameLayout>
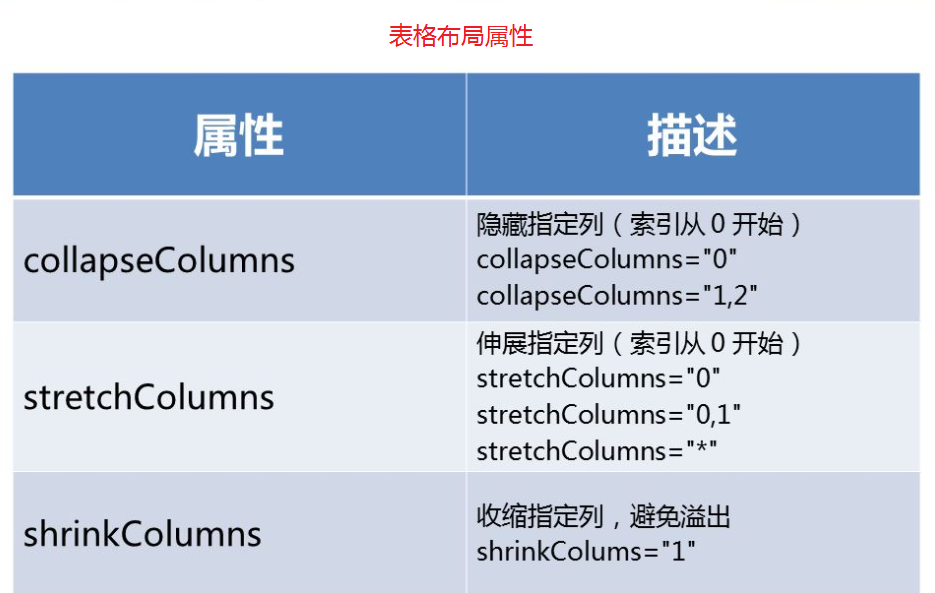
五、表格布局(Table Layout)
表格布局没有边框,由多个TableRow(行)构成,每行有多个单元格(不能设置宽),其中可放置子元素。
表格布局是线性布局的子类,是嵌套的线性布局。
layout_column:设置子元素在行中的位置(从0开始)。
layout_span:合并多个单元格。
实现以下效果:
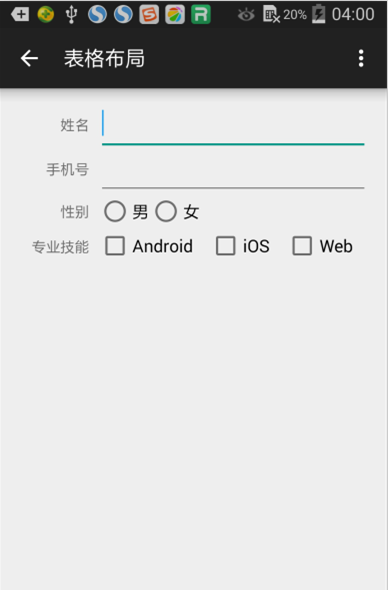
(1)新建 TableLayoutActivity ,然后在 AndroidManifest.xml 配置文件中,添加返回主界面的功能。
(2)在主界面(activity_main.xml)中,加一个按钮,点击该按钮,可跳至该线性布局界面。
(3)在主活动(MainActivity)中加一个switch判断的事件,实现点击主界面按钮,可跳至线性布局界面。
(4)在 activity_table_layout.xml 中写该线性布局界面。
<TableLayout xmlns:android="http://schemas.android.com/apk/res/android" android:layout_width="match_parent" android:layout_height="match_parent" android:padding="16dp" android:stretchColumns="*"> <TableRow android:layout_width="match_parent" android:layout_height="wrap_content" android:orientation="horizontal"> <TextView android:id="@+id/textView_name" android:layout_width="wrap_content" android:layout_height="wrap_content" android:layout_marginRight="8dp" android:gravity="right" android:text="姓名"/> <EditText android:id="@+id/editText_name" android:layout_width="wrap_content" android:layout_height="wrap_content" android:layout_column="1" android:layout_span="3" android:ems="10" android:inputType="textPersonName"/> </TableRow> <TableRow android:layout_width="fill_parent" android:layout_height="fill_parent"> <TextView android:id="@+id/textView_phone" android:layout_width="wrap_content" android:layout_height="wrap_content" android:layout_marginRight="8dp" android:gravity="right" android:text="手机号"/> <EditText android:id="@+id/editText_phone" android:layout_width="wrap_content" android:layout_height="wrap_content" android:layout_column="1" android:layout_span="3" android:inputType="phone"/> </TableRow> <TableRow android:layout_width="fill_parent" android:layout_height="fill_parent"> <TextView android:id="@+id/textView_gender" android:layout_width="wrap_content" android:layout_height="fill_parent" android:layout_marginRight="8dp" android:gravity="right|center_vertical" android:text="性别"/> <RadioGroup android:layout_width="fill_parent" android:layout_height="wrap_content" android:layout_column="1" android:layout_span="3" android:orientation="horizontal"> <RadioButton android:id="@+id/radioButton_male" android:layout_width="wrap_content" android:layout_height="wrap_content" android:checked="false" android:text="男"/> <RadioButton android:id="@+id/radioButton_female" android:layout_width="wrap_content" android:layout_height="wrap_content" android:checked="false" android:text="女"/> </RadioGroup> </TableRow> <TableRow android:layout_width="fill_parent" android:layout_height="fill_parent"> <TextView android:id="@+id/textView_skill" android:layout_width="wrap_content" android:layout_height="wrap_content" android:layout_column="0" android:layout_marginRight="8dp" android:gravity="right" android:text="专业技能"/> <CheckBox android:id="@+id/checkBox_android" android:layout_width="wrap_content" android:layout_height="wrap_content" android:layout_column="1" android:checked="false" android:text="Android"/> <CheckBox android:id="@+id/checkBox_ios" android:layout_width="wrap_content" android:layout_height="wrap_content" android:layout_column="2" android:checked="false" android:text="iOS"/> <CheckBox android:id="@+id/checkBox_web" android:layout_width="wrap_content" android:layout_height="wrap_content" android:layout_column="3" android:checked="false" android:text="Web"/> </TableRow></TableLayout>
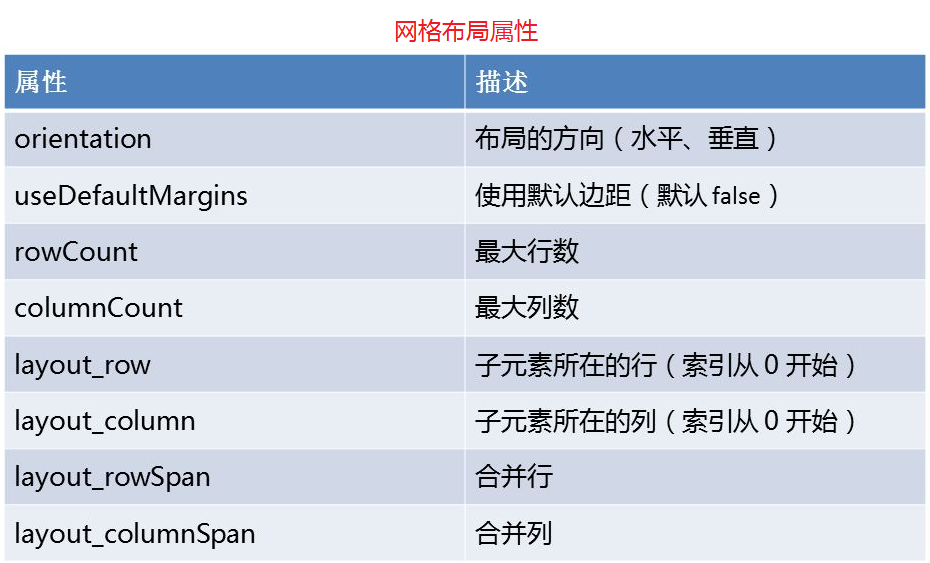
六、网格布局(Grid Layout)
实现以下效果:
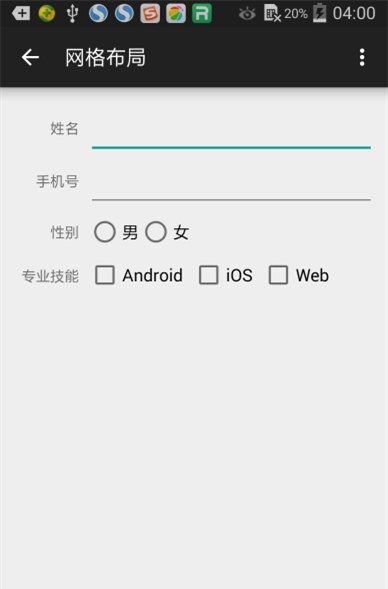
(1)新建 GridLayoutActivity ,然后在 AndroidManifest.xml 配置文件中,添加返回主界面的功能。
(2)在主界面(activity_main.xml)中,加一个按钮,点击该按钮,可跳至该线性布局界面。
(3)在主活动(MainActivity)中加一个switch判断的事件,实现点击主界面按钮,可跳至线性布局界面。
(4)在 activity_grid_layout.xml 中写该线性布局界面。
<?xml version="1.0" encoding="utf-8"?><GridLayout xmlns:android="http://schemas.android.com/apk/res/android" android:layout_width="match_parent" android:layout_height="wrap_content" android:columnCount="4" android:padding="16dp" android:rowCount="4" android:useDefaultMargins="true"> <TextView android:id="@+id/textView_name" android:layout_width="wrap_content" android:layout_height="wrap_content" android:layout_column="0" android:layout_gravity="right" android:layout_row="0" android:text="姓名"/> <EditText android:id="@+id/editText3" android:layout_width="wrap_content" android:layout_height="wrap_content" android:layout_column="1" android:layout_columnSpan="3" android:layout_gravity="fill_horizontal" android:layout_row="0" android:ems="10" android:inputType="textPersonName"/> <TextView android:id="@+id/textView_phone" android:layout_width="wrap_content" android:layout_height="wrap_content" android:layout_column="0" android:layout_gravity="right" android:layout_row="1" android:text="手机号"/> <EditText android:id="@+id/editText4" android:layout_width="wrap_content" android:layout_height="wrap_content" android:layout_column="1" android:layout_columnSpan="3" android:layout_gravity="fill_horizontal" android:layout_row="1" android:ems="10" android:inputType="phone"/> <TextView android:id="@+id/textView_gender" android:layout_width="wrap_content" android:layout_height="wrap_content" android:layout_column="0" android:layout_gravity="right|center_vertical" android:layout_row="2" android:text="性别"/> <RadioGroup android:layout_width="match_parent" android:layout_height="match_parent" android:layout_column="1" android:layout_columnSpan="3" android:layout_row="2" android:orientation="horizontal"> <RadioButton android:id="@+id/radioButton_male" android:layout_width="wrap_content" android:layout_height="wrap_content" android:checked="false" android:text="男"/> <RadioButton android:id="@+id/radioButton_female" android:layout_width="wrap_content" android:layout_height="wrap_content" android:checked="false" android:text="女"/> </RadioGroup> <TextView android:id="@+id/textView_skill" android:layout_width="wrap_content" android:layout_height="wrap_content" android:layout_column="0" android:layout_gravity="right" android:layout_row="3" android:text="专业技能"/> <CheckBox android:id="@+id/checkBox_android" android:layout_width="wrap_content" android:layout_height="wrap_content" android:layout_column="1" android:layout_row="3" android:checked="false" android:text="Android"/> <CheckBox android:id="@+id/checkBox_ios" android:layout_width="wrap_content" android:layout_height="wrap_content" android:layout_column="2" android:layout_row="3" android:checked="false" android:text="iOS"/> <CheckBox android:id="@+id/checkBox_web" android:layout_width="wrap_content" android:layout_height="wrap_content" android:layout_column="3" android:layout_row="3" android:checked="false" android:text="Web"/></GridLayout>
七、小结
1.线性布局和相对布局使用得最多。当需要排布规则的时候,才考虑网格布局;当后面的会覆盖前面的,才考虑帧布局。
2.线性布局最简单,可设置权重。
3.相对布局的控件,都写出其id(因为有互相的位置关系);其他布局最好也全部写,也可以看需要写。
4.使用相对布局或网格布局,可以避免线性布局的嵌套使用。
5.表格布局已经OUT了!使用网格布局代替。
附 补充代码
1.主界面(activity_main.xml)
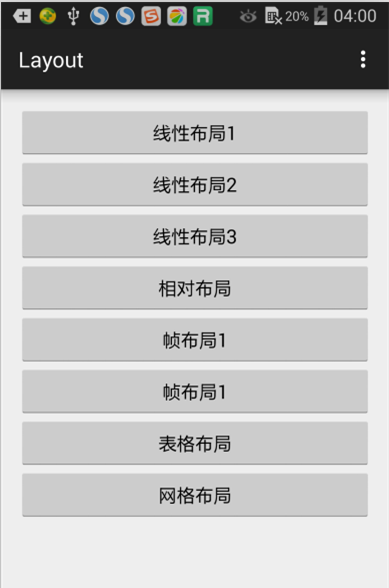
<LinearLayout xmlns:android="http://schemas.android.com/apk/res/android" xmlns:tools="http://schemas.android.com/tools" android:layout_width="match_parent" android:layout_height="match_parent" android:orientation="vertical" android:paddingLeft="@dimen/activity_horizontal_margin" android:paddingRight="@dimen/activity_horizontal_margin" android:paddingTop="@dimen/activity_vertical_margin" android:paddingBottom="@dimen/activity_vertical_margin" tools:context=".MainActivity"> <Button android:id="@+id/btnLinearLayout" android:layout_width="match_parent" android:layout_height="wrap_content" android:text="@string/title_activity_linear_layout" android:onClick="onClick"/> <Button android:id="@+id/btnLinearLayout2" android:layout_width="match_parent" android:layout_height="wrap_content" android:onClick="onClick" android:text="@string/title_activity_linear_layout2"/> <Button android:id="@+id/btnLinearLayout3" android:layout_width="match_parent" android:layout_height="wrap_content" android:onClick="onClick" android:text="@string/title_activity_linear_layout3"/> <Button android:id="@+id/btnRelativeLayout" android:layout_width="match_parent" android:layout_height="wrap_content" android:text="@string/title_activity_relative_layout" android:onClick="onClick"/> <Button android:id="@+id/btnFrameLayout" android:layout_width="match_parent" android:layout_height="wrap_content" android:onClick="onClick" android:text="@string/title_activity_frame_layout"/> <Button android:id="@+id/btnFrameLayout2" android:layout_width="match_parent" android:layout_height="wrap_content" android:onClick="onClick" android:text="@string/title_activity_frame_layout"/> <Button android:id="@+id/btnTableLayout" android:layout_width="match_parent" android:layout_height="wrap_content" android:onClick="onClick" android:text="@string/title_activity_table_layout"/> <Button android:id="@+id/btnGridLayout" android:layout_width="match_parent" android:layout_height="wrap_content" android:onClick="onClick" android:text="@string/title_activity_grid_layout"/></LinearLayout>
2.主活动(MainActivity)
package com.xiangdong.layout;import android.content.Intent;import android.support.v7.app.ActionBarActivity;import android.os.Bundle;import android.view.Menu;import android.view.MenuItem;import android.view.View;public class MainActivity extends ActionBarActivity { @Override protected void onCreate(Bundle savedInstanceState) { super.onCreate(savedInstanceState); setContentView(R.layout.activity_main); } public void onClick(View view){ Intent intent = null; switch (view.getId()){ case R.id.btnLinearLayout: intent = new Intent(this,LinearLayoutActivity.class); break; case R.id.btnLinearLayout2: intent = new Intent(this, LinearLayout2Activity.class); break; case R.id.btnLinearLayout3: intent = new Intent(this, LinearLayout3Activity.class); break; case R.id.btnRelativeLayout: intent = new Intent(this,RelativeLayoutActivity.class); break; case R.id.btnFrameLayout: intent = new Intent(this, FrameLayoutActivity.class); break; case R.id.btnFrameLayout2: intent = new Intent(this, FrameLayout2Activity.class); break; case R.id.btnTableLayout: intent = new Intent(this, TableLayoutActivity.class); break; case R.id.btnGridLayout: intent = new Intent(this, GridLayoutActivity.class); break; } startActivity(intent); } @Override public boolean onCreateOptionsMenu(Menu menu) { // Inflate the menu; this adds items to the action bar if it is present. getMenuInflater().inflate(R.menu.menu_main, menu); return true; } @Override public boolean onOptionsItemSelected(MenuItem item) { // Handle action bar item clicks here. The action bar will // automatically handle clicks on the Home/Up button, so long // as you specify a parent activity in AndroidManifest.xml. int id = item.getItemId(); //noinspection SimplifiableIfStatement if (id == R.id.action_settings) { return true; } return super.onOptionsItemSelected(item); }}