��������д�������Android App����ÿһ������Ա���Ŀ�ꡣ��ô��ô����д��һ�������App�أ����źܶ��ѧ��Ҳ����������ã��һ�仰���ش�������⣺ϸ�ں���Ҫ���������Ǿʹ��������XML������̸̸��ô���Android��������ɣ�
Ҳ���㾭���������Ƚϸ��ӵIJ��֣���������£���ķ������Ƕ��Ƕ��ʵ��Ч����������ķ����Ƿ������ŵķ����أ� ������Ҫ��һ�������ʺţ�������������������ǣ������ķ������õ��Ľ���������Ž⣬��ô����ͨ��һ���������о�һ����ôȥ�Ż����ǵ�XML���ְɣ�����ͨ���������еġ����֡�tabҳ���еIJ�����������ôʵ�֡�
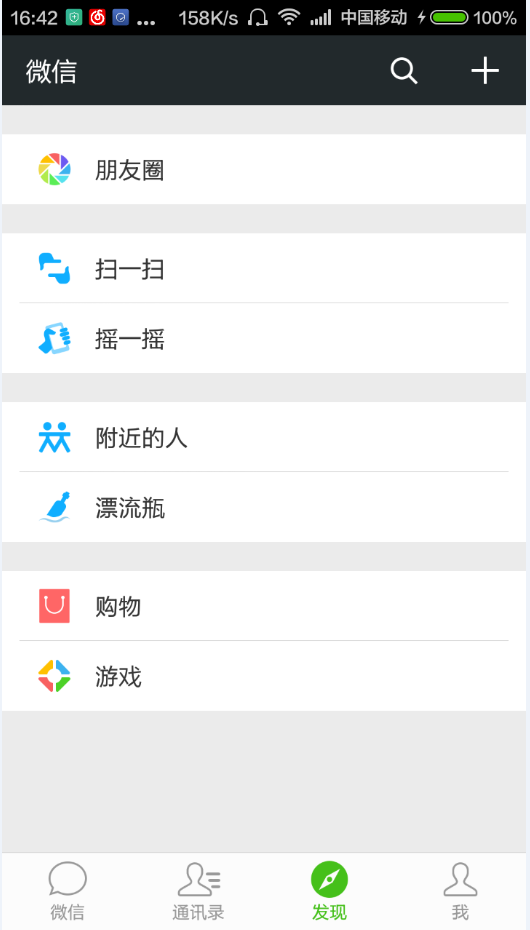
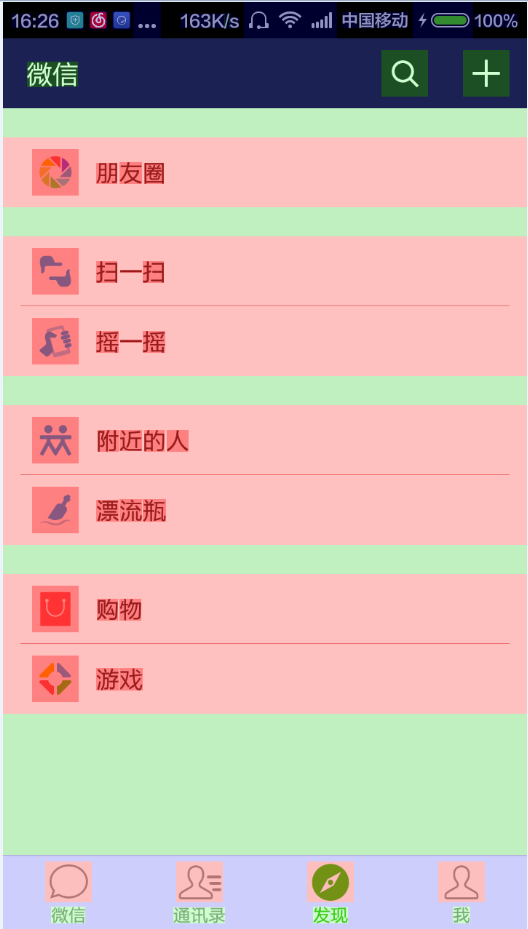
��������ͼƬ���Ž����ͼ����������Ч��ͼ�ĵ�һ�ۻ��ÿ������뵽ʹ�����Բ���ʵ���������ͼƬ���ұ����֣�һ�а�ɫ����Ч���ܷ��㡣��ô���ǾͰ���һ��˼·д�����²��ִ��룺
<LinearLayout xmlns:android="http://schemas.android.com/apk/res/android" xmlns:tools="http://schemas.android.com/tools" android:layout_width="match_parent" android:layout_height="match_parent" android:background="@color/color_eeeeee" android:orientation="vertical" tools:context=".MainActivity"> <LinearLayout android:layout_width="match_parent" android:layout_height="0dp" android:layout_weight="1" android:orientation="vertical"> <LinearLayout android:layout_width="match_parent" android:layout_height="wrap_content" android:layout_marginTop="20dp" android:background="@drawable/item_bg_select" android:clickable="true" android:gravity="center_vertical" android:orientation="horizontal" android:paddingLeft="20dp" android:paddingRight="20dp"> <ImageView android:layout_width="wrap_content" android:layout_height="wrap_content" android:src="@drawable/afe" /> <TextView android:layout_width="wrap_content" android:layout_height="wrap_content" android:layout_marginLeft="15dp" android:text="@string/fiends" android:textColor="@android:color/black" android:textSize="16sp" /> </LinearLayout> <LinearLayout android:layout_width="match_parent" android:layout_height="wrap_content" android:layout_marginTop="20dp" android:background="@android:color/white" android:orientation="vertical"> <LinearLayout android:layout_width="match_parent" android:layout_height="wrap_content" android:background="@drawable/item_bg_select" android:clickable="true" android:gravity="center_vertical" android:orientation="horizontal" android:paddingLeft="20dp" android:paddingRight="20dp"> <ImageView android:layout_width="wrap_content" android:layout_height="wrap_content" android:src="@drawable/afg" /> <TextView android:layout_width="wrap_content" android:layout_height="wrap_content" android:layout_marginLeft="15dp" android:text="@string/scan" android:textColor="@android:color/black" android:textSize="16sp" /> </LinearLayout> <View android:layout_width="match_parent" android:layout_height="0.5dp" android:layout_marginLeft="10dp" android:layout_marginRight="10dp" android:background="@color/color_e0e0e0"></View> <LinearLayout android:layout_width="match_parent" android:layout_height="wrap_content" android:background="@drawable/item_bg_select" android:clickable="true" android:gravity="center_vertical" android:orientation="horizontal" android:paddingLeft="20dp" android:paddingRight="20dp"> <ImageView android:layout_width="wrap_content" android:layout_height="wrap_content" android:src="@drawable/afh" /> <TextView android:layout_width="wrap_content" android:layout_height="wrap_content" android:layout_marginLeft="15dp" android:text="@string/shake" android:textColor="@android:color/black" android:textSize="16sp" /> </LinearLayout> </LinearLayout> <LinearLayout android:layout_width="match_parent" android:layout_height="wrap_content" android:layout_marginTop="20dp" android:background="@android:color/white" android:orientation="vertical"> <LinearLayout android:layout_width="match_parent" android:layout_height="wrap_content" android:background="@drawable/item_bg_select" android:clickable="true" android:gravity="center_vertical" android:orientation="horizontal" android:paddingLeft="20dp" android:paddingRight="20dp"> <ImageView android:layout_width="wrap_content" android:layout_height="wrap_content" android:src="@drawable/afd" /> <TextView android:layout_width="wrap_content" android:layout_height="wrap_content" android:layout_marginLeft="15dp" android:text="@string/nearby" android:textColor="@android:color/black" android:textSize="16sp" /> </LinearLayout> <View android:layout_width="match_parent" android:layout_height="0.5dp" android:layout_marginLeft="10dp" android:layout_marginRight="10dp" android:background="@color/color_e0e0e0"></View> <LinearLayout android:layout_width="match_parent" android:layout_height="wrap_content" android:background="@drawable/item_bg_select" android:clickable="true" android:gravity="center_vertical" android:orientation="horizontal" android:paddingLeft="20dp" android:paddingRight="20dp"> <ImageView android:layout_width="wrap_content" android:layout_height="wrap_content" android:src="@drawable/afb" /> <TextView android:layout_width="wrap_content" android:layout_height="wrap_content" android:layout_marginLeft="15dp" android:text="@string/float_bottle" android:textColor="@android:color/black" android:textSize="16sp" /> </LinearLayout> </LinearLayout> <LinearLayout android:layout_width="match_parent" android:layout_height="wrap_content" android:layout_marginTop="20dp" android:background="@android:color/white" android:orientation="vertical"> <LinearLayout android:layout_width="match_parent" android:layout_height="wrap_content" android:background="@drawable/item_bg_select" android:clickable="true" android:gravity="center_vertical" android:orientation="horizontal" android:paddingLeft="20dp" android:paddingRight="20dp"> <ImageView android:layout_width="wrap_content" android:layout_height="wrap_content" android:src="@drawable/agg" /> <TextView android:layout_width="wrap_content" android:layout_height="wrap_content" android:layout_marginLeft="15dp" android:text="@string/shopping" android:textColor="@android:color/black" android:textSize="16sp" /> </LinearLayout> <View android:layout_width="match_parent" android:layout_height="0.5dp" android:layout_marginLeft="10dp" android:layout_marginRight="10dp" android:background="@color/color_e0e0e0"></View> <LinearLayout android:layout_width="match_parent" android:layout_height="wrap_content" android:background="@drawable/item_bg_select" android:clickable="true" android:gravity="center_vertical" android:orientation="horizontal" android:paddingLeft="20dp" android:paddingRight="20dp"> <ImageView android:layout_width="wrap_content" android:layout_height="wrap_content" android:src="@drawable/ak6" /> <TextView android:layout_width="wrap_content" android:layout_height="wrap_content" android:layout_marginLeft="15dp" android:text="@string/games" android:textColor="@android:color/black" android:textSize="16sp" /> </LinearLayout> </LinearLayout> </LinearLayout> <LinearLayout android:layout_width="match_parent" android:layout_height="wrap_content" android:background="@android:color/white" android:orientation="horizontal"> <TextView android:layout_width="0dp" android:layout_height="wrap_content" android:layout_weight="1" android:drawableTop="@drawable/ala" android:gravity="center" android:text="@string/weixin" android:textColor="@color/color_9e9e9e" /> <TextView android:layout_width="0dp" android:layout_height="wrap_content" android:layout_weight="1" android:drawableTop="@drawable/al9" android:gravity="center" android:text="@string/countans" android:textColor="@color/color_9e9e9e" /> <TextView android:layout_width="0dp" android:layout_height="wrap_content" android:layout_weight="1" android:drawableTop="@drawable/alc" android:gravity="center" android:text="@string/finds" android:textColor="@color/color_9e9e9e" /> <TextView android:layout_width="0dp" android:layout_height="wrap_content" android:layout_weight="1" android:drawableTop="@drawable/ale" android:gravity="center" android:text="@string/me" android:textColor="@color/color_9e9e9e" /> </LinearLayout></LinearLayout>���ϲ��ֵ�Ч��ͼ���£�
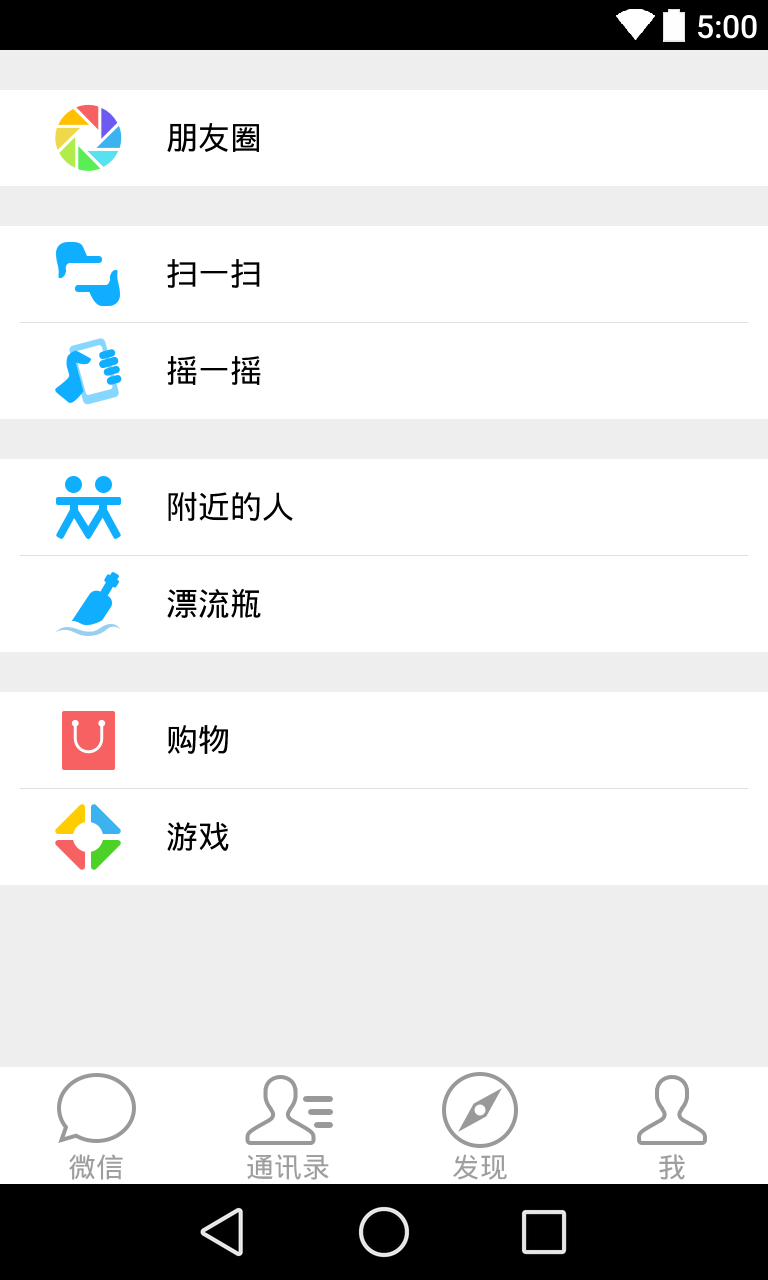
�Dz��Dz��ʵ������һ����Ч������ô������ô���ж����ϲ����Dz������ŵ��أ���Ȼ���������й������鿴�ġ����źܶ�ͯЬ�ù��ˣ���һ������ Hierarchy View���ڶ������� ��ʾGPU���Ȼ��ơ�
Hierarchy View��Ⲽ��Ƕ�ײ��
�������ʹ��AS�����Ļ���������� AS �������е�� Tools�C>Android�C>Android Device Monitor�C>Hierarchy View��������Hierarchy View��ôʹ������Ͳ���ϸ�����ˣ������ͨ������������鿴��ǰ���ֵIJ�νṹ������ͼ�IJ��ֵIJ�νṹ���������ŵIJ��֣�
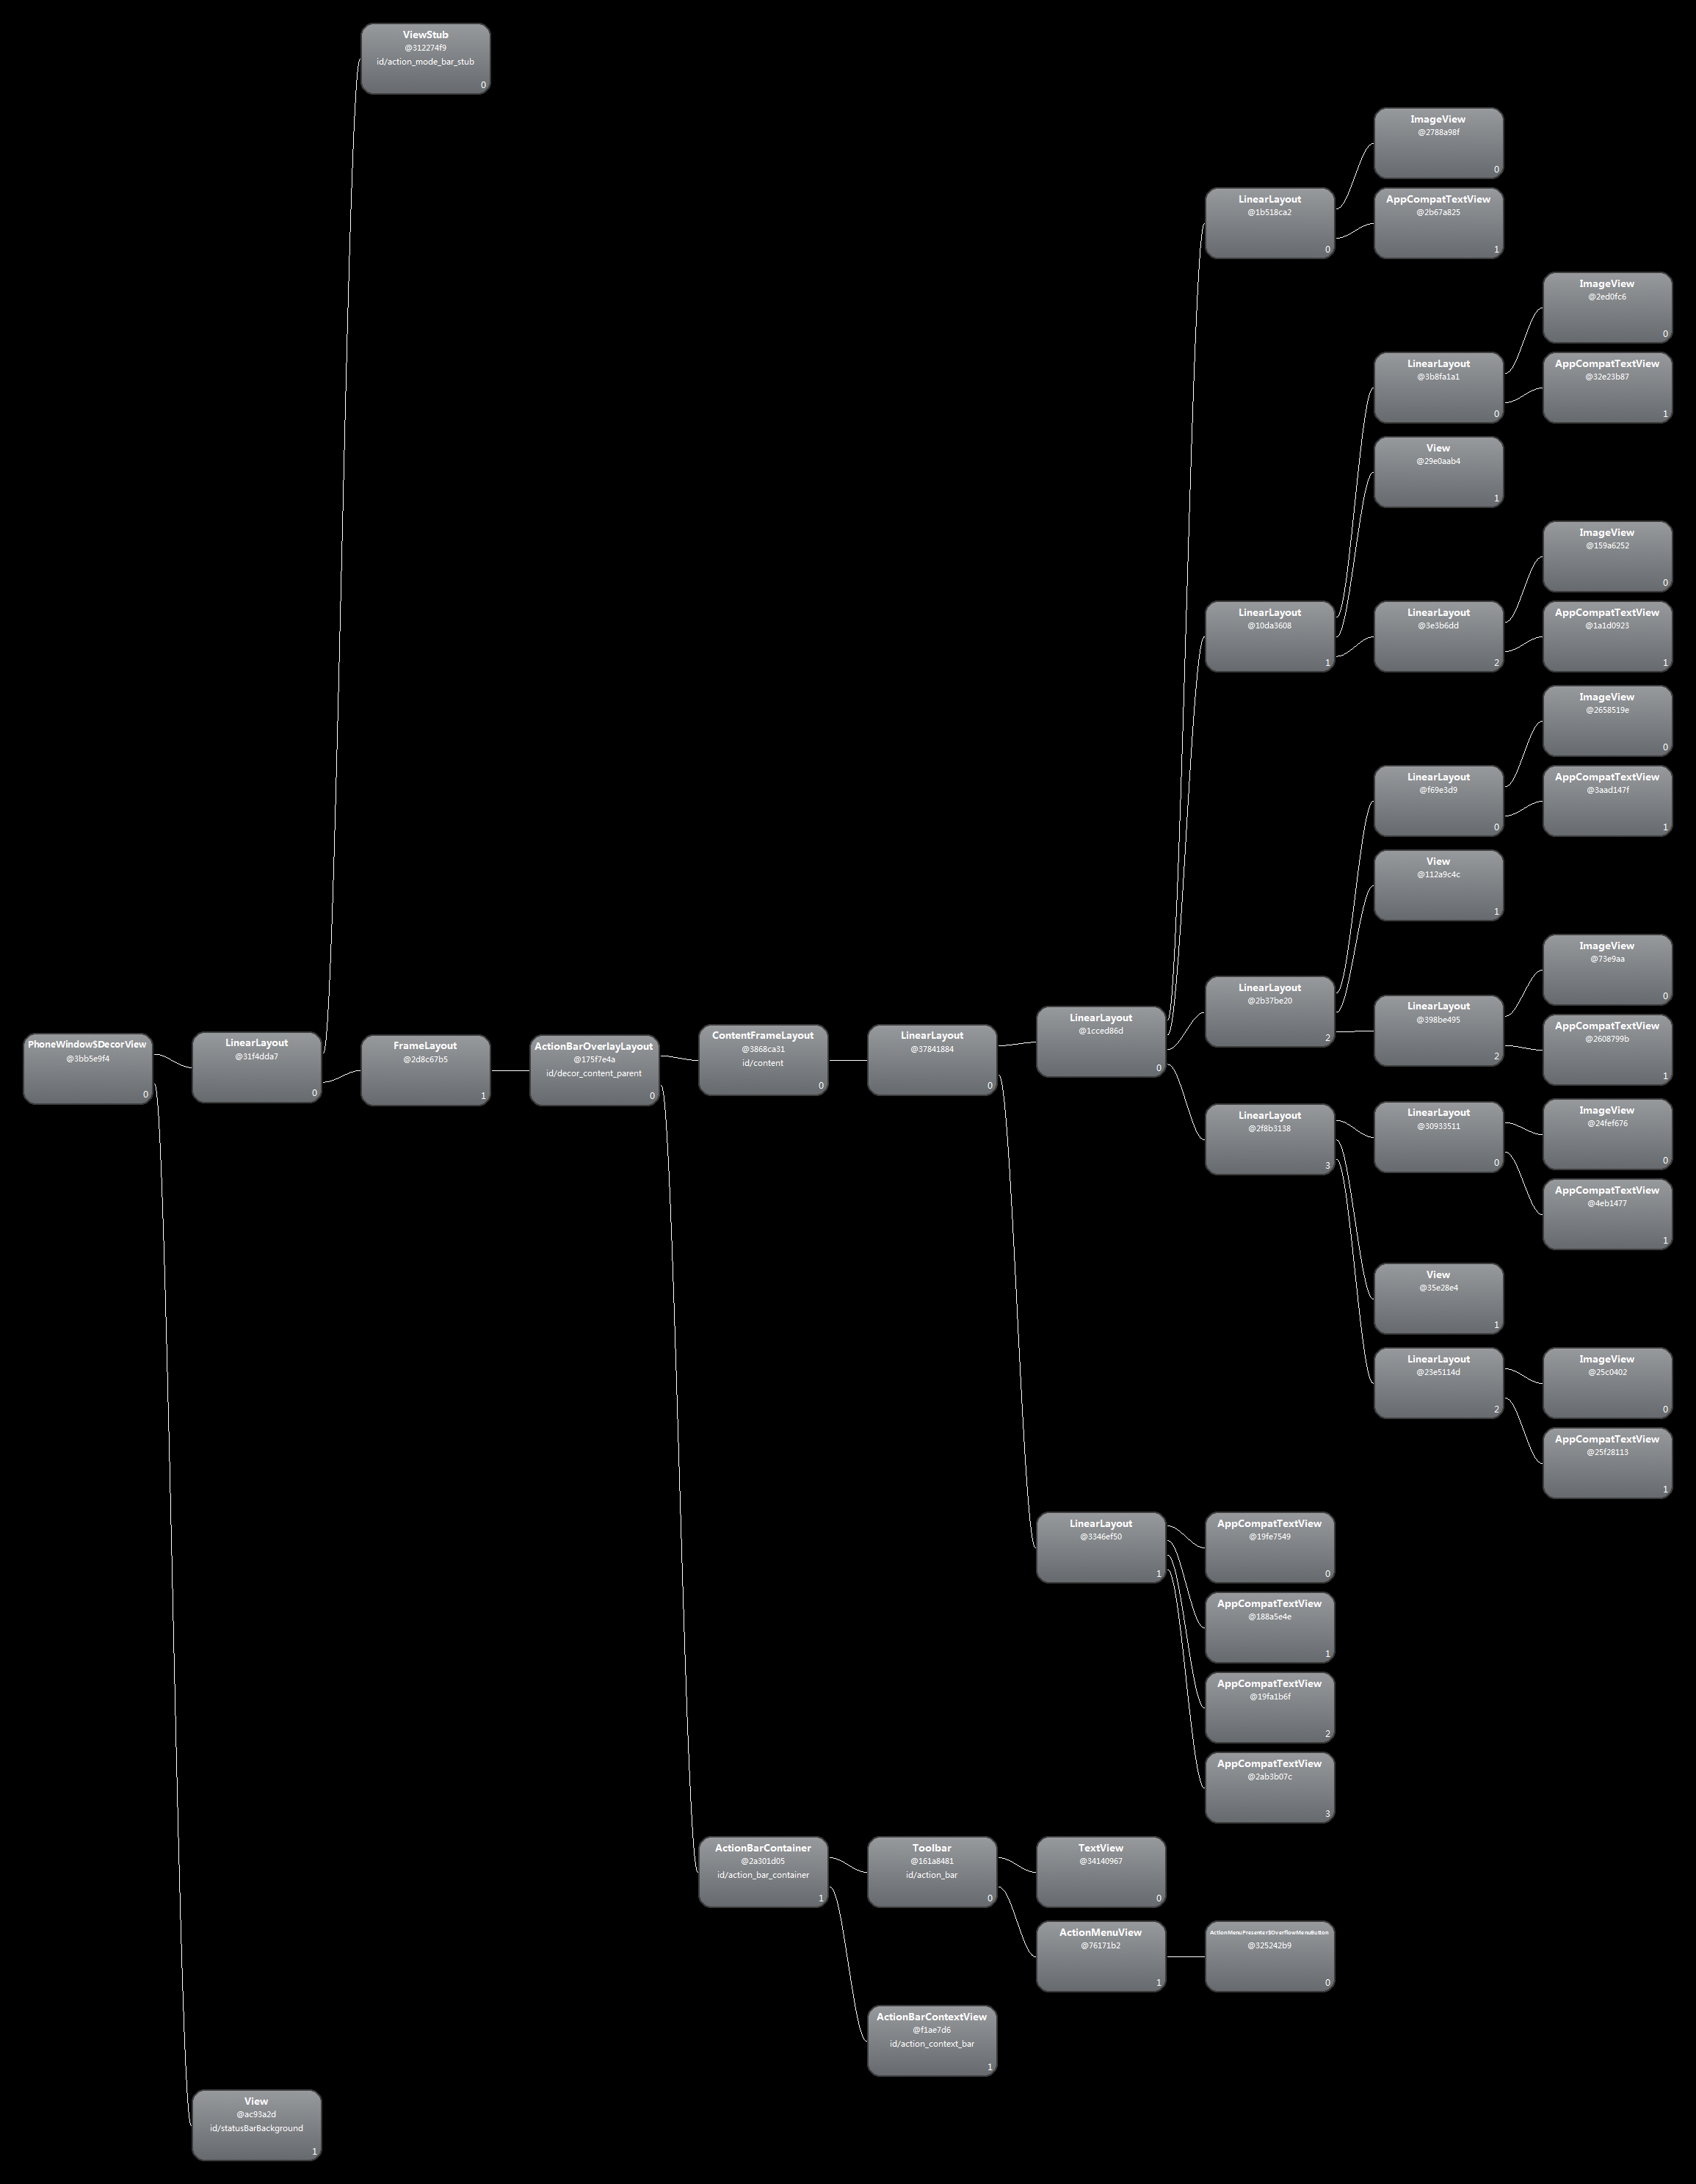
ContentFrameLayout�ӵ�֮�������������XML����IJ����ˣ�����ͼ���Կ��������Dz�������� 5 �㣬��ʵ��Ӵ�����Ҳ���Կ����� 5 �㣬��ô�����Ƿ��ܼ������ϵIJ��ֵ�Ƕ�ײ���أ����ǿ϶��ģ��ϻ�����˵������ֱ����һ�����Ż����IJ��ִ���ɡ�
<RelativeLayout xmlns:android="http://schemas.android.com/apk/res/android" xmlns:app="http://schemas.android.com/apk/res-auto" xmlns:tools="http://schemas.android.com/tools" android:layout_width="match_parent" android:layout_height="match_parent" android:background="@color/color_eeeeee" tools:context=".MainActivity"> <TextView android:id="@+id/tv_one" style="@style/textStyle" android:layout_marginTop="20dp" android:background="@drawable/item_bg_select" android:drawableLeft="@drawable/afe" android:text="@string/fiends" /> <android.support.v7.widget.LinearLayoutCompat android:id="@+id/lv_two" style="@style/LinerLayoutStyle" android:layout_below="@+id/tv_one" app:divider="@drawable/lines" app:dividerPadding="10dp" app:showDividers="middle"> <TextView style="@style/textStyle" android:background="@drawable/item_bg_select" android:drawableLeft="@drawable/afg" android:text="@string/scan" /> <TextView style="@style/textStyle" android:background="@drawable/item_bg_select" android:drawableLeft="@drawable/afh" android:text="@string/shake" /> </android.support.v7.widget.LinearLayoutCompat> <android.support.v7.widget.LinearLayoutCompat android:id="@+id/lv_threed" style="@style/LinerLayoutStyle" android:layout_below="@+id/lv_two" app:divider="@drawable/lines" app:dividerPadding="10dp" app:showDividers="middle"> <TextView style="@style/textStyle" android:background="@drawable/item_bg_select" android:drawableLeft="@drawable/afd" android:text="@string/nearby" /> <TextView style="@style/textStyle" android:background="@drawable/item_bg_select" android:drawableLeft="@drawable/afb" android:text="@string/float_bottle" /> </android.support.v7.widget.LinearLayoutCompat> <android.support.v7.widget.LinearLayoutCompat style="@style/LinerLayoutStyle" android:layout_below="@+id/lv_threed" app:divider="@drawable/lines" app:dividerPadding="10dp" app:showDividers="middle"> <TextView style="@style/textStyle" android:background="@drawable/item_bg_select" android:drawableLeft="@drawable/agg" android:text="@string/shopping" /> <TextView style="@style/textStyle" android:background="@drawable/item_bg_select" android:drawableLeft="@drawable/ak6" android:text="@string/games" /> </android.support.v7.widget.LinearLayoutCompat> <include layout="@layout/bottom_layout" android:layout_width="match_parent" android:layout_height="wrap_content" android:layout_alignParentBottom="true" /></RelativeLayout>�ۣ����������˺ܶడ������Ҳ��������࣬���˿��žͺ��������ô���ǵ��������������Ż��أ������¼����ܽ
- ʹ�� style ����������һ��ͨ�õ����ԣ��Ӷ��ظ����ô��룬���ٴ��������������ʹ��������style��һ����textStyle �� LinerLayoutStyle ���������£�
<!--TextView ��ͨ������--> <style name="textStyle"> <item name="android:layout_width">match_parent</item> <item name="android:layout_height">wrap_content</item> <item name="android:textSize">16sp</item> <item name="android:textColor">@android:color/black</item> <item name="android:paddingRight">20dp</item> <item name="android:paddingLeft">20dp</item> <item name="android:gravity">center_vertical</item> <item name="android:clickable">true</item> </style> <!--LinerLayout ��ͨ������--> <style name="LinerLayoutStyle" > <item name="android:layout_width">match_parent</item> <item name="android:layout_height">wrap_content</item> <item name="android:layout_marginTop">20dp</item> <item name="android:background">@android:color/white</item> <item name="android:orientation">vertical</item> </style>2.���ٲ���Ƕ�IJ�Σ����沼��ʹ��TextView���������ĸ�����ͼƬ��ֱ�����LinerLayout�°���һ��ImageView ��TextView���Ӷ����������һ��Ƕ�ײ��֣��ٴ�����RelativeLayout��Բ����ּ�����һ�����ף�����˼��ز��ֵ�Ч�ʡ���ͼ��

��ͼ�п�������������������Ƕ�ײ��֣����������ĿҲ���٣��Ӷ����ٲ��ֻ��Ƶ�ʱ�䣬�������˲��ּ���Ч�ʡ�
3.ʹ�� LinearLayoutCompat �����ʵ�����Բ���Ԫ��֮��ķָ��ߣ��Ӷ�������ʹ��View��ʵ�ַָ���Ч����LinearLayoutCompat�ľ���������ο� http://blog.csdn.net/feiduclear_up/article/details/46619637 ��
4.ʹ�� include ��ǩ���صײ��˵������֣�include ��ǩ��Ŀ�����ظ����ò��֣������ٴ����ˡ�
<?xml version="1.0" encoding="utf-8"?><LinearLayout xmlns:android="http://schemas.android.com/apk/res/android" android:layout_width="match_parent" android:layout_height="wrap_content" android:background="@android:color/white" android:orientation="horizontal"> <TextView android:layout_width="0dp" android:layout_height="wrap_content" android:layout_weight="1" android:drawableTop="@drawable/ala" android:gravity="center" android:text="@string/weixin" android:textColor="@color/color_9e9e9e" /> <TextView android:layout_width="0dp" android:layout_height="wrap_content" android:layout_weight="1" android:drawableTop="@drawable/al9" android:gravity="center" android:text="@string/countans" android:textColor="@color/color_9e9e9e" /> <TextView android:layout_width="0dp" android:layout_height="wrap_content" android:layout_weight="1" android:drawableTop="@drawable/alc" android:gravity="center" android:text="@string/finds" android:textColor="@color/color_9e9e9e" /> <TextView android:layout_width="0dp" android:layout_height="wrap_content" android:layout_weight="1" android:drawableTop="@drawable/ale" android:gravity="center" android:text="@string/me" android:textColor="@color/color_9e9e9e" /></LinearLayout>��ʾGPU���Ȼ���
��������ֻ��� ���á�->������ѡ�->��ʾGPU���Ȼ��ƣ�������ص������ǰ���ͬ��ɫֵ����ʾ���ֵĹ��Ȼ��ƣ����ƵIJ�δ����ŵ��������̣����죬�졣����һ��ֱ�۵�����ͼƬ����ʾ��
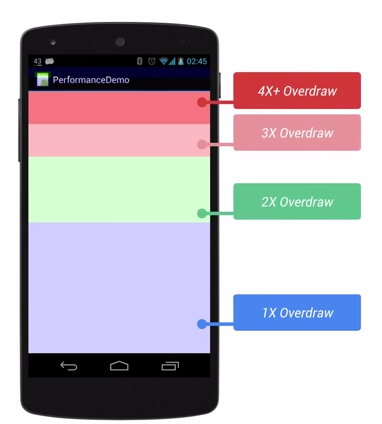
ͼƬ���ϵ��´�����ͬ��ε�OverDraw�������ڲ���ʱ�������ٺ�ɫ Overdraw�������������ɫ�����������ŵ� Overdrawͼ�������Զ���IJ���Overdrawͼ��
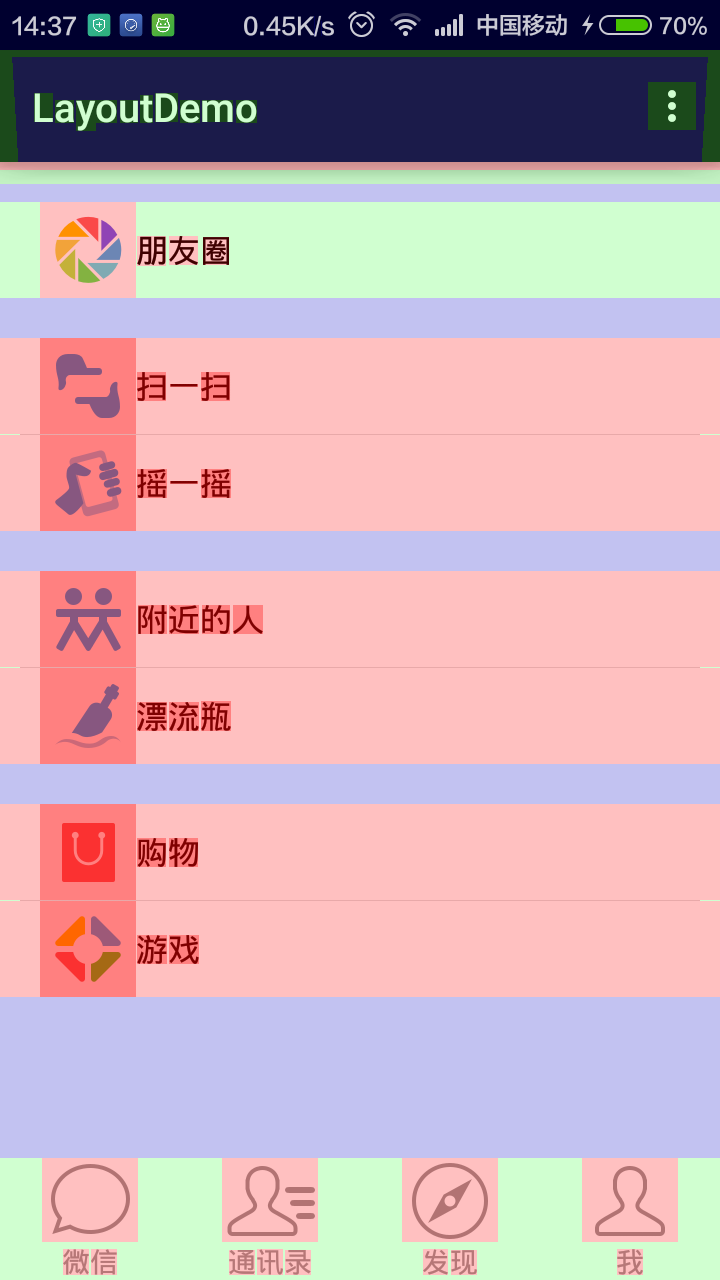
��һ��ͼ�� ��Ѷ�ŵ�Overdraw ͼ���ڶ���ͼƬ�������Զ���� Overdraw ͼƬ������������ͼƬ�����������Լ��IJ��ֺ���ԭ��IJ��� Overdraw ���Ȼ��������࣬ûɶ������ô�����ܲ���ȥ���ٺ�ɫ���ֵĹ��Ȼ����أ����ɣ�
������ȥ����˲���RelativeLayout�ı���
android:background="@color/color_eeeeee"Ȼ����ÿ��itemѡ����Դ selector
android:background="@drawable/item_bg_select1"֮ǰ�� item_bg_select.xml ��Դ�����´��룺
<?xml version="1.0" encoding="utf-8"?><selector xmlns:android="http://schemas.android.com/apk/res/android"> <item android:drawable="@color/color_e0e0e0" android:state_pressed="true"></item> <item android:drawable="@android:color/white"></item></selector>��֮��� item_bg_select1.xml��Դ�������£�
<?xml version="1.0" encoding="utf-8"?><selector xmlns:android="http://schemas.android.com/apk/res/android"> <item android:drawable="@color/color_e0e0e0" android:state_pressed="true"></item></selector>���Ƿ��֣��µ� selector��Դȥ����
<item android:drawable="@android:color/white"></item>��Ϊ���������ǰ�ɫ�ģ������ظ��������������item�ı�����ɫ��
��֮���Ч��ͼ���£�
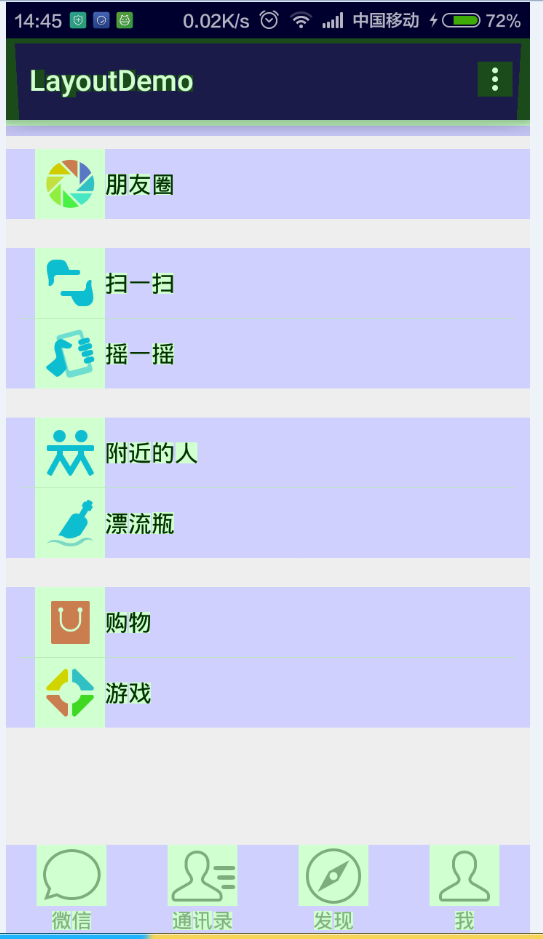
����������û�к�ɫ���Ӷ���߲��ֵĻ���Ч�ʡ�
�ܽ���ڿ���������ͨ�����ٱ�����ɫ������������Overdraw������������Լ����ֹ��Ȼ��Ƶ�������ű���������кܴ�ĸ��ƣ��Dz��Ǹо���nice������
�����ز��� ViewStub
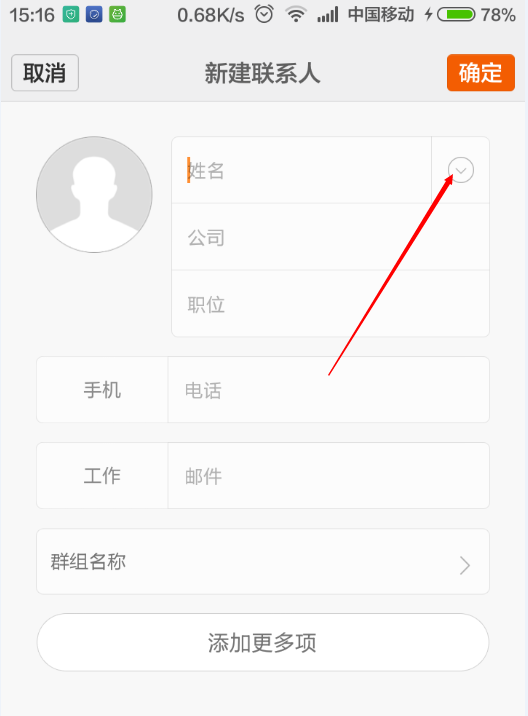
�����������ַ������Ż����֣����������취�������Ż����֣���ijЩ����£���Щ�����ǽ�����Ҫʱ�ż��أ�����С���ֻ���������ϵ�˹��ܾ����ڱ༭������ʱ����һ��������ť��ʾ����������Ϣ����ͼ
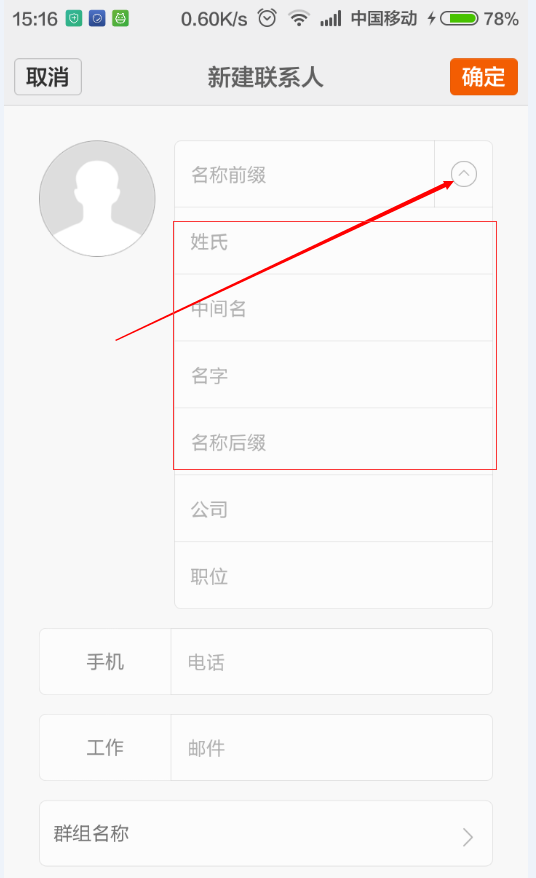
����������������������뵽�� ���ǽ������õ�Ԫ��ʹ��INVISIBLE����GONE�������أ������Ƿ���ĺ��أ��Ƿ�ﵽ�� �����Ż�������Ч���أ����� INVISIBLEֻ�����ز��֣����Dz��ֻ���ռ�ӵ�ǰλ�ã���ϵͳ�ڼ��ز��ֵ�ʱ����һ���ֻ��ǻ���Ƴ�����ͬ�����ѻ���ʱ�䡣��ô��û�кõİ취�������һ�����أ����Զ��������ǿ���ʹ�������ز��� ViewStub��
ViewStub��AndroidΪ���ṩ��һ�ַdz��������Ŀؼ���ViewStub��˵Ҳ��View��һ�֣�������û�д�С��û�л��ƹ��ܣ�Ҳ�����벼�֣���Դ���ķdz��ͣ����������ڲ��ֵ��л���������Ϊ����ȫ����Ӱ�����ܵġ�
����������ѧϰһ�� ViewStub��ʹ�÷����ɣ�
<?xml version="1.0" encoding="utf-8"?><LinearLayout xmlns:android="http://schemas.android.com/apk/res/android" android:layout_width="match_parent" android:layout_height="match_parent" android:orientation="vertical" android:padding="20dp"> <EditText android:id="@+id/et_name" android:layout_width="150dp" android:drawableRight="@drawable/a0e" android:layout_height="wrap_content" android:hint="@string/name" /> <ViewStub android:id="@+id/view_stub" android:layout_width="wrap_content" android:layout_height="wrap_content" android:layout="@layout/item_name" /> <EditText android:layout_width="150dp" android:layout_height="wrap_content" android:hint="@string/comp" /> <EditText android:layout_width="150dp" android:layout_height="wrap_content" android:hint="@string/lead" /></LinearLayout>item_name.xml �������£�
<?xml version="1.0" encoding="utf-8"?><LinearLayout xmlns:android="http://schemas.android.com/apk/res/android" android:layout_width="match_parent" android:layout_height="match_parent" android:orientation="vertical"> <EditText android:id="@+id/et_name1" android:layout_width="150dp" android:layout_height="wrap_content" android:hint="@string/name1" /> <EditText android:id="@+id/et_name2" android:layout_width="150dp" android:layout_height="wrap_content" android:hint="@string/name2" /> <EditText android:id="@+id/et_name3" android:layout_width="150dp" android:layout_height="wrap_content" android:hint="@string/name3" /> <EditText android:id="@+id/et_name4" android:layout_width="150dp" android:layout_height="wrap_content" android:hint="@string/name4" /></LinearLayout>Ȼ�����ڴ�������ôʹ�ü���
findViewById(R.id.et_name).setOnClickListener(new View.OnClickListener() { @Override public void onClick(View v) { ViewStub viewStub = (ViewStub) findViewById(R.id.view_stub); if (null != viewStub) { //��Ҫ����һ����ʾ���಼�� View view = viewStub.inflate(); EditText name1 = (EditText) view.findViewById(R.id.et_name1); EditText name2 = (EditText) view.findViewById(R.id.et_name2); EditText name3 = (EditText) view.findViewById(R.id.et_name3); EditText name4 = (EditText) view.findViewById(R.id.et_name4); } } });Ч��ͼ���£� 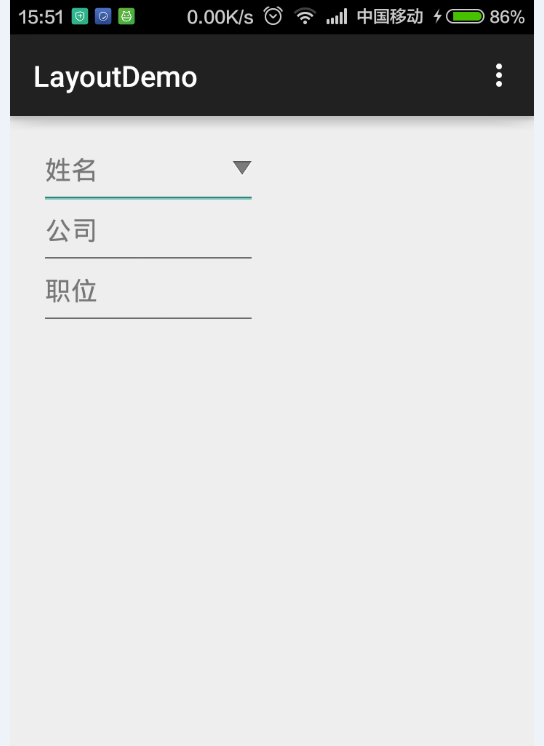
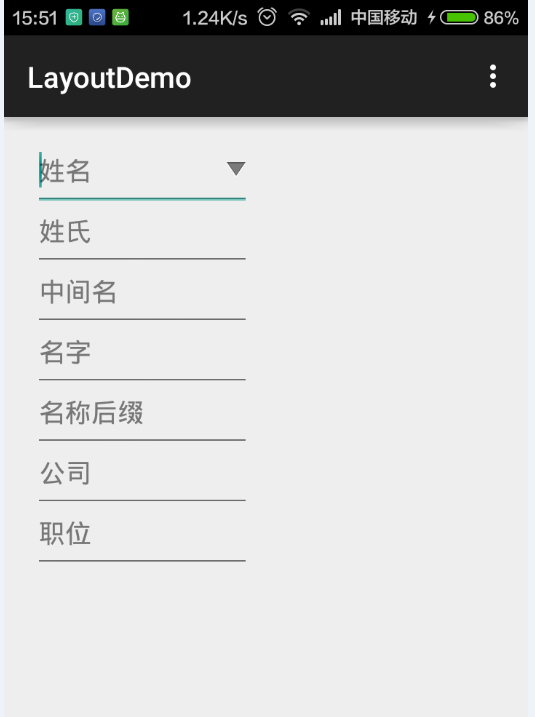
��Ч��ͼ���Կ��������û��������������ťʱ���������������IJ��־ͼ��س����ˣ�����ԭ���IJ�������ʾ��ViewStub����֮�µģ�λ����ʾû���κ��쳣����Ȼ�����ͨ�� setVisibility(View.VISIBLE)����viewStub.inflate()������������ʾ��ͨ��setVisibility(View.INVISIBLE)������ ViewStub��
Android Lint ����
���ﲻչ������ Lint ���ߣ�����Ȥ��ͯЬ�����Լ���������һ�ѣ����������Ҫ��������鹤���д���IJ����������ֲ���������Դ�ظ���ͼƬ�ظ����ȣ��ÿ����߽�һ���Ż��Լ���Ӧ�á��������AS �û���������ڹ����� Analyze��>Inspect Code �˹���ʹ�á�
�ο��ĵ���http://hukai.me/android-performance-render/
�ο��ĵ���http://blog.csdn.net/guolin_blog/article/details/43376527
��Ȩ����������Ϊ����ԭ�����£�δ��������������ת�ء�