在上一篇文章《安卓开发笔记——打造属于自己的博客园APP(二)》中,我们基本上实现了主界面的搭建,网络框架的搭建,各博客列表页面的展示包括更新效果,对图片做了三级缓存处理(后面会把文章,新闻做成离线闪存,实现无网络也能照常浏览)。
今天来讲讲博客详情页和评论页面的实现,国际惯例,先上效果图:(动态图片比较大,加载需要点时间)

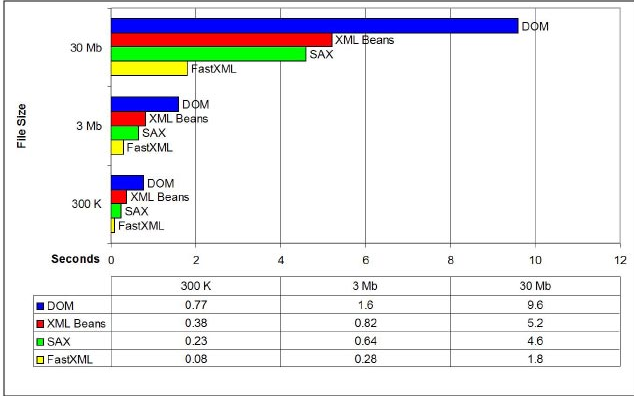
这里说下,关于上篇文章XML的解析,我后来查了下确实有一些方便解析的工具,例如:FastXML,Xstram等且效率更高,这里是在它的官方找到的一张数据图:
文章里我就还是先采用原生的pull解析了,等重构代码时候再换上工具类吧,先把项目做完。
好了,废话不多说了,直接进入主题:
1、关于RecyclerView的点击事件
首先先来说下关于RecyclerView的点击监听事件,在上篇文章提到,RecyclerView是ListView升级版,顾名思义它是为效率而生的,它不关心多余的任何事情,比如Item项的动作监听,Item项的分割线,Item项的添加动画效果,只专注于数据的展示实现,相比ListView它更符合软件设计原则,更加解耦。
上面提到它不关心Item项的动作监听,很自然,它没有和ListView控件一样提供类似setOnItemClickListener这种监听方法,需要我们自己来实现,那么很自然的,我们会选择在Adapter里去设置监听事件,关于RecyclerView不熟悉的朋友可以先看下这篇文章:http://blog.csdn.net/lmj623565791/article/details/45059587
首先我们在Adapter设置一个点击回调接口,并提供setter方法:
1 /** 2 * 自定义点击回调接口 3 */ 4 public interface RecyclerViewListener { 5 void setOnclickListener(View view, int pos); 6 } 7 8 private RecyclerViewListener mRecyclerViewListener; 9 10 /**11 * 提供setter方法12 *13 * @param recyclerViewListener14 */15 public void setRecyclerViewListener(RecyclerViewListener recyclerViewListener) {16 this.mRecyclerViewListener = recyclerViewListener;17 }
然后我们在onBindViewHolder中设置监听事件:
1 //设置点击监听2 viewholder.itemView.setTag(i);3 viewholder.mMore.setTag(Integer.MAX_VALUE);4 viewholder.itemView.setOnClickListener(new ItemClick());5 viewholder.mMore.setOnClickListener(new ItemClick());
再来个实现接口:
/** * 点击事件实现类 */ public class ItemClick implements View.OnClickListener{ @Override public void onClick(View v) { if(mRecyclerViewListener!=null){ mRecyclerViewListener.setOnclickListener(v,(int)v.getTag()); } } }
这样子,我们就可以在我们的博客列表页面设置点击事件了,关于下面的showPopUpMenu是一个点击弹出窗口,可以实现收藏博文和关注博主的功能,我们下一篇文章会提到。这里我们实现当点击RecyclerView条目的时候会通过Intent传递Blog对象到博文详情页面。
1 //设置条目点击监听 2 mBlogListAdapter.setRecyclerViewListener(new BlogListAdapter.RecyclerViewListener() { 3 @Override 4 public void setOnclickListener(View view, int pos) { 5 6 if (view.getId() == R.id.ib_more) { 7 //点击菜单按钮 8 showPopUpMenu(view, pos); 9 } else {10 //点击条目,传递对象11 Intent intent = new Intent();12 intent.setClass(getActivity(), BlogContentActivity.class);13 Bundle bundle = new Bundle();14 bundle.putSerializable("blog", mBlogs.get(pos));15 intent.putExtras(bundle);16 startActivity(intent);17 }18 }19 });
2、关于博文详情页面的实现
这里是关于博文详情的接口:http://wcf.open.cnblogs.com/blog/post/body/{POSTID} (POSTID代表文章Id)
这里是关于博文详情的XML解析代码:
1 package com.lcw.rabbit.myblog.parser; 2 3 import org.xmlpull.v1.XmlPullParser; 4 import org.xmlpull.v1.XmlPullParserException; 5 import org.xmlpull.v1.XmlPullParserFactory; 6 7 import java.io.IOException; 8 import java.io.InputStream; 9 10 /**11 * 对博文详情xml数据的解析12 * Created by Lichenwei13 * Date: 2015-08-1714 * Time: 13:3215 */16 public class BlogContentXmlParser {17 18 19 /**20 * 用于解析博文详情的xml,返回Avatar的List集合对象21 *22 * @param inputStream23 * @param encode24 * @return25 * @throws XmlPullParserException26 * @throws IOException27 */28 public static String getBlogContent(InputStream inputStream, String encode) throws XmlPullParserException, IOException {29 30 String info="";31 //获取XmlPullParser实例32 XmlPullParserFactory factory = XmlPullParserFactory.newInstance();33 XmlPullParser parser = factory.newPullParser();34 parser.setInput(inputStream, encode);35 //获取解析事件36 int eventType = parser.getEventType();37 //当xml文档未到尾端时38 while (eventType != XmlPullParser.END_DOCUMENT) {39 switch (eventType) {40 //解析根标签的时候,实例化集合41 case XmlPullParser.START_DOCUMENT:42 break;43 case XmlPullParser.START_TAG:44 if("string".equals(parser.getName())){45 parser.next();46 info=parser.getText();47 }48 break;49 }50 eventType = parser.next();51 }52 return info;53 54 }55 56 }
关于博文详情页的实现,我做了很多方法的尝试,因为我们获取的数据是Html代码,我们很自然的会想到用WebView,但是用WebView来展示,我们需要一个固定的样式来控制页面内容,不然会导致页面格式无法控制,比如文字的排布换行,图片的大小控制,包括整体页面的屏幕适配,由于我们获取的只是部分Html代码,所以会纯在很多问题,并且有滑动卡顿(对于安卓来说,WebView本来就是个软肋)。
然后我尝试着用Html类下的fromHtml方法来实现对页面代码的格式化,它是基于TextView的,发现滑动很流畅,文字大小也可以控制的很好,但又有一个问题出现了,关于图片的展示问题,虽然fromHtml提供了另外一个包含ImageGetter的构造方法,但是在我们通过异步获取图片的时候它不发预知图片尺寸的大小,导致最后获取出来的图片会覆盖了文字。
效果如图:

后来我尝试的去GitHub上找找开源的组件发现了HtmlTextView:https://github.com/sufficientlysecure/html-textview,但是也不能够达到想要的效果,最后无奈的用了一个最笨的方法去做,就是在我们获取到Html格式数据的时候,我们通过String的replace方法用正则表达式方式去判断位置,比如<img/>标签,然后通过添加换行符号<br/>来人工换行,这样子看似没什么问题,但是图片毕竟有很多,有大有小,也并不是很完美的可以解决问题。
最后我觉得不应该老在安卓端里去考虑问题,毕竟我们的数据是从网络获取下来的,我们对它们具有完全的掌控权,为啥不从Html代码端去考虑问题的解决呢?然后我决定写一个静态的Html模板,对它做了移动端的屏幕适配,然后再把我们获取到的内容插入进去。(这里而外再提一个方法,我们也可以通过Jsoup去解析Html代码,然后去创建一个实体对象,把内容加入到List集合,然后再通过页面展示)
好了,看下我的Html静态模板的实现:
这是Html模板:


1 <html> 2 <head> 3 <title>Blog Content</title> 4 <meta name="viewport" 5 content="width=device-width, minimum-scale=0.5, initial-scale=1.2, maximum-scale=2.0, user-scalable=1"/> 6 <link rel="stylesheet" type="text/css" href="css.css"/> 7 8 </head> 9 <body>10 <div id="header">11 <h3>12 #title#13 </h3>14 15 <div class="describe"><p/>#author#<p/>16 17 <div id="info">#info#<p/>#time#</div>18 </div>19 </div>20 <div id="content">21 #content#22 </div>23 </body>24 </html>
这是Css文件:
1 body{font-family:Helvetica,"Microsoft Yahei",Verdana,Helvetica,SimSun,Arial,"Arial Unicode MS",MingLiu,PMingLiu,"MS Gothic",sans-serief;margin:0;padding:0 8px;background-color:#efeff0;color:#333;word-wrap:break-word;} 2 p{margin-top:0;margin-bottom:5pt;line-height: 1.6em;} 3 #header{text-align:center;background:transparent url('webBgLine.png') repeat-x scroll center bottom; padding-top:6pt;margin-bottom:5pt;-webkit-background-size:320px 2px;} 4 #header h3{margin-bottom:0px; margin-top:5px;font-size:14pt;padding:0 5pt;color:#464646;line-height:1.3em;} 5 .describe{color:#8e8e8e;font-size:12pt;padding:4pt 0; color:#333;} 6 #info{ font-size:10pt;line-height:1.6; color:#787878;} 7 #content{ font-size:12pt;line-height:1.8;} 8 img{max-width:80%;height:auto;} 9 div.bimg{text-align:center;padding:0;}10 .photo_title{font-weight:bold;font-size:14pt;margin-top:15px;}11 .langs_cn{color:#006200;}12 audio{width:100%}13 *{-webkit-touch-callout: none; /* prevent callout to copy image, etc when tap to hold */14 /*-webkit-text-size-adjust: none;*/ /* prevent webkit from resizing text to fit */15 -webkit-tap-highlight-color: rgba(0,0,0,0.15); /* make transparent link selection, adjust last value opacity 0 to 1.0 */16 /*-webkit-user-select: none; /* prevent copy paste, to allow, change 'none' to 'text' */17 }18 @media screen and (-webkit-device-pixel-ratio: 2) {19 #header{background-image:transparent url([email protected]') repeat-x scroll center bottom;-webkit-background-size:320px 1px;}20 }
这样我们就可以通过Java端实现动态插入了,由于是加载了静态模板,滑动起来也不会出现卡顿。
1 InputStream inputStream = getAssets().open("NewsDetail.html");2 byte[] temp = AppUtil.readInputStream(inputStream);3 String content = new String(temp);4 mWebView.loadDataWithBaseURL("file:///android_asset/", content.replace("#title#", mBlog.getBlogTitle()).replace("#author#", "作者:" + mBlog.getAuthorName()).replace("#info#", "推荐:" + mBlog.getBlogDiggs() + "\t\t评论:" + mBlog.getBlogComments() + "\t\t浏览:" + mBlog.getBlogViews()).replace("#time#", TimeUtil.ParseDateToString(TimeUtil.ParseUTCDate(mBlog.getBlogPublished())))5 .replace("#content#", mInfo), "text/html", "utf-8", null);
看下布局文件,这里用到了一个Material Design里的FAB(Floating Action Button)浮动按钮,这个控件很简单,只需要设置对应的属性,然后其他用法和普通控件是保持一致的。
1 <LinearLayout xmlns:android="http://schemas.android.com/apk/res/android" 2 xmlns:app="http://schemas.android.com/apk/res-auto" 3 android:layout_width="match_parent" 4 android:layout_height="match_parent" 5 android:fitsSystemWindows="true" 6 android:orientation="vertical"> 7 8 <!--ToolBar--> 9 <include layout="@layout/activity_toolbar" />10 11 12 <FrameLayout13 android:layout_width="match_parent"14 android:layout_height="match_parent">15 16 <WebView17 android:id="@+id/wv_blog_content"18 android:layout_width="match_parent"19 android:layout_height="match_parent"20 android:scrollbars="vertical"21 />22 23 <ProgressBar24 android:id="@+id/pb_bar"25 style="@style/MyProgressBar"26 android:layout_width="match_parent"27 android:layout_height="wrap_content"28 android:layout_gravity="center_vertical"29 android:indeterminate="true" />30 31 <android.support.design.widget.FloatingActionButton32 android:id="@+id/fab_comment"33 android:layout_width="wrap_content"34 android:layout_height="wrap_content"35 android:layout_gravity="right|bottom"36 android:layout_marginBottom="30dp"37 android:layout_marginRight="20dp"38 android:src="@mipmap/ic_star_outline_white_24dp"39 app:backgroundTint="@color/md_green_600"40 app:borderWidth="0dp"41 app:elevation="8dp"42 app:fabSize="normal"43 app:pressedTranslationZ="12dp"44 app:rippleColor="@color/md_green_800" />45 </FrameLayout>46 </LinearLayout>
这里只是先简单的一个图片替换和Toast的显示,具体操作等下篇文章我们用到数据库的时候再说。
1 mFloatingActionButton = (FloatingActionButton) findViewById(R.id.fab_comment); 2 3 mFloatingActionButton.setOnClickListener(new View.OnClickListener() { 4 @Override 5 public void onClick(View v) { 6 if (!isLike) { 7 isLike = true; 8 mFloatingActionButton.setImageResource(R.mipmap.ic_grade_white_24dp); 9 Toast.makeText(BlogContentActivity.this, "文章已收藏", Toast.LENGTH_SHORT).show();10 //添加收藏文章到数据库11 } else {12 isLike = false;13 mFloatingActionButton.setImageResource(R.mipmap.ic_star_outline_white_24dp);14 Toast.makeText(BlogContentActivity.this, "取消文章收藏", Toast.LENGTH_SHORT).show();15 //从数据库删除收藏文章16 }17 }18 });
然后这里是关于WebView的设置,大家也可以参考这篇文章自己做设置:http://www.pedant.cn/2014/09/10/webview-optimize-points/#0-tsina-1-5518-397232819ff9a47a7b7e80a40613cfe1
1 mWebView = (WebView) findViewById(R.id.wv_blog_content); 2 //避免中文乱码 3 mWebView.getSettings().setDefaultTextEncodingName("utf-8"); 4 //适配低版本,关闭图片自动加载 5 if (Build.VERSION.SDK_INT >= 19) { 6 mWebView.getSettings().setLoadsImagesAutomatically(true); 7 } else { 8 mWebView.getSettings().setLoadsImagesAutomatically(false); 9 }10 //等页面加载完毕再加载图片11 WebViewClient webViewClient = new WebViewClient() {12 @Override13 public void onPageFinished(WebView view, String url) {14 //关闭Progress15 mProgressBar.setVisibility(View.GONE);16 if (!view.getSettings().getLoadsImagesAutomatically()) {17 view.getSettings().setLoadsImagesAutomatically(true);18 }19 }20 };21 mWebView.setWebViewClient(webViewClient);22 mWebView.setScrollBarStyle(View.SCROLLBARS_INSIDE_OVERLAY);23 mWebView.getSettings().setJavaScriptEnabled(false);24 mWebView.getSettings().setSupportZoom(false);25 mWebView.getSettings().setBuiltInZoomControls(false);26 mWebView.getSettings().setCacheMode(WebSettings.LOAD_CACHE_ELSE_NETWORK);27 mWebView.getSettings().setLayoutAlgorithm(WebSettings.LayoutAlgorithm.SINGLE_COLUMN);
3、关于评论详情页面的实现
这里是关于博文详情的接口:http://wcf.open.cnblogs.com/blog/post/{POSTID}/comments/{PAGEINDEX}/{PAGESIZE} (POSTID代表文章Id,PAGEINDEX代表评论页数,PAGESIZE代表评论每页展示的条数)这里不得不吐槽下接口的残疾,都没提供用户头像数据,只能用默认灰白头像做了。
这个就很简单了,直接可以复制我们之前做首页列表的XML布局文件甚至是Fragment里的主逻辑代码,只需要做一下页面内容的小改动就可以了,下面直接给代码。
博文评论主页样式:
1 <LinearLayout xmlns:android="http://schemas.android.com/apk/res/android" 2 xmlns:app="http://schemas.android.com/apk/res-auto" 3 android:layout_width="match_parent" 4 android:layout_height="match_parent" 5 android:fitsSystemWindows="true" 6 android:gravity="center" 7 android:orientation="vertical"> 8 9 <!--ToolBar-->10 <include layout="@layout/activity_toolbar" />11 <android.support.v4.widget.SwipeRefreshLayout12 android:id="@+id/swipe_refresh"13 android:layout_width="match_parent"14 android:layout_height="match_parent"15 android:layout_margin="4dp">16 17 <android.support.v7.widget.RecyclerView18 android:id="@+id/rv_view"19 android:layout_width="match_parent"20 android:layout_height="match_parent"21 android:background="@color/md_grey_200"22 android:scrollbars="vertical"23 />24 </android.support.v4.widget.SwipeRefreshLayout>25 26 <com.lcw.rabbit.myblog.view.MyProgressBar27 android:id="@+id/progressbar"28 android:layout_width="match_parent"29 android:layout_height="20dp"30 android:layout_gravity="bottom"31 android:visibility="gone"32 />33 34 35 36 </LinearLayout>
列表样式和详细内容样式:
1 <android.support.v7.widget.CardView xmlns:android="http://schemas.android.com/apk/res/android" 2 xmlns:app="http://schemas.android.com/apk/res-auto" 3 android:id="@+id/cv_cardview" 4 android:layout_width="match_parent" 5 android:layout_height="wrap_content" 6 android:layout_margin="8dp" 7 android:gravity="center" 8 app:cardCornerRadius="6dp"> 9 10 <include layout="@layout/recyclerview_item_blogcommentlist_content" />11 12 </android.support.v7.widget.CardView>
1 <LinearLayout xmlns:android="http://schemas.android.com/apk/res/android" 2 xmlns:app="http://schemas.android.com/apk/res-auto" 3 android:layout_width="match_parent" 4 android:layout_height="wrap_content" 5 android:background="?android:selectableItemBackground" 6 android:orientation="horizontal" 7 android:padding="3dp"> 8 9 <!--信息内容-->10 <LinearLayout11 android:layout_width="0dp"12 android:layout_height="wrap_content"13 android:layout_marginLeft="3dp"14 android:layout_weight="1"15 android:orientation="vertical">16 17 <LinearLayout18 android:layout_width="wrap_content"19 android:layout_height="wrap_content"20 android:layout_marginLeft="3dp"21 android:layout_weight="1"22 android:padding="3dp"23 android:orientation="horizontal">24 25 <!--头像-->26 <com.makeramen.roundedimageview.RoundedImageView27 android:id="@+id/iv_userhead"28 android:layout_width="25dp"29 android:layout_height="25dp"30 android:layout_gravity="center_vertical"31 android:layout_marginRight="5dp"32 android:src="@mipmap/avatar_default"33 app:riv_border_color="#ffffff"34 app:riv_border_width="2dip"35 app:riv_corner_radius="30dip"36 app:riv_mutate_background="true"37 app:riv_oval="true"38 app:riv_tile_mode="repeat" />39 40 <TextView41 android:id="@+id/tv_name"42 android:layout_width="match_parent"43 android:layout_height="wrap_content"44 android:layout_gravity="center_vertical"45 android:layout_marginTop="2dp"46 android:layout_weight="1"47 android:ellipsize="end"48 android:singleLine="true"49 50 android:text="用户昵称"51 android:textColor="@color/md_green_700"52 android:textSize="16sp"53 android:textStyle="bold" />54 </LinearLayout>55 56 <TextView57 android:id="@+id/tv_comment"58 android:layout_width="match_parent"59 android:layout_height="wrap_content"60 android:layout_weight="1"61 android:maxLines="3"62 android:layout_marginLeft="3dp"63 android:text="文章评论内容"64 android:textSize="16sp" />65 66 <LinearLayout67 android:layout_width="match_parent"68 android:layout_height="match_parent"69 android:layout_margin="1dp"70 android:layout_weight="1"71 android:padding="3dp"72 android:orientation="horizontal">73 74 <TextView75 android:layout_width="wrap_content"76 android:layout_height="match_parent"77 android:gravity="center_vertical"78 android:text="评论时间:"79 android:textColor="@color/md_grey_500"80 android:textSize="12sp" />81 82 <TextView83 android:id="@+id/tv_time"84 android:layout_width="wrap_content"85 android:layout_height="match_parent"86 android:layout_marginRight="5dp"87 android:gravity="center_vertical"88 android:textColor="@color/md_grey_500"89 android:textSize="12sp" />90 91 </LinearLayout>92 93 </LinearLayout>94 95 96 </LinearLayout>
主代码:
1 package com.lcw.rabbit.myblog; 2 3 import android.os.Bundle; 4 import android.support.v4.widget.SwipeRefreshLayout; 5 import android.support.v7.app.AppCompatActivity; 6 import android.support.v7.widget.DefaultItemAnimator; 7 import android.support.v7.widget.LinearLayoutManager; 8 import android.support.v7.widget.RecyclerView; 9 import android.support.v7.widget.Toolbar; 10 import android.view.View; 11 12 import com.android.volley.Request; 13 import com.android.volley.Response; 14 import com.android.volley.VolleyError; 15 import com.android.volley.toolbox.StringRequest; 16 import com.lcw.rabbit.myblog.adapter.BlogCommentListAdapter; 17 import com.lcw.rabbit.myblog.entity.Comment; 18 import com.lcw.rabbit.myblog.parser.BlogCommentXmlParser; 19 import com.lcw.rabbit.myblog.utils.VolleyRequestQueueManager; 20 import com.lcw.rabbit.myblog.view.MyProgressBar; 21 import com.mugen.Mugen; 22 import com.mugen.MugenCallbacks; 23 import com.mugen.attachers.BaseAttacher; 24 25 import org.xmlpull.v1.XmlPullParserException; 26 27 import java.io.ByteArrayInputStream; 28 import java.io.IOException; 29 import java.util.ArrayList; 30 import java.util.List; 31 32 /** 33 * 博文评论页 34 */ 35 public class BlogCommentActivity extends AppCompatActivity { 36 private Toolbar mToolbar; 37 private SwipeRefreshLayout mSwipeRefreshLayout; 38 private RecyclerView mRecyclerView; 39 private BlogCommentListAdapter mBlogCommentListAdapter; 40 //无限滚动 41 private BaseAttacher mBaseAttacher; 42 private MyProgressBar myProgressBar; 43 44 private String mBlogId; 45 private List<Comment> mComments; 46 47 //默认第一页 48 private int currentPage = 1; 49 //是否正在加载 50 private boolean isLoading = false; 51 52 53 @Override 54 protected void onCreate(Bundle savedInstanceState) { 55 super.onCreate(savedInstanceState); 56 setContentView(R.layout.activity_blog_comment); 57 initView(); 58 initData(); 59 initAction(); 60 getBlogComment(mBlogId, 1, 10); 61 } 62 63 private void initAction() { 64 //设置下拉刷新 65 mSwipeRefreshLayout.setOnRefreshListener(new SwipeRefreshLayout.OnRefreshListener() { 66 @Override 67 public void onRefresh() { 68 getBlogComment(mBlogId, 1, 10); 69 } 70 }); 71 72 73 //设置无限滚动,上拉加载 74 mBaseAttacher = Mugen.with(mRecyclerView, new MugenCallbacks() { 75 @Override 76 public void onLoadMore() { 77 //加载更多 78 isLoading = true; 79 mBaseAttacher.setLoadMoreEnabled(false); 80 myProgressBar.setVisibility(View.VISIBLE); 81 getBlogComment(mBlogId, (currentPage + 1), 10); 82 } 83 84 @Override 85 public boolean isLoading() { 86 return isLoading; 87 } 88 89 @Override 90 public boolean hasLoadedAllItems() { 91 return isLoading; 92 } 93 }).start(); 94 //离底部一项的时候加载更多 95 mBaseAttacher.setLoadMoreOffset(1); 96 } 97 98 /** 99 * 获取Intent传递过来的数据100 */101 private void initData() {102 mBlogId = getIntent().getExtras().getString("blogId");103 //设置空数据源104 mComments=new ArrayList<Comment>();105 mBlogCommentListAdapter = new BlogCommentListAdapter(this,mComments);106 mRecyclerView.setAdapter(mBlogCommentListAdapter);107 }108 109 110 /**111 * 获取博客评论数据并设置112 * @param blogId113 * @param page114 * @param num115 */116 private void getBlogComment(String blogId, final int page, int num) {117 //更新当前页数118 currentPage = page;119 StringRequest request = new StringRequest(Request.Method.GET, "http://wcf.open.cnblogs.com/blog/post/" + blogId + "/comments/" + page + "/" + num, new Response.Listener<String>() {120 @Override121 public void onResponse(String s) {122 try {123 //获取评论数据数据并解析XML124 ByteArrayInputStream inputStream = new ByteArrayInputStream(s.getBytes());125 List<Comment> comments = BlogCommentXmlParser.getBlogComment(inputStream, "utf-8");126 if (page == 1) {127 //清空之前的数据预防重复加载128 mComments.clear();129 }130 for (Comment comment : comments) {131 //整理数据源132 mComments.add(comment);133 }134 135 if (mBlogCommentListAdapter == null) {136 //如果Adapter不存在137 mBlogCommentListAdapter = new BlogCommentListAdapter(BlogCommentActivity.this,mComments);138 mRecyclerView.setAdapter(mBlogCommentListAdapter);139 } else {140 //存在通知adatper数据源更新141 mBlogCommentListAdapter.refreshData(mComments);142 143 }144 //关闭下拉刷新样式145 mSwipeRefreshLayout.setRefreshing(false);146 isLoading = false;147 myProgressBar.setVisibility(View.GONE);148 mBaseAttacher.setLoadMoreEnabled(true);149 150 151 } catch (XmlPullParserException e) {152 e.printStackTrace();153 } catch (IOException e) {154 e.printStackTrace();155 }156 }157 }, new Response.ErrorListener() {158 @Override159 public void onErrorResponse(VolleyError volleyError) {160 161 }162 });163 VolleyRequestQueueManager.addRequest(request, "BlogCommentList");164 165 }166 167 private void initView() {168 mToolbar = (Toolbar) findViewById(R.id.activity_toolbar);169 mToolbar.setTitle("文章评论");170 setSupportActionBar(mToolbar);171 getSupportActionBar().setDisplayHomeAsUpEnabled(true);172 173 mSwipeRefreshLayout = (SwipeRefreshLayout) findViewById(R.id.swipe_refresh);174 //设置拉下刷新滚动条颜色175 mSwipeRefreshLayout.setColorSchemeResources(android.R.color.holo_blue_light, android.R.color.holo_red_light, android.R.color.holo_orange_light, android.R.color.holo_green_light);176 mRecyclerView = (RecyclerView) findViewById(R.id.rv_view);177 mRecyclerView.setLayoutManager(new LinearLayoutManager(this));178 mRecyclerView.setItemAnimator(new DefaultItemAnimator());179 myProgressBar = (MyProgressBar)findViewById(R.id.progressbar);180 181 182 }183 184 185 }
适配器代码:
1 package com.lcw.rabbit.myblog.adapter; 2 3 import android.content.Context; 4 import android.content.res.Resources; 5 import android.graphics.Bitmap; 6 import android.graphics.BitmapFactory; 7 import android.support.v7.widget.RecyclerView; 8 import android.text.Html; 9 import android.view.LayoutInflater; 10 import android.view.View; 11 import android.view.ViewGroup; 12 import android.widget.TextView; 13 14 import com.lcw.rabbit.myblog.R; 15 import com.lcw.rabbit.myblog.entity.Comment; 16 import com.lcw.rabbit.myblog.utils.TimeUtil; 17 import com.makeramen.roundedimageview.RoundedImageView; 18 19 import java.util.List; 20 21 /** 22 * 推荐博文评论列表适配器 23 * Created by Lichenwei 24 * Date: 2015-08-16 25 * Time: 22:34 26 */ 27 public class BlogCommentListAdapter extends RecyclerView.Adapter<BlogCommentListAdapter.RecyclerViewViewHolder> { 28 29 private Context mContext; 30 private List<Comment> mComments; 31 32 public BlogCommentListAdapter(Context context, List<Comment> comments) { 33 this.mContext = context; 34 this.mComments = comments; 35 } 36 37 /** 38 * 设置新的数据源,提醒adatper更新 39 * 40 * @param comments 41 */ 42 public void refreshData(List<Comment> comments) { 43 this.mComments = comments; 44 this.notifyDataSetChanged(); 45 } 46 47 /** 48 * 创建ViewHolder 49 * 50 * @param viewGroup 51 * @param i 52 * @return 53 */ 54 @Override 55 public RecyclerViewViewHolder onCreateViewHolder(ViewGroup viewGroup, int i) { 56 View view = LayoutInflater.from(viewGroup.getContext()).inflate(R.layout.recyclerview_item_blogcommentlist, viewGroup, false); 57 return new RecyclerViewViewHolder(view); 58 } 59 60 /** 61 * 根据资源ID返回Bitmap对象 62 * 63 * @param resId 64 * @return 65 */ 66 public Bitmap getBitmapFromRes(int resId) { 67 Resources res = mContext.getResources(); 68 return BitmapFactory.decodeResource(res, resId); 69 70 } 71 72 /** 73 * 绑定数据 74 * 75 * @param viewholder 76 * @param i 77 */ 78 @Override 79 public void onBindViewHolder(RecyclerViewViewHolder viewholder, int i) { 80 //设置头像 81 // if (mAuthors.get(i).getAuthorPic() != null && !"".equals(mAuthors.get(i).getAuthorPic())) { 82 // ImageCacheManager.loadImage(mAuthors.get(i).getAuthorPic(), viewholder.mUserhead, getBitmapFromRes(R.mipmap.avatar_default), getBitmapFromRes(R.mipmap.avatar_default)); 83 // } else { 84 // viewholder.mUserhead.setImageResource(R.mipmap.avatar_default); 85 // } 86 viewholder.mName.setText(mComments.get(i).getAuthorName()); 87 //处理评论内容里的Html代码 88 viewholder.mContent.setText(Html.fromHtml(mComments.get(i).getCommentContent())); 89 //处理日期特殊格式 90 viewholder.mTime.setText(TimeUtil.DateToChineseString(TimeUtil.ParseUTCDate(mComments.get(i).getCommentTime()))); 91 } 92 93 @Override 94 public int getItemCount() { 95 return mComments.size(); 96 } 97 98 /** 99 * 自定义ViewHolder100 */101 public static class RecyclerViewViewHolder extends RecyclerView.ViewHolder {102 private RoundedImageView mUserhead;103 private TextView mName;104 private TextView mContent;105 private TextView mTime;106 107 public RecyclerViewViewHolder(View view) {108 super(view);109 mUserhead = (RoundedImageView) view.findViewById(R.id.iv_userhead);110 mName = (TextView) view.findViewById(R.id.tv_name);111 mContent = (TextView) view.findViewById(R.id.tv_comment);112 mTime = (TextView) view.findViewById(R.id.tv_time);113 114 }115 116 117 }118 }
获取博文详情XML解析:
1 package com.lcw.rabbit.myblog.parser; 2 3 import com.lcw.rabbit.myblog.entity.Comment; 4 5 import org.xmlpull.v1.XmlPullParser; 6 import org.xmlpull.v1.XmlPullParserException; 7 import org.xmlpull.v1.XmlPullParserFactory; 8 9 import java.io.IOException;10 import java.io.InputStream;11 import java.util.ArrayList;12 import java.util.List;13 14 /**15 * 对博文评论页xml数据的解析16 * Created by Lichenwei17 * Date: 2015-08-1718 * Time: 13:3219 */20 public class BlogCommentXmlParser {21 22 23 /**24 * 用于解析博文评论详情的xml,返回Avatar的List集合对象25 *26 * @param inputStream27 * @param encode28 * @return29 * @throws XmlPullParserException30 * @throws IOException31 */32 public static List<Comment> getBlogComment(InputStream inputStream, String encode) throws XmlPullParserException, IOException {33 List<Comment> mComments = null;34 Comment mComment = null;35 36 //获取XmlPullParser实例37 XmlPullParserFactory factory = XmlPullParserFactory.newInstance();38 XmlPullParser parser = factory.newPullParser();39 parser.setInput(inputStream, encode);40 //获取解析事件41 int eventType = parser.getEventType();42 //当xml文档未到尾端时43 while (eventType != XmlPullParser.END_DOCUMENT) {44 switch (eventType) {45 //解析根标签的时候,实例化集合46 case XmlPullParser.START_DOCUMENT:47 mComments = new ArrayList<Comment>();48 mComment = new Comment();49 break;50 case XmlPullParser.START_TAG:51 //当解析到entry标签的时候,实例化Blog对象52 if ("entry".equals(parser.getName())) {53 mComment = new Comment();54 }55 if ("id".equals(parser.getName())) {56 parser.next();57 mComment.setCommentId(parser.getText());58 } else if ("published".equals(parser.getName())) {59 parser.next();60 mComment.setCommentTime(parser.getText());61 } else if ("name".equals(parser.getName())) {62 parser.next();63 mComment.setAuthorName(parser.getText());64 } else if ("uri".equals(parser.getName())) {65 parser.next();66 mComment.setAuthorUrl(parser.getText());67 } else if ("content".equals(parser.getName())) {68 parser.next();69 mComment.setCommentContent(parser.getText());70 }71 break;72 case XmlPullParser.END_TAG:73 //当解析到entry标签结束的时候添加入Blogs集合,清空Blog对象74 if ("entry".equals(parser.getName())) {75 mComments.add(mComment);76 mComment = null;77 }78 break;79 80 }81 //手动跳转第一次遍历82 eventType = parser.next();83 }84 85 return mComments;86 87 }88 }
好了,今天先写到这里,改天继续更新,有什么建议或疑问,可以在文章评论给我留言。
作者:李晨玮
出处:http://www.cnblogs.com/lichenwei/
本文版权归作者和博客园共有,欢迎转载,但未经作者同意必须保留此段声明,且在文章页面明显位置给出原文链接。
正在看本人博客的这位童鞋,我看你气度不凡,谈吐间隐隐有王者之气,日后必有一番作为!旁边有“推荐”二字,你就顺手把它点了吧,相得准,我分文不收;相不准,你也好回来找我!
- 3楼smallsunshine
- 持续关注 安卓开发笔记系列。
- 2楼路上的脚印
- 期待最终的成品
- Re: 李晨玮
- @路上的脚印,哈哈,慢慢做,一个项目做起来还有很多细节的地方需要处理,谢谢支持!
- 1楼chuiyuan
- good