近期做项目需要添加上传短视频功能,功能设置为类似于微信,点击开始拍摄,设置最长拍摄时间,经过研究最终实现了这个功能,下面就和大家分享一下,希望对你有帮助。
1.视频录制自定义控件:
/** * 视频播放控件 */public class MovieRecorderView extends LinearLayout implements OnErrorListener { private SurfaceView mSurfaceView; private SurfaceHolder mSurfaceHolder; private ProgressBar mProgressBar; private MediaRecorder mMediaRecorder; private Camera mCamera; private Timer mTimer;// 计时器 private OnRecordFinishListener mOnRecordFinishListener;// 录制完成回调接口 private int mWidth;// 视频分辨率宽度 private int mHeight;// 视频分辨率高度 private boolean isOpenCamera;// 是否一开始就打开摄像头 private int mRecordMaxTime;// 一次拍摄最长时间 private int mTimeCount;// 时间计数 private File mVecordFile = null;// 文件 public MovieRecorderView(Context context) { this(context, null); } public MovieRecorderView(Context context, AttributeSet attrs) { this(context, attrs, 0); } @SuppressLint("NewApi") public MovieRecorderView(Context context, AttributeSet attrs, int defStyle) { super(context, attrs, defStyle); TypedArray a = context.obtainStyledAttributes(attrs, R.styleable.MovieRecorderView, defStyle, 0); mWidth = a.getInteger(R.styleable.MovieRecorderView_width, 320);// 默认320 mHeight = a.getInteger(R.styleable.MovieRecorderView_height, 240);// 默认240 isOpenCamera = a.getBoolean( R.styleable.MovieRecorderView_is_open_camera, true);// 默认打开 mRecordMaxTime = a.getInteger( R.styleable.MovieRecorderView_record_max_time, 10);// 默认为10 LayoutInflater.from(context) .inflate(R.layout.movie_recorder_view, this); mSurfaceView = (SurfaceView) findViewById(R.id.surfaceview); mProgressBar = (ProgressBar) findViewById(R.id.progressBar); mProgressBar.setMax(mRecordMaxTime);// 设置进度条最大量 mSurfaceHolder = mSurfaceView.getHolder(); mSurfaceHolder.addCallback(new CustomCallBack()); mSurfaceHolder.setType(SurfaceHolder.SURFACE_TYPE_PUSH_BUFFERS); a.recycle(); } /** * */ private class CustomCallBack implements Callback { @Override public void surfaceCreated(SurfaceHolder holder) { if (!isOpenCamera) return; try { initCamera(); } catch (IOException e) { e.printStackTrace(); } } @Override public void surfaceChanged(SurfaceHolder holder, int format, int width, int height) { } @Override public void surfaceDestroyed(SurfaceHolder holder) { if (!isOpenCamera) return; freeCameraResource(); } } /** * 初始化摄像头 */ private void initCamera() throws IOException { if (mCamera != null) { freeCameraResource(); } try { mCamera = Camera.open(); } catch (Exception e) { e.printStackTrace(); freeCameraResource(); } if (mCamera == null) return; setCameraParams(); mCamera.setDisplayOrientation(90); mCamera.setPreviewDisplay(mSurfaceHolder); mCamera.startPreview(); mCamera.unlock(); } /** * 设置摄像头为竖屏 */ private void setCameraParams() { if (mCamera != null) { Parameters params = mCamera.getParameters(); params.set("orientation", "portrait"); mCamera.setParameters(params); } } /** * 释放摄像头资源 */ private void freeCameraResource() { if (mCamera != null) { mCamera.setPreviewCallback(null); mCamera.stopPreview(); mCamera.lock(); mCamera.release(); mCamera = null; } } private void createRecordDir() { //录制的视频保存文件夹 File sampleDir = new File(Environment.getExternalStorageDirectory() + File.separator + "ysb/video/");//录制视频的保存地址 if (!sampleDir.exists()) { sampleDir.mkdirs(); } File vecordDir = sampleDir; // 创建文件 try { mVecordFile = File.createTempFile("recording", ".mp4", vecordDir);// mp4格式的录制的视频文件 } catch (IOException e) { e.printStackTrace(); } } /** * 初始化 * @throws IOException */ @SuppressLint("NewApi") private void initRecord() throws IOException { mMediaRecorder = new MediaRecorder(); mMediaRecorder.reset(); if (mCamera != null) mMediaRecorder.setCamera(mCamera); mMediaRecorder.setOnErrorListener(this); mMediaRecorder.setPreviewDisplay(mSurfaceHolder.getSurface()); mMediaRecorder.setVideoSource(VideoSource.CAMERA);// 视频源 mMediaRecorder.setAudioSource(AudioSource.MIC);// 音频源 mMediaRecorder.setOutputFormat(OutputFormat.MPEG_4);// 视频输出格式 mMediaRecorder.setAudioEncoder(AudioEncoder.AMR_NB);// 音频格式 mMediaRecorder.setVideoSize(mWidth, mHeight);// 设置分辨率: // mMediaRecorder.setVideoFrameRate(16);// 这个我把它去掉了,感觉没什么用 mMediaRecorder.setVideoEncodingBitRate(1 * 1024 * 1024 * 100);// 设置帧频率,然后就清晰了 mMediaRecorder.setOrientationHint(90);// 输出旋转90度,保持竖屏录制 mMediaRecorder.setVideoEncoder(VideoEncoder.MPEG_4_SP);// 视频录制格式 // mediaRecorder.setMaxDuration(Constant.MAXVEDIOTIME * 1000); mMediaRecorder.setOutputFile(mVecordFile.getAbsolutePath()); mMediaRecorder.prepare(); try { mMediaRecorder.start(); } catch (IllegalStateException e) { e.printStackTrace(); } catch (RuntimeException e) { e.printStackTrace(); } catch (Exception e) { e.printStackTrace(); } } /** * 开始录制视频 * @param fileName * 视频储存位置 * @param onRecordFinishListener * 达到指定时间之后回调接口 */ public void record(final OnRecordFinishListener onRecordFinishListener) { this.mOnRecordFinishListener = onRecordFinishListener; createRecordDir(); try { if (!isOpenCamera)// 如果未打开摄像头,则打开 initCamera(); initRecord(); mTimeCount = 0;// 时间计数器重新赋值 mTimer = new Timer(); mTimer.schedule(new TimerTask() { @Override public void run() { mTimeCount++; mProgressBar.setProgress(mTimeCount);// 设置进度条 if (mTimeCount == mRecordMaxTime) {// 达到指定时间,停止拍摄 stop(); if (mOnRecordFinishListener != null) mOnRecordFinishListener.onRecordFinish(); } } }, 0, 1000); } catch (IOException e) { e.printStackTrace(); } } /** * 停止拍摄 */ public void stop() { stopRecord(); releaseRecord(); freeCameraResource(); } /** * 停止录制 */ public void stopRecord() { mProgressBar.setProgress(0); if (mTimer != null) mTimer.cancel(); if (mMediaRecorder != null) { // 设置后不会崩 mMediaRecorder.setOnErrorListener(null); mMediaRecorder.setPreviewDisplay(null); try { mMediaRecorder.stop(); } catch (IllegalStateException e) { e.printStackTrace(); } catch (RuntimeException e) { e.printStackTrace(); } catch (Exception e) { e.printStackTrace(); } } } /** * 释放资源 */ private void releaseRecord() { if (mMediaRecorder != null) { mMediaRecorder.setOnErrorListener(null); try { mMediaRecorder.release(); } catch (IllegalStateException e) { e.printStackTrace(); } catch (Exception e) { e.printStackTrace(); } } mMediaRecorder = null; } public int getTimeCount() { return mTimeCount; } //返回录制的视频文件 public File getmVecordFile() { return mVecordFile; } /** * 录制完成回调接口 */ public interface OnRecordFinishListener { public void onRecordFinish(); } @Override public void onError(MediaRecorder mr, int what, int extra) { try { if (mr != null) mr.reset(); } catch (IllegalStateException e) { e.printStackTrace(); } catch (Exception e) { e.printStackTrace(); } }}
2.视频录制界面文件movie_recorder_view.xml:
<?xml version="1.0" encoding="utf-8"?><LinearLayout xmlns:android="http://schemas.android.com/apk/res/android" xmlns:tools="http://schemas.android.com/tools" android:layout_width="match_parent" android:layout_height="match_parent" android:background="@android:color/background_dark" android:orientation="vertical"> <SurfaceView android:id="@+id/surfaceview" android:layout_width="fill_parent" android:layout_height="0dp" android:layout_weight="1" /> <ProgressBar android:id="@+id/progressBar" style="?android:attr/progressBarStyleHorizontal" android:layout_width="match_parent" android:layout_height="2dp" /> </LinearLayout>
做好这些准备工作,下面我们就可以开始设计我们的视频录制功能了。PS:以上代码取至网上,在此向大牛致敬。
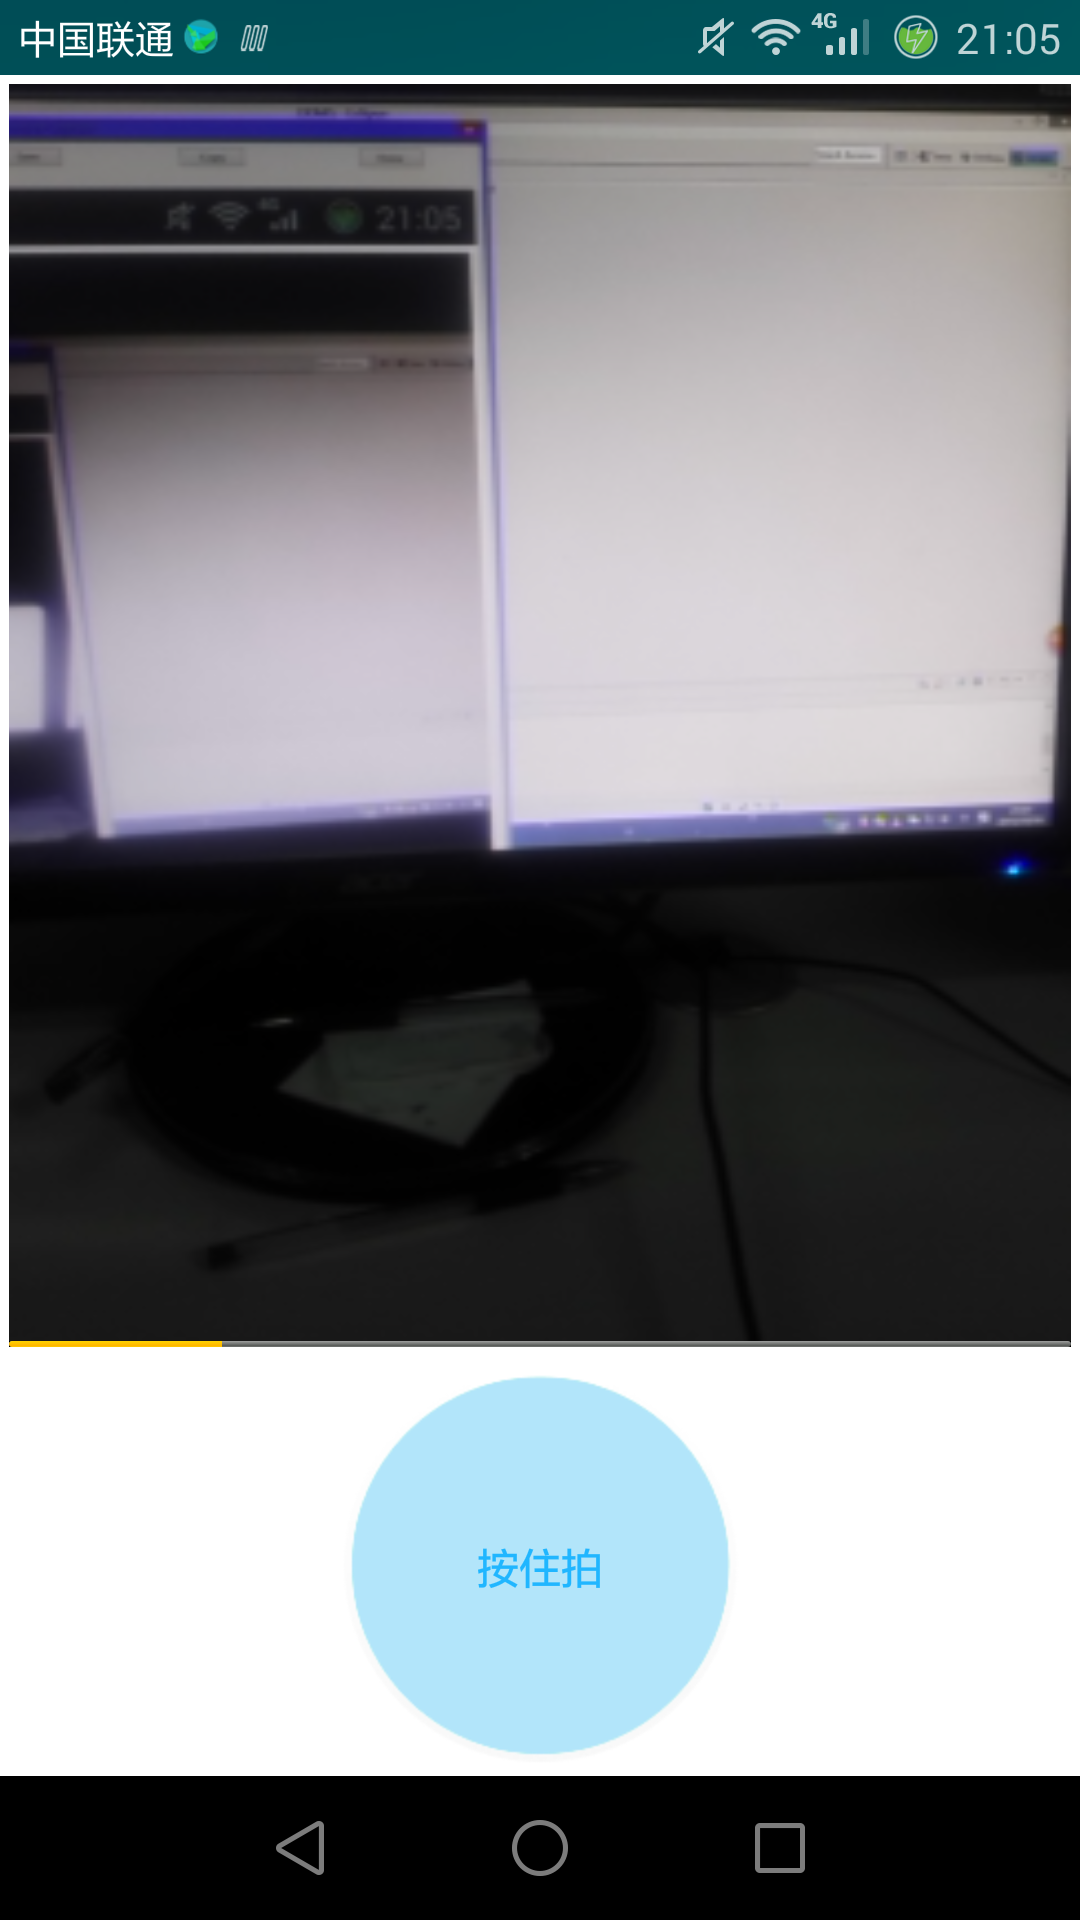
3.拍摄主界面,拍摄界面有两部分组成,上面是视频拍摄控件显示,下面是用户点击拍摄按钮,配置文件:activity_main.xml。
<?xml version="1.0" encoding="utf-8"?><LinearLayout xmlns:android="http://schemas.android.com/apk/res/android" xmlns:tools="http://schemas.android.com/tools" android:layout_width="match_parent" android:layout_height="match_parent" android:background="@android:color/white" android:orientation="vertical"> <com.example.wechatvideorecorddemo.MovieRecorderView android:id="@+id/movieRecorderView" android:layout_width="match_parent" android:layout_height="0dp" android:layout_weight="1" android:layout_margin="3dp" /> <Button android:id="@+id/shoot_button" android:layout_width="wrap_content" android:layout_height="wrap_content" android:layout_gravity="center" android:background="@drawable/bg_movie_add_shoot" android:text="按住拍" android:textColor="#20b6ff"/></LinearLayout>
4.有了主界面的视图,下面我们就开始书写我们的Activity文件MainActivity.java:
public class MainActivity extends Activity { private MovieRecorderView mRecorderView;//视频录制控件 private Button mShootBtn;//视频开始录制按钮 private boolean isFinish = true; private boolean success = false;//防止录制完成后出现多次跳转事件 @Override protected void onCreate(Bundle savedInstanceState) { super.onCreate(savedInstanceState); setContentView(R.layout.activity_main); mRecorderView = (MovieRecorderView) findViewById(R.id.movieRecorderView); mShootBtn = (Button) findViewById(R.id.shoot_button); //用户长按事件监听 mShootBtn.setOnTouchListener(new OnTouchListener() { @Override public boolean onTouch(View v, MotionEvent event) { if (event.getAction() == MotionEvent.ACTION_DOWN) {//用户按下拍摄按钮 mShootBtn.setBackgroundResource(R.drawable.bg_movie_add_shoot_select); mRecorderView.record(new OnRecordFinishListener() { @Override public void onRecordFinish() { if(!success&&mRecorderView.getTimeCount()<10){//判断用户按下时间是否大于10秒 success = true; handler.sendEmptyMessage(1); } } }); } else if (event.getAction() == MotionEvent.ACTION_UP) {//用户抬起拍摄按钮 mShootBtn.setBackgroundResource(R.drawable.bg_movie_add_shoot); if (mRecorderView.getTimeCount() > 3){//判断用户按下时间是否大于3秒 if(!success){ success = true; handler.sendEmptyMessage(1); } } else { success = false; if (mRecorderView.getmVecordFile() != null) mRecorderView.getmVecordFile().delete();//删除录制的过短视频 mRecorderView.stop();//停止录制 Toast.makeText(MainActivity.this, "视频录制时间太短", Toast.LENGTH_SHORT).show(); } } return true; } }); } @Override public void onResume() { super.onResume(); isFinish = true; if (mRecorderView.getmVecordFile() != null) mRecorderView.getmVecordFile().delete();//视频使用后删除 } @Override public void onSaveInstanceState(Bundle outState) { super.onSaveInstanceState(outState); isFinish = false; success = false; mRecorderView.stop();//停止录制 } @Override public void onPause() { super.onPause(); } @Override public void onDestroy() { super.onDestroy(); } private Handler handler = new Handler() { @Override public void handleMessage(Message msg) { if(success){ finishActivity(); } } }; //视频录制结束后,跳转的函数 private void finishActivity() { if (isFinish) { mRecorderView.stop(); Intent intent = new Intent(this, SuccessActivity.class); Bundle bundle = new Bundle(); bundle.putString("text", mRecorderView.getmVecordFile().toString()); intent.putExtras(bundle); startActivity(intent); } success = false; } /** * 录制完成回调 */ public interface OnShootCompletionListener { public void OnShootSuccess(String path, int second); public void OnShootFailure(); }}
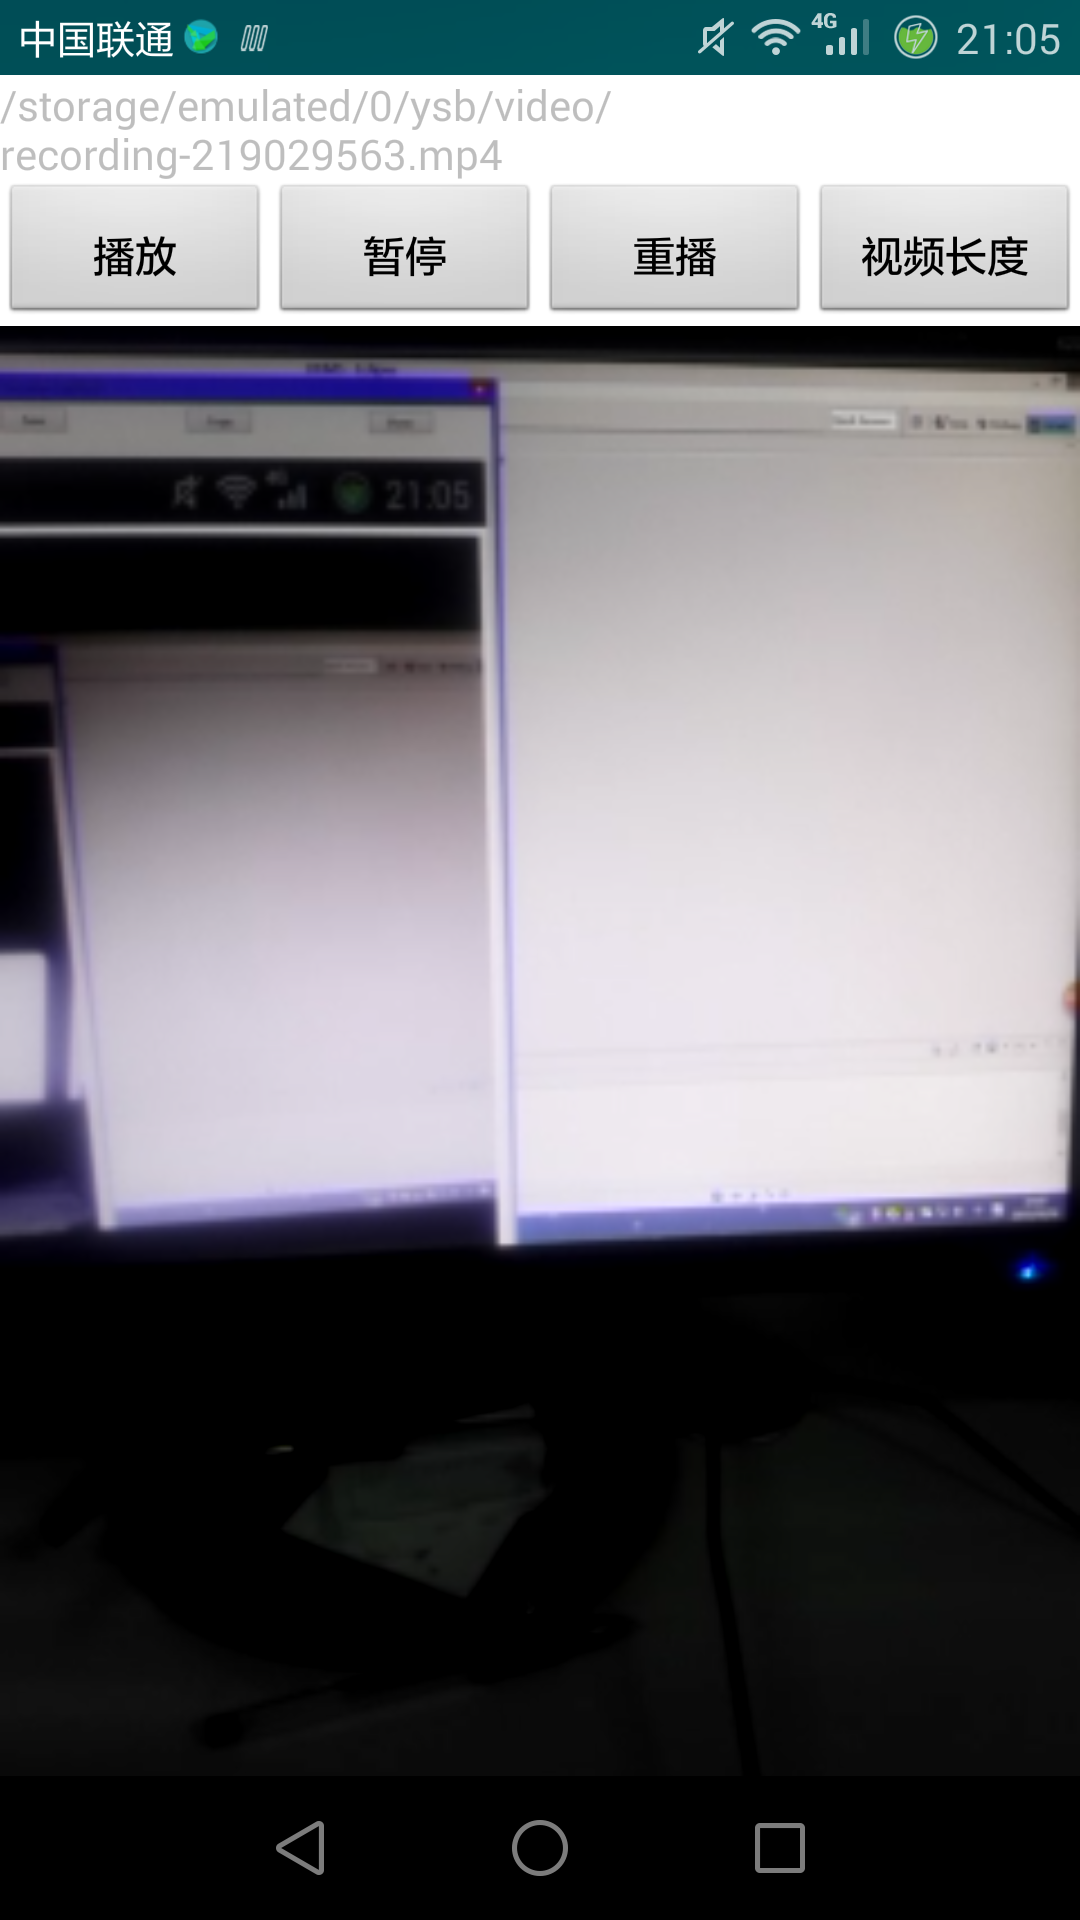
到这里我们仿微信的短视频拍摄就已经大功告成,那么下面我们检验一下,我们录制的效果如何,下面我以Android提供的视频播放控件(VideoView)为大家介绍一下如何播放录制的短视频。
5.播放视频的配置文件activity_success.xml:
<?xml version="1.0" encoding="utf-8"?><LinearLayout xmlns:android="http://schemas.android.com/apk/res/android" xmlns:tools="http://schemas.android.com/tools" android:layout_width="match_parent" android:layout_height="match_parent" android:background="@android:color/white" android:orientation="vertical"> <TextView android:id="@+id/text" android:layout_width="wrap_content" android:layout_height="wrap_content" android:layout_gravity="center" android:text="@string/app_name" /> <LinearLayout android:layout_width="match_parent" android:layout_height="wrap_content" android:orientation="horizontal" > <Button android:id="@+id/button1" android:layout_width="match_parent" android:layout_height="wrap_content" android:layout_weight="1" android:gravity="center" android:padding="5dp" android:text="播放" /> <Button android:id="@+id/button2" android:layout_width="match_parent" android:layout_height="wrap_content" android:layout_weight="1" android:gravity="center" android:padding="5dp" android:text="暂停" /> <Button android:id="@+id/button3" android:layout_width="match_parent" android:layout_height="wrap_content" android:layout_weight="1" android:gravity="center" android:padding="5dp" android:text="重播" /> <Button android:id="@+id/button4" android:layout_width="match_parent" android:layout_height="wrap_content" android:layout_weight="1" android:gravity="center" android:padding="5dp" android:text="视频长度" /> </LinearLayout> <VideoView android:id="@+id/videoView1" android:layout_width="wrap_content" android:layout_height="500dp" /></LinearLayout>
6.视频播放的控制代码SuccessActivity.java:
public class SuccessActivity extends Activity implements OnClickListener{ private TextView text;//视频保存的路径 private Button button1;//播放开关 private Button button2;//暂停开关 private Button button3;//重新播放开关 private Button button4;//视频大小开关 private VideoView videoView1;//视频播放控件 private String file;//视频路径 @Override protected void onCreate(Bundle savedInstanceState) { super.onCreate(savedInstanceState); setContentView(R.layout.activity_success); Bundle bundle = getIntent().getExtras(); file = bundle.getString("text");//获得拍摄的短视频保存地址 init(); setValue(); } //初始化 private void init() { text = (TextView) findViewById(R.id.text); button1 = (Button) findViewById(R.id.button1); button2 = (Button) findViewById(R.id.button2); button3 = (Button) findViewById(R.id.button3); button4 = (Button) findViewById(R.id.button4); videoView1 = (VideoView) findViewById(R.id.videoView1); } //设置 private void setValue() { text.setText(file); button1.setOnClickListener(this); button2.setOnClickListener(this); button3.setOnClickListener(this); button4.setOnClickListener(this); videoView1.setVideoPath(file); } @Override public void onClick(View v) { switch (v.getId()) { case R.id.button1: videoView1.start(); break; case R.id.button2: videoView1.pause(); break; case R.id.button3: videoView1.resume(); videoView1.start(); break; case R.id.button4: Toast.makeText(this, "视频长度:"+(videoView1.getDuration()/1024)+"M", Toast.LENGTH_SHORT).show(); break; default: break; } } }
功能界面截图:
好了,到这里关于拍摄短视频的知识就和大家分享完毕,具体的实现很简单,相信大家看到这里已经已经学会了,当然如果你还有什么疑问,可以留言讨论。最后给大家分享一个demo的下载地址,方便大家下载学习,下载地址:http://pan.baidu.com/s/1hqts0pm
- 2楼小破孩123
- 手机型号?
- 1楼LetMeCarryU
- 有bug,在我手机上几本不能用