������Ʒ,ԭ�ķ�����
http://tech.it168.com/a2011/0411/1176/000001176645_all.shtml
�ڵ���������վ�Ľ����У����ﳵ��������Dz���ȱ�ٵġ�����д���ﳵ�ķ���Ҳ�Ƕ��ֶ������еļ��еĸ��ӣ����ڱ����У���������ʹ��PHP,JQuery��CSS��AJAX������ȥ���һ������ʽ�Ĺ��ﳵ��������ﳵ��Ч���ȽϿᣬ����ѡ���Ҫ�������Ʒ��ֱ�������������һ����������ͼ����ȥ�������һ�ι���Ĺ��̣����ڳ��й���Ĺ����е������Ľ�ʹ��MySQL���ݿ⣬�����õ���jQuery�е�һ���ܺ��õIJ��simpletip(��ַ��http://craigsworks.com/projects/simpletip/)�����������������ϸ���÷���
����1������Mysql���ݿ�
�������ȣ�Ϊ���ǵĹ��ﳵӦ�ý������µ�mysql���ݿ��ļ�������������ṹ��������һЩ�������ݣ�
CREATE TABLE IF NOT EXISTS `internet_shop` (
`id` int(6) NOT NULL auto_increment,
`img` varchar(32) collate utf8_unicode_ci NOT NULL default '',
`name` varchar(64) collate utf8_unicode_ci NOT NULL default '',
`description` text collate utf8_unicode_ci NOT NULL,
`price` double NOT NULL default '0',
PRIMARY KEY (`id`),
UNIQUE KEY `img` (`img`)
) ENGINE=MyISAM DEFAULT CHARSET=utf8 COLLATE=utf8_unicode_ci AUTO_INCREMENT=7 ;
INSERT INTO `internet_shop` VALUES(1, 'iPod.png', 'iPod', 'The original and popular iPod.', 200);
INSERT INTO `internet_shop` VALUES(2, 'iMac.png', 'iMac', 'The iMac computer.', 1200);
INSERT INTO `internet_shop` VALUES(3, 'iPhone.png', 'iPhone', 'This is the new iPhone.', 400);
INSERT INTO `internet_shop` VALUES(4, 'iPod-Shuffle.png', 'iPod Shuffle', 'The new iPod shuffle.', 49);
INSERT INTO `internet_shop` VALUES(5, 'iPod-Nano.png', 'iPod Nano', 'The new iPod Nano.', 99);
INSERT INTO `internet_shop` VALUES(6, 'Apple-TV.png', 'Apple TV', 'The new Apple TV. Buy it now!', 300);
������������ֻ�Ǽ��������Ʒ�����Ա������а�������Ʒ��ͼƬ�����ƣ��۸����������ʵ�ʵ�Ӧ���У����ܻ���Ƹ����ӵ���Ʒ���ԡ�
��������2�����ҳ��ṹ
���������������ǿ�ʼ������ǵ�ҳ��ṹ��HTML�������£�
<div id="main-container"> <!�D��DIV -->
<div class="tutorialzine"> <!�D���� -->
<h1>Shopping cart</h1>
<h3>The best products at the best prices</h3>
</div>
<div class="container"> <!�D��ʾ��Ʒ����-->
<span class="top-label">
<span class="label-txt">Products</span> <!�D��ʾProducts�ı���div -->
</span>
<div class="content-area">
<div class="content drag-desired">
<?php
// ���ﶯ̬�����ݿ��ж�ȡ��Ʒ
?>
<div class="clear"></div> <!�D�������ڵ��û�����ƶ����ò�Ʒʱ����ʾ�ò�Ʒ�ļ��->
</div>
</div>
<div class="bottom-container-border"> <!�D����ײ���Բ������-->
</div>
</div>
<div class="container"> <!�D���ﳵ��div��>
<span class="top-label">
<span class="label-txt">Shopping Cart</span>
</span>
<div class="content-area">
<div class="content drop-here"> <!�D������Ϊ�ɽ����û�������Ʒ�����ﳵ������ -->
<div id="cart-icon">
<img src="img/Shoppingcart_128x128.png" alt="shopping cart" class="pngfix" width="128" height="128" />
<!--һ�����صȴ���ͼ��-->
<img src="img/ajax_load_2.gif" alt="loading.." id="ajax-loader" width="16" height="16" />
</div>
<!�D�������?
<form name="checkoutForm" method="post" action="order.php">
<div id="item-list"> <!�D�����嵥�б� -->
</div>
</form>
<div class="clear"></div>
<div id="total"></div> <!�D��Ʒ�ܼ� -->
<div class="clear"></div> <!-- clearing the floats -->
<!--���ʵİ�ť?
<a href="" onclick="document.forms.checkoutForm.submit(); return false;" class="button">Checkout</a>
</div>
</div>
<div class="bottom-container-border"> <!--������ĵײ�-->
</div>
</div>
���������ҳ���У����ϰ벿�֣�������һ��div�㣬������ʾ������Ʒ��������ҳ���°벿�֣�����������һ�����ڽ����û���ק��Ʒ�����ﳵ�IJ㣬ֻҪ�û�����Ʒ��ק��������е���������(��������ק�����ﳵ��)��������Ϊ���û�����Ʒ�ŵ��˹��ﳵ�С�
��������3�����CSS
������CSS����������Ϊdemo.css���������£�
body,h1,h2,h3,p,td,quote,small,form,input,ul,li,ol,label{...}{
/**//* ΪijЩ����������Զ���� */
margin:0px;
padding:0px;
font-family:Arial, Helvetica, sans-serif;
}
body{...}{
color:#555555;
font-size:13px;
background-color:#282828;
}
.clear{...}{
clear:both;
}
#main-container{...}{ /**//* ҳ��������Ŀ��Ⱥͱ߾�����*/
width:700px;
margin:20px auto;
}
.container{...}{ /**//* ��Ʒ�б�����ﳵ�����div���� */
margin-bottom:40px;
}
.top-label{...}{ /**//* ����ҳ���ϲ�products����ʽ*/
background:url(img/label_bg.png) no-repeat;
display:inline-block;
margin-left:20px;
position:relative;
margin-bottom:-15px;
}
.label-txt{...}{
background:url(img/label_bg.png) no-repeat top right;
display:inline-block;
font-size:10px;
height:36px;
margin-left:10px;
padding:12px 15px 0 5px;
text-transform:uppercase;
}
.content-area{...}{ /**//* content-area�������ʽ */
background:url(img/container_top.png) no-repeat #fcfcfc;
padding:15px 20px 0 20px;
}
.content{...}{
padding:10px;
}
.drag-desired{...}{ /**//* ��Ʒ�б��������ʽ*/
background:url(img/drag_desired_label.png) no-repeat top right;
padding:30px;
}
.drop-here{...}{ /**//*���ﳵ�������ʽ */
background:url(img/drop_here_label.png) no-repeat top right;
}
.bottom-container-border{...}{
background:url(img/container_bottom.png) no-repeat;
height:14px;
}
.product{...}{ /**//* ��Ʒ����ʽ */
border:2px solid #F5F5F5;
float:left;
margin:15px;
padding:10px;
}
.product img{...}{
cursor:move;
}
p.descr{...}{
padding:5px 0;
}
small{...}{
display:block;
margin-top:4px;
}
.tooltip{...}{ /**//* ��Ʒ�ļ����õ�����ʽ�������ʽjQuery ��simpletip plugin������õ� */
position: absolute;
top: 0;
left: 0;
z-index: 3;
display: none;
background-color:#666666;
border:1px solid #666666;
color:#fcfcfc;
padding:10px;
-moz-border-radius:12px; /**//* Բ��Ч��*/
-khtml-border-radius: 12px;
-webkit-border-radius: 12px;
border-radius:12px;
}
�������ϵ���ʽ�и����˹ؼ����ֵ�ע�ͣ�����ע�����ʹ����CSS3�е�Բ��Ч����ʽborder-radius,�������ٿ�ʣ���������ʽ���֣�
#cart-icon{...}{ /**//* ����������ʽ */
width:128px;
float:left;
position:relative;
}
#ajax-loader{...}{
position:absolute; /**//* ���ǵȴ����ص�ͼ�����ʽ*/
top:0px;
left:0px;
visibility:hidden;
}
#item-list{...}{ /**//* ���������ѷ��õ���Ʒ����ʽ*/
float:left;
width:490px;
margin-left:20px;
padding-top:15px;
}
a.remove,a.remove:visited{...}{ /**//* �Ƴ����ﳵ����Ʒ�����ӵ���ʽ */
color:red;
font-size:10px;
text-transform:uppercase;
}
#total{...}{ /**//* �ܼƵ���ʽ*/
clear:both;
float:right;
font-size:10px;
font-weight:bold;
padding:10px 12px;
text-transform:uppercase;
}
#item-list table{...}{
background-color:#F7F7F7;
border:1px solid #EFEFEF;
margin-top:5px;
padding:4px;
}
a.button,a.button:visited{...}{ /**//* ���㰴ť*/
display:none;
height:29px;
width:136px;
padding-top:15px;
margin:0 auto;
overflow:hidden;
color:white;
font-size:12px;
font-weight:bold;
text-align:center;
text-transform:uppercase;
background:url(img/button.png) no-repeat center top;
}
a.button:hover{...}{
background-position:bottom;
text-decoration:none;
}
����Ϊ�˼���IE 6������������ر��������µ�CSS��ʽ���룬����IE 6֧��PNG�±����������ԣ�
<!--[if lt IE 7]>
<style type="text/css">
.pngfix { behavior: url(pngfix/iepngfix.htc);}
.tooltip{width:200px;}; /*Ϊ��Ʒ�Ľ�������Ĭ�ϵĿ��� */
</style>
<![endif]-->
���������е�iepngfix.htc��blank.gif��ѹ�������ʵ�Ŀ¼�ڣ�.htc��Html Components�����ļ���Ҫ��CSS�б�����;blank.gif��һ��1��1���ص���GIFͼƬ��
����������ǵ�ҳ��Ч��������Ӧ���������ģ�
����4��PHP�������
�����������PHP���ֵĴ�����ƣ��������г����ݿ���е���Ʒ�������������ʾ��
Demo.php��
$result = mysql_query("SELECT * FROM internet_shop");
while($row=mysql_fetch_assoc($result))
{
echo '<div class="product"><img src="img/products/'.$row['img'].'" alt="'.htmlspecialchars($row['name']).'" width="128" height="128" class="pngfix" /></div>';
}
��������һ����Ҫ��дPHP����ĵط����ǵ��û�����ƶ���ij����Ʒ����ʱ��ͨ��jQuery��simpletips���������Ʒ��ͼƬ��Ϊ������ʹ��ajax��ʽ���ã���ø���Ʒ�Ľ��ܣ����ҷ���Ϊһ��HTML�ļ��ٸ�ǰ��ҳ����д��������ļ���ajaxĿ¼�µ�tips.php�ļ���������ʾ��
Ajax/tips.php
define('INCLUDE_CHECK',1);
require "../connect.php";
if(!$_POST['img']) die("There is no such product!");
$img=mysql_real_escape_string(end(explode('/',$_POST['img'])));
$row=mysql_fetch_assoc(mysql_query("SELECT * FROM internet_shop WHERE img='".$img."'"));
if(!$row) die("There is no such product!");
echo '<strong>'.$row['name'].'</strong>
<p class="descr">'.$row['description'].'</p>
<strong>price: $'.$row['price'].'</strong>
<small>Drag it to your shopping cart to purchase it</small>';
�������⣬���ǻ���Ҫ��дһ��addtocart.php�ļ�������ļ��������ǣ����û���ѡ������Ʒ���������ﳵʱ�����������ݿ��м�������Ʒ��Ȼ����JSON����ʽ���ظ�ǰ�ˣ��������£�
<?
define('INCLUDE_CHECK',1);
require "../connect.php";
if(!$_POST['img']) die("There is no such product!");
$img=mysql_real_escape_string(end(explode('/',$_POST['img'])));
$row=mysql_fetch_assoc(mysql_query("SELECT * FROM internet_shop WHERE img='".$img."'"));
echo '{status:1,id:'.$row['id'].',price:'.$row['price'].',txt:\'\
\
<table width="100%" id="table_'.$row['id'].'">\
<tr>\
<td width="60%">'.$row['name'].'</td>\
<td width="10%">$'.$row['price'].'</td>\
<td width="15%"><select name="'.$row['id'].'_cnt" id="'.$row['id'].'_cnt" onchange="change('.$row['id'].');">\
<option value="1">1</option>\
<option value="2">2</option>\
<option value="3">3</option></select>\
\
</td>\
<td width="15%"><a href="#" onclick="remove('.$row['id'].');return false;" class="remove">remove</a></td>\
</tr>\
</table>\'}';
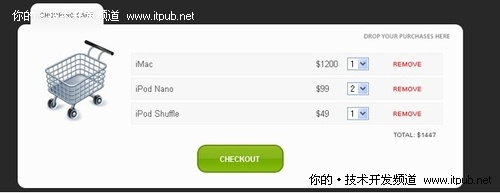
�������û�����Ʒ���������ﳵ�����ǰ��ҳ����Ա������ʽ��һ��ʾ���û���ѡ����Ʒ������ͼ��
������ǿ��µ��û�����ʰ�ť���ҳ��order.php�ı�д����������ֻ�Ǽ��û���ѡ��������г������ҽ�����Ʒ�۸�ϼƣ��������£�
<?php
define('INCLUDE_CHECK',1);
require "connect.php";
if(!$_POST) // ����Ƿ��������ύ
{
if($_SERVER['HTTP_REFERER'])
header('Location : '.$_SERVER['HTTP_REFERER']);
exit;
}
?>
<!-- XHTML code.. -->
<?php
$cnt = array();
$products = array();
foreach($_POST as $key=>$value)
{
$key=(int)str_replace('_cnt','',$key);
$products[]=$key; // ����Ʒ��ID��ŷŵ�����products��ȥ
$cnt[$key]=$value;
$result = mysql_query("SELECT * FROM internet_shop WHERE id IN(".join($products,',').")"); // selecting all the products with the IN() function
if(!mysql_num_rows($result)) // û�ҵ���ز�Ʒ
{
echo '<h1>There was an error with your order!</h1>';
}
else
{
echo '<h1>You ordered:</h1>';
while($row=mysql_fetch_assoc($result))
{
echo '<h2>'.$cnt[$row['id']].' x '.$row['name'].'</h2>';
//�����ܼ۸�
$total+=$cnt[$row['id']]*$row['price'];
}
echo '<h1>Total: $'.$total.'</h1>';
}
?>
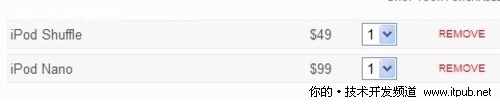
�������ʹ������products�������û�ѡ��õ���Ʒ���ƣ���cnt�������¼��ÿ����Ʒ����ļ��������ʵ��Ч�����£�

����5��jQuery�������
������������Ҫ������ص�jQuery�ļ������£�
<script type="text/javascript" src="http://ajax.googleapis.com/ajax/libs/jquery/1.3.2/jquery.min.js"></script>
<script type="text/javascript" src="http://ajax.googleapis.com/ajax/libs/jqueryui/1.7.2/jquery-ui.min.js"></script>
<script type="text/javascript" src="simpletip/jquery.simpletip-1.3.1.pack.js"></script> <!-- the jQuery simpletip plugin -->
<script type="text/javascript" src="script.js"></script>
����ͬʱ������Ҫ��д�Լ���script.js�ļ���������ļ��У�����ʹ����jQuery��toolstip�ؼ���
var purchased=new Array(); //������������û��������Ʒ
var totalprice=0; //��Ʒ�ܼ�
$(document).ready(function()...{
$('.product').simpletip(...{ //ʹ��simpletip�ؼ�
offset:[40,0],
content:'<img style="margin:10px;" src="img/ajax_load.gif" alt="loading" />',
onShow: function()...{
var param = this.getParent().find('img').attr('src');
// ��IE6������
if($.browser.msie && $.browser.version=='6.0')
...{
param = this.getParent().find('img').attr('style').match(/src=\"([^\"]+)\"/);
param = param[1];
}
// ͨ��ajax��ʽ����tips.php�ļ�
this.load('ajax/tips.php',...{img:param});
}
});
$(".product img").draggable(...{ // ����������ƷͼƬ����ק
containment: 'document',
opacity: 0.6,
revert: 'invalid',
helper: 'clone',
zIndex: 100
});
$("div.content.drop-here").droppable(...{ // ����Ʒ�����������ﳵ����ʱ����
drop:
function(e, ui)
...{
var param = $(ui.draggable).attr('src');
// ��IE 6�µ�����
if($.browser.msie && $.browser.version=='6.0')
...{
param = $(ui.draggable).attr('style').match(/src=\"([^\"]+)\"/);
param = param[1];
}
addlist(param); //����addlist����
}
});
});
��������addlist�����ı�д�����ж��ṩ����ϸ��ע�ͣ�
function addlist(param)
...{
$.ajax(...{ // ajax�������� addtocart.php
type: "POST",
url: "ajax/addtocart.php",
data: 'img='+encodeURIComponent(param), // the product image as a parameter
dataType: 'json', // JSON��ʽ����
//�ڵ���ǰ����ʾ���ص�Сͼ��
beforeSend: function(x)...{$('#ajax-loader').css('visibility','visible');},
//���óɹ�ʱ�Ļص�����
success: function(msg)...{
//���óɹ������صȴ����ص�Сͼ��
$('#ajax-loader').css('visibility','hidden'); // hiding the loading gif animation
//������
if(parseInt(msg.status)!=1)
...{
return false; }
else
...{
var check=false;
var cnt = false;
//���ij����Ʒ�Ƿ��Ѿ��ڹ��ﳵ�д�����
for(var i=0; i<purchased.length;i++)
...{
if(purchased[i].id==msg.id) ...{
check=true;
cnt=purchased[i].cnt;
break;
}
}
if(!cnt)
$('#item-list').append(msg.txt);
if(!check) //�������Ʒ���¹�����Ʒ�����ﳵ�в����ڣ���purchased������������ز�Ʒ
...{
purchased.push(...{id:msg.id,cnt:1,price:msg.price});
}
else // ������ﳵ���Ѿ��и���Ʒ������������
...{
// ��������ÿ����Ʒֻ����3������Ȼ��ҿ�����
if(cnt>=3) return false;
//���ӹ��ﳵ����ʾ������
purchased[i].cnt++;
//�������������������
$('#'+msg.id+'_cnt').val(purchased[i].cnt);
}
totalprice+=msg.price; // ���¼����ܼ۸�
update_total(); // ���ܼ۸�
}
$('.tooltip').hide(); // ������Ʒ�Ľ���
}
});
}
//���������࣬�ҳ���ǰ��Ʒ��purchased�����е�λ��
function findpos(id)
...{
for(var i=0; i<purchased.length;i++)
...{
if(purchased[i].id==id)
return i;
}
return false;
}
//����Ʒ�ӹ��ﳵ���Ƴ�
function remove(id)
...{
//�ҳ����������е�λ��
var i=findpos(id);
totalprice-=purchased[i].price*purchased[i].cnt; //�����ܼ۸�
purchased[i].cnt = 0; // reset the counter����purchased�����У�����Ʒ������Ϊ0
$('#table_'+id).remove(); //�ڹ��ﳵ�б���ɾ������Ŀ
update_total();
}
//���û���ÿ����Ʒ�������ı�����ʱ�����÷���
function change(id)
...{
var i=findpos(id);
//�����ܼ۸�
totalprice+=(parseInt($('#'+id+'_cnt').val())-purchased[i].cnt)*purchased[i].price;
purchased[i].cnt=parseInt($('#'+id+'_cnt').val());
update_total();
}
//���㵱ǰ���ﳵ�еĻ�Ʒ�ܼ۸�
function update_total()
...{
if(totalprice)
...{
//���������Ʒ����ʾ�ܼ۸��ǩ�ı�
$('#total').html('total: $'+totalprice); $('a.button').css('display','block');
}
else // ���û������Ʒ������ʾ�ܼ۸��ǩ�ı�
...{
$('#total').html('');
$('a.button').hide();
}
}
����������ǿ������п������Ч����
����Ч�������������ַ������http://demo.tutorialzine.com/2009/09/shopping-cart-php-jquery/demo.php
��ش������أ�http://demo.tutorialzine.com/2009/09/shopping-cart-php-jquery/demo.zip