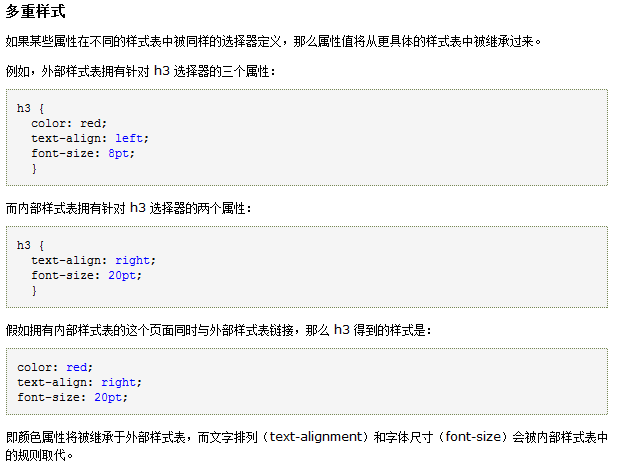
1、word-spacing与letter-spacing的区别:
在对网页文本进行精细控制时,需要应用到多方面的CSS属性设置,如垂直方向上的行距line-height,水平方向上的字距word-spacing和letter-spacing。word-spacing是指单词间隔,letter-spacing是指字母的间隔。在设置时常常将两者混淆,得不到想要的设置效果。
2、cellspacing与cellpadding的区别:
??? DIV是层的标记,相当于一个区域块.这个比table要好,可以准确的定位比例
??? cellpadding为表格的填充,是单元格的元素与边界的距离 ;
??? cellspacing为表格的间距,是单元格与单元格之间的距离
???? 例子:http://www.htmlcodetutorial.com/tables/index_famsupp_29.html
在table中控制单元格之间的间距要用到cellspacing、cellpadding,默认情况cellspacing、 cellpadding均不为0
,但经常的状况为了不让table单元格之间的间距影响到美观,我们经常会把cellspacing、 cellpadding设置为0,因此经常看到“<table cellspacing=0 cellpadding=0>”这样的代码。这样做无形中增加了代码的体积,因此使用css控制cellspacing/cellpadding显的意义重大了!以下是控制方法:
table{border:0;margin:0;border-collapse:collapse;}
table td{padding:0;}
第一行控制cellspacing,关键是“border- collapse:collapse;”(相邻边被合并)这一句;第二行控制cellpadding,很少人知道控制td吧?:)
?
3、fieldset和legend

				<div>
					<fieldset>
						<legend>
							<span>搜索条件</span>
						</legend>
						<table style="width: 100%;" border="0">
							<tr>
								<td width="20%">
									<span>费用名称</span>
								</td>
								<td width="80%">
									<input type="text"/>
								</td>
							</tr>
						</table>
					</fieldset>
				</div>
?fieldset元素用于对表单中的元素进行分组并在文档中区别标出文本。
fieldset元素元素是块元素。 并且需要关闭标签,即必须成对出现:<fieldset></fieldset>。
legend是在fieldSet对象绘制的方框内插入一个标题。
legend元素必必位于fieldset内的第一个元素。
legend元素是块元素。并且需要关闭标签,即必须成对出现:<legend></legend>。
?
可以对fieldset设置了上下与左右的填充:
padding:3px 6px;
padding-bottom:1px;
padding-top:1px;
...
?
4、css继承
?
5、css基础
常用的属性。
1、字体:font, font-size, font-family, font-weight, text-decoration, line-height
A. font是一个复合属性。所有后面的这几个属性的值都可以放在font里面用。
B. font-size定义文字的大小。
C. font-family定义字体。
D. font-weight定义文字的粗细。
E. text-decoration定义文字的装饰。
F. line-height定义行高。
2、文本:text-indent, vertical-align, text-align, word-break
?
text-indent,设置对象的缩进。
?vertical-align,设置对象的上下对齐方式。
?text-align,设置对象的左右对齐方式。
?
word-break,设置字体的强制换行。
3、背景:background, background-color, background-image, background-position, background-repeat
A. background定义背景的一个复合属性。和上面的font一样,可以把后面这几个属性的值都放在font里面用。
B. background-color定义的是背景的颜色。
C. background-image定义的是背景的图片。
D. background-position定义背景的位置。
E. background-repeat定义背景的是否平铺。
4、定位:position, z-index, top, right, bottom, left.
A. position定位方式。
B. z-index 定义层叠顺序。
C. top, right, bottom 和left表示距离他父级的上边,右边,下边和左边的距离。
5、尺寸:width, height
A. width定义对象的宽度。
B. height定义对象的高度。
6、布局:clear, float, display
A. clear 设置不允许又浮动对象的边。
B. float设置对象浮动及如何浮动。
C. display设置对象是否及如何显示。
D. visibility 设置对象是否显示。
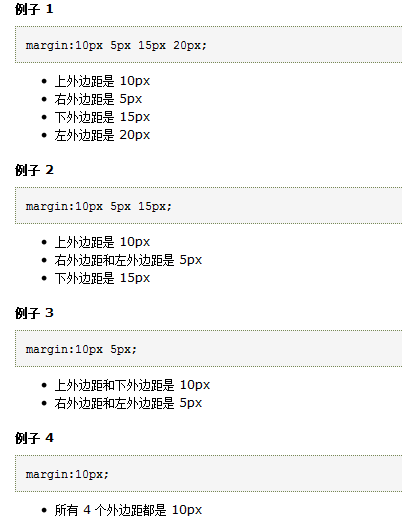
7、外补丁:margin
, margin-top, margin-right, margin-bottom, margin-left
margin 设置一个元素所有外边距的宽度。该属性可以有 1 到 4 个值。
A. margin定义外补丁的一个复合属性。同上。
B. margin-top定义对象的上边距离父级的外补丁。
C. margin-right 定义对象的右边距离父级的外补丁。
D. margin-bottom 定义对象的下边距离父级的外补丁。
E. margin-left 定义对象的左边距离父级的外补丁。
?
8、边框:border, border-top, border-right, border-bottom, border-left
同上(外补丁)。
9、内补丁:padding
, padding-top, padding-right, padding-bottom, padding-left
同上(外补丁)。
10、列表:list-style, list-style-image, list-style-position, list-style-type
A.list-style是一个定义列表项目的复合属性。
B. list-style-image定义列表项目的图标。
C. list-style-type定义列表项目的标记。
11、其他:Cursor
这里只讲cursor,就是定义鼠标的显示样式,可以用图标。
13、伪对象::first-letter
这里只讲这一个伪对象,他的作用是定义对象的第一个字母的样式。
14、声明:!important
提升应用样式的优先权。这个声明在firefox和ie7上面支持,在ie6上面不支持。他的主要作用是用来调整不同浏览器显示效果的差异。
单位
1、长度:Px
px象素,in英寸等。用得最多的是象素px。
2、颜色:rgb(RGB),#RRGGBB
Rgb(255,255,255),#FFFFFF
3、Color name:red, blue
注意
1、html代码和css代码尽量小写。
2、子随父姓,就近原则。
?
15、left:
??? 设置对象与其最近一个具有定位设置的父对象
左边的位置。此属性仅仅在对象的定位( position )属性被设置时可用
。否则,此属性设置会被忽略。
??? left: 100%; top: 0;
??? ?和父对象一样宽,和父对象顶部对齐
6、div中position:
?
position:absolute这个是绝对定位;是相对于浏览器
的定位。
比如:position:absolute;left:20px;top:80px; 这个容器始终位于距离浏览器左20px,距离浏览器上80px的这个位置。
position:relative是相对定位,是相对于前面的容器
定位的。
?
?
常用:
1、
<ul class="test-links">
	<li>
		<a style="" title=""><span style="">package</span></a>
	</li>
</ul>

.test-links {
			list-style-type: none;  //不使用项目符号,就是ul或ol前面的实心圆
		}
?2、① a:link:未访问链接
② a:visited:已访问链接
③
a:hover:鼠标移到链接上时
④
a:active:激活时(链接获得焦点时)链接的颜色
?
注释: 为了产生预期的效果,在 CSS 定义中,a:hover 必须位于 a:link 和 a:visited 之后!!
注释: 为了产生预期的效果,在 CSS 定义中,a:active 必须位于 a:hover 之后!!
一般a:hover和a:visited链接的状态(颜色、下划线等)应该是相同的。
前三者分别对应body元素的link、vlink、alink这三个属性。
四个“状态”的先后过程是:a:link ->a:hover ->a:active ->a:visited。另外,a:active不能设置有无下划线(总是有的)。
a:link {color: blue; text-decoration:none;} //未访问:蓝色、无下划线
a:visited {color:purple;text-decoration:none;} //已访问:purple、无下划线
a:hover {color: red; text-decoration:underline;} //鼠标移近:红色、下划线
a:active:{color: red; } //激活:红色
?
a:link{
	display: block;
	text-decoration: none;
	color: black;
	background: #c5dbf2;
	width: 120px;
	height: 40px;
	line-height: 40px;

	border: 1px solid #fff;     //所有边框样式
	border-width: 1px 1px 0 0;  //上右下左
}

a:hover {
	color: #fff;
	background: #2687eb;
}
3、display:
none ??? 此元素不会被显示。
block ??? 此元素将显示为块级元素,此元素前后会带有换行符
。
?
?
?
编写CSS时,可以按如下顺序执行:
(1)先编写全局样式(base.css)
* { margin:0; padding:0; word-wrap:break-word; word-break:break-all; }
body { background:#FFF; color:#333; font:12px/1.6em Helvetica, Arial, sans-serif; }
a { color:#0287CA; text-decoration:none; }
a:hover { text-decoration:underline; }
ul, li { list-style:none; }
img { border:none; }
h1, h2, h3, h4, h5, h6 { font-size:1em; }
html { overflow:-moz-scrollbars-vertical; } /* 在Firefox下始终显示滚动条*/
(2)然后是可大范围内重用的样式
大多数页面都会用到头部样式、导航样式和尾部样式。因此,header.css、nav.css和footer.css是可以重用的样式
#header{
width:800px;
height:80px;
border: 1px solid #AAAAAA;
margin:10px auto;
background:#3B5998;
}
margin:10px auto使其能够居中。
(3)最后编写细节方面的样式
http://polaris1119.iteye.com/blog/770735
?
#topTable{
    font-size:11px;
    border:1px solid black;
    border-collapse: collapse;
}
#topTable td{
    border:1px solid black;
}
?
?
?style='text-transform: uppercase;' onchange='this.value = this.value.toUpperCase();'
?
?
?
Table中单元格样式:
?
<style media="screen">
		.th1 {
		     border-left: 1px solid #CCCCCC;
		     border-top: 1px solid #CCCCCC;
		     border-bottom: 1px solid #CCCCCC;
		}
		.th2 {
		     border-left: 1px solid #CCCCCC;
		     border-top: 1px solid #CCCCCC;
		     border-bottom: 1px solid #CCCCCC;
		     border-right: 1px solid #CCCCCC;
		}
		.td1 {
		     border-left: 1px solid #CCCCCC;
		     border-bottom: 1px solid #CCCCCC;
		     padding: 0px;
		     text-align:right;
		}
		.td2 {
		     border-left: 1px solid #CCCCCC;
		     border-bottom: 1px solid #CCCCCC;
		     border-right: 1px solid #CCCCCC;
		     padding: 0px;
		     text-align:right;
		}
	</style>
?
?
<tr height="25px;">
	<th class="td1"><html:text property="seniorPrice[${mID.index}]" styleId="seniorPrice[${mID.index}]" maxlength="12" style="width:70px;"></html:text></th>
	<th class="td1"></th>
	<th class="td1"></th>
	<th class="td2"></th>
</tr>
?
?
。。。
?
加、减按钮时,需在最后加一个空行,且Table高度不可以设置,否则会挤压每行高度。
?
?
?