注:本文由BeyondVincent(破船)原创首发
转载请注明出处:BeyondVincent(破船)@DevDiv.com

更多内容请查看下面的帖子
[DevDiv原创]Windows 8 开发Step by Step
1、小引
在之前的博文中,我已经给大家简单的介绍了AppBar的使用,参考下面的两篇文章
Windows Store apps开发[3]应用程序栏(AppBar)的使用
Windows Store apps开发[5]导航栏(AppBar)的使用
在这篇文章中,我对AppBar使用进行一个小结,设涉及到两个方面:AppBar的基本使用和AppBar的扩展
2、AppBar的基本使用
在Windows Phone与Windows store app之间,有好多相似的内容,比如AppBar就是其一。在Windows store app中,使用并扩展了appbar,让其变得更加的灵活和可扩展性。在Windows Phone中,appbar定位在屏幕的底部,并且最多只能包含4个按钮和有限的menu item数目,而在windows 8中,有两类appbar,分别在屏幕的顶部和底部。从开发者的角度来考虑,appbar相当于屏幕的扩展,一般情况下是隐藏起来的,当用户从底部或者顶部swipe的时候,会显示出来。顶部的appbar主要用于页面的导航,而底部则是一些命令。
Windows 8的Page公开了两个属性:TopAppBar和BottomAppBar。
<Page.TopAppBar> <AppBar> <!-- 在这里放置top appbar --> </AppBar></Page.TopAppBar><Page.BottomAppBar> <AppBar> <!-- 在这里放置 bottom appbar --> </AppBar></Page.BottomAppBar>
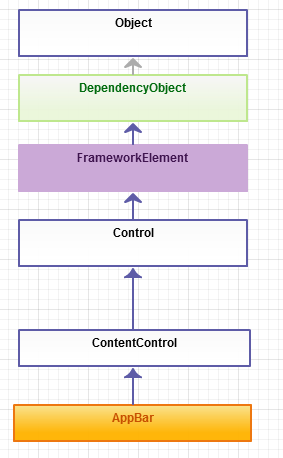
AppBar的继承关系如下:

AppBar有两个重要的属性,你可以进行处理:IsOpen和IsSticky。其中IsOpen用来处理appbar的,允许以编程的方式打开或关闭appbar。而IsSticky不是很好理解,它的目的是获取或设置appbar是否完全关闭。
在appbar里面,可以放置任何你需要的内容,并且appbar的size也没有任何限制。例如下面的例子是在appbar中放置一组button按钮,并且使用StackPanel水平放置这些button:
<Page.BottomAppBar> <AppBar Background="Orange"> <StackPanel Orientation="Horizontal"> <Button Style="{StaticResource SkipBackAppBarButtonStyle}" /> <Button Style="{StaticResource PlayAppBarButtonStyle}" /> <Button Style="{StaticResource PauseAppBarButtonStyle}" IsEnabled="False" /> <Button Style="{StaticResource SkipAheadAppBarButtonStyle}" /> </StackPanel> </AppBar> </Page.BottomAppBar>运行效果如下图:

可以将button分为2组,放置在不同的地方,以表示不同的意思。如下:
<Page.BottomAppBar> <AppBar Name="appBar" Background="Orange"> <Grid> <Grid.ColumnDefinitions> <ColumnDefinition Width="*" /> <ColumnDefinition Width="*" /> </Grid.ColumnDefinitions> <StackPanel Grid.Column="0" Orientation="Horizontal" HorizontalAlignment="Left"> <Button Style="{StaticResource SkipBackAppBarButtonStyle}" /> <Button Style="{StaticResource PlayAppBarButtonStyle}" /> <Button Style="{StaticResource PauseAppBarButtonStyle}" IsEnabled="False" /> <Button Style="{StaticResource SkipAheadAppBarButtonStyle}" /> </StackPanel> <StackPanel Grid.Column="1" Orientation="Horizontal" HorizontalAlignment="Right"> <Button Style="{StaticResource EditAppBarButtonStyle}" /> <Button Style="{StaticResource SaveAppBarButtonStyle}" /> <Button Style="{StaticResource DeleteAppBarButtonStyle}" /> </StackPanel> </Grid> </AppBar></Page.BottomAppBar>效果如下图:

3、AppBar的扩展
有时候,为了减小appbar的size,我们可以使用Context menu与某个button相关联,来表示更多的行为。当需要使用context menu时,可以通过编码实现。有点小麻烦就是你需要知道menu所放置的位置——与相关按钮的位置。下面我们来看看如何做到:
在xaml中如下定义appbar
<Page.BottomAppBar> <AppBar Name="appBar" Background="Orange"> <StackPanel Grid.Column="0" Orientation="Horizontal" HorizontalAlignment="Left"> <Button Style="{StaticResource MoreAppBarButtonStyle}" Click="MoreButton_Click" /> </StackPanel> </AppBar></Page.BottomAppBar>实现MoreButton_Click方法
当MoreButton_Click事件触发后,就创建一个PopupMenu并将其放在被单击的button上面
private async void MoreButton_Click(object sender, RoutedEventArgs e){ FrameworkElement element = (FrameworkElement)sender; PopupMenu menu = new PopupMenu(); menu.Commands.Add(new UICommand("姓名", FilterButton_Click, "name")); menu.Commands.Add(new UICommand("日期", FilterButton_Click, "date")); var clicked = await menu.ShowForSelectionAsync(element.GetElementRect(0, -10), Placement.Above);}上面的代码注意看:我使用了一个GetElementRect方法。这个方法是我对FrameworkEment进行扩展的一个方法,用来返回FrameworkEment的rect。
public static class Positioning{ public static Rect GetElementRect(this FrameworkElement element, int hOffset, int vOffset) { Rect rect = Positioning.GetElementRect(element); rect.Y += vOffset; rect.X += hOffset; return rect; } public static Rect GetElementRect(this FrameworkElement element) { GeneralTransform buttonTransform = element.TransformToVisual(null); Point point = buttonTransform.TransformPoint(new Point()); return new Rect(point, new Size(element.ActualWidth, element.ActualHeight)); }}再看看FilterButton_Click的实现:
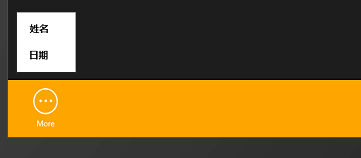
private void FilterButton_Click(IUICommand command){ appBar.IsOpen = false;}代码写完,我们来看看运行效果,点击More按钮时,会弹出姓名和日期,当点击姓名时,appbar会隐藏。
