文章目录
- 一、基础网络搭建
-
- 1、Dense()
- 2、build()
- 3、.trainable_variables
- 4、Sequential: 多层 的连接(Multi-Layers)
- 4、相关代码
- 二、误差计算
- 三、输出方式
-
- 1、 sigmoid
- 2、softmax
- 3、 tanh
- 四、可视化
- 五、完整代码
一、基础网络搭建
1、Dense()
全连接层,相当于添加一个层;
输出维度 其内包含了***线性变换、激活函数、kernel、bias***等变量;
输入维度是根据其输入img自动确定的。
x = tf.random.normal([4,784])
net = tf.keras.layers.Dense(512)
out = net(x) # 实例化 net
定义net 时,并没有创建 w,b 变量,若调用net.bias会出错,必须放在net()实例化后或者build()后。
当对net()实例化后,其会自动创建默认的 w,b 。此时可以调用查看:
out.shape()
net.kernel.shape
net.bias.shape		# b
net.weights.shape 	# w
2、build()
定义完网络结构,并没有真正搭建网络,只是定义了,就好比定义了一个变量,但阿三是并没有使用一样,故定义后必须build。
net.build(input_shape=(None,n)) # 此处的n必须与dataset的维度对应,否则会出错
3、.trainable_variables
返回网络的成员变量 [w1,b1,w2,b2,....]
4、Sequential: 多层 的连接(Multi-Layers)
相当于一个容器,里面可以放多层结构
model = keras.Sequential([layer1, layer2, layer3])# 或者可以采用model = tf.keras.Squential()
model.add(layer)
4、相关代码
import tensorflow as tf
from 	tensorflow import kerasx = tf.random.normal([2, 3])model = keras.Sequential([keras.layers.Dense(2, activation='relu'),keras.layers.Dense(2, activation='relu'),keras.layers.Dense(2)])
model.build(input_shape=[None, 3])
model.summary()		# 打印模型的相关信息for p in model.trainable_variables:	# 返回[w1,b1,w2,b2,...,wn,bn]print(p.name, p.shape)
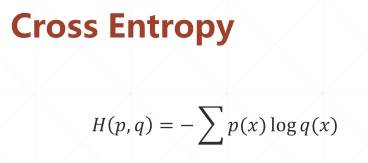
二、误差计算


loss_mse = tf.reduce_mean(tf.losses.MSE(y_onehot,logits))loss_cross_entropy = tf.reduce_mean(tf.losses.categorical_crossentropy(y_onehot,logits,from_logits=True))
三、输出方式
1、 sigmoid
仅将输出? ? 限制在 [0,1],不能满足Σ? ? = 1
y = sigmoid(out)

2、softmax
满足 ? ? ∈ [0,1] 且 , Σ? ? = 1
一般把没有加激活函数的输出叫做 logits
结果:多分类,概率 强的更强,弱的更弱
logits = tf.nn.softmax(out)

3、 tanh
将输出限制在 ? ? ∈ [?1,1]
y = tf.tanh(out)

四、可视化
1、创建路径保存可视化文件
current_time = datetime.datetime.now().strftime("%Y%m%d-%H%M%S")
log_dir = 'logs/' + current_time  # log存储路径
summary_writer = tf.summary.create_file_writer(log_dir) #创建一个监控,指定路径
2、取scalar、image
with summary_writer.as_default():tf.summary.scalar('train-loss_mse', float(loss_mse), step=step)
每次写scalar、image前都要加上 with summary_writer.as_default():,连续写scalar、image可以不加。目的在于让tf.summary.scalar()和tf.summary.image()在其scope下面。
with summary_writer.as_default():tf.summary.image("Training sample:", sample_img, step=0) # 显示训练的第一张图片,显示默认尺寸
3、终端输入命令:tensorboard --logdir 路径
五、完整代码
from matplotlib import pyplot as plt
import io
import datetime
import tensorflow as tf
from tensorflow import keras
from tensorflow.keras import datasets, layers, optimizers, Sequential, metricsdef preprocess(x,y):x = tf.cast(x, dtype=tf.float32) / 255.y = tf.cast(y, dtype=tf.int32)return x,y# tensorboard 显示一个图片可能会出出现间隙(如果原始图像尺寸小于标准图片大小),以下2个函数是为了消除图片间隙,节约空间。
def plot_to_image(figure):"""Converts the matplotlib plot specified by 'figure' to a PNG image andreturns it. The supplied figure is closed and inaccessible after this call."""# Save the plot to a PNG in memory.buf = io.BytesIO()plt.savefig(buf, format='png')# Closing the figure prevents it from being displayed directly inside# the notebook.plt.close(figure)buf.seek(0)# Convert PNG buffer to TF imageimage = tf.image.decode_png(buf.getvalue(), channels=4)# Add the batch dimensionimage = tf.expand_dims(image, 0)return imagedef image_grid(images):"""Return a 5x5 grid of the MNIST images as a matplotlib figure."""# Create a figure to contain the plot.figure = plt.figure(figsize=(10, 10))for i in range(25):# Start next subplot.plt.subplot(5, 5, i + 1, title='name')plt.xticks([])plt.yticks([])plt.grid(False)plt.imshow(images[i], cmap=plt.cm.binary)return figurebatchsz=128
(x,y),(x_test,y_test) = keras.datasets.mnist.load_data()db = tf.data.Dataset.from_tensor_slices((x,y))
db = db.map(preprocess).shuffle(60000).batch(batchsz)db_test = tf.data.Dataset.from_tensor_slices((x_test,y_test))
db_test = db_test.map(preprocess).batch(batchsz, drop_remainder=True)model = Sequential([layers.Dense(256, activation=tf.nn.relu), 		# [b, 784] => [b, 256]layers.Dense(128, activation=tf.nn.relu), 		# [b, 256] => [b, 128]layers.Dense(64, activation=tf.nn.relu), 		# [b, 128] => [b, 64]layers.Dense(32, activation=tf.nn.relu), 		# [b, 64] => [b, 32]layers.Dense(10) # [b, 32] => [b, 10], 330 = 32*10 + 10
])model.build(input_shape=[None,28*28])
model.summary()
# w = w-lr*grad
optimizer = optimizers.Adam(lr=1e-3)# metrics 性能评价指标
acc_meter = metrics.Accuracy()
loss_meter = metrics.Mean()current_time = datetime.datetime.now().strftime("%Y%m%d-%H%M%S")
log_dir = 'logs/' + current_time  # log存储路径
summary_writer = tf.summary.create_file_writer(log_dir) #创建一个监控,指定路径# get x from (x,y) < ------- > next(iter(db))[1] -> y
sample_img = next(iter(db))[0]
# ===========得到第一张图片 ================<< 可视化1 >>========================================================
sample_img = sample_img[0]
sample_img = tf.reshape(sample_img, [1, 28, 28, 1])
with summary_writer.as_default():tf.summary.image("Training sample:", sample_img, step=0)  # 显示训练的第一张图片,一默认尺寸显示def main():for epoch in range(30):for step, (x, y) in enumerate(db):with tf.GradientTape() as tape:x = tf.reshape(x, (-1, 28 * 28))# [b,784]logits = model(x)y_onehot = tf.one_hot(y,depth = 10)# [b]loss_mse = tf.reduce_mean(tf.losses.MSE(y_onehot,logits))loss_cross_entropy = tf.reduce_mean(tf.losses.categorical_crossentropy(y_onehot,logits,from_logits=True))loss_meter.update_state(loss_mse)grads = tape.gradient(loss_cross_entropy, model.trainable_variables)optimizer.apply_gradients(zip(grads, model.trainable_variables))# 自动完成更新=> w = w- lr*gradif step % 100 == 0:print(epoch,step,'loss:',float(loss_mse), float(loss_cross_entropy), loss_meter.result().numpy())loss_meter.reset_states()# ================<< 可视化2 >>===================================================with summary_writer.as_default():tf.summary.scalar('train-loss_mse', float(loss_mse), step=step)tf.summary.scalar('train-loss_ce', float(loss_cross_entropy), step=step)# testtotal_correct = 0total_num = 0for x, y in db_test:x = tf.reshape(x, [-1, 28*28])logits = model(x)prob = tf.nn.softmax(logits, axis=1)pred = tf.argmax(prob, axis=1)pred = tf.cast(pred, dtype=tf.int32)correct = tf.equal(pred, y)correct = tf.reduce_sum(tf.cast(correct, dtype=tf.int32))total_correct += int(correct)total_num += x.shape[0]acc = total_correct / total_numacc_meter.update_state(y, pred)print(epoch, 'test acc:', acc, acc_meter.result().numpy())# ================<< 可视化3 >>=================================================================================test_images = x[:25]# print(x.shape)test_images = tf.reshape(test_images, [-1, 28, 28, 1])with summary_writer.as_default():tf.summary.scalar('test-acc', float(acc), step=step)tf.summary.image("test-onebyone-images:", test_images, max_outputs=25, step=step) # 正常排列图片,非常大,视图不好test_images = tf.reshape(test_images, [-1, 28, 28])figure = image_grid(test_images)tf.summary.image('test-images:', plot_to_image(figure), step=step)  # 5x5 的图片组视图# loss_meter.reset_states()if __name__ == '__main__':main()