当前位置: 代码迷 >> 综合 >> Android常用布局(FrameLayout(框架布局)、LinearLayout(线性布局)、RelativeLayout(相对布局))详解
  详细解决方案

Android常用布局(FrameLayout(框架布局)、LinearLayout(线性布局)、RelativeLayout(相对布局))详解

热度:65   发布时间:2023-10-10 12:23:19.0

很多开发者一听说Android终端的屏幕尺寸五花八门,屏幕分辨率千奇百怪,就觉得Android开发在屏幕适配方面是必定是一件头疼的事情。因为在Android问世之前,广大开发者知道的UI解决方案大致分为两类:

1、在Web开发中的CSS,一层一层的去层叠样式。
2、在iOS开发中去计算每一个UIView的尺寸。

上面两种方案,无论哪种方案面对碎片化严重的Android终端,那都是一场噩梦。好在Android提供了另一套解决方案来应对严重的终端碎片化,这就是布局和9-patch。

这里想来说说布局,在Android SDK刚刚问世的时候,Android提供了AbsoluteLayout,FrameLayout,LinearLayout,RelativeLayout和Tablelayout五大布局来应对终端碎片化问题。

但很快Android发现AbsoluteLayout是一个愚蠢的方案,在Android 1.5系统中就不再支持此布局,剩下的四个布局中,Tablelayout虽然依然被支持,但是由于Fragment以及新的TabLayout的出现,博主在此断言,Tablelayout也命不久矣,被移除支持只是迟早的事儿。

所以,Android的五大基本布局现在只剩下三个(这里说的是基本布局,在Android support包里引入的新的布局不计入内),下面分别介绍一下这三个基本布局。

一、FrameLayout
FrameLayout应该是Android系统中最简单的布局了,在FrameLayout中的元素,默认都是以FrameLayout控件的坐上顶点作为基准点,一层一层的重叠起来,后加进来的元素覆盖前面的元素。

下面先来一个演示,代码如下:

?
1
2
3
4
5
6
7
8
9
10
11
12
13
14
15
16
17
18
19
20
21
22
< FrameLayout
   xmlns:android = "http://schemas.android.com/apk/res/android"
   android:layout_width = "match_parent"
   android:layout_height = "match_parent" >
  
   < View
     android:layout_width = "200dp"
     android:layout_height = "200dp"
     android:background = "#ff0000" />
  
   < View
     android:layout_width = "200dp"
     android:layout_height = "200dp"
     android:background = "#000000" />
  
   < View
     android:layout_width = "200dp"
     android:layout_height = "200dp"
     android:layout_margin = "100dp"
     android:background = "#00ff00" />
  
</ FrameLayout >

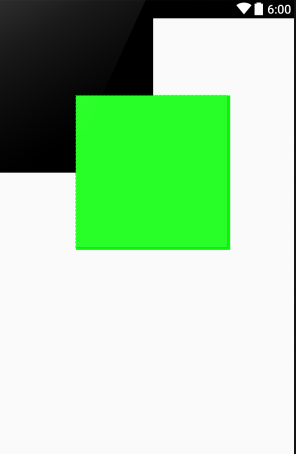
运行结果如下:

Android常用布局(FrameLayout(框架布局)、LinearLayout(线性布局)、RelativeLayout(相对布局))详解

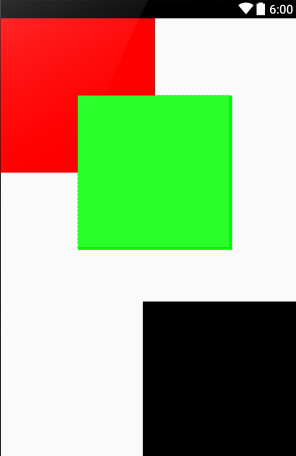
在代码里,有三个View,而在运行结果上只能看到两个View,一个黑色和一个绿色。这是因为红色的View被黑色的View盖住了。

在FrameLayout中,通过android:layout_gravity属性去指定子元素的位置,下面调整一下上诉例子中的黑色View的位置,让红色的View显示出来,调整后的代码如下:

?
1
2
3
4
5
<View
   android:layout_width= "200dp"
   android:layout_height= "200dp"
   android:layout_gravity= "bottom|right"
   android:background= "#000000" />
 

可以看到上面代码里添加了android:layout_gravity属性,并且指定了两个值,一个为bottom,一个为right,表示这个View将被放到FrameLayout的右下角。运行结果如下图所示:

Android常用布局(FrameLayout(框架布局)、LinearLayout(线性布局)、RelativeLayout(相对布局))详解

二、LinearLayout
LinearLayout是线性布局,它可以让它内部的元素按照指定方向依次排开。LinearLayout的方向是通过android:orientation属性指定,并且可以通过android:gravity属性指定对其方式。

还是直接上段代码看看效果,代码如下:

?
1
2
3
4
5
6
7
8
9
10
11
12
13
14
15
16
17
18
19
20
21
22
< LinearLayout
   xmlns:android = "http://schemas.android.com/apk/res/android"
   android:layout_width = "match_parent"
   android:layout_height = "match_parent"
   android:orientation = "vertical"
   android:gravity = "center" >
  
   < View
     android:layout_width = "100dp"
     android:layout_height = "100dp"
     android:background = "#ff0000" />
  
   < View
     android:layout_width = "100dp"
     android:layout_height = "100dp"
     android:background = "#000000" />
  
   < View
     android:layout_width = "100dp"
     android:layout_height = "100dp"
     android:background = "#00ff00" />
</ LinearLayout >

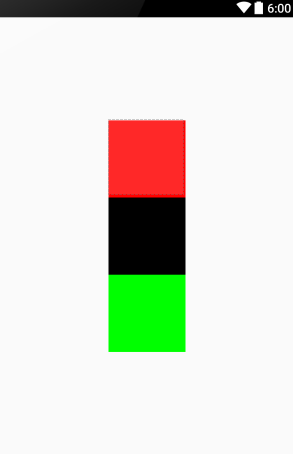
在代码中,设置了LinearLayout的方向为纵向,并且对其方式居中对齐,于是运行结果如下图所示:

Android常用布局(FrameLayout(框架布局)、LinearLayout(线性布局)、RelativeLayout(相对布局))详解

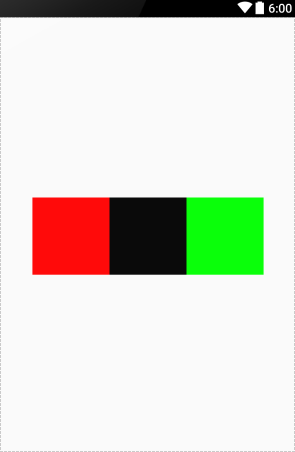
除了android:orientation将设为vertical外,也可以设为horizontal。让LinearLayout内部的元素横向排列,将上面例子中的android:orientation属性值改为horizontal后的运行结果,如下图所示:

Android常用布局(FrameLayout(框架布局)、LinearLayout(线性布局)、RelativeLayout(相对布局))详解

三、RelativeLayout
RelativeLayout是基本布局里面最灵活,也是最复杂的布局,它内部的元素可以通过设定彼此之间的相对关系来决定布局,使用RelativeLayout时,推荐为其内部每个元素都设定id,下面依然通过一个列子来演示此布局的使用方法。代码如下:

?
1
2
3
4
5
6
7
8
9
10
11
12
13
14
15
16
17
18
19
20
21
22
23
24
25
26
27
28
29
30
31
32
33
34
35
36
37
< RelativeLayout
   xmlns:android = "http://schemas.android.com/apk/res/android"
   android:layout_width = "match_parent"
   android:layout_height = "match_parent" >
  
   < View android:id = "@+id/red"
     android:layout_width = "100dp"
     android:layout_height = "100dp"
     android:background = "#ff0000" />
  
   < View android:id = "@+id/black"
     android:layout_width = "100dp"
     android:layout_height = "100dp"
     android:layout_toRightOf = "@id/red"
     android:layout_below = "@id/red"
     android:background = "#000000" />
  
   < View android:id = "@+id/green"
     android:layout_width = "100dp"
     android:layout_height = "100dp"
     android:layout_below = "@id/black"
     android:layout_alignParentRight = "true"
     android:background = "#00ff00" />
  
   < View android:id = "@+id/gray"
     android:layout_width = "100dp"
     android:layout_height = "100dp"
     android:layout_centerInParent = "true"
     android:background = "#888888 />
  
   < View android:id = "@+id/orange"
     android:layout_width = "100dp"
     android:layout_height = "100dp"
     android:layout_toRightOf = "@id/green"
     android:layout_below = "@id/gray"
     android:background = "#ff8800" />
</ RelativeLayout >

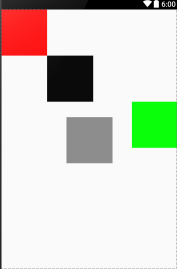
先分析代码,可以看到每一个View都被设置了一个id值,分别为red,black,green,gray和orange。然后通过代码,可以看出black位于red的右边和下面,green位于black的下面并且右对齐其父元素(即RelativeLayout),gray居中对齐父元素(即RelativeLayout), orange位于green的右边同时位于gray的下面,运行结果如图所示:

Android常用布局(FrameLayout(框架布局)、LinearLayout(线性布局)、RelativeLayout(相对布局))详解

在此在归纳一下RelativeLayout中,与布局相关的属性

android:layout_below:位于指定元素的下方
android:layout_above:位于指定元素的上方
android:layout_toLeftOf:位于指定元素的左侧
android:layout_toRightOf:位于指定元素的右侧
android:layout_centerVertical:垂直居中对齐父元素
android:layout_centerHorizontal:水平居中对齐父元素
android:layout_centerInParent:居中对齐父元素
android:layout_alignParentRight:与父元素右对齐
android:layout_alignParentLeft:与父元素左对齐
android:layout_alignParentTop:与父元素上对齐
android:layout_alignParentBottom:与父元素下对齐
android:layout_alignRight:与指定元素右对齐
android:layout_alignLeft:与指定元素左对齐
android:layout_alignTop:与指定元素上对齐
android:layout_alignBottom:与指定元素下对齐
从Android 4.2开始,也就是从API Level 17开始,Android增强了RelativeLayout,使其能够更好的应对并本地化这一需求,比如在有的国家,文字是从右往左阅读,这也就是所说的RTL。为了应对RTL,RelativeLayout又增加了以下属性:

android:layout_alignStart:与指定元素的开始位置对齐
android:layout_toStartOf:位于指定元素的开始侧
android:layout_alignParentStart:与父元素与开始侧对齐
android:layout_alignEnd:与指定元素的结束始位置对齐
android:layout_toEndOf:位于指定元素的结束侧
android:layout_alignParentEnd:与指定元素的结束位置对齐
这里的开始和结束我们可以做如下理解:

开始:在从左到右阅读习惯的国家,开始侧等于左侧,toStartOf的显示效果就等于toLeftOf。但是在从右往左阅读习惯的国家,那么开始侧就变成了右侧,toStartOf的显示效果就等于了toRightOf。
结束:同上面对开始的理解一样,结束侧在从左到右阅读习惯的国家就是右侧,反之则在左侧。
  相关解决方案