项目打包
- yarn build或者npm build
需要上传的文件
1. .nuxt目录
2. package.json
3. nuxt.config.js
4. static
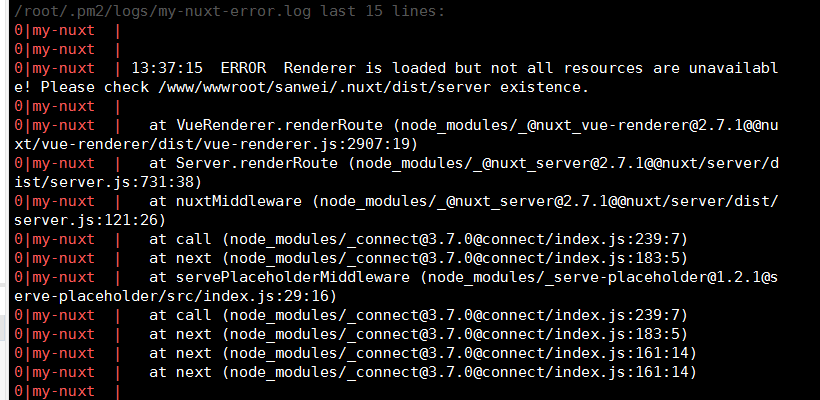
5. server目录 (不传会报错ERROR Renderer is loaded but not all resources are unavailable! Please check /www/wwwroot/sanwei/.nuxt/dist/server existence.)
项目打包后上传到OSS
1.需要创建一个deploy.js
- const OSS = require("ali-oss");
- const fs = require("fs");
- const path = require("path");
- const os = require("os");
- const PUBLIC_PATH = path.join(__dirname, "/");
- //需要替换成自己的
- const client = new OSS({
- region: 'oss的地理位置',
- accessKeyId: ' accessKeyId',
- accessKeySecret: ' accessKeySecret',
- bucket: 'bucket名字'
- })
- /**
- *获取文件目录并删除
- * @param {*} dir //文件目录
- */
- async function deleteDir(dir) {
- let result = await client.list({
- prefix: dir + "/",
- delimiter: "/"
- });
- if (result.objects) {
- let aa = [];
- result.objects.forEach(function (obj) {
- aa.push(obj.name);
- });
- try {
- await client.deleteMulti(aa, {
- quiet: true
- });
- console.log("删除成功");
- } catch (e) {
- console.log("文件删除失败", e);
- }
- }
- }
- /**
- * 遍历文件夹递归上传
- * @param {path} src 本地路径
- * @param {string} dist oos文件夹名
- */
- function addFileToOSSSync(src, dist) {
- let docs = fs.readdirSync(src);
- docs.forEach(function (doc) {
- let _src = src + "/" + doc,
- _dist = dist + "/" + doc;
- let st = fs.statSync(_src);
- // 判断是否为文件
- if (st.isFile() && doc !== ".DS_Store") {
- putOSS(_src, _dist);
- }
- // 如果是目录则递归调用自身
- else if (st.isDirectory()) {
- addFileToOSSSync(_src, _dist);
- }
- });
- }
- /**
- *单个文件上传至oss
- */
- async function putOSS(src, dist) {
- try {
- await client.put("/" + dist, src);
- } catch (e) {
- console.log("上传失败".e);
- }
- }
- /**
- *上传文件启动
- *@param {string} dirName 将要上传的文件名
- */
- async function upFile(dirName) {
- try {
- await deleteDir(dirName);
- await addFileToOSSSync(PUBLIC_PATH + ".nuxt/dist/client", dirName);
- console.log(dirName + "上传oss成功");
- } catch (err) {
- console.log(dirName + "上传oss成功失败", err);
- }
- }
- upFile("dist"); //指定oss目录
2.在package.json中添加deploy.js
- "scripts": {
- "dev": "cross-env NODE_ENV=development nodemon server/index.js --watch server",
- "build": "nuxt build",
- "deploy": "node deploy.js",
- "start": "cross-env NODE_ENV=production node server/index.js",
- "generate": "nuxt generate"
- },
3.在nuxt.config.js中设置publicPath

nuxt publickPath
4.上传文件
- npm deploy
服务器(以下部分都是在服务器端操作)
- yum install gcc gcc-c++
安装node,npm环境
- wget https://npm.taobao.org/mirrors/node/v10.14.1/node-v10.14.1-linux-x64.tar.gz
- tar -xvf node-v10.14.1-linux-x64.tar.gz
- mv node-v10.14.1-linux-x64 node
配置环境变量
- vim /etc/profile
- #set for nodejs
- export NODE_HOME=/usr/local/node (需要替换成自己的Node安装目录)
- export PATH=$NODE_HOME/bin:$PATH
生效配置文件
- source /etc/profile
- node -v
- npm -v
安装项目依赖
- npm i --production
安装pm2
- npm i -g pm2
设置开机自启动
- pm2 startup
- pm2 save
使用pm2启动你的nuxt.js
- pm2 start npm --name "my-nuxt" -- run start
pm2常用命令
- pm2 list # 查看当前正在运行的进程
- pm2 start all # 启动所有应用
- pm2 restart all # 重启所有应用
- pm2 stop all # 停止所有的应用程序
- pm2 delete all # 关闭并删除所有应用
- pm2 logs # 控制台显示所有日志
- pm2 start 0 # 启动 id为 0的指定应用程序
- pm2 restart 0 # 重启 id为 0的指定应用程序
- pm2 stop 0 # 停止 id为 0的指定应用程序
- pm2 delete 0 # 删除 id为 0的指定应用程序
- pm2 logs 0 # 控制台显示编号为0的日志
- pm2 show 0 # 查看执行编号为0的进程
- pm2 monit my-nuxt # 监控名称为my-nuxt的进程
pm2 list

pm2 list
pm2 logs

pm2 logs
配置Nginx
首先在nginx conf目录下新建一个conf文件我的是在 /www/server/nginx/conf/
配置规则
- touch sanwei.conf
- vi sanwei.conf
- map $sent_http_content_type $expires {
- "text/html" epoch;
- "text/html; charset=utf-8" epoch;
- default off;
- }
- server {
- listen 80; # the port nginx is listening on
- server_name sanwei.suanliutudousi.com; # setup your domain here
- gzip on;
- gzip_types text/plain application/xml text/css application/javascript;
- gzip_min_length 1000;
- location / {
- expires $expires;
- proxy_redirect off;
- proxy_set_header Host $host;
- proxy_set_header X-Real-IP $remote_addr;
- proxy_set_header X-Forwarded-For $proxy_add_x_forwarded_for;
- proxy_set_header X-Forwarded-Proto $scheme;
- proxy_read_timeout 1m;
- proxy_connect_timeout 1m;
- proxy_pass http://127.0.0.1:3000; # set the adress of the Node.js instance here
- }
- }
保存退出,然后再在 nginx.conf文件的http中添加 刚才创建的sanwei.conf

重启nginx
启动代码格式:nginx安装目录地址 -c nginx配置文件地址(下面需要替换成你的nginx文件目录)
- /usr/local/nginx/sbin/nginx -c /usr/local/nginx/conf/nginx.conf