前后端分离:

前端:
1.准备项目
idea创建空项目 ![]() 新增模块
新增模块 ![]()
注:提交项目到github管理 https://github.com/zhengqingya/aigou_web_parent.git
采用 ![]() 模块 (vue-cli搭建),拷贝到
模块 (vue-cli搭建),拷贝到![]() 下面,如下:
下面,如下:

idea右下角安装依赖库


下载完之后项目下会多出 ![]() 文件夹
文件夹
注:如果 npm install 一直报错 如下
解决:删除 C:\Users\Administrator\AppData\Roaming 路径下的 npm和npm-cache2个文件夹再重新到项目中npm install即可
2.启动项目: - (项目中的修改就具体看代码吧,这里不多说)
安装依赖库: npm install (上面已完成...)
运行:npm run dev
打包:npm run bulild
后端: - 商品服务品牌实现
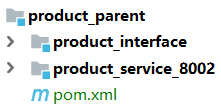
一、创建商品模块服务 
集成mybatis-plus代码生成器:
1.![]()
导入依赖:
<dependencies><!-- springboot支持 --><dependency><groupId>org.springframework.boot</groupId><artifactId>spring-boot-starter-web</artifactId></dependency><!-- springboot测试 --><dependency><groupId>org.springframework.boot</groupId><artifactId>spring-boot-starter-test</artifactId></dependency><!--注:不能全部引入mybatis-plus -》 做数据操作的, 这里不需要! -只需引入核心包解决错误而已--><dependency><groupId>com.baomidou</groupId><artifactId>mybatis-plus</artifactId><version>2.2.0</version></dependency>
</dependencies>2.![]()
导入依赖:
<dependencies><!--springboot支持--><dependency><groupId>org.springframework.boot</groupId><artifactId>spring-boot-starter-web</artifactId></dependency><!--springboot测试--><dependency><groupId>org.springframework.boot</groupId><artifactId>spring-boot-starter-test</artifactId></dependency><!--mybatis-plus支持--><dependency><groupId>com.baomidou</groupId><artifactId>mybatis-plus-boot-starter</artifactId><version>2.2.0</version></dependency><!--数据库支持--><dependency><groupId>mysql</groupId><artifactId>mysql-connector-java</artifactId></dependency><!--配置中心支持--><dependency><groupId>org.springframework.cloud</groupId><artifactId>spring-cloud-starter-config</artifactId></dependency><!-- Eureka客户端依赖 --><dependency><groupId>org.springframework.cloud</groupId><artifactId>spring-cloud-starter-netflix-eureka-client</artifactId></dependency><!--引入swagger支持--><dependency><groupId>io.springfox</groupId><artifactId>springfox-swagger2</artifactId><version>2.9.2</version></dependency><!-- https://mvnrepository.com/artifact/io.springfox/springfox-swagger-ui --><dependency><groupId>io.springfox</groupId><artifactId>springfox-swagger-ui</artifactId><version>2.9.2</version></dependency><dependency><groupId>com.zhengqing</groupId><artifactId>product_interface</artifactId><version>1.0-SNAPSHOT</version></dependency>
</dependencies><!--打包插件依赖-->
<build><plugins><plugin><groupId>org.springframework.boot</groupId><artifactId>spring-boot-maven-plugin</artifactId><configuration><mainClass>com.zhengqing.aigou.ProductService_8002</mainClass><layout>ZIP</layout></configuration><executions><execution><goals><goal>repackage</goal></goals></execution></executions></plugin></plugins>
</build>
配置:
server:port: 8002spring:profiles:active: devcloud:config:name: application-product #github上面名称profile: ${spring.profiles.active} #环境 java -jar -D xxx jarlabel: master #分支discovery:enabled: true #从eureka上面找配置服务service-id: aigou-config-server #指定服务名#uri: http://127.0.0.1:1299 #配置服务器 单机配置
eureka: #eureka不能放到远程配置中client:service-url:defaultZone: http://localhost:7001/eureka #告诉服务提供者要把服务注册到哪儿 #单机环境instance:prefer-ip-address: true #显示客户端真实ipgithub上配置文件新增: (具体可看:https://github.com/zhengqingya/aigou-config)
server:port: 8002
spring:application:name: aigou-productdatasource:driver-class-name: com.mysql.jdbc.Driverurl: jdbc:mysql://localhost:3306/aigou_productusername: rootpassword: root
mybatis-plus:mapper-locations: classpath:com/zhengqing/aigou/mapper/*Mapper.xmltype-aliases-package: com.zhengqing.aigou.domain,com.zhengqing.aigou.query
eureka:client:service-url:defaultZone: http://localhost:7001/eureka  #告诉服务提供者要把服务注册到哪儿 #单机环境instance:prefer-ip-address: true #显示客户端真实ip
集成mybatis-plus:
//Spring boot方式
@EnableTransactionManagement
@Configuration
@MapperScan("com.zhengqing.aigou.mapper")
public class MybatisPlusConfig {@Bean  //分页插件public PaginationInterceptor paginationInterceptor() {return new PaginationInterceptor();}
}
然后去8001中拷贝一份Swgger2过来修改一下
@Configuration
@EnableSwagger2
public class Swagger2 {@Beanpublic Docket createRestApi() {return new Docket(DocumentationType.SWAGGER_2).apiInfo(apiInfo()).select()//对外暴露服务的包,以controller的方式暴露,所以就是controller的包..apis(RequestHandlerSelectors.basePackage("com.zhengqing.aigou.controller")).paths(PathSelectors.any()).build();}private ApiInfo apiInfo() {return new ApiInfoBuilder().title("商品服务api").description("商品服务接口文档说明").contact(new Contact("郑清", "", "960869719@qq.com")).version("1.0").build();}}
入口类:
@SpringBootApplication
@EnableEurekaClient
public class ProductService_8002 {public static void main(String[] args) {SpringApplication.run(ProductService_8002.class);}
}
3.注意:网关还需要配置一下
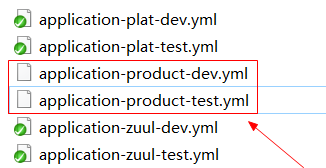
github上配置文件修改:

swagger配置修改:

解决前端跨域问题:

网关中配置如下即可:
注:这里网关配置的是127.0.0.1不是localhost,因此前端访问的时候要用127.0.0.1访问!
//解决跨域问题
@Configuration
public class GlobalCorsConfig {@Beanpublic CorsFilter corsFilter() {//1.添加CORS配置信息CorsConfiguration config = new CorsConfiguration();//1) 允许的域,不要写*,否则cookie就无法使用了config.addAllowedOrigin("http://127.0.0.1:6001");//2) 是否发送Cookie信息config.setAllowCredentials(true);//3) 允许的请求方式config.addAllowedMethod("OPTIONS");config.addAllowedMethod("HEAD");config.addAllowedMethod("GET");config.addAllowedMethod("PUT");config.addAllowedMethod("POST");config.addAllowedMethod("DELETE");config.addAllowedMethod("PATCH");// 4)允许的头信息config.addAllowedHeader("*");//2.添加映射路径,我们拦截一切请求UrlBasedCorsConfigurationSource configSource = newUrlBasedCorsConfigurationSource();configSource.registerCorsConfiguration("/**", config);//3.返回新的CorsFilter.return new CorsFilter(configSource);}
}
4.启动 
测试swagger: http://127.0.0.1:9527/swagger-ui.html
注:如果如下失败,重新启动一下9527网关即可成功 !!!

二、完成代码生成器
1.新建模块 
2.导入依赖:
<dependencies><!--springboot支持--><dependency><groupId>org.springframework.boot</groupId><artifactId>spring-boot-starter-web</artifactId></dependency><dependency><groupId>org.springframework.boot</groupId><artifactId>spring-boot-starter-test</artifactId></dependency><!--mybatis-plus支持--><dependency><groupId>com.baomidou</groupId><artifactId>mybatis-plus-boot-starter</artifactId><version>2.2.0</version></dependency><!--模板引擎--><dependency><groupId>org.apache.velocity</groupId><artifactId>velocity-engine-core</artifactId><version>2.0</version></dependency><!--数据库支持--><dependency><groupId>mysql</groupId><artifactId>mysql-connector-java</artifactId></dependency>
</dependencies>
3.配置:
#此处为本项目src所在路径(代码生成器输出路径),注意一定是当前项目所在的目录哟
OutputDir=E:\\IdeaProjects\\IT_zhengqing\\aigou_parent\\product_parent\\product_service_8002\\src\\main\\java
#mapper.xml SQL映射文件目录
OutputDirXml=E:\\IdeaProjects\\IT_zhengqing\\aigou_parent\\product_parent\\product_service_8002\\src\\main\\resources
#放接口
OutputDirBase=E:\\IdeaProjects\\IT_zhengqing\\aigou_parent\\product_parent\\product_interface\\src\\main\\java
#设置作者
author=zhengqing
#自定义包路径
parent=com.zhengqing.aigou#数据库连接信息
jdbc.driver=com.mysql.jdbc.Driver
jdbc.url=jdbc:mysql:///aigou_user
jdbc.user=root
jdbc.pwd=root
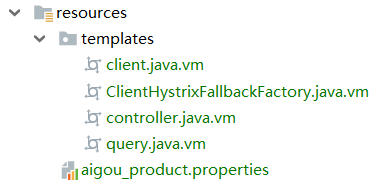
模板:
package com.zhengqing.aigou.client;import ${package.Entity}.${entity};
import com.zhengqing.aigou.query.${entity}Query;
import com.zhengqing.aigou.util.AjaxResult;
import com.zhengqing.aigou.util.PageList;
import org.springframework.cloud.openfeign.FeignClient;
import org.springframework.cloud.openfeign.FeignClientsConfiguration;
import org.springframework.web.bind.annotation.*;import java.util.List;@FeignClient(value = "AIGOU-ZUUL-GATEWAY",configuration = FeignClientsConfiguration.class,fallbackFactory = ${entity}ClientHystrixFallbackFactory.class)
@RequestMapping("/product/${table.entityPath}")
public interface ${entity}Client {/*** 保存和修改公用的* @param ${table.entityPath}  传递的实体* @return Ajaxresult转换结果*/@RequestMapping(value="/add",method= RequestMethod.POST)AjaxResult save(${entity} ${table.entityPath});/*** 删除对象信息* @param id* @return*/@RequestMapping(value="/delete/{id}",method=RequestMethod.DELETE)AjaxResult delete(@PathVariable("id") Integer id);//获取用户@RequestMapping("/{id}")${entity} get(@RequestParam(value="id",required=true) Long id);/*** 查看所有的员工信息* @return*/@RequestMapping("/list")public List<${entity}> list();/*** 分页查询数据** @param query 查询对象* @return PageList 分页对象*/@RequestMapping(value = "/json",method = RequestMethod.POST)PageList<${entity}> json(@RequestBody ${entity}Query query);
}
package com.zhengqing.aigou.client;import ${package.Entity}.${entity};
import com.zhengqing.aigou.query.${entity}Query;
import com.zhengqing.aigou.util.AjaxResult;
import com.zhengqing.aigou.util.PageList;
import feign.hystrix.FallbackFactory;
import org.springframework.stereotype.Component;import java.util.List;/*** @author zhengqing* @date 2019/01/12-20:56*/
@Component
public class ${entity}ClientHystrixFallbackFactory implements FallbackFactory<${entity}Client> {@Overridepublic ${entity}Client create(Throwable throwable) {return new ${entity}Client() {@Overridepublic AjaxResult save(${entity} ${table.entityPath}) {return null;}@Overridepublic AjaxResult delete(Integer id) {return null;}@Overridepublic ${entity} get(Long id) {return null;}@Overridepublic List<${entity}> list() {return null;}@Overridepublic PageList<${entity}> json(${entity}Query query) {return null;}};}
}
package ${package.Controller};import ${package.Service}.${table.serviceName};
import ${package.Entity}.${entity};
import com.zhengqing.aigou.query.${entity}Query;
import com.zhengqing.aigou.util.AjaxResult;
import com.zhengqing.aigou.util.PageList;
import com.baomidou.mybatisplus.plugins.Page;
import org.springframework.beans.factory.annotation.Autowired;
import org.springframework.web.bind.annotation.*;import java.util.List;@RestController
@RequestMapping("/${table.entityPath}")
public class ${entity}Controller {@Autowiredpublic ${table.serviceName} ${table.entityPath}Service;/*** 保存和修改公用的* @param ${table.entityPath}  传递的实体* @return Ajaxresult转换结果*/@RequestMapping(value="/add",method= RequestMethod.POST)public AjaxResult save(@RequestBody ${entity} ${table.entityPath}){try {if(${table.entityPath}.getId()!=null){${table.entityPath}Service.updateById(${table.entityPath});}else{${table.entityPath}Service.insert(${table.entityPath});}return AjaxResult.me();} catch (Exception e) {e.printStackTrace();return AjaxResult.me().setMessage("保存对象失败!"+e.getMessage());}}/*** 删除对象信息* @param id* @return*/@RequestMapping(value="/delete/{id}",method=RequestMethod.DELETE)public AjaxResult delete(@PathVariable("id") Integer id){try {${table.entityPath}Service.deleteById(id);return AjaxResult.me();} catch (Exception e) {e.printStackTrace();return AjaxResult.me().setMessage("删除对象失败!"+e.getMessage());}}//获取用户@RequestMapping(value = "/{id}",method = RequestMethod.GET)public ${entity} get(@RequestParam(value="id",required=true) Long id){return ${table.entityPath}Service.selectById(id);}/*** 查看所有的员工信息* @return*/@RequestMapping(value = "/list",method = RequestMethod.GET)public List<${entity}> list(){return ${table.entityPath}Service.selectList(null);}/*** 分页查询数据** @param query 查询对象* @return PageList 分页对象*/@RequestMapping(value = "/json",method = RequestMethod.POST)public PageList<${entity}> json(@RequestBody ${entity}Query query){Page<${entity}> page = new Page<${entity}>(query.getPage(),query.getRows());page = ${table.entityPath}Service.selectPage(page);return new PageList<${entity}>(page.getTotal(),page.getRecords());}
}
package com.zhengqing.aigou.query;/**** @author ${author}* @since ${date}*/
public class ${table.entityName}Query extends BaseQuery{
}
4.代码生成器
public class GenteratorCode {public static void main(String[] args) throws InterruptedException {//用来获取Mybatis-Plus.properties文件的配置信息ResourceBundle rb = ResourceBundle.getBundle("aigou_product");AutoGenerator mpg = new AutoGenerator();// 全局配置GlobalConfig gc = new GlobalConfig();gc.setOutputDir(rb.getString("OutputDir"));gc.setFileOverride(true);gc.setActiveRecord(true);// 开启 activeRecord 模式gc.setEnableCache(false);// XML 二级缓存gc.setBaseResultMap(true);// XML ResultMapgc.setBaseColumnList(false);// XML columListgc.setAuthor(rb.getString("author"));mpg.setGlobalConfig(gc);// 数据源配置DataSourceConfig dsc = new DataSourceConfig();dsc.setDbType(DbType.MYSQL);dsc.setTypeConvert(new MySqlTypeConvert());dsc.setDriverName(rb.getString("jdbc.driver"));dsc.setUsername(rb.getString("jdbc.user"));dsc.setPassword(rb.getString("jdbc.pwd"));dsc.setUrl(rb.getString("jdbc.url"));mpg.setDataSource(dsc);// 策略配置StrategyConfig strategy = new StrategyConfig();strategy.setTablePrefix(new String[] { "t_" });// 此处可以修改为您的表前缀strategy.setNaming(NamingStrategy.underline_to_camel);// 表名生成策略 t_user_xxx UserXxxstrategy.setInclude(new String[]{"t_user"}); // TODO 需要生成的表mpg.setStrategy(strategy);// 包配置PackageConfig pc = new PackageConfig();pc.setParent(rb.getString("parent"));pc.setController("controller");pc.setService("service");pc.setServiceImpl("service.impl");pc.setEntity("domain");pc.setMapper("mapper");mpg.setPackageInfo(pc);// 注入自定义配置,可以在 VM 中使用 cfg.abc 【可无】InjectionConfig cfg = new InjectionConfig() {@Overridepublic void initMap() {Map<String, Object> map = new HashMap<String, Object>();map.put("abc", this.getConfig().getGlobalConfig().getAuthor() + "-rb");this.setMap(map);}};List<FileOutConfig> focList = new ArrayList<FileOutConfig>();// 调整 domain 生成目录演示focList.add(new FileOutConfig("/templates/entity.java.vm") {@Overridepublic String outputFile(TableInfo tableInfo) {return rb.getString("OutputDirBase")+ "/com/zhengqing/aigou/domain/" + tableInfo.getEntityName() + ".java";}});// 调整 xml 生成目录演示focList.add(new FileOutConfig("/templates/mapper.xml.vm") {@Overridepublic String outputFile(TableInfo tableInfo) {return rb.getString("OutputDirXml")+ "/com/zhengqing/aigou/mapper/" + tableInfo.getEntityName() + "Mapper.xml";}});cfg.setFileOutConfigList(focList);mpg.setCfg(cfg);// 自定义模板配置,可以 copy 源码 mybatis-plus/src/main/resources/templates 下面内容修改,// 放置自己项目的 src/main/resources/templates 目录下, 默认名称一下可以不配置,也可以自定义模板名称TemplateConfig tc = new TemplateConfig();tc.setService("/templates/service.java.vm");tc.setServiceImpl("/templates/serviceImpl.java.vm");tc.setEntity(null);tc.setMapper("/templates/mapper.java.vm");tc.setController(null);tc.setXml(null);// 如上任何一个模块如果设置 空 OR Null 将不生成该模块。mpg.setTemplate(tc);// 执行生成mpg.execute();}}运行生成文件:

运行完之后项目会多出如下文件:

5.测试:
@RunWith(SpringRunner.class)
@SpringBootTest(classes = ProductService_8002.class)
public class UserServiceTest {@Autowiredprivate IUserService userService;@Testpublic void test() throws Exception {List<User> users = userService.selectList(null);System.out.println(users);}
}
启动:
然后运行:

如果运行报错,如下:
解决方法:
最后测试成功!
注:这里可能是我刚开始启动顺序原因导致了这个错,后来测试又好了,可以用了,不用修改7001了!
源码和文档:https://pan.baidu.com/s/1Gno6M_oiZ0gXPNj1LbuouA


