Eclipse Advanced Commands
This article describes use cases for Eclipse commands which go beyond the simple one for adding commands to menus, toolbars, etc.
This article is based on Eclipse Indigo (3.7).
Table of Contents
1.?Eclipse Commands
For an introduction into Eclipse Commands please see Eclipse Commands Tutorial .
2.? Enabled when (visible when)
The command framework allows to restrict the availability and visibility of commands, handlers and ui contributions via the core expressions .
In this example we want the command only be enabled if one item from a list of items is selected.
Create a new project "de.vogella.rcp.commands.enable" based on the "RCP application with a view" example.
Add a command with the ID "de.vogella.rcp.commands.enable.command". Add this command to the menu and the toolbar and create the following default handler.
?
package de.vogella.rcp.commands.enable.handler;import org.eclipse.core.commands.AbstractHandler;import org.eclipse.core.commands.ExecutionEvent;import org.eclipse.core.commands.ExecutionException;import org.eclipse.jface.dialogs.MessageDialog;import org.eclipse.ui.handlers.HandlerUtil;public class Command extends AbstractHandler { @Override public Object execute(ExecutionEvent event) throws ExecutionException { MessageDialog.openInformation(HandlerUtil.getActiveWorkbenchWindow( event).getShell(), "Info", "Info for you"); return null; }}
?
Select plugin.xml and add "org.eclipse.core.expressions" as a dependency. Select then the Extensions tab and add the extensions org.eclipse.core.expressions.definitions.
Using right mouse click add a definition "oneElementSelected". Add a "with" variable "selection".
?
Tip
"selection" is a predefined variable which will be calculated automatically by Eclipse. See core expressions for additional variables you can use. For example for a popup menu "activeMenuSelection" provides the selection.?
On the "activeMenuSelection" right mouse click and add a count with the value "1". The result should look like
?

?
On your handler, right mouse click and select enabledWhen. Right mouse click and add a "reference" to it with the value "oneElementSelected". The result should look like.
?

?
The expression were are using is based on "selection". Therefore the list must register itself as selection provider to inform the workbench in case something is selected. Therefore add "getSite().setSelectionProvider(viewer);" in createPartControl of View.java.
?
public void createPartControl(Composite parent) { viewer = new TableViewer(parent, SWT.MULTI | SWT.H_SCROLL | SWT.V_SCROLL); viewer.setContentProvider(new ViewContentProvider()); viewer.setLabelProvider(new ViewLabelProvider()); viewer.setInput(getViewSite()); // Makes the selection available to the workbench getSite().setSelectionProvider(viewer); }
?
If you now run the application your command should only be enabled if one element in the list is selected.
?
Tip
You can also only display the menu if one item is selected. The approach is the same but you only define the restriction on the menu contribution directly (visible when on the command in the menu). For a command in the toolbar the definition would look like:?

?
?
<script type="text/javascript"></script><script src="http://pagead2.googlesyndication.com/pagead/show_ads.js" type="text/javascript"></script>
3.?Eclipse standard commands
3.1.?Overview
Eclipse provides lots of standard commands which you can re-use. Just press on the "Browse button" while defining your commandId to see the available standard commands. For example the screenshot shows the usage of the standard about dialog command.
The advantage of using standard commands is that you get the keybinding, icons, etc for free.
?

?
?
Tip
Standard commands sometimes map to actions which are contributed via ActionFactory in the class ApplicationActionBarAdvisor. If the ActionFactory returns an IAction you need to register this action. If not these commands are inactive in your menu. For example the following made the reset perspective and welcome command active.?
?
// Method belongs to class ApplicationActionBarAdvisor @Override protected void makeActions(IWorkbenchWindow window) { IWorkbenchAction quickStartAction = ActionFactory.INTRO.create(window); register(quickStartAction); IWorkbenchAction resetView = ActionFactory.RESET_PERSPECTIVE .create(window); register(resetView); }
?
3.2.?Example
You can also use standard command and define a new handler for this command, e.g. you can use the standard Eclipse delete command (org.eclipse.ui.edit.delete).
?
Tip
To find the id of existing commands you can you the Eclipse Plugin Spy.?
You can use the extension point "org.eclipse.ui.handlers" to define new handlers for the standard commands.
?
Tip
Eclipse requires you to have only one active handler at the time therefore you have to use the "activeWhen" restriction on the handler to make it more special then the standard binding. To use for example delete in several views with different handlers use "activeWhen" with the variable "activePartId" and as the value your view id.?
Create a new RCP application "de.vogella.rcp.commands.standardcommands" with the template "Hello RCP".
Create a handler for the command "org.eclipse.ui.edit.delete" which display a message box. Add the command "org.eclipse.ui.edit.delete" to the menu.
?

?
?

?
The result should look like the following.
?

?
4.?Calling commands directly via code
You can call a command directly. For example if you have a command "add.command" defined you can call it via the following coding.
?
// From a view you get the site which allow to get the serviceIHandlerService handlerService = (IHandlerService) getSite().getService(IHandlerService.class);try { handlerService.executeCommand("add.command", null); } catch (Exception ex) { throw new RuntimeException("add.command not found"); // Give message }}
?
This coding above is called within a view which provides access to the site and to services. You can also get the service via the WorkbenchWindow.
5.?Providing your own expression
You can write your own Java class which can be used define a variable which can then be used to define if a certain UI element shall be active or not. For example you can read the authorization of the user from your own class and then return the value which is assign to the user. This return value can then be used in a visible / enabled statement. This is similar to the usage of the core expressions we have seen earlier.
Create a RCP application "de.vogella.rcp.commands.sourceprovider" with the template "Hello RCP".
We will create a source provider. This source provider can provide variables which can be used in defining the visibility of commands. Add the extension point "org.eclipse.ui.services" to your plugin and create a new service provider.
?

?
?

?
This defines a service which provides the variable "de.vogella.rcp.commands.sourceprovider.active" to the workbench. This class must implement ISourceProvider. This value can then be used similar to a core expression. Maintain the following code.
?
package de.vogella.rcp.commands.sourceprovider;import java.util.HashMap;import java.util.Map;import org.eclipse.ui.AbstractSourceProvider;import org.eclipse.ui.ISources;public class CommandState extends AbstractSourceProvider { public final static String MY_STATE = "de.vogella.rcp.commands.sourceprovider.active"; public final static String ENABLED = "ENABLED"; public final static String DISENABLED = "DISENABLED"; private boolean enabled = true; @Override public void dispose() { } // We could return several values but for this example one value is sufficient @Override public String[] getProvidedSourceNames() { return new String[] { MY_STATE }; } // You cannot return NULL @SuppressWarnings("unchecked") @Override public Map getCurrentState() { Map map = new HashMap(1); String value = enabled ? ENABLED : DISENABLED; map.put(MY_STATE, value); return map; } // This method can be used from other commands to change the state // Most likely you would use a setter to define directly the state and not use this toogle method // But hey, this works well for my example public void toogleEnabled() { enabled = !enabled ; String value = enabled ? ENABLED : DISENABLED; fireSourceChanged(ISources.WORKBENCH, MY_STATE, value); }}
?
Create two commands "de.vogella.rcp.commands.sourceprovider.command1" and "de.vogella.rcp.commands.sourceprovider.command2". Create any handler you want for the first command. Command2 will be used to change the state in our ISourceProvider. Maintain the following code for the handler.
?
package de.vogella.rcp.commands.sourceprovider.handler;import org.eclipse.core.commands.AbstractHandler;import org.eclipse.core.commands.ExecutionEvent;import org.eclipse.core.commands.ExecutionException;import org.eclipse.ui.handlers.HandlerUtil;import org.eclipse.ui.services.ISourceProviderService;import de.vogella.rcp.commands.sourceprovider.CommandState;public class Command2 extends AbstractHandler { @Override public Object execute(ExecutionEvent event) throws ExecutionException { // Get the source provider service ISourceProviderService sourceProviderService = (ISourceProviderService) HandlerUtil .getActiveWorkbenchWindow(event).getService( ISourceProviderService.class); // Now get my service CommandState commandStateService = (CommandState) sourceProviderService .getSourceProvider(CommandState.MY_STATE); commandStateService.toogleEnabled(); return null; }}
?
Add both commands to the menu.
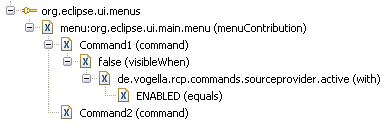
Now use the state provided by your ISourceProvider in your declaration of your menu.
?

?
This looks in plugin.xml like the following.
?
<extension point="org.eclipse.ui.menus"> <menuContribution locationURI="menu:org.eclipse.ui.main.menu"> <command commandId="de.vogella.rcp.commands.sourceprovider.command1" label="Command1" style="push"> <visibleWhen checkEnabled="false"> <with variable="de.vogella.rcp.commands.sourceprovider.active"> <equals value="ENABLED"> </equals> </with> </visibleWhen> </command> <command commandId="de.vogella.rcp.commands.sourceprovider.command2" label="Command2" style="push"> </command> </menuContribution></extension>
?
If you now start your application can select the second command the first command will not be available anymore. If you press it again the first command will be displayed again.
6.?Using parameters in commands
You can also define parameters in commands. Create project "de.vogella.rcp.commands.parameterfirst" using the "Hello RCP" template.
Create a command with the id "de.vogella.rcp.commands.parameterfirst.helloName" and a default handler "de.vogella.rcp.commands.parameterfirst.handler.HelloName".
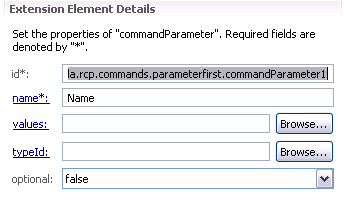
Right click on your command, select New -> commandParameter
?

?
Use the following id for the parameter "de.vogella.rcp.commands.parameterfirst.commandParameter1"
?

?
In the handler you have to evaluate the parameter.
?
package de.vogella.rcp.commands.parameterfirst.handler;import org.eclipse.core.commands.AbstractHandler;import org.eclipse.core.commands.ExecutionEvent;import org.eclipse.core.commands.ExecutionException;import org.eclipse.jface.dialogs.MessageDialog;import org.eclipse.ui.handlers.HandlerUtil;public class HelloName extends AbstractHandler { @Override public Object execute(ExecutionEvent event) throws ExecutionException { String name = event .getParameter("de.vogella.rcp.commands.parameterfirst.commandParameter1"); MessageDialog.openInformation(HandlerUtil.getActiveShell(event), "Hello", "Hello " + name); return null; }}
?
Add this command to the menu. On the command, right click and select New -> Parameter
?

?
As name maintain the name of the parameter, pass as value the value you want to use in your handler.
?

?
Add the same command again to the menu and pass another parameter.
If you run your application and select the menu entry the value should be used in the message box.
7.?Defining commands at runtime
You can create commands at runtime. Create project "de.vogella.rcp.commands.runtimecommands" using the "Hello RCP" template.
Define a menu contribution. Maintain the class "de.vogella.rcp.commands.runtimecommands.DefineCommands" in this menu contribution.
?

?
Create the following class.
?
package de.vogella.rcp.commands.runtimecommands;import org.eclipse.swt.SWT;import org.eclipse.ui.menus.CommandContributionItem;import org.eclipse.ui.menus.CommandContributionItemParameter;import org.eclipse.ui.menus.ExtensionContributionFactory;import org.eclipse.ui.menus.IContributionRoot;import org.eclipse.ui.services.IServiceLocator;public class DefineCommands extends ExtensionContributionFactory { @Override public void createContributionItems(IServiceLocator serviceLocator, IContributionRoot additions) { CommandContributionItemParameter p = new CommandContributionItemParameter( serviceLocator, "", "org.eclipse.ui.file.exit", SWT.PUSH); p.label = "Exit the application"; p.icon = Activator.getImageDescriptor("icons/alt_window_16.gif"); CommandContributionItem item = new CommandContributionItem(p); item.setVisible(true); additions.addContributionItem(item, null); }}
?
Run the example, your application should have the Exit command in the menu.