上一篇文章我们讲诉了自定义线程执行器和任务处理器
我们继续来讲解自定义线程的定时执行器,我们在很多场景下需要做到某些状态或者数据进行更新,如果事情很多很杂,很时候时候会创建很多不同的定时器那么势必会照成系统的消耗和性能低下的问题!今天我们来解决这一问题。
首先我们创建定时任务执行器基类
1 /// <summary> 2 /// 3 /// </summary> 4 public abstract class TimerTaskBase : BaseTask 5 { 6 7 8 /// <summary> 9 /// 开始执行的时间10 /// </summary>11 public long StartTime { get; set; }12 13 /// <summary>14 /// 是否一开始执行一次15 /// </summary>16 public bool IsStartAction { get; set; }17 18 /// <summary>19 /// 结束时间20 /// </summary>21 public long EndTime { get; set; }22 23 /// <summary>24 /// 执行次数25 /// </summary>26 public int ActionCount { get; set; }27 28 /// <summary>29 /// 已经执行的次数30 /// </summary>31 public int AActionCount { get; set; }32 33 /// <summary>34 /// 间隔执行时间35 /// </summary>36 public int IntervalTime { get; set; }37 38 /// <summary>39 /// 制定执行次数的定时任务40 /// </summary>41 /// <param name="startTime">0表示立即执行,否则延迟执行,填写开始时间</param>42 /// <param name="intervalTime">执行间隔时间,小于10毫秒,当10毫秒处理</param>43 /// <param name="isStartAction">是否一开始执行一次</param>44 /// <param name="actionCount">需要执行的次数</param>45 public TimerTaskBase(long startTime, int intervalTime, bool isStartAction, int actionCount)46 {47 this.StartTime = startTime;48 this.IntervalTime = intervalTime;49 this.IsStartAction = isStartAction;50 this.ActionCount = actionCount;51 this.EndTime = 0;52 }53 54 /// <summary>55 /// 制定结束时间的定时任务56 /// </summary>57 /// <param name="startTime">0表示立即执行,否则延迟执行,填写开始时间</param>58 /// <param name="intervalTime">执行间隔时间,小于10毫秒,当10毫秒处理</param>59 /// <param name="endTime">执行结束时间</param>60 /// <param name="isStartAction">是否一开始执行一次</param>61 public TimerTaskBase(long startTime, int intervalTime, long endTime, bool isStartAction)62 {63 this.StartTime = startTime;64 this.IntervalTime = intervalTime;65 this.IsStartAction = isStartAction;66 this.ActionCount = 0;67 this.EndTime = endTime;68 }69 70 /// <summary>71 /// 制定开始时间,无限执行任务72 /// </summary>73 /// <param name="startTime">0表示立即执行,否则延迟执行,填写开始时间</param>74 /// <param name="intervalTime">执行间隔时间,小于10毫秒,当 10 毫秒处理 建议 10 毫秒的倍数</param>75 /// <param name="isStartAction">是否一开始执行一次</param>76 public TimerTaskBase(long startTime, int intervalTime, bool isStartAction)77 {78 this.StartTime = startTime;79 this.IntervalTime = intervalTime;80 this.IsStartAction = isStartAction;81 this.ActionCount = 0;82 this.EndTime = 0;83 }84 85 public TimerTaskBase()86 {87 // TODO: Complete member initialization88 }89 }
上面的代码实现了,开始时间,间隔时间,结束时间和执行次数 的控制
那么我们来看看定时器线程的设计
1 public class TimerThread 2 { 3 public TimerThread() 4 { 5 System.Threading.Thread thread = new System.Threading.Thread(new System.Threading.ThreadStart(Run)); 6 thread.IsBackground = true; 7 thread.Start(); 8 } 9 10 /// <summary>11 /// 任务队列12 /// </summary>13 private List<TimerTaskBase> taskQueue = new List<TimerTaskBase>();14 15 /// <summary>16 /// 加入任务17 /// </summary>18 /// <param name="t"></param>19 public void AddTask(TimerTaskBase t)20 {21 if (t.IsStartAction)22 {23 //满足添加队列前先执行一次24 t.Run();25 }26 lock (taskQueue)27 {28 taskQueue.Add(t);29 }30 }31 32 public long GetDate()33 {34 return Convert.ToInt64(System.DateTime.Now.ToString("yyyyMMddHHmmssfff"));35 }36 37 //这里的线程同步器,不是用来通知的,38 //只是用来暂停的,因为Thread.Sleep() 消耗开销比较大39 ManualResetEvent mre = new ManualResetEvent(false);40 41 /// <summary>42 /// 重构函数执行器43 /// </summary>44 private void Run()45 {46 ///无限循环执行函数器47 while (true)48 {49 if (taskQueue.Count > 0)50 {51 IEnumerable<TimerTaskBase> collections = null;52 lock (taskQueue)53 {54 //拷贝一次队列 预防本次轮训检查的时候有新的任务添加55 //否则循环会出错 集合被修改无法迭代56 collections = new List<TimerTaskBase>(taskQueue);57 }58 //开始迭代59 foreach (TimerTaskBase tet in collections)60 {61 int actionCount = tet.AActionCount;62 long timers = GetDate();63 if ((tet.EndTime > 0 && timers > tet.EndTime) || (tet.ActionCount > 0 && actionCount >= tet.ActionCount))64 {65 //任务过期66 lock (taskQueue)67 {68 taskQueue.Remove(tet);69 }70 continue;71 }72 //获取最后一次的执行时间73 long lastactiontime = tet.TempAttribute.getlongValue("lastactiontime");74 if (lastactiontime != 0 && Math.Abs(timers - lastactiontime) < tet.IntervalTime)75 {76 continue;77 }78 //记录出来次数79 tet.AActionCount++;80 //记录最后执行的时间81 tet.TempAttribute.setValue("lastactiontime", timers);82 83 //上面的代码执行情况是非常几乎不用考虑消耗问题84 85 //下面是任务的执行需要考虑消耗,86 87 //这里我们不考虑执行耗时问题,88 //我们我这里没有涉及到后台线程池89 //也没有具体的业务逻辑,所以都放到这里统一执行90 tet.Run();91 }92 }93 //暂停10毫秒后再次检查94 mre.WaitOne(10);95 }96 }97 }
定时器为什么没有使用上一篇文章讲诉的自定义线程呢,是因为,上一篇文章的自定义线程是基于队列处理的,先进先出执行,而我们的定时器任务并非是基于队列的。所以需要单独定义。
那么我们先来实现一个每一秒执行的任务,
1 /// <summary> 2 /// 每秒执行的任务 3 /// </summary> 4 public class SecondsTimerTask : TimerTaskBase 5 { 6 /// <summary> 7 /// 定义一秒执行一次的 8 /// </summary> 9 public SecondsTimerTask()10 : base(0, 1000, false)11 {12 13 }14 15 public override void Run()16 {17 Console.WriteLine(DateTime.Now.ToString("HH:mm:ss:ffff: ") + "我是 每秒 执行的任务");18 }19 }
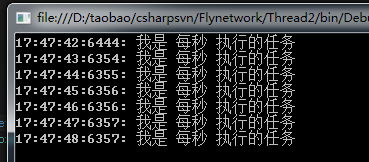
我们来测试一下看看效果
1 class Program2 {3 static void Main(string[] args)4 {5 TimerThread timerThread = new TimerThread();6 timerThread.AddTask(new SecondsTimerTask());7 Console.ReadLine();8 }9 }

还算是我们的预想的效果吧,每秒执行一次
接下来我们创建每分钟执行一次
1 public class MinuteTimerTask : TimerTaskBase 2 { 3 /// <summary> 4 /// 定义一分钟执行一次的 5 /// </summary> 6 public MinuteTimerTask() 7 : base(0, 1000 * 60, false) 8 { 9 10 }11 12 public override void Run()13 {14 Console.WriteLine(DateTime.Now.ToString("HH:mm:ss:ffff: ") + "我是 每分钟 执行的任务");15 }16 }
按照执行次数的定时器
1 /// <summary> 2 /// 我是按照执行次数结束的 3 /// </summary> 4 public class CountTimerTask : TimerTaskBase 5 { 6 /// <summary> 7 /// 定义一秒执行一次的 8 /// </summary> 9 public CountTimerTask()10 : base(0, 1000, false, 10)11 {12 13 }14 15 16 public override void Run()17 {18 Console.WriteLine(DateTime.Now.ToString("HH:mm:ss:ffff: ") + "我是 次数 执行的任务 我要执行:" + this.ActionCount + " 次 执行了: " + this.AActionCount + " 次");19 }20 }
测试一下
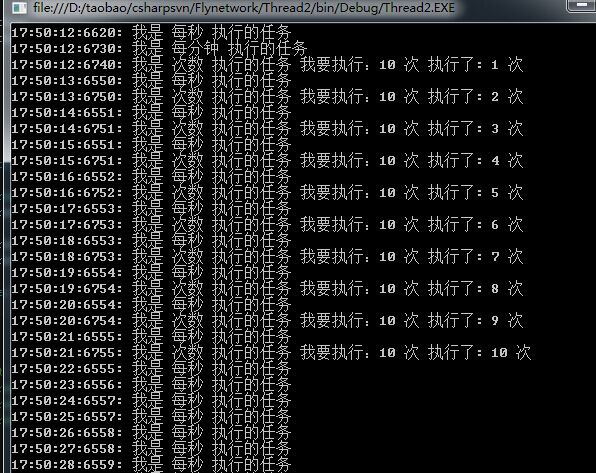
1 class Program 2 { 3 static void Main(string[] args) 4 { 5 TimerThread timerThread = new TimerThread(); 6 timerThread.AddTask(new SecondsTimerTask()); 7 8 timerThread.AddTask(new MinuteTimerTask()); 9 timerThread.AddTask(new CountTimerTask());10 11 Console.ReadLine();12 }13 }
运行结果:

到此我们的定时器线程执行器已经完成,满足我们需要做到定时更新状态,合作检查数据等应用场景!
不知道对你有没有帮助呢?
请不了吝啬你的小手,给予一个评论吧,帮助到你了请给与鼓励,如果有不足之处还请多多指教!