在看这篇之前 建议看看 【android 服务概述 本地服务示例】http://byandby.iteye.com/blog/1026110 和 【android AIDL服务】http://byandby.iteye.com/blog/1026193 和这两篇有点关系。
向服务传递复杂的类型
要向服务传递复杂的类型,需要执行比传递 Java原语类型更多的工作。在开始这一工作之前,应该了解一下AIDL对非原语类型的支持。
AIDL 支持String和CharSequence。
AIDL 支持传递其他AIDL接口,但你引用的每个AIDL接口都需要一个 import语句(即使引用的AIDL位于相同的包中)。
AIDL 支持 java.util.List 和 java.util.Map,但具有一些限制。集合中项的数据类型包括Java原语、String、CharSequence 或 android.os.Parcelable。无需为List或Map提供import语句,但需要为Parcelable提供import语句。
除了字符串以外,非原语类型需要一个方向指示符。方向指示符包括 in、out和intout。in表示值由客户端设置,out表示值由服务设置,inout表示客户端和服务都设置了该值。
Parcelable 接口告诉Android 运行时在封送 (marshalling) 和解封送 (unmarshalling) 过程中如果序列化和反序列化对象。 下面是我们的 Person类 它实现了 Parcelable接口。
package com.syh;import android.os.Parcel;import android.os.Parcelable;public class Person implements Parcelable { private int age; private String name; public static final Parcelable.Creator<Person> CREATOR = new Parcelable.Creator<Person>() { @Override public Person createFromParcel(Parcel source) { return new Person(source); } @Override public Person[] newArray(int size) { return new Person[size]; } }; public Person() { } private Person(Parcel in) { readFromParcel(in); } @Override public int describeContents() { return 0; } @Override public void writeToParcel(Parcel dest, int flags) { dest.writeInt(age); dest.writeString(name); } public void readFromParcel(Parcel in) { age = in.readInt(); name = in.readString(); } public int getAge() { return age; } public void setAge(int age) { this.age = age; } public String getName() { return name; } public void setName(String name) { this.name = name; }}要开始实现此接口,首先在Eclipse 中创建新Android项目 StockQuoteService2。将 CreateActivity设置为 MainActivity并使用包 com.syh。然后将Person.java文件添加到新项目的 com.syh包下。
Parcelable 接口定义在封送/解封送过程中混合和分解对象的契约。Parcelable接口的底层是Parcel容器对象。Parcel类是一种最快的序列化/反序列化机制,专为Android中的进程间通信而设计。该类提供了一些方法来将成员容纳到容器中,以及从容器展开成员。要为进程间通信正确地实现对象,必须执行以下操作。
(1) 实现Parcelable接口。这意味着要实现 writeToParcel()和readFromParcel()。写入方法将对象写入到包裹(parcel)中,而读取方法从包裹中读取对象。请注意,写入属性的顺序必须与读取顺序相同。
(2) 向该类添加一个名为 CREATOR 的 static final 属性。该属性需要实现 android.os.Parcelable.Creator<T>接口。
(3) 为Parcelable提供一个构造函数,该函数知道如何从 Parcel创建对象。
(4) 在与包含复杂类型的 .java文件匹配的 .aidl文件中定义 Parcelable类。AIDL编译器在编译AIDL 文件时将查找此文件。下面是我们的 Person.aidl文件,是.aidl文件不是java文件。
package com.syh;parcelable Person;
说明:在看到Parcelable时可能会引起以下疑问,为什么Android不使用内置的Java序列化机制?事实是,Android团队认为Java中的序列化太慢了,难以满足Android的进程间通信的需求。所以该团队构建了Parcelable解决方案。Parcelable方法要求显示序列化类的成员,但最终序列化对象的速度将快得多。
另请注意,Android提供了两种机制来将数据传递给另一个进程。第一种是使用Intent将bundle对象传递给活动,第二种是将Parcelable传递给服务。这两种机制不可互换,不要混淆。也就是说,Parcelable无法传递给活动。( Activity)如果希望启动一个活动并向其传递一些数据,可以使用Bundle。Parcelable只能用作AIDL定义的一部分。
项目中每个Parcelable 都需要一个 .aidl文件。在本例中,我们只有一个Parcelable,那就是 Person。
现在在远程服务中使用Person类。为了简单起见,我们将修改 IStockQuoteService,以接受类型为Person的输入参数。思路是,客户端将Person传递给服务,告诉它谁请求了报价。新的 IStockQuoteService.aidl文件内容如下:是 .aidl文件不是java文件
package com.syh;import com.syh.Person;interface IStockQuoteService{ String getQuote(in String ticker, in Person requester);}getQuote()方法现在接受两个参数:股票代号和Person,后者指定谁发出了请求。请注意,我们在参数上包含了方向指示符,因为这些参数属于非原语类型,我们还为Person类提供了一条 Import语句。Person类与服务定义位于同一个包中 (com.syh)。
下面来看一下我们的布局文件吧, 啥都没有 就一个 TextView
<?xml version="1.0" encoding="utf-8"?><LinearLayout xmlns:android="http://schemas.android.com/apk/res/android" android:orientation="vertical" android:layout_width="fill_parent" android:layout_height="fill_parent" ><TextView android:layout_width="fill_parent" android:layout_height="wrap_content" android:text="This is where the service would ask for help" /></LinearLayout>
我们的服务类 StockQuoteService2.java
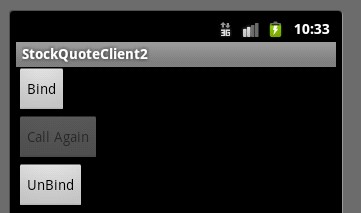
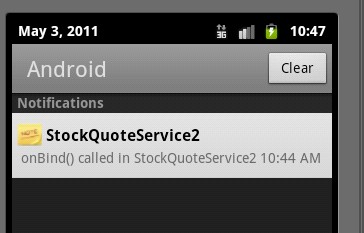
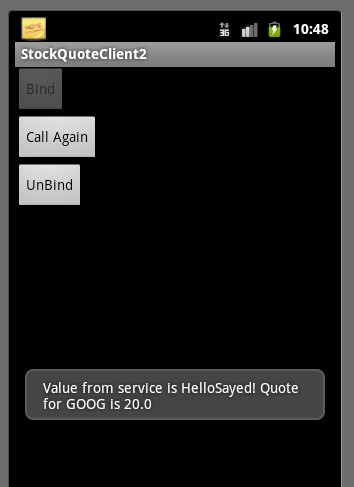
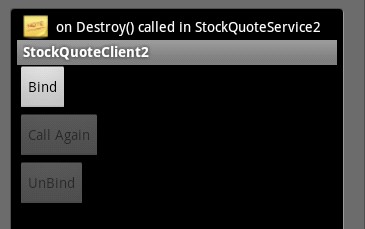
package com.syh;import android.app.Notification;import android.app.NotificationManager;import android.app.PendingIntent;import android.app.Service;import android.content.Intent;import android.os.IBinder;import android.os.RemoteException;public class StockQuoteService2 extends Service { private NotificationManager notificationMgr; public class StockQuoteServiceImpl extends IStockQuoteService.Stub { @Override public String getQuote(String ticker, Person requester) throws RemoteException { return "Hello" + requester.getName() + "! Quote for " + ticker + " is 20.0"; } } @Override public void onCreate() { super.onCreate(); notificationMgr = (NotificationManager) getSystemService(NOTIFICATION_SERVICE); displayNotificationMessage("onCreate() called in StockQuoteService2"); } @Override public void onDestroy() { displayNotificationMessage("on Destroy() called in StockQuoteService2"); super.onDestroy(); } @Override public void onStart(Intent intent, int startId) { super.onStart(intent, startId); } @Override public IBinder onBind(Intent intent) { displayNotificationMessage("onBind() called in StockQuoteService2"); return new StockQuoteServiceImpl(); } private void displayNotificationMessage(String message) { Notification notification = new Notification(R.drawable.emblem_note, message, System.currentTimeMillis()); PendingIntent contentIntent = PendingIntent.getActivity(this, 0, new Intent(this, MainActivity.class), 0); notification.setLatestEventInfo(this, "StockQuoteService2", message, contentIntent); notificationMgr.notify(R.id.app_notification_id, notification); }}我们使用了通知,通过状态栏 通知用户后台服务的不同状态,来看看运行效果。
下面是实现服务还需要完成的其他操作。
(1) 将note图像文件添加到/res/drawable 目录,随便一个图像就OK。
(2) 需要为通知管理器NotificationManager提供一个应用程序级唯一ID(整数)。要创建唯一ID,可以向字符串资源文件 /res/values/strings.xml 添加一个项ID。当调用notify()方法时,会将唯一ID 传递给通知管理器。
最后我们还需要修改 AndroidManifest.xml 来声明我们的服务 StockQuoteService2

好了到这里我们服务端就OK 了,下面来 弄客户端 新建一个名为 StockQuoteClient2的项目。使用 com.sayed作为包名,使用MainActivity作为活动名。 客户端就简单了,把服务端的 Person.java、IStockQuoteService.aidl、Person.aidl文件复制到客户端的com.sayed 包下。
来看看我们客户端的布局文件。
<?xml version="1.0" encoding="utf-8"?><LinearLayout xmlns:android="http://schemas.android.com/apk/res/android" android:orientation="vertical" android:layout_width="fill_parent" android:layout_height="fill_parent" ><Button android:id="@+id/bindBtn" android:layout_width="wrap_content" android:layout_height="wrap_content" android:text="Bind"/><Button android:id="@+id/callBtn" android:layout_height="wrap_content" android:layout_width="wrap_content" android:text="Call Again"/><Button android:id="@+id/unbindBtn" android:layout_width="wrap_content" android:layout_height="wrap_content" android:text="UnBind"/></LinearLayout>
我们的MainActivity类
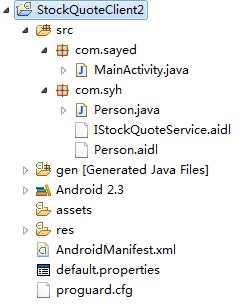
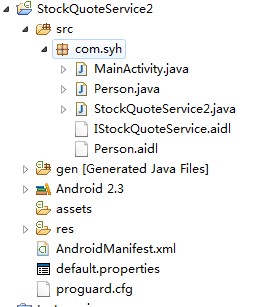
package com.sayed;import com.syh.IStockQuoteService;import com.syh.Person;import android.app.Activity;import android.content.ComponentName;import android.content.Context;import android.content.Intent;import android.content.ServiceConnection;import android.os.Bundle;import android.os.IBinder;import android.os.RemoteException;import android.util.Log;import android.view.View;import android.view.View.OnClickListener;import android.widget.Button;import android.widget.Toast;public class MainActivity extends Activity { private static final String TAG = "StockQuoteClient2"; private IStockQuoteService stockService = null; private Button bindBtn = null; private Button callBtn = null; private Button unbindBtn = null; @Override public void onCreate(Bundle savedInstanceState) { super.onCreate(savedInstanceState); setContentView(R.layout.main); bindBtn = (Button) findViewById(R.id.bindBtn); bindBtn.setOnClickListener(new OnClickListener() { @Override public void onClick(View v) { bindService(new Intent(IStockQuoteService.class.getName()), serConn, Context.BIND_AUTO_CREATE); bindBtn.setEnabled(false); callBtn.setEnabled(true); unbindBtn.setEnabled(true); } }); callBtn = (Button) findViewById(R.id.callBtn); callBtn.setOnClickListener(new OnClickListener() { @Override public void onClick(View v) { callService(); } }); callBtn.setEnabled(false); unbindBtn = (Button) findViewById(R.id.unbindBtn); unbindBtn.setOnClickListener(new OnClickListener() { @Override public void onClick(View v) { unbindService(serConn); bindBtn.setEnabled(true); callBtn.setEnabled(false); unbindBtn.setEnabled(false); } }); } private void callService() { try { Person person = new Person(); person.setAge(33); person.setName("Sayed"); String response = stockService.getQuote("GOOG", person); Toast.makeText(this, "Value from service is " + response, Toast.LENGTH_LONG).show(); } catch (RemoteException e) { Log.e("MainActivity", e.getMessage(), e); } } private ServiceConnection serConn = new ServiceConnection() { @Override public void onServiceConnected(ComponentName name, IBinder service) { Log.v(TAG, "onServiceConnected() called"); stockService = IStockQuoteService.Stub.asInterface(service); callService(); } @Override public void onServiceDisconnected(ComponentName name) { Log.v(TAG, "onServiceDisconnected() called"); stockService = null; } };}为了避免大家把 .aidl文件放错位置, 来2张项目截图,请大家找准位置,看准包名。
客户端
服务端
源码已上传