前言,进入移动互联网时代,信息推送成为了一个大家耳熟能详的东西,那么究竟这个推送在Android上是如何实现的呢,今天我们就来给大家介绍一下。
PUSH是一个互联网的概念相对PULL而言,传统的互联网信息获取的方式都是PULL的,也就是客户端需要信息时会向服务器发送一个GET请求并获得相应的数据。而PUSH就是一类可以由一方主动向另外一方发送消息的信息发送方式,可以是终端与终端之间也可以是服务器与客户端之间。
国内目前大概有四种方式来实现:基于HTTP协议,基于XMPP协议,基于MQTT协议、基于自有协议实现以及利用SMS的方式。
首先也是最简单的,利用HTTP协议模拟这个方式来实现,大概有三种:
1.Polling:以一定的间隔发出请求以获得最新数据,模拟成PSUH。这种方式在移动终端上较为常用,OPPO移动互联网那边的MCS目前也是这种方案,但是这有个明显的缺点:就是省电和推送延迟是一个无法调和的矛盾。
2.Streaming:HTTP是无状态的协议,客户端请求一个URL,服务器端响应,发回响应内容,断开连接。正常来说是这样运行的,但是如果服务器端不断开连接呢?那么理论上来说,服务器就可以不停的把最新数据发到浏览器。缺点: 代理支持不好。
3.Long-Polling:客户端发请求,服务器接到后挂起连接,直到有数据要发送到客户端,发完数据后断开连接;客户端接收到数据,又再一次请求服务器拿数据。这种方式对网络和服务器的负载有较大的考验。
参考:http://en.wikipedia.org/wiki/Push_technology
http://en.wikipedia.org/wiki/Comet_(programming)
http://download.oracle.com/docs/cd/E14571_01/web.1111/b31974/adv_ads.htm#CIHJGFHH
然后是采用XMPP协议来实现:
XMPP协议全称是(Extensible Messaging and Presence Protocol可扩展通讯和表示协议)是目前用于做IM的协议,想想IM的工作方式,发送的消息其实就是推送过去的,不然怎么实现实时聊天呢是吧。
简要说明一下XMPP协议的内容,它是基于XML协议的通讯协议,前身是Jabber,目前已由IETF国际标准化组织完成了标准化工作。XMPP协议中定义了三个角色:客户端,服务器和网关。基于这种C/S的架构,那么XMPP客户端之间的通信大部分情况是通过服务器传递的(传输文件是通过代理建立的socket5连接)。这里服务器承担了大部分的工作诸如:负责与其他接点建立TCP连接交互以及注册认证等;网关负责与其他异构系统进行数据转换;客户端建立与服务器的连接组织和解析XML信息包。
一个简单的会话过程是这样的,其中涉及的XML流的结构如下:

整个会话始于<stream:stream >止于</stream:stream>,其中又主要有三大元素<message/>,<presence/>和<iq/>(Info<Query)。
<Message>用于在两个jabber用户之间发送信息。Jsm(jabber会话管理器)负责满足所有的消息,不管目标用户的状态如何。如果用户在线jsm立即提交;否则jsm就存储。
To :标识消息的接收方。
from : 指发送方的名字或标示(id)o
Text: 此元素包含了要提交给目标用户的信息。
结构如下所示:
<message to= [email protected]/contact’ type =’chat’>
<body> 你好,在忙吗</body>
</message>
<Presence>
用来表明用户的状态,如:online、away、dnd(请勿打扰)等。当用户离线或改变自己的状态时,就会在stream的上下文中插入一个Presence元素,来表明自身的状态.结构如下所示:
<presence>
From =‘lily @ jabber.com/contact’
To = ‘yaoman @ jabber.com/contact'
<status> Online </status>
</presence>
<presence>元素可以取下面几种值:
Probe :用于向接受消息方法发送特殊的请求
subscribe:当接受方状态改变时,自动向发送方发送presence信息。
< IQ >
一种请求/响应机制,从一个实体从发送请求,另外一个实体接受请求,并进行响应.例如,client在stream的上下文中插入一个元素,向Server请求得到自己的好友列表,Server返回一个,里面是请求的结果.
<iq > 主要的属性是type。包括:
Get :获取当前域值。
Set :设置或替换get查询的值。
Result :说明成功的响应了先前的查询。
Error: 查询和响应中出现的错误。
结构如下所示:
<iq from =‘lily @ jabber.com/contact’id=’1364564666’ Type=’result’>
还需要特别说明的是,XMPP中定义的地址格式,这是每个实体接点在网络中的身份。它是一个唯一的标示符jabber identifier(JID),即实体地址,用来表示一个Jabber用户,但是也可以表示其他内容,例如一个聊天室.一个有效的JID包括一系列元素:
(1)域名(domain identifier);
(2)节点(node identifier);
(3)源(resource identifier).
它的格[email protected]/resource,[email protected],类似电子邮件的地址格式.domain用来表示接点不同的设备或位置,这个是可选的,例如a在Server1上注册了一个用户,用户名为doom,[email protected],在发送消息时,[email protected],resource可以不用指定,但a在登录到这个server1时, [email protected]/exodus(如果a用Exodus软件登录),[email protected]/psi(如果a用psi软件登录).资源只用来识别属于用户的位置或设备等,一个用户可以同时以多种资源与同一个XMPP服务器连接。
使用XMPP方案的优点是协议成熟、强大、可扩展性强、目前主要应用于许多聊天系统中;同时缺点也很明显协议较复杂、信息冗余(基于XML)、费流量。
目前XMPP整个实现方案包括服务器和客户端都有开源代码在维护(Openfire + Spark + Smack/asmack)
http://www.igniterealtime.org/downloads/index.jsp#smack
https://github.com/guardianprojec
还有一个基于XMPP协议轻装版用于在Android设备上实现推送的开源实例androidpn。
下面介绍一下androidpn的部署和测试,大家可以到这个地址去下载源码(http://sourceforge.net/projects/androidpn/files/?source=navbar)。下载完之后呢,直接运行androidpn-server-0.5.0/ bin目录下得run.bat,直接搭好服务,在浏览器上输入 http://127.0.0.1:7070就进入管理界面。(PS服务器搭建部分我也不懂,在这里就不再分析了)。注意这个服务只是在局域网内的,后面部署客户端需要跟它在一个局域网。androidpn-client-0.5.0里面的客户端代码在修改xmppHost之后可以直接运行在模拟器上。真机需要连入同一个局域网并将它设置为电脑在局域网中的IP。
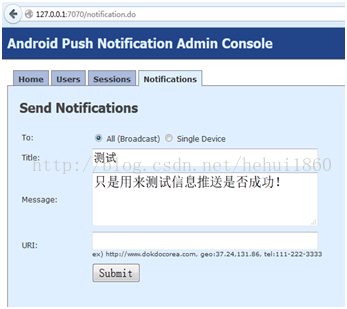
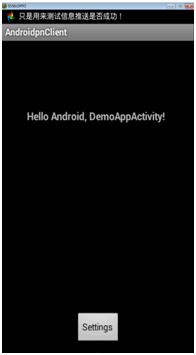
效果如图,在客户端可以接收到服务发过来的消息。
简要分析一下客户端的XMPP实现:它这里也是使用了Smack的jar包的。
xmppManager.connect();这是服务启动时启动XMPP连接的入口。
public void connect() { Log.d(LOGTAG, "connect()..."); submitLoginTask(); } private void submitConnectTask() { Log.d(LOGTAG, "submitConnectTask()..."); addTask(new ConnectTask()); } private void submitRegisterTask() { Log.d(LOGTAG, "submitRegisterTask()..."); submitConnectTask(); addTask(new RegisterTask()); } private void submitLoginTask() { Log.d(LOGTAG, "submitLoginTask()..."); submitRegisterTask(); addTask(new LoginTask()); } //连接服务器 private class ConnectTask implements Runnable { final XmppManager xmppManager; private ConnectTask() { this.xmppManager = XmppManager.this; } public void run() { Log.i(LOGTAG, "ConnectTask.run()..."); if (!xmppManager.isConnected()) { // Create the configuration for this new connection ConnectionConfiguration connConfig = new ConnectionConfiguration( xmppHost, xmppPort); // connConfig.setSecurityMode(SecurityMode.disabled); connConfig.setSecurityMode(SecurityMode.required); connConfig.setSASLAuthenticationEnabled(false); connConfig.setCompressionEnabled(false); XMPPConnection connection = new XMPPConnection(connConfig); xmppManager.setConnection(connection); try { // Connect to the server connection.connect(); Log.i(LOGTAG, "XMPP connected successfully"); // packet provider 这个地方是重点,实现了一个推送数据解析器,把服务器发送的XML文件转化为IQ Packet ProviderManager.getInstance().addIQProvider("notification", "androidpn:iq:notification", new NotificationIQProvider()); } catch (XMPPException e) { Log.e(LOGTAG, "XMPP connection failed", e); } xmppManager.runTask(); } else { Log.i(LOGTAG, "XMPP connected already"); xmppManager.runTask(); } } } /** * A runnable task to register a new user onto the server. */ private class RegisterTask implements Runnable { final XmppManager xmppManager; private RegisterTask() { xmppManager = XmppManager.this; } public void run() { Log.i(LOGTAG, "RegisterTask.run()..."); if (!xmppManager.isRegistered()) { final String newUsername = newRandomUUID(); final String newPassword = newRandomUUID(); Registration registration = new Registration(); PacketFilter packetFilter = new AndFilter(new PacketIDFilter( registration.getPacketID()), new PacketTypeFilter( IQ.class)); PacketListener packetListener = new PacketListener() { public void processPacket(Packet packet) { Log.d("RegisterTask.PacketListener", "processPacket()....."); Log.d("RegisterTask.PacketListener", "packet=" + packet.toXML()); if (packet instanceof IQ) { IQ response = (IQ) packet; if (response.getType() == IQ.Type.ERROR) { if (!response.getError().toString().contains( "409")) { Log.e(LOGTAG, "Unknown error while registering XMPP account! " + response.getError() .getCondition()); } } else if (response.getType() == IQ.Type.RESULT) { xmppManager.setUsername(newUsername); xmppManager.setPassword(newPassword); Log.d(LOGTAG, "username=" + newUsername); Log.d(LOGTAG, "password=" + newPassword); Editor editor = sharedPrefs.edit(); editor.putString(Constants.XMPP_USERNAME, newUsername); editor.putString(Constants.XMPP_PASSWORD, newPassword); editor.commit(); Log .i(LOGTAG, "Account registered successfully"); xmppManager.runTask(); } } } }; connection.addPacketListener(packetListener, packetFilter); registration.setType(IQ.Type.SET); registration.addAttribute("username", newUsername); registration.addAttribute("password", newPassword); connection.sendPacket(registration); } else { Log.i(LOGTAG, "Account registered already"); xmppManager.runTask(); } } } /** * A runnable task to log into the server. */ private class LoginTask implements Runnable { final XmppManager xmppManager; private LoginTask() { this.xmppManager = XmppManager.this; } public void run() { Log.i(LOGTAG, "LoginTask.run()..."); if (!xmppManager.isAuthenticated()) { Log.d(LOGTAG, "username=" + username); Log.d(LOGTAG, "password=" + password); try { xmppManager.getConnection().login( xmppManager.getUsername(), xmppManager.getPassword(), XMPP_RESOURCE_NAME); Log.d(LOGTAG, "Loggedn in successfully"); // connection listener if (xmppManager.getConnectionListener() != null) { xmppManager.getConnection().addConnectionListener( xmppManager.getConnectionListener()); } // packet filter PacketFilter packetFilter = new PacketTypeFilter( NotificationIQ.class); // packet listener 这里也是重点,将客户端接收到的IQ Packet进行逻辑处理,进行显示等等 PacketListener packetListener = xmppManager .getNotificationPacketListener(); connection.addPacketListener(packetListener, packetFilter); xmppManager.runTask(); } catch (XMPPException e) { Log.e(LOGTAG, "LoginTask.run()... xmpp error"); Log.e(LOGTAG, "Failed to login to xmpp server. Caused by: " + e.getMessage()); String INVALID_CREDENTIALS_ERROR_CODE = "401"; String errorMessage = e.getMessage(); if (errorMessage != null && errorMessage .contains(INVALID_CREDENTIALS_ERROR_CODE)) { xmppManager.reregisterAccount(); return; } xmppManager.startReconnectionThread(); } catch (Exception e) { Log.e(LOGTAG, "LoginTask.run()... other error"); Log.e(LOGTAG, "Failed to login to xmpp server. Caused by: " + e.getMessage()); xmppManager.startReconnectionThread(); } } else { Log.i(LOGTAG, "Logged in already"); xmppManager.runTask(); } } }到这里客户端与服务器的连接已经建立,后面等待接收推送消息的过程可以解析分析。//NotificationIQ就是服务端和客户端之间约束的一类信息包格式,包括了其XML文本的组织形式等。
public class NotificationIQ extends IQ { @Override public String getChildElementXML() { StringBuilder buf = new StringBuilder(); buf.append("<").append("notification").append(" xmlns=\"").append( "androidpn:iq:notification").append("\">"); if (id != null) { buf.append("<id>").append(id).append("</id>"); } buf.append("</").append("notification").append("> "); return buf.toString(); }}public class NotificationPacketListener implements PacketListener { @Override public void processPacket(Packet packet) { if (packet instanceof NotificationIQ) { NotificationIQ notification = (NotificationIQ) packet; if (notification.getChildElementXML().contains("androidpn:iq:notification")) { String notificationId = notification.getId(); String notificationApiKey = notification.getApiKey(); String notificationTitle = notification.getTitle(); String notificationMessage = notification.getMessage(); String notificationUri = notification.getUri(); Intent intent = new Intent(Constants.ACTION_SHOW_NOTIFICATION); intent.putExtra(Constants.NOTIFICATION_ID, notificationId); intent.putExtra(Constants.NOTIFICATION_API_KEY, notificationApiKey); intent.putExtra(Constants.NOTIFICATION_TITLE, notificationTitle); intent.putExtra(Constants.NOTIFICATION_MESSAGE, notificationMessage); intent.putExtra(Constants.NOTIFICATION_URI, notificationUri); xmppManager.getContext().sendBroadcast(intent); } } }}public class NotificationIQProvider implements IQProvider { @Override public IQ parseIQ(XmlPullParser parser) throws Exception { NotificationIQ notification = new NotificationIQ(); for (boolean done = false; !done;) { int eventType = parser.next(); if (eventType == 2) { if ("id".equals(parser.getName())) { notification.setId(parser.nextText()); } if ("apiKey".equals(parser.getName())) { notification.setApiKey(parser.nextText()); } if ("title".equals(parser.getName())) { notification.setTitle(parser.nextText()); } if ("message".equals(parser.getName())) { notification.setMessage(parser.nextText()); } if ("uri".equals(parser.getName())) { notification.setUri(parser.nextText()); } } else if (eventType == 3 && "notification".equals(parser.getName())) { done = true; } } return notification; }} Smack使用起来还是很简单的,它把固定请求到XML文本转化的过程都封装好了,并且提供了一组接口用于插入自定义的数据内容的转化过程,将协议内容的实现和业务逻辑进行封装隔离。Google提供了C2DM(Cloudto Device Messaging)服务也是基于这个协议来做的,但是这个在国内用不了,因为服务器是谷歌的,被墙了。
参考:http://blog.csdn.net/huyoo/article/details/24353105
http://blog.csdn.net/kaitiren/article/details/29586565
http://www.blogjava.net/qileilove/archive/2014/01/16/409013.html
http://guangboo.org/2013/01/30/xmpp-introduction
MQTT协议是Message Queuing Telemetry Transport的简称,消息队列遥测传输协议(更多信息见:http://mqtt.org/),这个协议是很轻量级的特别适合于嵌入式领域的处理、基于代理的“发布/订阅”模式的消息传输协议(代理其实它就是一个MQTT Service,只是这个工作模式中的一个角色定义,是其订阅发布模式的中间枢纽,负责将发布者传过来的消息发布到订阅者去。主要是APP推送模式在用这个模式,如果是服务器直接推送则代理的说法可以忽略)。目前已经应用到企业领域(参考:http://mqtt.org/software),且已有多种语言的版本支持。
我们来简要的看看MQTT协议的基本内容和基本的工作原理:
固定头部,使用两个字节,共16位:

第一个字节(byte1)
消息类型(4-7),使用4位二进制表示,可代表16种消息类型:
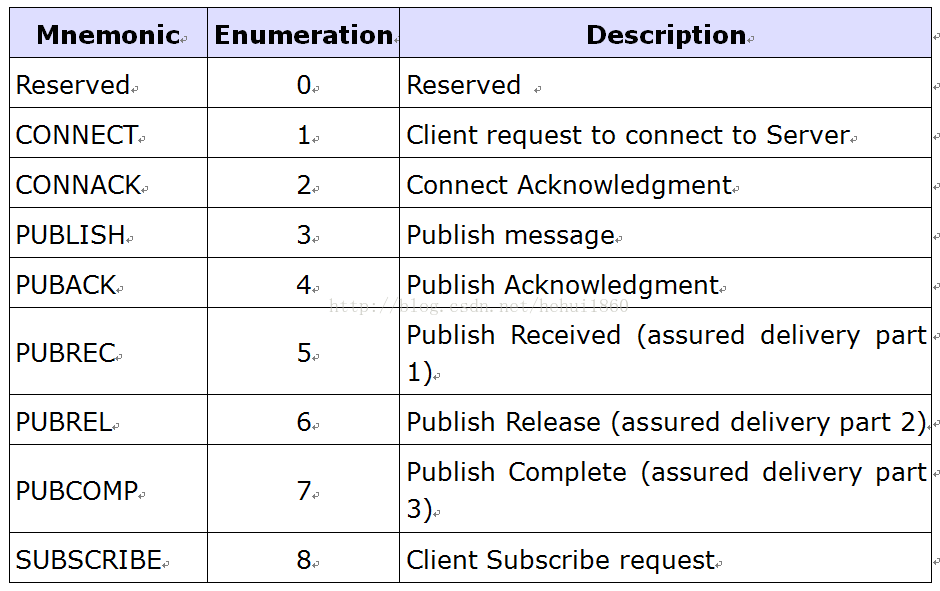
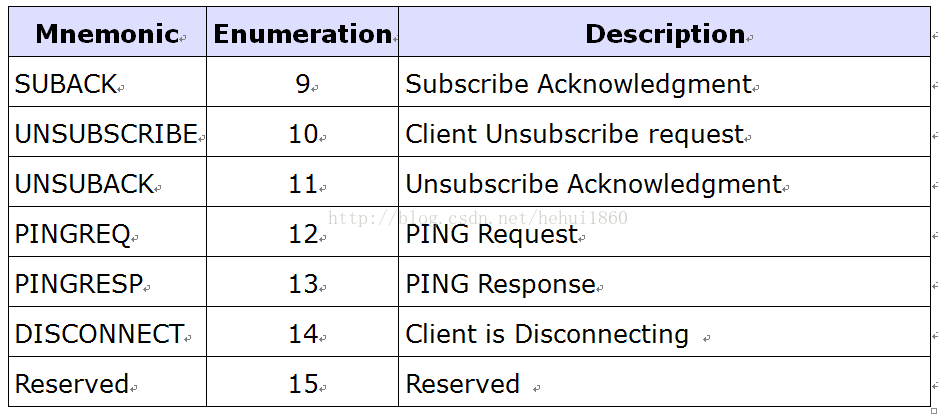
DUP flag(打开标志)
保证消息可靠传输,默认为0,只占用一个字节,表示第一次发送。不能用于检测消息重复发送等。只适用于客户端或服务器端尝试重发PUBLISH, PUBREL, SUBSCRIBE 或 UNSUBSCRIBE消息,注意需要满足以下条件:
当QoS > 0
消息需要回复确认
此时,在可变头部需要包含消息ID。当值为1时,表示当前消息先前已经被传送过。
QoS(Quality of Service,服务质量)
使用两个二进制表示PUBLISH类型消息:

RETAIN(保持)
仅针对PUBLISH消息。不同值,不同含义:
1:表示发送的消息需要一直持久保存(不受服务器重启影响),不但要发送给当前的订阅者,并且以后新来的订阅了此Topic name的订阅者会马上得到推送。
备注:新来乍到的订阅者,只会取出最新的一个RETAIN flag = 1的消息推送。
0:仅仅为当前订阅者推送此消息。
假如服务器收到一个空消息体(zero-length payload)、RETAIN = 1、已存在Topic name的PUBLISH消息,服务器可以删除掉对应的已被持久化的PUBLISH消息。
Remaining Length(剩余长度)
在当前消息中剩余的byte(字节)数,包含可变头部和负荷(称之为内容/body,更为合适)。单个字节最大值:01111111,16进 制:0x7F,10进制为127。单个字节为什么不能是11111111(0xFF)呢?因为MQTT协议规定,第八位(最高位)若为1,则表示还有后续 字节存在。同时MQTT协议最多允许4个字节表示剩余长度。那么最大长度为:0xFF,0xFF,0xFF,0x7F,二进制表示 为:11111111,11111111,11111111,01111111,十进制:268435455 byte=261120KB=256MB=0.25GB 四个字节之间值的范围:

可变头部
固定头部仅定义了消息类型和一些标志位,一些消息的元数据,需要放入可变头部中。可变头部内容字节长度 + Playload/负荷字节长度 = 剩余长度,这个是需要牢记的。可变头部,包含了协议名称,版本号,连接标志,用户授权,心跳时间等内容,这部分和后面要讲到的CONNECT消息类型,有 重复,暂时略过。
Playload/消息体/负荷
消息体主要是为配合固定/可变头部命令(比如CONNECT可变头部User name标记若为1则需要在消息体中附加用户名称字符串)而存在。
CONNECT/SUBSCRIBE/SUBACK/PUBLISH等消息有消息体。PUBLISH的消息体以二进制形式对待。
请记住,MQTT协议只允许在PUBLISH类型消息体中使用自定义特性,在固定/可变头部想加入自定义私有特性,就免了吧。这也是为了协议免于流 于形式,变得很分裂也为了兼顾现有客户端等。比如支持压缩等,那就可以在Playload中定义数据支持,在应用中进行读取处理。这部分会在后面详细论述。
消息标识符/消息ID
固定头中的QoS level标志值为1或2时才会在:PUBLISH,PUBACK,PUBREC,PUBREL,PUBCOMP,SUBSCRIBE,SUBACK,UNSUBSCRIBE,UNSUBACK等消息的可变头中出现。
一个16位无符号位的short类型值(值不能为 0,0做保留作为无效的消息ID),仅仅要求在一个特定方向(服务器发往客户端为一个方向,客户端发送到服务器端为另一个方向)的通信消息中必须唯一。比 如客户端发往服务器,有可能存在服务器发往客户端会同时存在重复,但不碍事。
可变头部中,需要两个字节的顺序是MSB(Most Significant Bit) LSB(Last/Least Significant Bit),翻译成中文就是,最高有效位,最低有效位。最高有效位在最低有效位左边/上面,表示这是一个大端字节/网络字节序,符合人的阅读习惯,高位在最左边。

但凡如此表示的,都可以视为一个16位无符号short类型整数,两个字节表示。
最大长度可为: 65535
UTF-8编码
有关字符串,MQTT中无论是可变头部还是消息体,只要是字符串部分采用的都是修改版的UTF-8编码,一般形式为如下,需要牢记:

还有很多具体的协议命名常量类型等等就不一一介绍了。
推送原理分析

实际上,其他推送系统(包括GCM、XMPP方案)的原理都与此类似。
下面自己搭建基于此方案的推送测试框架。1、 推送服务端
这里我采用的是ActiveMQ这个开源工具,很强大支持很多协议。可以从http://activemq.apache.org/activemq-5101-release.html下载其最新的版本,下载后需要先配置一下协议的host和port,在文件activemq.xml中作如下配置。

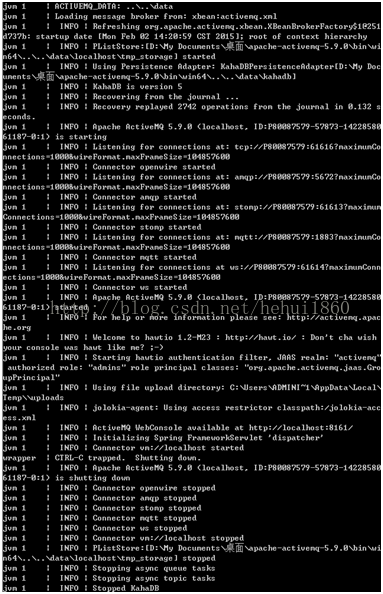
 这行,代表服务已经准备好并且正在监听1883端口的MQTT客户端。再点击http://localhost:8161/admin/进入管理界面如下:
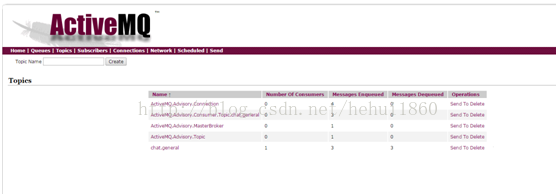
2、 客户端
客户端我采用的是AndroidPushNotificationsDemo,这也是一个开源项目,主要的MQTT协议的东西是基于wmqtt.jar这个jar包,这是IBM提供的。还有其他的一些开源包也提供了MQTT协议的封装比如:Eclipse Paho。在源码中修改一下MQTT_HOST为你服务器的IP就行了,直接运行项目
private static final String MQTT_HOST = "127.0.0.1";//我这里是模拟器测试的


运行后可以看界面,注意一下DeviceId为9774d56d682e549c,在启动服务之后(实际就是进行了MQTT连接)就在服务的界面上看到了这样一个Topic,点击send就可以直接给客户端发送消息了,看客户端的日志已经收到了。

代码也没有什么好讲的了,被封装之后使用起来的逻辑也很清晰,贴几个关键的方法:
// Creates a new connection given the broker address and initial topic public MQTTConnection(String brokerHostName, String initTopic) throws MqttException { // Create connection spec String mqttConnSpec = "tcp://" + brokerHostName + "@" + MQTT_BROKER_PORT_NUM; // Create the client and connect mqttClient = MqttClient.createMqttClient(mqttConnSpec, MQTT_PERSISTENCE); String clientID = MQTT_CLIENT_ID + "/" + mPrefs.getString(PREF_DEVICE_ID, ""); mqttClient.connect(clientID, MQTT_CLEAN_START, MQTT_KEEP_ALIVE); // register this client app has being able to receive messages mqttClient.registerSimpleHandler(this); // Subscribe to an initial topic, which is combination of client ID and device ID. initTopic = MQTT_CLIENT_ID + "/" + initTopic; subscribeToTopic(initTopic); log("Connection established to " + brokerHostName + " on topic " + initTopic); // Save start time mStartTime = System.currentTimeMillis(); // Star the keep-alives startKeepAlives(); } /* * Send a request to the message broker to be sent messages published with * the specified topic name. Wildcards are allowed. */ private void subscribeToTopic(String topicName) throws MqttException { if ((mqttClient == null) || (mqttClient.isConnected() == false)) { // quick sanity check - don't try and subscribe if we don't have // a connection log("Connection error" + "No connection"); } else { String[] topics = { topicName }; mqttClient.subscribe(topics, MQTT_QUALITIES_OF_SERVICE); } } // Schedule application level keep-alives using the AlarmManager private void startKeepAlives() { Intent i = new Intent(); i.setClass(this, PushService.class); i.setAction(ACTION_KEEPALIVE); PendingIntent pi = PendingIntent.getService(this, 0, i, 0); AlarmManager alarmMgr = (AlarmManager)getSystemService(ALARM_SERVICE); alarmMgr.setRepeating(AlarmManager.RTC_WAKEUP, System.currentTimeMillis() + KEEP_ALIVE_INTERVAL, KEEP_ALIVE_INTERVAL, pi); } private synchronized void keepAlive() { try { // Send a keep alive, if there is a connection. if (mStarted == true && mConnection != null) { mConnection.sendKeepAlive(); } } catch (MqttException e) { log("MqttException: " + (e.getMessage() != null? e.getMessage(): "NULL"), e); mConnection.disconnect(); mConnection = null; cancelReconnect(); } } public void sendKeepAlive() throws MqttException { log("Sending keep alive"); // publish to a keep-alive topic publishToTopic(MQTT_CLIENT_ID + "/keepalive", mPrefs.getString(PREF_DEVICE_ID, "")); } /* * Sends a message to the message broker, requesting that it be published * to the specified topic. */ private void publishToTopic(String topicName, String message) throws MqttException { if ((mqttClient == null) || (mqttClient.isConnected() == false)) { // quick sanity check - don't try and publish if we don't have // a connection log("No connection to public to"); } else { mqttClient.publish(topicName, message.getBytes(), MQTT_QUALITY_OF_SERVICE, MQTT_RETAINED_PUBLISH); } } // Disconnect public void disconnect() { try { stopKeepAlives(); mqttClient.disconnect(); } catch (MqttPersistenceException e) { log("MqttException" + (e.getMessage() != null? e.getMessage():" NULL"), e); } }这几个方法就包含了,建立连接,订阅,发送心跳,发布,断开连接等主要操作,这也正是MQTT协议的正常工作模式。参考:MQTT 3.1协议在线版本:
http://public.dhe.ibm.com/software/dw/webservices/ws-mqtt/mqtt-v3r1.html
http://www.blogjava.net/yongboy/archive/2014/02/07/409587.html
http://blog.csdn.net/shagoo/article/details/7910598 http://mosquitto.org/man/mosquitto-conf-5.html
http://www.yeeach.com/post/1176
http://www.tuicool.com/articles/AFvmee
http://my.oschina.net/scholer/blog/296402
tokudu.com/post/50024574938/how-to-implement-push-notifications-for-android
(XMPP):XMPP的心跳机制比较隐性啊,因为此协议没有明文规定keep-alive以及心跳包之类的东西(在其一个扩展协议XEP-0199中有定义),并且看客户端的源码也是看不到发送心跳包的逻辑(DEMO中有定时重连ReconnectionThread.java),但是它本质上是基于TCP连接,所以keep-alive本来就是支持的。并且细细想一下就知道了,应用层根本不需要规定啊,给服务器发送一个没有意义的packet不就可以了么,Smack中将这个心跳机制已经封装好了(低版本中是有一个线程发送空的packet,目前的版本中是实现了XEP-0199中的定义封装了一个叫PingManager的类定时发送Ping IQ)。
(MQTT):MQTT本质上也是TCP连接,长连接本来就支持,在这里应用协议还进行了扩展,心跳频率可以在MQTT协议CONNECT时的可变头部“Keep Alive timer”中定义时间,单位为秒,无符号16位short表示,增加了心跳包和心跳应答包PINGREQ和PINGRESP,前面协议处有提到,MQTT客户端的代码中也有体现。
参考:http://blog.csdn.net/aa2650/article/details/17027845
最后就是大公司的行为,比如腾讯,自有协议实现,这里就不讨论了,里面水很深,基本上他们的协议都是基于TCP/UDP来自己实现的。基于SMS这里提一下:工作模式就是当服务器有新内容时,发送一条类似短信的信令给客户端,客户端收到后从服务器中下载新内容,SMS的及时性由通信网络和手机的MODEM模块来保证。
先来说说移动无线网络的特点,因为 IP v4 的 IP 量有限,运营商分配给手机终端的 IP 是运营商内网的 IP,手机要连接 Internet,就需要通过运营商的网关做一个网络地址转换(Network Address Translation,NAT)。简单的说运营商的网关需要维护一个外网 IP、端口到内网 IP、端口的对应关系,以确保内网的手机可以跟 Internet 的服务器通讯。
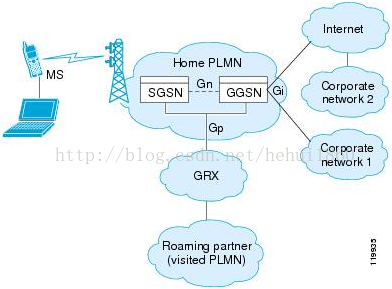
大部分移动无线网络运营商都在链路一段时间没有数据通讯时,会淘汰 NAT 表中的对应项,造成链路中断。正因为如此,为了不让 NAT 表失效,我们需要定时的发心跳,以刷新 NAT 表项,避免被淘汰造成数据链路中断。这个动作很简单,为了不让NAT失效,只需要定时Ping一下目标网址就可以了。(本人并不知道确切时间间隔,因为没有实际做过Android上的推送项目)
移动端还需要考虑的是,在不影响手机待机的情况定时发送心跳包的问题,这就是省电的话题。需要使用AlarmManager来做定时心跳的任务。以保证待机和正常心跳。另外省流量的问题,就是协议中定义的心跳包大小和发送间隔来共同决定的。
当然咯在Android平台上还有一个课题,就是如何让长连接的进程保持生存的问题,因为遇到内存不足的情况这个进程的生存能力是有质疑的,作为第三方是各有各的招,逮住一切的机会让自己重启来保持运行,作为OEM厂商完全有将其设计为系统进程的杀手锏。
PS:文中有些图片来自互联网文章中,但是并无明确出处,上传时加了本人的水印属于无心之失在此对作者说声抱歉咯。